Quantcast
Channel: Sage 300 ERP – Tips, Tricks and Components
Viewing all 1489 articles
Browse latest View live

General Ledger (GL) Accounts Distribution in Sage 300 ERP

$
0
0

General Ledger is a core of any accounting software where the organization’s revenue, expenses, assets, liabilities, etc. are recorded and maintained. In Sage 300 ERP, all financial transaction from all modules is reflected in GL.

But, are you aware on what basis the G/L Accounts get affected when transactions from Account Receivable (AR), Account Payable (AP), Inventory Control (IC), etc. are posted and GL batch gets generated?

GreytriX3 :  Best Practices for Integrating Third Party Apps with Sage ERP X3

This blog will help you to understand the process of how a GL Account is picked up from a sub ledger transaction in Sage 300 ERP.

Let’s take an example for Account Payable module.

Create an invoice entry for Vendor 1200, while making invoice user can select any GL account as per requirement.

• GL Account: 6380
• Document Number: INV-0001
• Account Set: USA

AP-Invoice-Entry

• Post this invoice batch, you will get the following message as GL transaction is created

AP Invoice Entry Post Message

• Check its effect in GL batch list
• Go to General Ledger >> GL Transactions >> Batch List

o Open this batch entry

• If you will refer the below screen shot there are three GL line created:

GL-Accounts-Distribution2

GL-Journal-Entry

AP Account Sets

In similar way, for other modules GL Accounts are distributed.

Also Read:

1. How to Pass GL Revaluation entry in Sage 300 ERP
2. Create GL Accounts Feature in Sage 300 ERP
3. Consolidate Transactions in Sage 300 ERP
4. Drill Down to Source Transaction from GL


How to Pass AP Revaluation entry in sage 300 ERP

$
0
0

Sage 300 ERP provides you to reevaluate multicurrency transactions at new exchange rates, to determine the current value of payables and receivables on specific dates (in multicurrency ledgers only).

When exchange rates fluctuate, you may need to revalue outstanding documents denominated in other currencies to reflect their present value in your own (functional) currency at a particular time, for example, at financial statement dates. (When you revalue a transaction, sub ledgers like AP, AR etc. recalculate its functional equivalent value at a new exchange rate.)

New Stuff: General Ledger (GL) Accounts Distribution in Sage 300 ERP

Let’s see how to pass AP Revaluation entry in Sage 300 ERP.

Firstly we have to decide that up to which date, we have to reevaluate Multicurrency transaction as per new Exchange rates.

After deciding revaluation date, we have to define currency code, revaluation date, and exchange rate in AP (or your respective sub ledger module) revaluation.

For defining AP Revaluation, navigate to-

Account Payable -> A/P Periodic Processing -> Revaluation

1

We can process provisional revaluation by click on provisional revaluation as mentioned in above screen shot.

We can see in above screen shot, we are going to reevaluate USD and EUR Transaction as on 31st Jan 14 with new Exchange rate.

So after click on process button, system will reevaluate all open documents with new exchange rate which falls up to date 31st Jan 14.

After provisional revaluation process, we have to see final effect of all AP Transaction

To see effect of AP Provisional revaluation, navigate to-

Account Payable -> A/P Transaction Reports  -> Posting Journals 

2

As we can see in below screen shot, system has revaluate 1 AP Invoice of vendor V0024 with new exchange rate 63 and passed amount in exchange gain (Loss) Account.

4

Document Source amount = 2665.60

Prior Exchange rate = 64.15

Prior functional = (2665.60 * 64.15 = 170998)

Effect after passing revaluation entry with new exchange rate

Document Source amount = 2665.60

New Exchange rate = 63

New functional amount = (2665.60 * 63 = 167933)

Exchange gain loss = (170998 – 167933) = 3065

Please Note: – As a Precaution, take database back up from (start->Sage Accpac->Tools->Database dump)   before Final AP Revaluation process.

Hope this blog post provides insight into how A/P Revaluation works and helps users to do accurate process of A/P Revaluation.

Also Read:

1. Reverse Receipt and Payment in Sage 300 ERP
2. Control Payments in Sage 300 ERP
3. Default Settings for Accounts Payable Payments in Sage 300 ERP
4. Purchase Register Report
5AP Vendor Ledger Report for Sage 300 ERP

Migrate Sales Payment from Sage 50 US to Sage 300 ERP

$
0
0

In continuation to our last blog, we shall discuss Sales invoices from Sage 50 US (Peachtree) to Sage 300 (Accpac) now. Let’s see how Sales Payment Transactions are migrated from Sage 50 US (Formerly known as Sage Peachtree) to Sage 300 ERP (Formerly known as Sage Accpac).

Previously, we had created an invoice in Sage 50 US with Inventory Type Item and applied payment on same. As a result, a sales payment transaction is created in Sage 50 with values such as Bank Account, check number, date, Address, amount, etc. with applied Invoice number and amount to it as shown in below screenshot.

AAS SALES PAYMENT

After the data migration in Sage 300 ERP, follow the below given path to check the migrated Payment transaction entry in Sage 300 ERP.

Go to Accounts Receivable >> AR Transaction>> Payment Batch list and check for payment entry.
After data migration from Sage 50 US the field values of Payment transactions gets migrated with the following mapping
.
Mapping
Here is the converted Sales payment from Sage 50 US into Sage 300 (refer below screen shot) where the Payment transaction are displayed as per above mapping.

PT Sales Payment

Keep following us to know how GUMUTM  helps small businesses to get successfully migrated into Sage 300 ERP. For More information, contact us at erpmig@greytrix.com

Also Read:

1. Migrate Customers from Sage PRO to Sage 300
2. Migrate Vendors from Sage PRO ERP to Sage 300 ERP
3. Migrate Purchase invoice from Sage 50 US to Sage 300 ERP
4. Migrate vendors from Sage 50 (Canada) to Sage 300
5. Migrate banks from Sage 50 (Canada) to Sage 300 ERP


Raw Material Purchase Report

$
0
0

Sage 300 ERP has a beautiful Inventory movement Report which displays all the related cost to an Item, to arrive at the landed cost, but it is in a row format i.e. Each cost base and additional is shown one below the other making it difficult for an individual to analyze the landed cost. Not only the cost but an organization would also need information on the quantities being purchased to measure the efficiency of raw materials storage which is the key to profitability.
To cater these needs, we have developed “RM Purchase Report” an Add-on, which is useful in tracking the receipts /invoice/additional invoices/credit/debit Note of purchased Raw material.

The Report UI is as shown below;

New Stuff: How to Pass AP Revaluation entry in sage 300 ERP

RM Purchase Register

1. Select Excel File: User has to select the desired path, of the file they want to print the RM Purchase Report of.
2. GRN Date: Similarly, user has to select “From and To” date range for which they want to print the report for the raw material received.
3. Vendor: User has to select “From and To” range of Vendor name, for which they want to print the report.
4. Location: User has to select “From and To” range of Location, for which they want to print the report.
5. Account set code: User has to select the list boxes for selecting Account set code as filter criteria.

Note: Filter criteria can be customized as per customer’s requirement.

Once the above details are filled, click on export to print the report at the desired location. The report shows the details about a GRN receipt for raw materials.
The report consists of Vendor Code, Vendor Name, Fiscal Period, Fiscal Year, Period , Period Year, Location ,Location Description ,Purchase Receipt No, Invoice No, Credit\ debit document number, Item No., Item Description, Receipt Unit, Total Quantity, Rate, Purchase Value, Category, Inventory Account , Inventory Account name, Additional Cost Type1, Additional Cost1, Additional Cost Vendor1, Additional Cost Invoice1, Effective cost (Purchase cost+ all additional costs) and Effective cost/ Unit.
The significant feature of this report is that it shows all additional Cost related information such as its Type, Cost, Vendor and Invoice.
The printed report will look as shown in the excel sheet.

RM Report

Thus, “RM Purchase Report” is able to make clear visualization of receipts, invoice, Additional invoices and \Credit debit note for each client.

Also Read:
1. Stock Status Report in Sage 300 ERP
2. Material Required to Assemble FG on order – Report
3. MRP Report in Sage 300 ERP
4. Greytrix Extended Report Pack for Sage 300 ERP
5. Custom Bills of Material Report for Sage 300 ERP 2012

Migrate Purchase Orders from Sage 50 (Canada) to Sage 300 ERP

$
0
0

This blog is in continuation to our GUMU™ ERP Migration services. In our previous blog we discussed about How bank is migrated from Sage 50 (Canada) to Sage 300 ERP. In this blog we will discuss about how Sage 50 Purchase Order gets migrated to Sage 300 ERP (Formerly known as Accpac) using GUMU. Let us have a quick look on sage 50 Purchase Order screen.

1

After data migration from Sage 50 (Canada) the field values of Sage 50 Purchase Order get converted with the following mapping:
2

Here is the converted Purchase Order from Sage 50 (Canada) simply accounting to sage 300. Kindly refer the below screenshot where Purchase Order is converted as per the mapping mentioned in above table.
3
4

In this way, Sage 50 Purchase Order is migrated into target Sage 300 ERP company database. For more information on ERP data migration, drop us a mail at erpmig@greytrix.com

Also Read:

1. What do you want to migrate to Sage ERP
2. Data migration from your accounting system to Sage ERP
3. Migration of Purchase Payment from QuickBooks to Sage 300
4. Migration of Banks from QuickBooks to Sage 300 ERP


Migrate Banks from Sage 50 US to Sage 300 ERP

$
0
0

We provide data Migration Services from Sage 50 US (formerly known as Sage Peachtree) to Sage 300 ERP (formerly known as Sage Accpac) at our Sage Migration Center.

Our GUMU™ migration utility is compatible to convert all Master and Open transactions along with Sales, Purchase and GL historical data from Sage 50 Accounting- US edition (formerly Sage Peachtree) to Sage 300 ERP.

Today, we will discuss about migrating bank data from Sage 50 US edition to Sage 300 ERP in our ERP Migration services. To open a Bank in Sage 50, go to the banking tab and click on listed Bank screen. Let’s have a quick look on the Sage 50 Bank screen.

1

After data migration from Sage 50 US, the field value of Sage 50 bank gets converted with following mapping:

2

Here is the converted bank field from Sage 50 US to sage 300.Kindly refer the below screenshot where the Bank has been converted as per the mapping mentioned in above table.

3

You might have seen that the Sage 50 report screen shows some amount in bank balance field but in Sage (Accpac) 300 ERP window screen bank balances are null. This is due to the migrated bank Transaction entries of open balance amounts that are not yet posted. So we need to post the same so that it is updated in Sage (Accpac) 300 bank balances.

Navigate to Common services >> Bank services >> Bank transactions >> Bank Entry. Select bank transaction entry and click on post button.

4

After posting transactions navigate to common services >> Bank services >> Banks and check the bank balance.

5

In this way, Sage 50 Bank details are migrated into target Sage 300 ERP company database. For more information on ERP data migration, drop us a mail at erpmig@greytrix.com

Also Read:
1. Migrate Sales Payment from Sage 50 US to Sage 300 ERP
2. Migrate Purchase invoice from Sage 50 US to Sage 300 ERP
3. Migrate Banks from Sage 50 (Canada) to Sage 300 ERP
4. Migrate customers from Sage 50 (Canada) to Sage 300

Migrate vendors from Sage 50 (US) to Sage 300

$
0
0

We provide data Migration Services from Sage 50 US (formerly known as Sage Peachtree) to Sage 300 ERP (formerly known as Sage Accpac) at our Sage Migration Center.

This blog is in continuation to our series GUMU™ ERP Migration services. In our last blog, we had discussed about how to Migrate Banks from Sage 50 US to Sage 300 ERP In this blog, we are going to discuss about how vendor data gets migrated from Sage 50 US to Sage 300 ERP using GUMU™.

Our GUMU™ migration utility is compatible to convert all Master and Open transactions along with Sales, Purchase and GL historical data from Sage 50 Accounting- US edition (formerly Sage Peachtree) to Sage 300 ERP.

Let’s have a quick look at the below screenshot of Sage 50 vendor screen.

01

After data migration from Sage 50 (US), the field values of Sage 50 vendor gets converted with the following mapping:

02

Here is the converted vendor field from Sage 50 US to sage 300.Kindly refer the below screenshot from below path:  Navigate to Account Payable >> A/P Vendors >> Vendors.

03

For more information on ERP data migration, drop us a mail at erpmig@greytrix.com

Also Read:
1. Migrate Sales Payment from Sage 50 US to Sage 300 ERP
2. Migrate Purchase invoice from Sage 50 US to Sage 300 ERP
3. Migrate Banks from Sage 50 (US) to Sage 300 ERP
4. Migrate Banks from Sage 50 (Canada) to Sage 300 ERP
5. Migrate customers from Sage 50 (Canada) to Sage 300


Fixed Due Date for Invoices in Sage 300 ERP

$
0
0

In this blog we will discuss about the option in Terms Code of “Due Date Table” which allows users to set fixed Due Date on Invoices.

The New Stuff: Migrate Sales Payment from Sage 50 US to Sage 300 ERP

There are scenarios where users need to set the due date on the Invoices based on the specific date range during which the invoice is generated in Sage 300.

Let’s take an example:-
1. If the invoice is created within the 1st to 10th day of the month, then Due date should be the 15th of the month
2. If invoice is generated within the 11th to 20th day of the month, then Due date should be the 25th of the month.

The above scenarios can be achieved using the existing Term code setup, by using the Due Date Type as Due Date Table.
1. Create Term code with “Due Date Type” set as “Due Date Table” as show in the below screen shot.

Image1

2. You can use the Due date table to specify the date range and the fixed due date for the invoice date:

a. Range: – You can specify the number of tiers for the month according to the starting and Ending Days.
b. Starting and “Ending” day range for the invoice date.
c. Day of Month: – Fixed Day of the month on which you need to set as the due date of the invoice.
d. Add Months: – With this option the user can add the desired number of month to the determine Due Date of the Invoice of the specific month. For e.g. If he adds ‘1’ in the add months section, then while calculating the due date, it will be calculated as Date+1 months. Hence, if the invoice date is 25/03/2014 then due date will be 5/4/2014

Also Read :
1. AR Customer Receipt Enquiry
2. Advance Receipt from a Customer
3. Knowing Customer Credit Status
4. Interest Invoices for Overdue Receivables
5. Knowing Customer Credit Status


Data Integrity Check Reports in Sage 300 ERP

$
0
0

Sage 300 ERP has a built in feature that you are recommended to run on periodical basis to ensure the data consistency. This process lets you keep a check on errors that have occurred and also fixes any minor errors itself.

In case you have multiple companies, this utility can be run separately for every entity.  Different modules can be selected for each company allowing for detailed check results.

Sage 300 ERP has data integrity checker in Administrative Services,

1

Note: If you want to check the checkbox enabling ‘Fix Minor Errors’ feature then make sure you take a full database dump and SQL Backup before doing this activity.

Greytrix Blog: Export to Excel & Export to PDF functionality on Sage CRM Self Service lists

The printer settings should be set to Preview, since the end result is a report that lists all the errors found and hence might be long. If the print destination is set to printer then it would prompt to select the printer to print the end results with.

Let’s consider a scenario where you have set the printer destination in Sage 300 ERP as a Printer and you have run the data integrity for huge database size. It has taken a lot of time to run the checks and at the end of the checks it prompted you to select the printer and paper size to print the hard copy of the results which could run into pages.  You might wish to opt to print only certain pages and just review others on screen. This option won’t let you do the same.  You would have to run the data integrity once again which might lead in to loss of time and increase the system downtime.

How do we solve this scenario? Is there any way to get back the logs generated after Data Integrity is run? Yes! There is.

Sage 300 ERP creates a text file and saves it in the shared data directory path after the Integrity Check Process. To access this file, you can get the shared data path from Help -> System Information

2

Navigate to this path and then to the Company Folder, followed by the folder where the name matches with the Database Id in which the Data Integrity was run. There would be an ERROR file generated in the respective database folder that would contain the report results of Data Integrity.

4

By this way, you not only have the option to recover the results of the Data Integrity but also have it in the text format that allows quick review of the results. The result also includes the details if system automatically fixed any minor errors.

The user running the data Integrity should be an admin user or a user with appropriate permissions.

Since this process needs exclusive access to all the records in the database, Make sure that no one is logged into Sage 300 ERP before running this process and there is a proper backup.

Also Read:

1. Data Integrity Check in Sage 300 ERP
2. Data Integration Utility for Sage 300 ERP
3. Data Activation Error in Sage 300 ERP
4How to Solve GL Error Batch in Sage 300 ERP
5POS Sage 300 ERP Integration

How to Use as Default option on the Bills of Material screen in Sage 300 ERP 2014

$
0
0

With the release of  Sage 300 ERP version 2014 , Sage 300 has released enhanced features  which would help user to make business smarter and efficient.

In this blog we will discuss about the new feature “Use As Default” appended  on Bills of Material screen in inventory control.

The New Stuff: Data Integrity Check Reports in Sage 300 ERP

1) In IC Bills of Material screen Sage has introduced new option “Use As Default
2) You can access the screen from the menu I/C Items and Price Lists–> Bills of Material.
3) The new feature allows user to mark Default BOM number in case if single master has multiple BOM defined.
4) With this, one can set the BOM number as default which is frequently used among the various BOM available for the particular item.

1

5) In above screen shot for Master Item Number “A2[IMAGE-15000]G” BOM Number “1” is marked as “Use As Default”.
6) Now when you generate Assemblies for the above master item, you will notice Default BOM Number is set as “1” on Assemblies/Disassembles screen as shown in the below figure. In order to open the below screen go I/C Transactions–>Assemblies

2

7) One can also view summary of the all the default BOM Number set for the particular Master item with Bills of Material report(Go to I/C Setup reports–>Bills of Material report)

3

Also Read:
1) Custom Bills of Material Report for Sage 300 ERP 2012
2) BOM Setup for Manufacturing Company in Sage 300 ERP
3) Order Process for Manufacturing Company in Sage 300 ERP
4) Simplify Assembly using Sage 300 ERP
5) Using BOM and Assembly to Convert Items in Sage 300 ERP

Terms Code feature in Account receivable in Sage 300 ERP

$
0
0

Sage 300 ERP provides Terms code feature which allows users to define due date, Discount rate and Period, Number of Payments in a multiple payment schedule etc.

The New Stuff: How to Use as Default option on the Bills of Material screen in Sage 300 ERP 2014

You can access the AR Terms code screen from the Menu Account Receivable>>AR Setup>>A/R Terms

1

We will discuss the different features on the Terms code screen in brief:-
1. Terms Code: This will be the code up to six digits maximum used to define the terms code.
2. Last Maintained: This information field displays the date of the last change made to the terms code
3. Calculate Base for Discount with Tax: This will specify that whether the tax amount will be include in invoice amount while calculating the discount amount.

4. Discount Type: It will be used to select the discount date for the transaction.

a. Days from invoice date: Select this option if discount dates are calculated as a particular number of days from the document date.
b. End of next month: Select this option if the discount date is the last day of the next month, regardless of the document date or the number of days in the month.
c. Day of next month: Type the number of the day of the next month which is the desired discount date.
d. Days from day of next month: Type the number of days from a specific day of the next month. Example: If the discount date is 15 days after the first of the month, enter 15 in the Number Of Days field, and 1 in the Day Of Month field.
e. Due date table: Select this option if you use standard discount dates for invoices entered within specified range of days.

5. Due Date Type: This is the method we need to use for calculating the due dates for the Transactions.

a. Days from invoice date: This option is used if invoices are due by a particular number of days from the document date.
b. End of next month: Select this option if invoices are due on the last day of the next month, regardless of the document date or the number of days in the month.
c. Day of next month: Type the number of the day of the next month that is the due date.
d. Days from day of next month: Type the number of days from a specific day of the next month.
e. Due date table: This option is used if you use standard due dates for invoices entered within specified ranges of days.

6. Multiple Payment Schedule: Select this option to define a terms code that allows installment payments. When you select this option, the terms table expands to accommodate additional payments (otherwise, only a single line is displayed).

2

In above screen shot we have checked multiple payments schedule due to which we can set the number of payments and their respective discount, percent due etc.

a. Number of Days / Day of Month (discount): This column appears in the payment schedule to the right of the Discount Percent column by default. Its name depends upon your selection for the Discount Type field.

Number of Days: This column indicates that the discount period expires the specified number of days from the invoice date or number of days from Day of Next Month.

Day of Month Due: This column displays the day of the next month on which the discount expires.

b. Number of Days / Day of Month (due): This column appears in the payment schedule to the left of the Discount Percent column by default. Its name depends on your selection for the Due Date Type field:

Number of Days: This column indicates that the due date is the specified number of days from the invoice date or number of days from Day of Next Month.

Day of Month Due: This column displays the day of the next month that payment is due.

c. Payment Number: With multiple payments you can enter as many periods as you want.

d. Percent Due: Enter the percentage of the balance that is due for each payment number. The total amount entered should be equal to 100.

e. Discount Percentage: This field will be used to specify the discount percentage for the particular payment number.

Note: You cannot assign inactive terms code to any customer. Also before deleting any terms code record make sure that you have not assigned it to any customer.

Hence with terms code you can define due date as well as discount percentage for transaction.

Also read:
1. Interest Invoices for Overdue Receivables
2. Customer Credit Limit in Sage 300 ERP
3. Create Write-off Batches for Open Invoices in Sage 300 ERP
4. Auto Apply Option for AR Receipt in Sage 300 ERP
5. AR Customer Receipt Enquiry

Document Numbering for AR Misc. Receipt

$
0
0

As we know, Greytrix Document Numbering Add-on for Sage 300 ERP provides ability to setup and auto assign document numbers on transactions based on predefined structure. Greytrix Document Numbering offers numbering series for almost all the transactions. A new feature in the same also allows setting numbering on AR Misc. Receipt entry.

With the recent development, the only thing the user has to do now is, mapping the “Numbering Mapping screen” and Greytrix Document Numbering add-on will do the rest.

Say for an instance; User wants to create document number based on AR Misc. Receipt, then he has to select A/R Misc. Receipt as Document Type in Numbering Mapping screen. Select an Account Set code [ex. USA], select structure code and save the numbering mapping as shown in below screen shot.

New Stuff: ‘Outstanding Orders’ report in Back to Back PO OE – Sage 300 ERP

Document Numbering for AR Misc Receipt

So when user is creating the AR Misc. Receipt entry for Account Set ‘USA’, document Numbering module would check for any mappings in the numbering mapping screen. If any mapping is found, then it generates the document number based on Account Set ‘USA’. In the below screenshot, for AR Misc. Receipt Entry, ‘ARM*001’ number is auto-generated following the above mapping process

AR Receipt Enrty Screen

Greytrix can generate numbering series for all the transactions in Sage 300 ERP as per the client’s requirements.

Also Read:

1. Set Document Numbering based on Bank Code for Sage 300 ERP
2. Set Document Numbering for Sage 300 ERP on the combination of Account Set and Location
3. Grouping feature in Document Numbering Series for Sage Accpac
4. Configuring Document Numbering for Sage 300 ERP

Why use Greytrix Trading Excise

$
0
0

Trading Excise is Greytrix Add-On, seamlessly, integrated with Sage 300 ERP, allows creating and intermeeting Excise Taxes reports in trading organization which is one of the most important and time consuming tasks for an accountant and management.

New Stuff: Document Numbering for AR Misc. Receipt

Considering real business scenario it is very tedious to calculate excise taxes and other excise amounts, Greytrix Trading Excise makes the task easier in just few clicks saving time, as said:

“Stitch In Time Saves Nine”

This is applicable for this Add-On too

Let’s have a brief look what Greytrix Trading Excise is all about:

1. Supports:

• Both Local Purchaser and Importer considering service taxes and custom taxes
• Different Vendors like Manufacturer, Dealer, Importer, etc. and item – If excisable or not
• Excisable and Non Excisable Locations/Warehouses
• Maintain standard registration and statutory information like PAN, ECC, CE Reg No.,VAT, Central Sales Tax      No., RG32 Numbering methods
• Maintain 20+ Excise specific Customer Information like CE Commiserate, CE Registration Number, ECC,              PAN
• Maintain 30+ Vendor Information like CE details, Division Details, PAN details, Range Details
• Maintain 20+ Item Details for Excisable Items like Tariff Class, Price, Item Type

2. Transaction Mode:

• Receive Excise Goods and Calculate Excise Tax from Purchase Order Entry of Sage 300 ERP with Vendor    Information and Assessable Amount.
• Return Excise Goods from PO Return Entry Screen and reconcile Excise Taxes accordingly
• Ship Excisable Goods and Calculate Tax against the assessable amount against the respective Receipt
• Maintain business logic and GAAP principles in all transactions Details.

3. Excise Reports:

• Excise Purchase Bill Register
• Excise Form 2 part 1
• Excise Form2 part 2
• Excise Defacing Report
• Excise Declaration Report
• R. G. 23D Report
• Excise Invoice Report (Sales Register)
• Excise Stock Register

Note: These reports are based as per Central Excise Government law

This reduces the pain of accountants and save much time. Trading Excise Module for Sage 300 ERP provides small and medium trading enterprises a seamless way to input information, furnish returns and maintain mandatory registers as required by Indian Tax authorities while making sure that the workflow, inventory valuation, financial reporting and operational modules data integrity is maintained in Sage 300 ERP.

Also Read:

1. Transfer of Excise duties along with Inventory Transfer in Sage 300 ERP
2. Tax Calculation on the basis of Quantity in Sage 300 ERP
3. Greytrix TDS – Quarterly E-TDS Return September Update
4. Maintain TDS accounts Location or Branch wise

Greytrix Bill of Lading for Sage 300 ERP Version 2014

$
0
0

In our last blog we had discussed about our product Greytrix Bill of Lading. With the release of Sage ERP version 2014, our product, Greytrix Bill of Lading has also been updated to be compatible with for Sage 300 2014.

The New Stuff : Why use Greytrix Trading Excise

Greytrix Bill Of Lading is a comprehensive product, which allows its users with options to create, view, e-mail and print a formatted bill of lading. BOL picks up orders or shipment created in Sage 300 ERP version 2014 and generates Bill of Lading for that particular order.

Basic feature list of Bill of Lading:

1. BOL allows you to create Bill Of Lading against Orders as well as for Shipments.
2. User can create BOL by including multiple Orders and Shipments. It involves all the item details of the selected Shipment/Sales Order.
3. BOL report displays the standard information like total weight of all the items, nature of goods (hazardous/ non-hazardous), total number of packages sent for shipment and address of shipper, consignee and Bill to locations.

Greytrix Bill of lading is available for Sage 300 ERP v5.5 onwards. Download trial setup of Greytrix Bill of lading from here.

Also Read :
1. Greytrix Bill of Lading for Sage 300 ERP
2. Shipping Labels in Sage 300 ERP
3. Greytrix Drop Shipment for Sage 300 ERP
4. Custom Bills of Material Report for Sage 300 ERP 2012
5. Greytrix Document Attachment for Sage 300 ERP v6.1

Enhanced features in Greytrix Drop Shipment for Sage 300 ERP Version 2014

$
0
0

In our last blog, we had discussed the feature list of our Greytrix Drop Shipment. With the release of Sage 300 ERP Version 2014; Greytrix Drop shipment has also been enhanced with features to update the vendor address details and Purchase Order date.

The New Stuff : Greytrix Bill of Lading for Sage 300 ERP Version 2014

Add-on Enhanced Feature list:

• Re-modeled the UI Design.
• Feature to select the Purchase order date.
• Feature to update the Vendor address details.

1. With this new release, we have re-modeled our product and provided an additional tab for “Drop Shipment” in the Order Entry Screen as shown in the below screenshot.

1

2. Drop Ship check box is provided in the Drop Shipment tab, to help users Drop-Ship the Purchase Order.

3. Select the Vendor Number and PO Date and also update the Vendor address details.

2

4. The information is updated automatically in the PO Date and Vendor address fields in the Purchase order created for verification in future.

3

5. Click the “Zoom” button to view the updated vendor address details.

4

Hence with the help of Drop shipment add-on; you can generate purchase order from sales order, create automatic OE Shipment on PO Receipt posting and also update the Vendor Information for the Purchase Order.

Also Read:
1. Greytrix Drop Shipment for Sage 300 ERP
2.  Quick Shipment feature for Sage 300 ERP
3. How to handle Inventory Shipment in Sage 300 ERP
4. Partial Shipments using Sage 300 ERP
5. Create Single Invoice Entry from Multiple Shipment Entry in Sage 300 ERP


Kitting Item in Sage 300 ERP

$
0
0

In Sage 300 ERP there is feature introduced for Kitting items. Kitting items are the collections of component items that are priced and sold through Order Entry as a single item, and are often collected together at the time of sale – such as a pencil case, or computer set.

New Stuff: Enhanced features in Greytrix Drop Shipment for Sage 300 ERP Version 2014

E.g. while purchasing, the organization can purchase keyboard, monitor, mouse and CPU as individual items and during sale can sell it as a computer (i.e. combination of keyboard, monitor, mouse and CPU) which is a kit item. Companies do not maintain stock for the kit item i.e. computer, where the component items (keyboard, monitor, mouse and CPU) are the stock item.

Difference between kitting items and bills of materials in Sage 300 ERP:

1. Kitting items allow you to group items for special promotions and sell them as a single item. Kits do not have built costs, and the kitting items are not treated as stock items. The cost of a kit is based on each individual item in the kit.
2. Bills of material, on the other hand, are designed for manufacturing items from other items or subassemblies, and for stocking the new items. Here both finished items and component items are stock items.

For the reference you can see the below screen shot of item master for kit item i.e. Computer – non stock item.

1

You can see the below screen shot of item master for component item i.e. stock item.2

Below is the screen shot which represents the way to create Kitting Items in Sage 300 ERP.3At header “Computer” is the master item and at detail “Monitor, Keyboard, CPU and Mouse are the component items. The above screen represents that for making 1 set of Computer the component items required are: Monitor – 1, Keyboard – 1, CPU – 1 and Mouse -2.

Below is the snapshot for Shipment Entry for Computer. Here you need to select just the Master item and it will automatically reduce the stock for the respective component items from Inventory once you ship the master item.4Following are the effect on the inventory which you can analyze it from the Inventory Movement Report:5After shipping 1 computer 1 qty of Monitor, Keyboard, CPU and 2 qty of Mouse are reduced from the stock.

Similarly, when you check the stock status for the Computer (Non Stock) then there is no effect on stock.6 By using kitting items in Sage 300 (formerly Accpac) the management of stock of component items becomes very easier. While selling an item you do not need to set up the component item again and again. You just need to create a master for a kitting item where you can define all the details relevant to the component item and while selling you just need to select the Master item and Sage 300 ERP will automatically take care of the making the modifications in stock of the component item.

Also Read:

1. Generate BOM and Kitting items on the fly from Order Entry screen in Sage 300 ERP
2. Sellable and Non-sellable items in Sage 300 ERP
3. BOM and KIT – Understanding the Basic Difference
4. Custom Fields for Bills of Material in Sage 300 ERP
5. BOM Setup for Manufacturing Company in Sage 300 ERP

Item Status Report

$
0
0

An item status report, as the name suggests is used to report (print) the status of the inventory items in detail according to the options selected from the image of the form given below:

Inventory control  -> I/C Stock Control Reports -> Item Status.

1 The items whose status is to be printed can be categorized in terms of account sets. Items belonging to a specific account set would be printed if the “From Account Set” to “to” option is selected or else items of all the account sets would be printed.

Consider you need a quick-reference list of item information such as quantities on hand or the names of suppliers. You should also print a new copy for your files after adding, deleting, or changing item records.

You can print either all, active or inactive items belonging to the account sets if specified:

2

Just not to cluster your report you can even classify it according to the active or inactive items.

The items can be sorted by:

3

4Any of the above options could be useful to classify the item exactly the way you want it to be, be it according to the specific item’s colour or how dangerous it is.

This form gives an option for the users to include from the following options to print:

5An item status report will look like this after filling up the necessary details:

6

Above is the item status report from account set FIFO to LIFO from all the items in the inventory sorted by the item number including the optional fields, profile, units of measure, taxes, quantity by location, total quantities, additional item information, vendors, statistics, LIFO/FIFO costing, serials, lots.

We hope detailed information provided here helps you to know the status of the items in your inventories.

Also Read:

1. Populate Items on Order Entry Screen using Template Code.
2. Set Up Non Stock Items in Sage 300 ERP
3.Manufacturers Item Number in Sage 300 ERP
4.Export Items with Criteria on Optional Fields
5.Assign Unique Serial Number to Individual Items in Inventory Control Module of Sage 300 ERP

Sage 300 ERP Portals – One Stop Shop

$
0
0

Sage 300 ERP Portal has been evaluated as one of the most efficient tool for Management users. It caters best to users who need to ratify all the vital and strategic information at a single glance without going through different screens and reports.

With the modular functionality and an added advantage of customizing the portal screen the user can themselves add/edit and remove the icons present on the portal. Thus based on the profile of the user we can set the portal desktop accordingly so that he can access the things he wants within a few clicks.

As shown below you can customize the screen icons wherein we can add/remove the required icons and then access them from anywhere without logging into the ERP1Going forward we can also add the snap shots of the strategic reports like the balance sheet and income statements. These Snapshots will allow you to verify the strategic details at a very higher level at one go. Further to this if the user wants to get into the details of it, and then can drill down into it to get the base details which comprise the data.

Our X3 Blogs: Sage ERP X3 – Tips, Tricks and Components
2Thus from higher management perspective the Sage 300 ERP portal proves to be very efficient tool for extracting strategic data at in visually appealing format and within a single click. The number of snapshots present on a single screen makes it very simple to read and user friendly. These snap shots can be added and removed as required as the portal gives you the flexibility and customize these snapshots according to the usage.

Thus Sage 300 ERP portal is a beautiful tool which can be used to extract the required information with very practical and real-time feel including the graphs and pie charts which really makes it more informative to use and verify the data.

Also Read:

1.  Greytrix Customer Portal for Sage 300 ERP
2. 5 Steps to Intelligent Reporting using Sage 300 ERP
3. Data Integration Utility for Sage 300 ERP
4. GL Clearing Report in Sage 300 ERP
5MRP Report in Sage 300 ERP

Requisition Report in Sage 300 ERP

$
0
0

In Sage 300 ERP (formerly named as Sage ACCPAC ERP), there is a report where we can see the details of the purchase requisition. By using this report we can also get the summary level information for the purchase requisition.

New stuff: Sage 300 ERP Portals – One Stop Shop

To process the requisition report, navigate to “Purchase Orders> P/O Analytical Reports > Transaction List”.

 Below is the screenshot for the PO transaction list. By selecting ‘’requisitions’’ from print field, we can get the report for the PO requisition.1The “Report type” field mainly deals with the detailed level or summary level aspects of PO requisition report.

 For the better understanding, let’s consider a scenario where you require an item & if you want to go through all the requisitions raised in past for that item; at that time you can print requisition transaction list report. Requisition report either gives you detailed information or it can give summary level information too. For an item, you can select item number for sorting the requisition.

 For the detailed level requisition report we get all the details relevant the item, as shown in the following screenshot.

2

For the summary level requisition report we get the document level data and this will not include the item details, as shown in the following screenshot.

3

Untitled

‘’Include’’ field is used to select the additional information you want to include in the requisition report such as the entries from the “Requisition Information” option for the transaction type, transaction details, addresses, requisition numbers (for purchase orders) .You can also choose ‘’Requisition details’’ (for Requisition-related transactions)

Untitled

‘’Status’’ field is used ,when printing the Requisition List, select the statuses to include (Entered, Purchase Order Printed, Never Received, Partially Received, Completed, On Hold). Also select to sort the report by vendor number or transaction number.

This report can be useful in multiple ways to provide the requisitions for the relevant items. Hope this blog provides insight on how P/O Requisition transaction report can used for multipurpose.

Also read:

1.Requisition Approvals in Sage 300 ERP
2.Reporting in Apparel (GreyMatrix) Solution for Sage 300 ERP
3.Sage 300 ERP for Ready Mix Concrete Industry
4.Maintain Reorder and Minimum Order Levels in Sage
5.How to create PO from I/C

Features of P/O transaction Report in Sage 300 ERP

$
0
0

In Sage 300 ERP (formerly named as Sage ACCPAC ERP), there is a report where we can see the transaction details of the purchase orders. By using this report we can also get the summary level information for the purchase order & their relevant transactions.

To process the purchase order transaction report, navigate to ‘’Purchase Orders> P/O Analytical Reports > Transaction List’’.

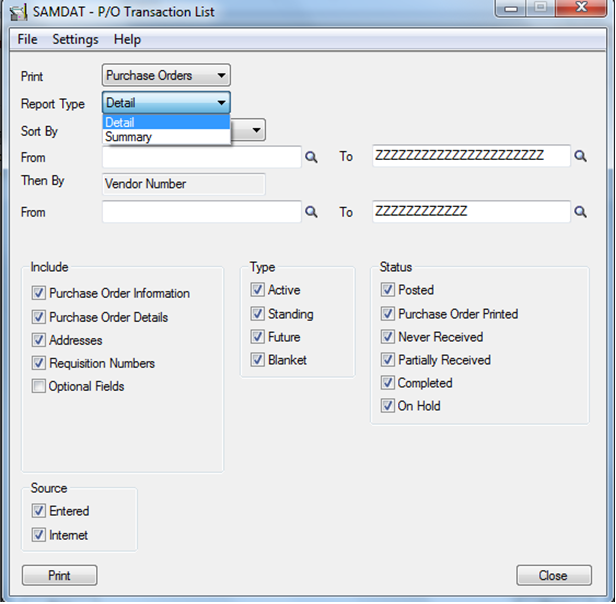
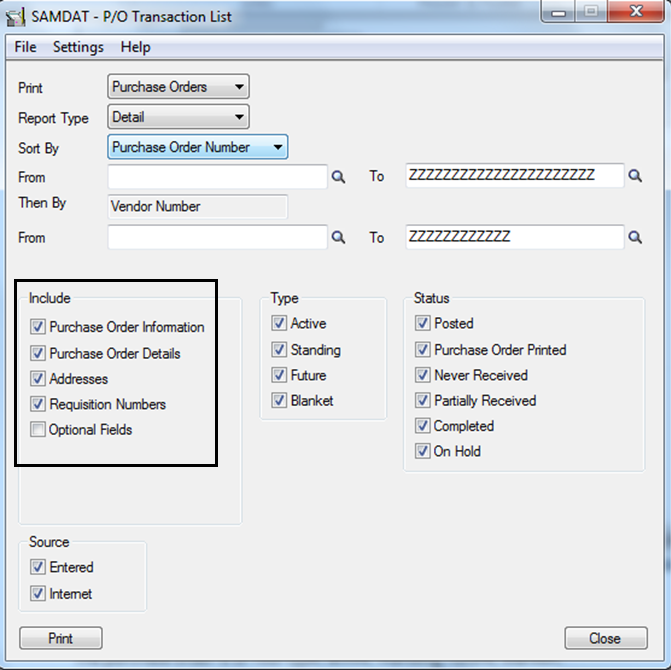
The below is the screenshot for the PO transaction list. By selecting ‘’purchase orders’’ from print field, we can get the report for the Purchase order transaction.

1

The’’ Report type’’ field mainly deals with the detailed level or summary level aspects of Purchase order transaction report.

For the better understanding, let’s consider a scenario where you want to purchase an item; first you will raise P/O to the vendor. While raising P/O for the item you can also view the past purchase orders for that item; at that time you can print purchase orders transaction list report with respect to item number. P/O transaction report either gives you detailed information or it can give summary level information too. For an item, you can also select item number for sorting the P/O transaction list.

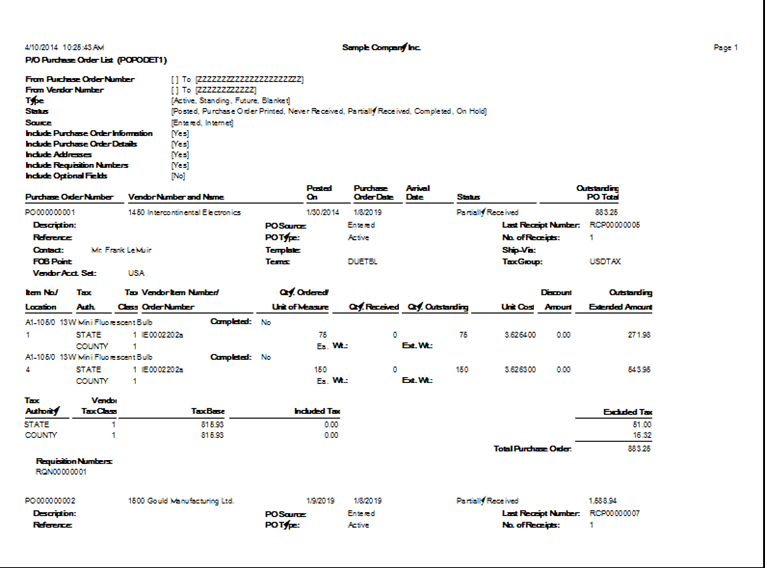
For the detailed level PO transaction report we get all the details relevant to the item, as shown in the following screenshot. Detailed PO transaction report gives all the values, quantities, items, receipts,requisitions, amounts, dates , vendors related to the purchase order list.

2

For the summary level PO transaction report we get the document level data and this will not include the item details, as shown in the following screenshot.

Summary level PO transaction report gives the overall status of the Purchase order list.

3

Untitled

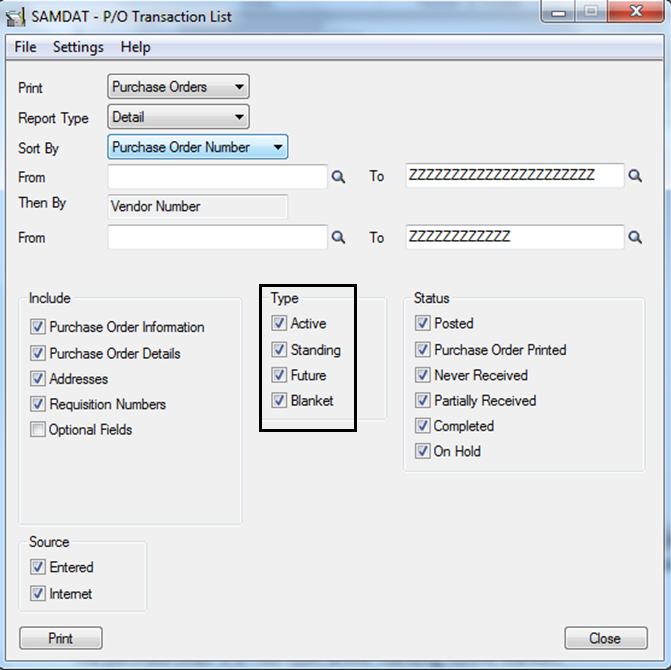
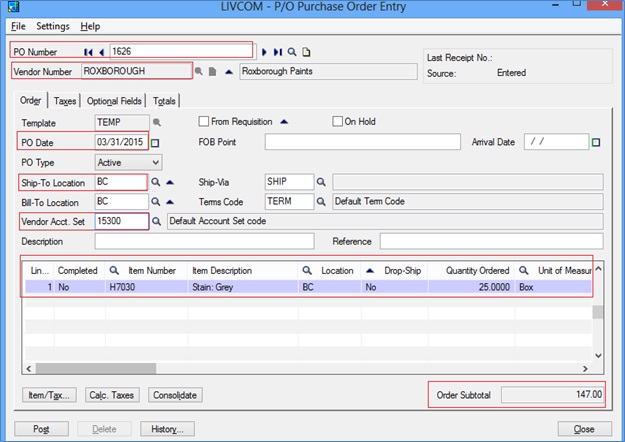
The purchase order is of four type; active, standing, future, blanket.

1. Active PO: An active purchase order is a purchase order you intend to process immediately.

2. Standing PO: Standing purchase orders contain items you often order together. You can issue active purchase orders from standing purchase orders, as frequently as needed

3. Future PO: Future purchase orders are purchase orders you enter with a future date on which you expect to activate and issue the purchase order.

4. Blanket PO: You might use blanket purchase orders when you want to make a number of purchases over time, but want to avoid having to post a new requisition and purchase order for each purchase.

Untitled

‘’Include’’ field is used to select the additional information you want to include in the PO transaction report such as the entries from the “Purchase order Information” option for the transaction type, purchase order transaction details, addresses, requisition numbers (for purchase orders) .You can also choose ‘’Purchase order details’’ (for Requisition-related transactions).

Untitled

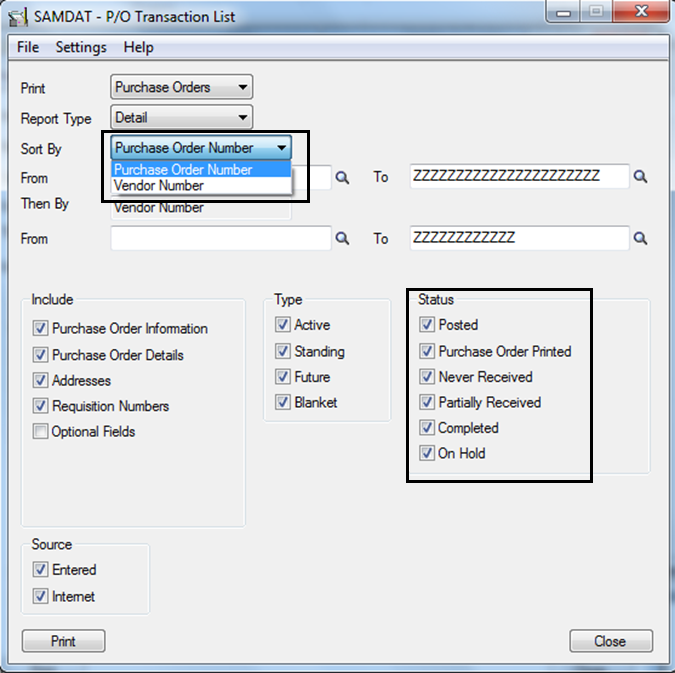
‘’Status’’ field is used ,when printing the Purchase order List, select the statuses to include (Entered, Purchase Order Printed, Never Received, Partially Received, Completed, On Hold). Also select to sort the report by vendor number or transaction number.

This report can be useful in multiple ways to provide the P/O transactions for the relevant items. Hope this blog provides insight on how Purchase order transaction report can used for retrieving required data easily.

Tags – P/O report, P/O transaction, P/O list, P/O transaction report, Detail P/O transaction

Also read:

1.Quantity and Cost restriction in PO Transaction
2.Purchase Order Transaction Flow in Sage 300 ERP
3.How to access the POPUP screen control in Sage Accpac user interface
4.Purchase Order Reports in Sage 300 ERP
5.3 Way Matching PO Receipt
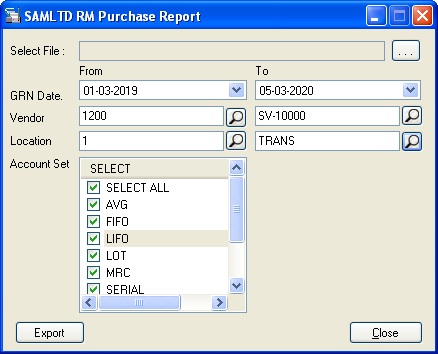
Viewing all 1489 articles
Browse latest View live


<script src="https://jsc.adskeeper.com/r/s/rssing.com.1596347.js" async> </script>