Quantcast
Channel: Sage 300 ERP – Tips, Tricks and Components
Viewing all 1486 articles
Browse latest View live

Access denied for Sage 50 user using Password: YES

$
0
0

Error: This error occurs while making connection with Sage 50 MySQL database using ODBC driver.untitled

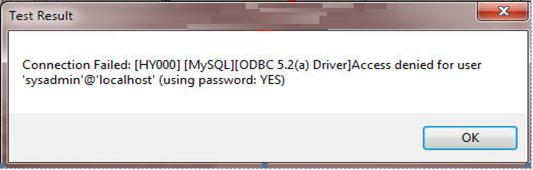
This error may occur due to the following reasons:

1) Sage 50 company is not open.
2) User password length either less than 5 characters or more than 7 characters.
3) User does not have permission to use Sage 50 data from outside. Refer blog for the solution.MySQLConnectionScreen

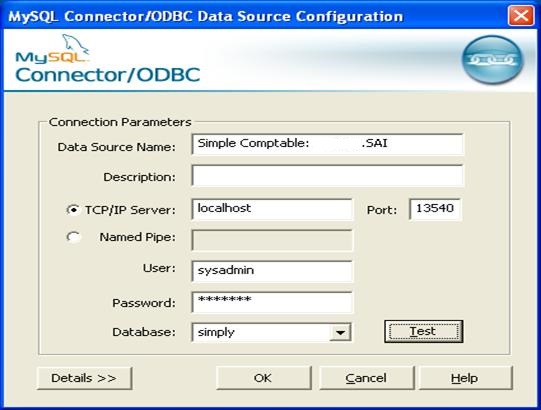
ALSO READ: Migrate banks from Sage 50 (Canada) to Sage 300 ERP

Solution:
1) Open the Sage 50 Company using the administrative user e.g. “sysadmin”.
2) Now go to “Setup->Set Up Users & Roles…” as per the screen below. 02_PathToSettings
3) After entering, use password on the pop-up screen to open the below screen -

03_ConfigureUser
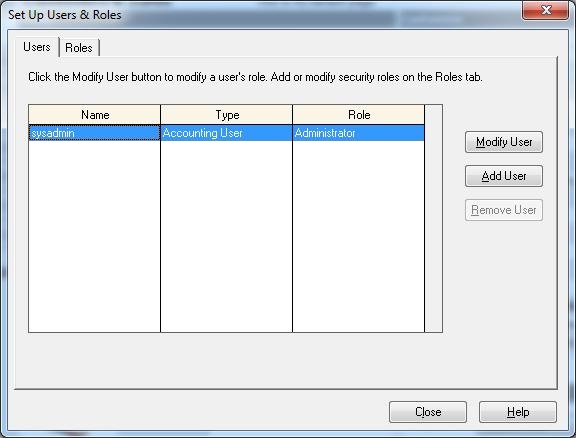
Select the user from the list and click on the “Modify User” button to configure the access permissions for the user. The screen will appear as shown below.
04_ModifyUser
3) Change the user password to make its length between 5-7 characters and click “OK” button.
4) After performing these steps you will be able to connect to simply using ODBC.

By following the above given solution, one can easily get past the access denied hurdle.

Related Blogs:
1) User Authorization Report in Sage 300 ERP
2) User Role and Security Application in Sage 300 ERP
3) You do not have a license to use this product” Error in Sage 300 ERP
4) Cannot Login to Sage 300 ERP due to User Limitation
5) Data migration from your accounting system to Sage ERP


Migrate Purchase Orders from Sage 50 (US) to Sage 300 ERP

$
0
0

We provide data Migration Services from Sage 50 US (formerly known as Sage Peachtree) to Sage 300 ERP (formerly known as Sage Accpac) at our Sage Migration Center.

This blog is in continuation to our GUMU™ ERP Migration services. In our previous blog we discussed about How bank is migrated from Sage 50 (US) to Sage 300 ERP. In this blog we will discuss about how Sage 50 Purchase Order gets migrated to Sage 300 ERP (Formerly known as Accpac) using GUMU.

Our GUMU™ migration utility is compatible to convert all Master and Open transactions along with Sales, Purchase and GL historical data from Sage 50 Accounting- US edition (formerly known as Sage Peachtree) to Sage 300 ERP.

Let us have a quick look on sage 50 Purchase Order screen.

1

After data migration from Sage 50 (US) the field values of Sage 50 Purchase Order get converted with the following mapping:

2

Here is the converted Purchase Order from Sage 50 (US) Peachtree to sage 300. Kindly refer the below screenshot where Purchase Order is converted as per the mapping mentioned in above table.

3

In this way, Sage 50 Purchase Order is migrated into target Sage 300 ERP company database. For more information on ERP data migration, drop us a mail at erpmig@greytrix.com

Also Read:

1. What do you want to migrate to Sage ERP
2. Data migration from your accounting system to Sage ERP
3. Migration of Purchase Payment from QuickBooks to Sage 300
4. Migration of Banks from QuickBooks to Sage 300 ERP

Migrate Items from Sage 50 (CAD) to Sage 300 ERP

$
0
0

This blog is in continuation to our GUMU™ ERP Migration services. In this blog we will discuss about how Sage 50 Item gets migrated to Sage 300 ERP (Formerly known as Accpac) using GUMU. Let us have a quick look on sage 50 Item screen.

1

After data migration from Sage 50 (Canada) the field values of Sage 50 Item get converted with the following mapping:

2

Here is the converted Item from Sage 50 (Canada) simply accounting to sage 300. Kindly refer the below screenshot where item is converted as per the mapping mentioned in above table.

3

In this way, Sage 50 Item is migrated into target Sage 300 ERP company database. For more information on ERP data migration, drop us a mail at erpmig@greytrix.com

Also Read:

1. What do you want to migrate to Sage ERP
2. Data migration from your accounting system to Sage ERP
3. Migration of Purchase Payment from QuickBooks to Sage 300
4. Migration of Banks from QuickBooks to Sage 300 ERP

Bank Transfer Entry In Sage 300 ERP

$
0
0

Bank Transfer entry is a transaction involving cash between one 2 Cash accounts or between 2 banks.

A user needs to follow the below mentioned steps to use “Bank Transfer Entry”

1. In sage ERP, navigate to Common services >> Bank Services >> Bank Transactions >> Bank Transfer
2. Enter the date of fund transfer
3. Then enter the Description & Reference if any.

bank transfer

New Stuff: Invoice Action Report

4. Then select the ‘From Bank’ where you want to transfer the Money or Fund and enter the transfer amount, now select the ‘To Bank’, the deposit amount automatically reflects as per the transfer amount.

bank tranfer

5. If any Service Charges are applicable for, from or to bank then select the G/L Account and enter the amount, then click on Post button to post entry.

bank tranfer 3

Hence, with the ‘Bank Transfer Entry’ user can transfer the cash funds from one bank to other bank.

Also Read:

1Accurate Bank Reconciliation
2Set Document Numbering based on Bank Code for Sage 300 ERP
3. Bank Reconciliation Reports in Sage 300 ERP
4Create Bank Entry from Reconciliation Screen
5. Auto Bank Reconciliation in Sage 300 ERP

Migrate Sales Order from Sage 50 (US) to Sage 300 ERP

$
0
0

We provide data Migration Services from Sage 50 US (formerly known as Sage Peachtree) to Sage 300 ERP (formerly known as Sage Accpac) at our Sage Migration Center.

This blog is in continuation to our GUMU™ ERP Migration services. In our previous blog we discussed about Migrate Purchase Orders from Sage 50 (US) to Sage 300 ERP. In this blog we will discuss about how Sage 50 Sales Order gets migrated to Sage 300 ERP (Formerly known as Accpac) using GUMU™.

Our GUMU™ migration utility is compatible to convert all Master and Open transactions along with Sales, Purchase and GL historical data from Sage 50 Accounting- US edition (formerly known as Sage Peachtree) to Sage 300 ERP.

Let us have a quick look on sage 50 Sales Order screen.

1


After data migration from Sage 50 (US) the field values of Sage 50 Sales Order get converted with the following mapping:

2

Here is the converted Sales Order from Sage 50 (US) Peachtree to sage 300. Kindly refer the below screenshot where Sales Order is converted as per the mapping mentioned in above table.

3
4

In this way, Sage 50 Sales Order is migrated into target Sage 300 ERP company database. For more information on ERP data migration, drop us a mail at erpmig@greytrix.com

Also Read:

1. What do you want to migrate to Sage ERP
2. Data migration from your accounting system to Sage ERP
3. Migration of Purchase Payment from QuickBooks to Sage 300
4. Migration of Banks from QuickBooks to Sage 300 ERP


Date wise IC stock Transaction Report

$
0
0

In any organization it is very crucial to keep a track of inventory that they have. In Sage 300 ERP there are reports like Stock Transaction Report and Stock Status Report which list the inventory change.

Stock Transaction Report gives list of inventory changes, status of items on basic of Account Set, Location and Fiscal Period. In some business scenarios, user might need to print the report for particular date range instead of Fiscal Period.

To facilitate this we have customized standard Stock Transaction Report to filter data on basic of date range.

New Stuff: Account Set wise Filter in AP Aged Payable Report

To print the report Navigate to Inventory Control –>I/C Stock Control Reports –> Stock Transactions.

Screen1-1

After Printing Report, it will show output as follows:

Output

The report is particularly useful when you need the details of your Stock Transaction on a date range. You can also export this report in Excel or PDF as per your convenience.

Contact us at accpac@greytrix.com if you would like more information on the same.

Also Read:

1. Stock Status Report in Sage 300 ERP.
2.New Inventory Control features in Sage 300 ERP 2014
3.How to handle Inventory Shipment in Sage 300 ERP.
4.Item Status Report.
5.I/C Physical Inventory Reconciliation Process.

CALL .NET WEB SERVICE THROUGH OCX

$
0
0

Did you know that SAGE 300 ERP allows you to create/use web services from within the active x control which can be used to integrate with third party applications?

Yes this is true you can create web services for the desired functionality and deploy it on the server. The web services can include functionalities like:

- auto updates in SQL tables
- auto-insert some ERP data into the separate SQL table for reporting purpose or
- might be for some integration purpose.

All you need to do is create desired web service and call this web service on a event within the active x control. The web service is called by using a URL which has an IP address of the server, application name & web service name where the web service resides.

New Stuff:Date wise IC stock Transaction Report

For e.g. http://192.168.0.208/TestApplication/TestWebService.asmx

Consider a case where you want some integration functionality on a click on some command button.

To achieve this, create a web service which will include the integration functionality & deploy that application on server. Modify the desired active x control (OCX) to add a New Command and on the click of this button call the web service URL with particular method name and pass the parameters for which that particular web service is required. Assuming your parameters are perfect and the web service is properly designed the web service will return the success result otherwise you will get the error in return response.

Also Read:

1.Migrating your Sage Pro Company Database to Sage 300 ERP using GUMU Migration services.
2.IIS 405 PUT Method Not Allowed in IIS Manager.
3.GUMU is now compatible to Integrate Magento with Sage 300 ERP.
4.Adding VB Application to Sage Accpac Portal.
5.INTEGRATION OF OPERA PMS WITH SAGE 300 ERP.


Avoid Applying Credit Note for previously credited invoice

$
0
0

Of late, we come across a situation where we had to raise an OE Credit Note against an OE Sales Invoices, to do so, previously, we would directly go to the OE credit note screen and select the invoice and then raise a credit note. Followed by this credit note there can be two scenarios:-

1. We have to raise another credit note against the same invoice even though we have already done that.
2. We have to make sure that the system does not allow a user to create an OE credit note against the invoices against which a credit note is already created.

In Sage, this functionality is handled very flexibly wherein we can set the option as per our requirement where the system can allow the user to keep creating credit notes against already created invoices or we can stop creating a credit note against an invoice which is already credited.

New Stuff: Date wise IC stock Transaction Report

In Order Entry options of Sage 300 we can set this option as per the user requirement as shown below.

oe options

If the option is set to ‘Ignore’, it will allow you to create as many credit notes you want against the already credit invoice. If the option is set to ’Warning’ then the system will prompt you with a warning but will still allow you to create the credit notes.

On the other hand if the option is set to ‘Error’ then the system will not allow you to create a second credit note against an invoice against which a credit note initially is posted. Even though you to try it will flag you with the below error message.

error

Thus depending on the requirement we can set the things and maintain the control over the credit note part.

Also Read:

1. Cannot Issue an OE Credit Note to return a serialized item to a different location.
2. 
Invoice Action Report
3. Template feature for Order Entry in Sage 300 ERP
4. Partial Shipments using Sage 300 ERP
5Sales Invoice Reversals in Sage 300 ERP


Printing Custom Sage 300 Report from Sage CRM

$
0
0

There may arise a scenario where one would need to print custom Sage 300 form from Sage CRM. To achieve this, we will need to tweak the standard Sage 300 report printing macro to enable report printing from Sage CRM.

In this blog we will discuss the technical guidelines for amending the additional code required for printing reports from Sage CRM order entry screen.

The New Stuff : Customize Sage CRM Order screens to promote Orders into Sage 300 ERP

Follow below code snippet:

Step1: Define the Variable in general declaration section:

<SNIP >
Dim temp As Boolean
Dim rpt As AccpacReport
Dim rptPrintSetup As AccpacPrintSetup
Dim session As AccpacSession
Dim newdblink As AccpacDBLink
Dim printrpt As AccpacPrintReport
</SNIP >

Step 2: Calling our Custom Report “OEPICK01.rpt”

<SNIP >
Set newdblink = adsOEORDH.DBLink
Set session = adsOEORDH.DBLink.session
Set rpt = session.ReportSelect(“OEPICK01[C:\Program Files\Sage\Sage 300 ERP\OE61A\ENG\OEPBPICK.RPT]“, “      “, “      “)
rpt.SetParam “SELECTBY”, “0″             ‘ Report parameter: 2
rpt.SetParam “SORTBY”, “0″               ‘ Report parameter: 3
rpt.SetParam “FROMSELECT”,   ‘ Report parameter: 4
rpt.SetParam “TOSELECT”,   ‘ Report parameter: 5
rpt.SetParam “FROMLOC”, ” “              ‘ Report parameter: 6
rpt.SetParam “TOLOC”, “ZZZZZZ”           ‘ Report parameter: 7
rpt.SetParam “PRINTBY”, “0″              ‘ Report parameter: 14
rpt.SetParam “SERIALLOTNUMBERS”, “1″     ‘ Report parameter: 15
rpt.SetParam “PRINTKIT”, “1″             ‘ Report parameter: 11
rpt.SetParam “PRINTBOM”, “1″             ‘ Report parameter: 12
rpt.SetParam “REPRINT”, “1″              ‘ Report parameter: 8
rpt.SetParam “QTYDEC”, “0″               ‘ Report parameter: 9 – O/E Sales History:Detail,Sort by   Item Number
rpt.SetParam “COMPLETED”, “0″            ‘ Report parameter: 10
rpt.SetParam “SESHNDL”, “1454615″        ‘ Report parameter: 13
rpt.NumOfCopies = 1
rpt.Destination = PD_FILE
rpt.Format = PF_PDF
temp = rpt.PrintReport
Set printrpt = New AccpacPrintReport
printrpt.ReportViewer session, rpt.WebReportURL
</SNIP >

In the Order Entry screen we have implemented the same code on the click of the “Print forms” button as shown below.

Order Entry

Using the above code you can easily print the custom report from the Sage CRM.

Printing_Report

Also Read:
1. Update Bill-To-Address and Ship-To Address on OE Order Entry Screen
2. Populate Items on Order Entry Screen using Template Code
3. Template feature for Order Entry in Sage 300 ERP
4. Open Orders Inquiry for Sage 300 ERP Order Entry Screen
5. Generate BOM and Kitting items on the fly from Order Entry screen in Sage 300 ERP

Migrate Items from Sage 50 (US) to Sage 300 ERP

$
0
0

We provide data Migration Services from Sage 50 US (formerly known as Sage Peachtree) to Sage 300 ERP (formerly known as Sage Accpac) at our Sage Migration Center.

This blog is in continuation to our GUMU™ ERP Migration services. In our previous blog we discussed about Migrate Sales Orders from Sage 50 (US) to Sage 300 ERP. In this blog we will discuss about how Sage 50 Items gets migrated to Sage 300 ERP (Formerly known as Accpac) using GUMU.

Our GUMU™ migration utility is compatible to convert all Master and Open transactions along with Sales, Purchase and GL historical data from Sage 50 Accounting- US edition (formerly known as Sage Peachtree) to Sage 300 ERP.

Item Master: Following is the mapping of the Types of Sage 50 Accounting Items created in Sage 300 ERP.1

Let us have a quick look on sage 50 Items screen.

2

After data migration from Sage 50 (US) the field values of Sage 50 Items get converted with the following mapping:

3

Here is the converted Items from Sage 50 (US) Peachtree to sage 300. Kindly refer the below screenshot where Items is converted as per the mapping mentioned in above table.

4

In this way, Sage 50 Item is migrated into target Sage 300 ERP company database. For more information on ERP data migration, drop us a mail at erpmig@greytrix.com

Also Read:

1. What do you want to migrate to Sage ERP
2. Data migration from your accounting system to Sage ERP
3. Migration of Purchase Payment from QuickBooks to Sage 300
4. Migration of Banks from QuickBooks to Sage 300 ERP

Bulk Invoicing Feature for Sage 300 ERP

$
0
0

In our last blog we had discussed about our bulk shipment component for Sales Orders from multiple customers at the same time.

Quick Shipment feature for Sage 300 ERP

Taking it a step further, we have developed a separate standalone component for providing the feature of bulk invoicing for multiple shipments from multiple customers at the same time. With this component, the Account person in the organization can list out all open shipments for which invoices need to be generated in Sage 300.

The New Stuff: Printing Custom Report from Sage CRM

With bulk invoice program, users can view all the open shipments that are not yet invoiced. Users can select all or particular shipments for creating invoice.

invoice1

In order to invoice; user needs to individually select the range of shipment that needs to be invoiced or he can also click on Select All button which will select the complete list of shipments available in the grid and then clicking on Invoice All button, which will generate Invoice of all the selected Shipments.

After the Invoice is done; users can print the Invoice report from the interface itself using the Print button and also if any errors occur during the process, our routine also logs the error in a log file which can be referred to resolve the error.

Note: This customization is done using Sage 300 SDK, as a result easy to deploy and it works with Sage 300 ERP V2014, v2012 and Sage 300 ERP v6.0A

Also Read:
1. Avoid Applying Credit Note for previously credited invoice
2. Invoice Action Report
3. Create Invoice directly from Shipment Entry
4. Print picking slip after creation of OE Invoice in Sage 300
5. Interest Invoices for Overdue Receivables

Currency Details – Greytrix Extended Report Pack

$
0
0

As we know, the “Greytrix Extended Report” consists of important registers and vouchers, which are specifically designed and configured to meet Indian Business working style. In this blog, we will discuss about a new feature added in Greytrix Extended report pack.

The new UI “Currency Details” added in Greytrix Extended Report Pack. “Currency Details” screen allows a user to maintain name of currency and sub currency along with currency code according to the requirement.

New Stuff: Date wise IC stock Transaction Report

Currency Code Screen

All the currencies defined in Common Services are  auto populated. Users can edit and change the details of currency and sub currency field as per his/her need.

Please note that this screen allows users to define the currency nouns only, users are not allowed to add currency codes from this screen. If user wants to add currency code then he/she needs to add the currency code in Common Services >> Currency Code.

The main motive of this screen is to have currency and sub currency description as per the user requirement in the report. So it helps the user to print the “amount in words” while printing AP invoice, AP payment, and AR receipt report.

For example: The invoice report [Please find screen shot below] displays “amount (in Words)” with currency and sub currency.

AP Invoice Report

Also Read:

1. GL Voucher in Greytrix Extended Report for Sage 300 ERP
2. AP Vendor Ledger Report for Sage 300 ERP
3. AR Customer ledger/ Transaction
4. Greytrix Extended Report Pack for Sage 300 ERP

Inventory Control Settings – Allow Items at All Locations

$
0
0

In this blog, we will discuss about “Allow Items at all locations” feature in inventory control module of Sage 300 ERP.

In IC Option setting, there is a check box ‘Allow Items at All Locations’ under the ‘Processing’ tab [please find screen shot below]. This feature allows the system to keep the inventory item for all the locations. If the checkbox is checked then all the inventory items are available at all locations.

New Stuff: New Inventory Control features in Sage 300 ERP 2014

IC Options

Suppose the checkbox is unchecked in the IC Option screen (as shown in above screen shot), then user has to manually assign the items on each location (IC Setup>>IC Location screen).

IC Locations

So in case, a particular item is not allocated for the particular location for example “Pune”, then user cannot make an OE entry for that location.

This feature also restricts users to do an Order for an item for a particular location. User can make OE entry for those items only, which are assigned for the location. If the item is not assigned in IC Location, and if user tries to do the OE entry, then user will get below error.

OE Order Entry

Also Read:

1. How to assign unique serial Number to Individual Items in Sage 300 ERP Versions 2014
2. How to Use as Default option on the Bills of Material screen in Sage 300 ERP 2014
3. Setting up Price Inclusive of Taxes in Sage 300 ERP
4. Alternate Amount in Inventory Control module of Sage 300 ERP

Deleting Inactive records in Sage 300 ERP

$
0
0

Sage 300 ERP has a feature which is quite helpful in removing inactive records i.e. inactive vendors, vendor groups, remit to location, recurring payables records from Accounts Payable module in just a single click.

This feature allows you to make your data up to date by deleting the unnecessary details from your system. In addition you to this, by using this functionality you can make your reports precise and more readable without considering inactive records in it. But this functionality will work for items which are in Inactive status.

Our New GUMU Solution: GUMU for Sage CRM – Sage ERP X3 Integration ~ realtime, bi-directional, multi-folder

Note: – Before proceeding towards the steps we need to take some point into consideration as mentioned below:

  • Settle all invoices and debit notes.
  • Clear all the vendor’s fully paid documents, Vendor comments, Vendor Statistic using the Clear History if you want. However, the ‘Delete Inactive Records’ form automatically deletes the comments and statistics in the vendor records.
  • Delete remit-to location for the vendor.
  • Delete recurring payables for the vendor.
  • Delete Vendor group.

To identify inactive vendor records, print the Vendor Report by navigating to:

                                       Accounts payable >> A/P Vendor Reports>>Vendors

vendor report

On printing this report, you will get the list of inactive vendor records also as show below:

vendor report

Here, you can see the vendor status as “Inactive on” which means vendor is inactive. Next, to ‘Delete a vendor group of the vendors’, print the Vendor Group report, selecting the Group Members option which will help you to find out which vendors is assigned to which vendor group.

vendor report

On printing the report you will get the details like which vendor comes under which group as show in below report.

vendor report

Note that when you delete a vendor group, you also delete the vendor group statistics.

Before you delete inactive remit-to locations, make sure there are no unposted transactions that use them. (You cannot edit and save a transaction with an inactive or deleted remit-to location; however, you can post it without errors.).

Steps for deleting inactive records:-

  • Choose the Delete Inactive Records screen from the Periodic Processing as show below.

vendor report

  • Select the records to delete, as shown above. And enter the range of codes or numbers to delete for each record type you selected, or use the Finder. Now enter a range of date to indicate when a record must have been made inactive to delete it. Accounts Payable selects records that have a status of Inactive and a corresponding “inactive” date within the range of dates you specify. By default, the ‘To date’ is the current session date. If you do not want to delete all the records for the same range of inactive dates, process each set of records separately.
  • Click Process to delete the inactive records.
  • Repeat these steps to select other ranges of records to delete
  • When finished, click Close to close the screen.
  • Now again print vendor report, remit to location report, Vendor group report to check the output of the process which we have done and you will see there will be no records found for the inactive vendors.

Also Read:
1. Restrict Posting to Inactive G/L Account through Sub-Ledger
2. Exclude Inactive Accounts option in GL Chart of Accounts Report of Sage 300 ERP
3. Inactive Items option in IC Reports of Sage 300 ERP 2012
4AP Vendor Ledger Report for Sage 300 ERP
5Default Settings for Accounts Payable Payments in Sage 300 ERP

Transactions Details Optional Fields Report

$
0
0

In Sage 300 ERP we can create user specified optional fields at transaction as well as at Masters Level. Sage 300 ERP also offers the report named as Transaction Detail Optional Fields which displays the output as per the defined optional fields.

Below example will give you exact idea demonstrating how we can make the use of this report.

Let’s say in our organisation there are few employees who are using mobile SIM card provided by the organization.

New Stuff: Deleting Inactive records in sage 300 ERP

Now, if we need to track the expenses of each SIM card respectively, then one way is to create those employees who possess a SIM as vendors but if we use this method, then for each SIM, the charges be will needed to be raised as a separate entry for each employee. This will indeed increases extra entry overhead.

Other way is to create an optional field named as “COSTCENTER” (user defined) and add employee name in its value field as shown in below screen shot.

Optional field

Define the optional field in Account Payable Module>>>AP setup>>>optional field>>>Invoice details as shown in below screen shot.

AP Optional field

Now, suppose we have received the bill for the month of April 2014 of all the respective employees.

We will now book this expense first with help of AP invoice entry selecting SIM service provider as a vendor.

AP Invoice Entry

AP Invoice Entry

As you proceed with the AP invoice entry at the detail line level, we have an optional field column. When you click on it an additional window will pop-up which will allow you to select the employee name from the finder, provided the same is visible in the above screen shot.

Now, let us see how report will display the data. Navigate through the below path

General Ledger>>>G/L Reports>>>Trans. Details Optional Fields

Tran.optional field report

Select the expense account in the account range.

Trans.Optional field report output

When we refer to the output of the report we are able to see employee name and their respective SIM expenses.

In this way, we can track the employee expenses also please note in this blog we have taken employee as a reference for tracking expense. Same way we can use Department or location or Directors’ expense which ever cost centre that suits to organisation.

Adapting this practice will eliminate consumption of vendor master data.

Also Read:
1. Configure Reverse Charge Mechanism for Service Tax in Sage 300 ERP
2. How to filter finder based on optional fields
3. Transactional Analysis And Optional Fields In Sage 300 ERP
4. Invoice Action Report
5. Avoid Applying Credit Note for previously credited invoice


Pre-payment Creation through OE Invoice

$
0
0

Pre-payments are advance payments received against future invoices. Sage 300 ERP allows you to book advance payments received from customers as Pre-Payments in Accounts Receivable module. An interesting feature of Sage 300 ERP module is to book a prepayment or advance payment at runtime when booking a customer order in Order Entry module and apply this payment to OE invoice at time of making OE Invoice.

In this blog, we will see how pre-payment is generated and applied against OE Invoice.

In OE Invoice UI after selecting Shipment no, Prepayment Button gets enabled as shown in below screen shot:

New Stuff: Transactions Details Optional Fields Report

01.jpg

Click on Pre-payment:

02.jpg

Here you can enter pre-payment details like payment code, check receipt no, date, amount, bank code etc. as shown above. User can make a full payment or partial payment (deposit) through OE Invoice Prepayment screen. Finally click on the Add button to apply the pre-payment against the Invoice. Pre-payments entered with invoices immediately reduce the amount due on the invoices sent to customers, and is matched to invoices posted to Accounts Receivable.

03.jpg

When you are creating an invoice, pre-payment entered is automatically applied to invoice. However point to note is you can enter only one pre-payment for each invoice. You can also generate Pre-payment in Order and Shipment transactions. The order/shipment pre-payment total is displayed on the invoice total page, enabling you to easily determine if there is an outstanding balance.

Also Read:

1.Advance Payment to a Vendor
2.Error in AP Payment While Applying Document
3.Advance Receipt from a Customer
4.Reverse Transactions – Payment Reversal Transaction in SAGE 300 ERP
5.Auto Apply Option for AR Receipt in Sage 300 ERP

Inventory Movement Report in Sage 300 ERP

$
0
0

In Sage 300 ERP there are many useful inbuilt inventory reports. Let us see today “Inventory Movement” report which helps you to manage your inventory efficiently.

This report provides a complete movement of the stock including the quantities and extended costs of inventory items that were received in stock and shipped out of stock during the period that is specified.

Greytrix Blog: With Sage CRM you have “Better Control Over your Customers and your Systems too”

The report displays the stock activity showing each transaction in and out of stock for the period. Users can group items in all locations together or display items in each location separately.

Image

Please find below the UI screenshot of the “Inventory Movement” report of Sage 300 ERP (Accpac).

Image

By viewing UI of the report you can see there are various parameters available, based upon which you can view the report as per your desired requirement.

Steps to print the report:

  • Select “Transactions By”. There are two methods for selecting a cutoff date.
    • Document Date: Use this method if you want to specify transactions for a specific range of dates.
    • Year/Period: Use this method if you want to include all transactions up to the end of a fiscal period. Make your selections in the Year and Period fields.
  • Print Separate or Consolidated Locations. If you select Separate Locations, the report prints each location on a new page. If you select Consolidated Locations, the report prints a single total for each item for all locations (within the range you specify).
  • Select Report Currency. In a multicurrency ledger, choose whether you want to see the amount in source or functional currency.
  • Select From/To. Indicate the ranges of account sets, locations, and item numbers that you want to include in the report. You can also select a range of values for the field that you use to sort the report.
  • Select Sort By: You can choose to sort the report by item category, item segment, or by optional field value. You can also choose a range of values for the sort field.
  • Once done with all click on Print and view the output of the report.

Below is the screen print of the output for Inventory Movement in Sage 300 ERP.

Image

Information printed on this report

  • Reports transactions for a particular period of time, specified using transaction dates or fiscal periods.
  • Opening and closing balances, as well as inventory-in and inventory out item totals in functional currency.
  • For each transaction, prints the document number, source ledger (e.g. Order Entry, Purchase Orders, Project and Job Costing), inventory location, unit of measure, inventory-in or inventory-out quantity and cost.
  • Subtotals by the sorting order field (category, item segment, or optional field).
  • Report for separate locations, consolidated locations, or items by location.

Through this report you can keep a track on entire inventory, you will also have an update of warehouse wise status. If you know the stock status then accordingly you can process your sales orders and purchase orders. This will lead to prevent the wastage of stock.

Also Read:
1. Inventory Control Settings – Allow Items at All Locations
2. New Inventory Control features in Sage 300 ERP 2014
3. Inventory Cost Analysis in Sage 300 ERP
4. I/C Physical Inventory Reconciliation Process
5. Adjustment Entry in Inventory Control

Cycle Counting using Sage 300 ERP

$
0
0
 Image When we talk about the term ‘Cycle Counting’ many people say “but we are not into business of bicycles”. Cycle counting is an efficient method of reducing the time, efforts and chances of data inaccuracy incurred during conventional stock take procedures

New Stuff: Control the way imports are handled in Sage ERP X3

Majority of companies, in a regular scenario, would inspect their stock once or twice a year to reconcile physical stock with the system stock and then adjust the differences. This procedure though important, is very time consuming, requires a complete downtime from operations of around 3-4 days and also involves heavy manual work which can lead to more errors in the process. Since the value of your assets and plant capacity depend on timely count of your stock, it is very important to do this process with utmost accuracy and on pre-scheduled program. In fact, some businesses have made it their core offerings to do these stock counts for companies and they have made good money out of it.

So is there some easier alternative to these tedious and time taking stock take?

Yes. There is – Cycle Count.

Cycle count as the name suggests, is a method wherein you break the task of 1 stop inventory count into multiple small and frequently recurring cycles of inventory count generally by category of items. This method has numerous benefits/advantages as compared to conventional stock take process.

This method is time saving, reduces the ‘non-operational’ days, reduces chances of huge inventory adjustments at end of year and helps maintain more accurate inventory throughout the year.

This process can be easily implemented in Sage 300 ERP by doing the stock take by locations and by category of items. For example we can define high value products in category A and schedule a cycle count for it once every month while items with lesser valuation can be counted less frequently.

Standard Physical Inventory Process of Sage 300 is very intuitive so the users need not maintain paper records of what inventory was counted last and when. Every time an inventory worksheet is generated it can be stored in PDF or several other formats for quick and easy retrieval at later stage.

Cycle count is most suitable for organizations with very accurate data entry methods and where general inventory variations do not exceed 10%. Though the purpose of this method is to avoid humongous efforts at year end, it does not ensure accurate results if not properly planned and implemented

Also Read: 
1. Date wise IC stock Transaction Report
2. New Inventory Control features in Sage 300 ERP 2014
3. How to assign unique serial Number to Individual Items in Sage 300 ERP Versions 2014
4. How to Use as Default option on the Bills of Material screen in Sage 300 ERP 2014
5. Alternate Amount in Inventory Control module of Sage 300 ERP

Hide Completed Lines in Order Entry

$
0
0

There may be a scenario where the user may not ship the entire inventory for an order. There will also be a scenario where the user reviews the orders after the shipment but the previously shipped lines are also visible on the order details. In this case, the user is unable to easily locate between Non-shipped lines from the Shipped lines.

The New Stuff : Cycle Counting using Sage 300 ERP

When a user opens any order detail to process the shipment, the remaining backorder line items also are, they may be completed as well as non-completed detail lines. So it adds up more effort on the part of the user to locate the lines which are yet to be shipped.

HIde1

To handle this scenario, we have developed a simple, yet useful component in which we have customized Standard order entry screen and provided a feature to hide the completed detail lines from the order details.

As you can see in above screen shot of Order “ORD000000000122” contains multiple line items in which   some items are completed and others are back ordered. So in this situation, filtering out backorder items and shipping it again become the cumbersome process. So in order to hide the completed detail lines and make the shipping process effortless we have provided the checkbox known as “Hide Completed Line Items”.

Once, the user checks the “Hide Completed Line Items” checkbox, the completed detail lines are hide from the order detail and only those line which are not yet shipped are filtered on the order detail grid, as shown in the below screenshot:

hide2

Hence with the help of this feature, users can easily filter between the completed and non-completed order detail line.

Note: This customization is done using Sage 300 SDK, as a result easy to deploy and it works with Sage 300 ERP v6.0A

Also Read:
1. Create Invoice directly from Shipment Entry
2. Drill Down to Source Transaction from GL
3. Update Bill-To-Address and Ship-To Address on OE Order Entry Screen
4. Populate Items on Order Entry Screen using Template Code
5. Quantity On Hand Drilldown feature for OE Order Entry Screen

How to generate PO invoice from PO receipt

$
0
0

PO Receipt Entry screen provides the feature to receipt both inventory and non-inventory items from Purchase Orders. Also when we receive items, we can also post an invoice for the primary vendor (vendor for which PO Receipt is generated) and for any other vendors for which we have assigned additional costs on the receipt. In this blog we will discuss in detail about this feature of PO receipt entry screen.

The New stuff : Hide Completed Lines in Order Entry

Standard PO receipt entry screen contains feature which allows user to generate Invoices while posting the PO Receipt itself. With the use of the button named as “Invoice”.

fig1

By following simple process, user can generate PO invoices while posting PO Receipts in Sage 300:

Here we are going to take an example of the PO receipt which have set two additional costs one for Primary vendor (i.e. vendor for which PO Receipt will be generated).

fig2

And another additional cost for different vendors. See below…

fig3

In order to generate invoice we will need to click on Invoice and provide invoice number for both primary vendor and additional cost vendor. These invoices will get generate while posting the receipt.

fig4

Hence with the help of this feature user can directly generate invoices while receipting the PO.

Also Read:
1. Pre-payment Creation through OE Invoice
2. Avoid Applying Credit Note for previously credited invoice
3. Create Invoice directly from Shipment Entry
4. Fixed Due Date for Invoices in Sage 300 ERP
5. Invoice Action Report

Viewing all 1486 articles
Browse latest View live


<script src="https://jsc.adskeeper.com/r/s/rssing.com.1596347.js" async> </script>