Quantcast
Channel: Sage 300 ERP – Tips, Tricks and Components
Viewing all 1489 articles
Browse latest View live

Choosing Vendor Contract Cost over IC Vendor Detail Cost in Sage 300 ERP

$
0
0

In order to setup specific pricing by vendors in Sage 300 ERP (formerly Sage Accpac ERP), there are 2 methods;

1. I/C Vendor Details Cost in Inventory control module.
2. Vendor Contract Costs under Purchase Order module.

Both these methods serve similar purpose, but they are not identical.  Using this blog, we will discuss the difference in both;

When User add Purchase orders, Purchase Receipts, Purchase invoices, Purchase Returns, and Purchase Credit/Debit notes; Vendor Contract Cost appear by default.

If no contract cost exists for an item and vendor, Purchase Orders display Default Item Cost specified in the P/O Options form, which can be Most Recent Cost, Standard Cost, Average Cost, Last Unit Cost, Vendor Cost, or either of the two user-defined costs.

If User has set pricing using I/C Vendor Details; then same can be defaulted to purchase transactions, by choosing Vendor Cost as Default Item Cost in PO Setup Options.

Also Read: Landed cost in Sage 300 ERP

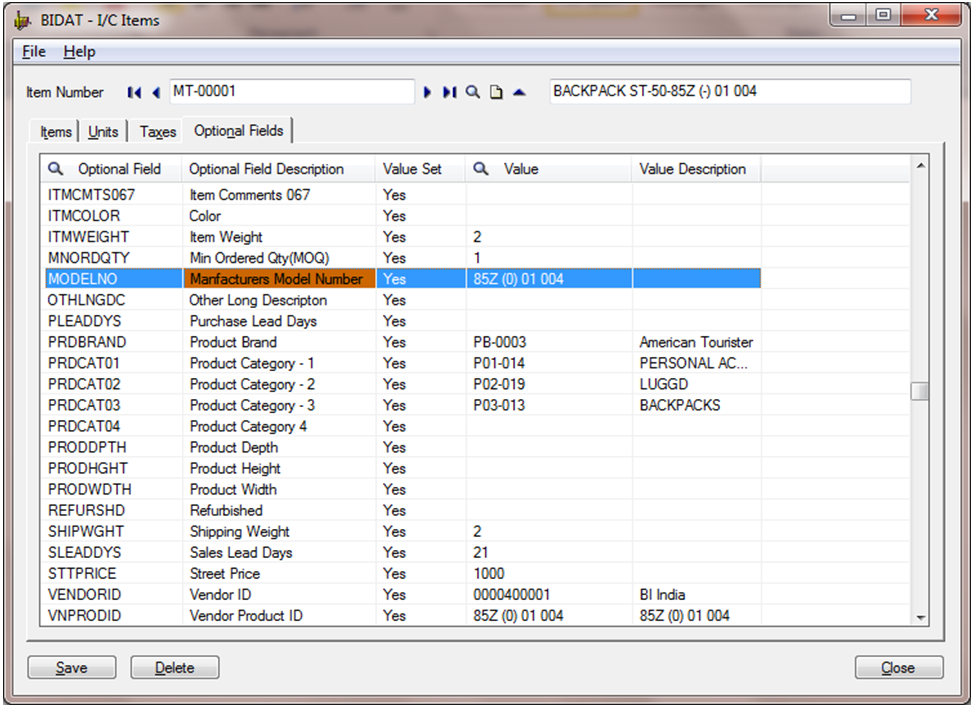
Only nine vendors can be linked to each item with every vendor having a different priority.  This can be helpful when generating purchase orders directly from OE Order and selecting vendor by vendor type.

Vendor Cost setup under I/C Vendor Details form always get update while posting Purchase Receipts\Invoices. 

Under certain circumstances user may wish to enter a purchase transaction with a special pricing. However, if they do not want to update vendor cost with this pricing to avoid special pricing on future orders. 

Note: There is no way to restrict pricing; it will be updated to I/C Vendor Details as per the standard business logic.

This is where Vendor Contract Cost has a preference over I/C Vendor detail Cost.

With contract pricing; various terms like volume discounts, base unit cost can be easily maintained.  Even if pricing is override in purchase transactions; contract cost remains unaffected.

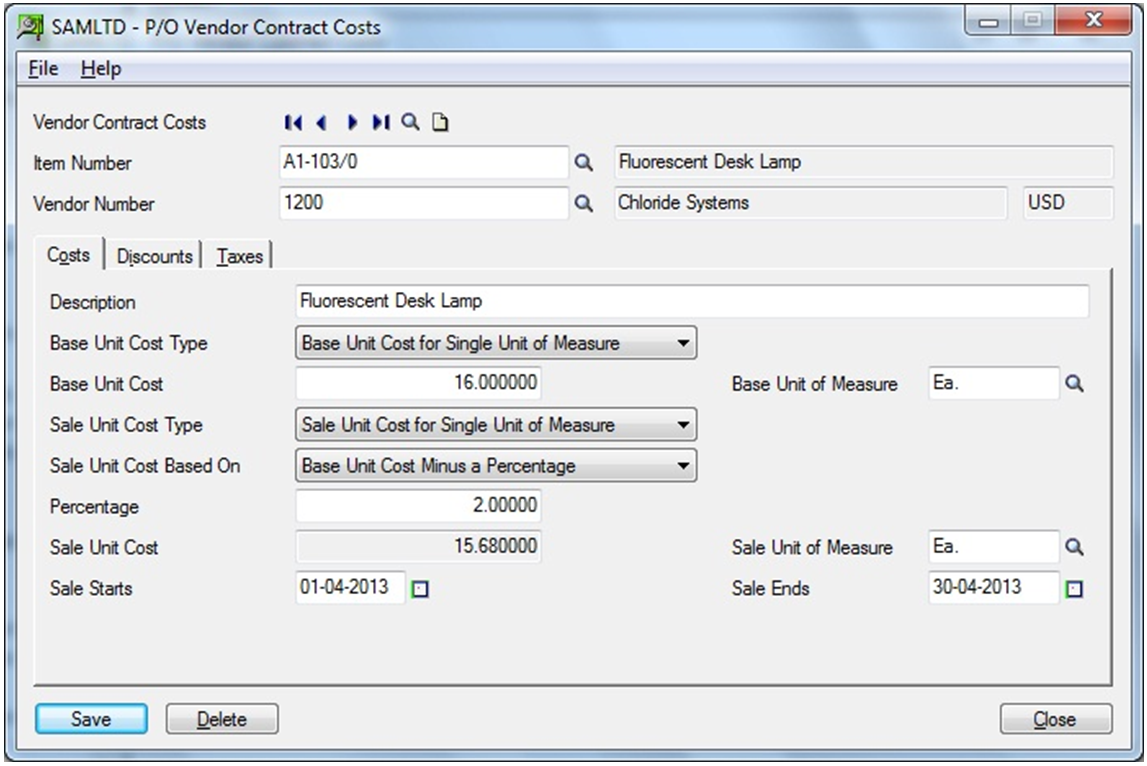
Since contract pricing has a preference over other cost type, it is preferred to maintain vendor specific pricing under Vendor Contract Cost.

Related Posts:

1. Vendor Pricing Analysis in Sage 300 ERP
2. Post Bank Entries from Reconciliation Screen in Sage 300 ERP


Installation of Sage 300 ERP Workstation Setup

$
0
0

A workstation is a computer that connects to a server to access Sage 300 ERP (formerly Sage Accpac ERP) programs and/or data. Workstation is normally used for multi user operation. In Workstation, user can access Server computer that hosts Sage 300 ERP Program and data that can run Sage 300 Desktop.

Following are the steps to Install Workstation setup:

1. Share Sage 300 Program and Data folder in network from Server computer. Access the same folder from workstation system.
2. Then navigate to Sage 300 Program folder\Sage 300 ERP\WSSetup and Double‐click on setup.exe file (Workstation Setup file)

3. Sage 300 workstation setup installation will be started and it will guide you through the rest of setup process.
4. Click on Next button to proceed.

Also Read: Sage Advisor Update for Sage 300 ERP 2012

5. In Programs and Data path, give path of Sage 300 Program and Data folder from Server.

6. Click on Next button and install.

7. Once done, Click on Finish to complete the installation

8. Once workstation installation is completed, configure Sage 300 Database in Data Base setup.

Follow below steps for Database Setup:

a. Navigate to Sage 300 ERP >> Database Setup
b. Enter password for Administrator user

c. Verify the Database for which you want to run Sage 300 and connect the same to the Database Server.

Once Database setup is done, user can use Sage 300 Programs from workstation.

This way workstation setup helps in multi user operation instead of installing the complete Sage 300 Setup at each user end.

Related Posts:

1. Installing Sage Exchange in Sage 300 ERP
2. Database Profiles table error on Sage 300 Workstation

IIS 405 PUT Method Not Allowed in IIS Manager

$
0
0

In this blog, we will discuss about SDATA PUT method that is supported by Sage 300 (formerly Sage Accpac ERP) PORTAL, but it’s not allowed as default in IIS manager.

PUT is considered as WebDAV verb, and WebDAV module claims the request, but it returns 405 since WebDAV is disabled.

WebDAV cannot be set with other module like RESTFull, also handling WebDAV specific verb, such as PUT, DELETE, COPY, etc. Disable WebDAV on site does not resolve your concern.

Also Read: Run VBA Macro without Logging to Sage 300 ERP

Hence, to allow IIS to support PUT method; we will have to make following changes in IIS manager.

- If OS is Vista or W2K8, then navigate to control panel/Add Remove Program, and remove WebDAV.
- If OS is Win7 or server machine, then navigate to Server Manager >> Role >> Web Server -> Common HTTP Features -> WebDAV Publishing, and for client machine  Control Panel -> Uninstall Program -> Turn Windows features on or off -> IIS -> World Wide Web Services -> Common HTTP feature -> WebDAV Publishing.

A simple one-step solution to resolve issue is to uninstall WebDAV module, to handle 405 error in IIS Manager.

Related Posts:

1. Cannot Login to Sage 300 ERP due to User Limitation
2. “You do not have a license to use this product” Error in Sage 300 ERP
3. Login to Sage 300 ERP via Windows Authentication
4. Restrict users access of GL Accounts in Sage 300 ERP

Account Receivable Transaction Reports in Sage 300 ERP

$
0
0

Sage 300 ERP (formerly Sage Accpac ERP) provides various reporting option such as AR Invoices, AR Receipt, etc. These reports are useful while using Sage 300 ERP for maintaining track of customer transaction, customers closing balance, opening balance and overall transaction till date.

In this blog, we will discuss about A/R transaction Reports in detailed. These reports lets user print invoices, debit notes, credit notes, receipts, Prepayment, Unapplied cash and Misc. receipt. Let us discuss this in detail;

1. A/R Invoices: This report allows user to print copies of invoices, credit notes, and debit notes that they create in Account Receivable Module. User can print these reports when they need to calculate amounts. Thus to print report navigate to Account Receivable >> A/R Transactions Reports >> Invoices

Invoice form provides different options, choose desired options and click on Print button. You will get report in following format;

Also Read: Greytrix Extended Report Pack for Sage 300 ERP

2. A/R Receipts:  This report allows user to print transactions for receipt, prepayment, unapplied cash and misc. receipt for transactions made in AR Receipt Entry. Hence, to print this report navigate to Account Receivable >> A/R Transactions Reports >>Receipts

After selecting the desired options, clicking on Print button will print the report in following format;

3. A/R G/L Transactions:  G/L Transactions report provide a list of General Ledger transactions created from posted Accounts Receivable batches and revaluations. User prints this report to get details of transactions. Thus to print this report navigate to Account Receivable >> A/R Transactions Reports >> G/L Transactions

Users can also make use of finder to add list of invoices, receipts, adjustments depend on batch type selected.

UI gives number of options after choosing desired options you will get report in following format:

Now, as we have discussed the basic reports in AR module and seen transaction document wise data in report, we will now proceed further with some other reports that will show Customer wise data like Customer wise Total Debit/Credit, Opening/Closing Balance etc…. in our NEXT BLOG….

Related Posts:

1. Order Entry Reports in Sage 300 ERP
2. Purchase Order Reports in Sage 300 ERP
3. Email Standard Order Entry Invoice Report in PDF or RTF Format

Customer Transaction and Aged Trial Balance Report in Sage 300 ERP

$
0
0

In our previous blog, we discussed about “Account Receivable Transaction Reports in Sage 300 ERP”, which shows basic transaction wise data from AR Module. Now, we will discuss AR Transactions Reports that shows Customer wise data like Customer wise Debit/Credit Total, Opening/Closing Balance for a particular period or Date Range.

1. Customer Transactions: This report keeps track on current status of Customers Account. It also lists all customer transactions that were posted during the current period and in the period for which you keep transaction history. Thus to print this report navigate to Account Receivable >> A/R Transactions Reports >> Customer Transactions

Report UI provides different types of report with grouping and sorting options. After printing report, the format of report will be as follows:

Also Read: Email Standard Order Entry Invoice Report in PDF or RTF Format

2. Aged Trial Balance: Aged Trial Balance report list accounts receivable with outstanding balance by age buckets (30\60\90 days etc.). This report provide different options like printing report in detailed form, listing all outstanding documents for each customer, or summary form, printing one line for each customer number, including the current balance and the balance in each aging period.  Hence, to print this report navigate to Account Receivable >> A/R Transactions Reports >> Aged Trial Balance

After printing this report, the format of report will be as follows:

This report shows customer outstanding transaction for current period up to four aging periods. It also allows user to print report by using document date or posting date.

Hence, allows user to see total outstanding transaction for each document for that customer by printing it detail wise or summary wise to view only outstanding balance. Thus, Sage 300 ERP provides a number of useful reports for Account Receivable putting critical information at fingertips.

Related Posts:

1. Greytrix Extended Report Pack for Sage 300 ERP
2. Order Entry Reports in Sage 300 ERP
3. Purchase Order Reports in Sage 300 ERP

Fiscal Set Comparison in Sage 300 ERP 2012

$
0
0

Sage 300 ERP (formerly Sage Accpac ERP) provides a feature, wherein user can compare General Ledger fiscal set for the year selected. User can view comparison between expenses for the current month and expenses for previous month using G/L Account History. To access this, navigate to General Ledger >> G/L Accounts >> Accounts History Inquiry and select the desired account for which you wish to view the history.

Sage 300 ERP 2012 combines features of GL Account History and GL Budget Maintenance in a unique way in G/L Fiscal Set Comparison.

Users can locate this screen on their Sage 300 Desktop >>General Ledger >>G/L Accounts >>Fiscal Set Comparison or can use the Visual Process Flows.

Also Read: Financial Budgeting in Sage 300 ERP

In GL Fiscal Set Comparison screen, User can view amounts for either Net Change (useful for P&L type of accounts) or for Balance (useful for Balance Sheet Items) in the account selected with a click of radio button.

A combination of 4 drop down menus offers users to select from 2 types of fiscal sets and 2 years to compare with each other.

For Example a user can select to compare the expenditure on Advertising Actual’s for current year Vs. Budgeted for the current year as shown in below screenshot.

Upon selection of the desired criteria, user has to click on go button and then view the net/balance for the 2 selected fiscal sets with columns to show Difference and Percent difference between them.

This feature helps users to get a quick glance of the fiscal sets without printing any reports.

Related Posts:

1. Closing Procedure Checklist for Sage 300 ERP
2. Monthly Audit Methodology in Sage 300 ERP
3. Year End process in Sage 300 ERP
4. Financial Reporter in General Ledger Module of Sage 300 ERP
5. Lock – Unlock Fiscal Period Module wise in Sage 300 ERP

Print Customer Statements in Sage 300 ERP

$
0
0

Sage 300 (Accpac) ERP allows printing a statement, letter or label for a customer. Print the Statement to send them to the customers to show the status of the account and to request payment. It prints a wide variety of Accounts Receivable information on statements for customers.

Before we start, to print the statements, the print statement option in customer master has to be checked. If the option is unchecked, it won’t print any statements for that customer.

To print the report, navigate to AR Customer Report->Statement/Letter/Label

1. Select the type of document that requires to be printed: statement, letter, or label.

2. Select the following general options:
Delivery Method: Print Destination or Customer

National Account Statements: Select this option to print statements for national accounts instead for individual customers assigned to each account.

Run Date: The date that appears on the statements.

Cut-Off Date: The Statement includes only transactions or balances that have a document date on or before the cut-off date mentioned.

Age By: Specify to age transactions by Due date or Document date.

3. Select Tab includes the following options:

Account Type:  Open Item, Balance Forward customers, All customers

Select By: Specify up to four selection criteria to indicate the customer accounts to list on the report.

Sort By: Specify up to four orders by which to list (sort) records for the customer statements

4. Criteria Tab includes the following options:

Select Customers Based On Balance Type: Select this option to include or exclude accounts by their balances. You can list accounts with debit balances, credit balances, or zero balances

Sort Documents By: Select either Document Number or Document Date depending on the order that you want documents to appear on the statement.

Open Item Statement Type:  This field appears if you selected All Customers or Open Item as the account type. Select the format that is to be used for the statements.

Include Paid Transactions For Open Item Accounts. This option appears only if you selected Version 5.1, 5.2, And 5.3 Format for the Open Item Statement type. Select the option to include transactions that have been paid, but have not yet been cleared

Include Applied Details For Open Item Accounts. This option appears only if you selected Version 5.1, 5.2, And 5.3 Format for the Open Item Statement type. Select the option to include all the documents – such as receipts, prepayments, unapplied cash, and credit notes — that were applied to each reported invoice for open item accounts.

Select Customers With Balances [X] Days and Later.  If you select this option, specify the minimum number of days that customer balances must be outstanding to be included in the statement run.

Use Aging Periods. The default aging periods from the Statement tab of the Options form appear here, but you can change the aging periods for the statement run, if necessary.

If additional copies of statements are required, or earlier processing was halted, click the Reprint button. The Reprint Statements form appears, letting you reprint statements that you have printed before.

Happy Printing!!

Greytrix Document Attachment for Sage 300 ERP v6.1

$
0
0

Greytrix Document Attachment for Sage 300 ERP v6.1 (formerly Sage Accpac ERP) is a comprehensive add-on that helps users to attach, refer and view the related documents that they want to see floating along with the transaction screens Viz. Order Entry, Invoice Entry, Journal Entry, etc.

Document Attachment Features are as follows:

1. Allows user to attach scanned documents such as reports, Fax, images to almost all the transaction screens in Sage 300 like Order Entry, AR Invoices, AP Invoice, Purchase Order, PO Invoice, Adjustments, GL Transactions.
2. User can keep track of Original Sales Orders, Purchase Orders, Amendments done to the  Orders, Revised Orders
3. User can attach documents to AP/AR Adjustment Entries, which have been passed and posted with a manual approval of an authorized person on Paper

Also Read: Greytrix Document Numbering Series for Sage 300 ERP

Document attachment functionality is provided for the following screens;

 - AP – Invoice Entry, Adjustment Entry, Payment Entry,Invoice Batch List,Payment Batch List,Adjustment Batch List
- AR – Invoice Entry, Receipt Entry, Adjustment Entry,Invoice Batch List,Receipt Batch List,Adjustment Batch List
- GL – Journal Entry,Batch List
- OE – Invoice Entry, Order Entry ,Shipment Entry
- PO – Invoice Entry,Order Entry ,Receipt Entry

What’s New with this version;

1. This version of Document Attachment product is released as a Module (registered with Sage), so that standard Sage 300 transaction UI is not disturbed and patch updates don’t affect product and the system. It is compatible with Sage 300 ERP v6.1.

2. Ability to activate or deactivate Doc Attach module as per company

3. Users can configure UNC filename path in new Setup Screen and there is no need to maintain Document Attachment.ini file.

4. Users can also attach documents to historic transactions in Sage 300 (already posted transactions).

As a result, users using this Add-on with Sage 300 v6.1 will be able to attach, view various documents through Sage 300 transaction screens with ease.

Related Posts:

1. Email Standard Order Entry Invoice Report in PDF or RTF Format


Display Item Master Optional fields at Transactional Level in Sage 300 ERP

$
0
0

Several times customer comes across scenarios wherein they want to display item master optional fields at the transaction level. In such cases, User can make use of transactional optional field available feature in Sage 300 ERP, were they can fetch optional field present at the item master level to transaction level.

Consider a case, where we have an item master which has an optional field called as Manufacturer model number as shown in the below screen shot.

Also Read: Return Material Authorization in Sage 300 ERP

In this case, our Item number is different from that of optional field value present in Manufacturer Model Number.

Here, we might come across a situation, where we are preparing a PO receipt and manufacturer model number is base factor. We receive material on the basis of manufacturing number, instead of receiving it based on item number. 

Thus in this case, it is necessary that we display optional field value at the PO receipt transaction level. To do so we have to set the optional field as shown in the below setup screen.

In PO receipt screen, select appropriate PO against which you would like to make a PO receipt  Further come to detail line for that particular item and click on optional field which will show the Model number value which is directly coming from item master optional field.

In this way, we can fetch item master optional field in transactional level. Hence, this takes away the efforts required to look up several documents to find matching manufacturing number every time we make a PO Receipt and leads to a hassle free data entry.

Related Posts:

1. Assign Unique Serial Number to Individual Items in Inventory Control Module of Sage 300 ERP
2. Simplify Assembly using Sage 300 ERP

Item Pricing based on Multiple Unit of Measurement

$
0
0

In Sage 300 ERP, you can define selling price for single item based on multiple unit of measurement. Organizations can use this feature where the single item is sold in form of multiple units of measurement. This helps in maintaining prices in several units of measure mirroring your original business practices and takes away the need to change the practices to match the working of any new systems.

Say for example; a vendor selling cold drink, sells a single bottles as well as in Boxes, 1 box contains 10 bottles of cold drink. The selling price of single bottle is $5 and the price of cold drink box is $40.

You can configure the above set settings in Sage 300 ERP with help of base price type based on multiple units of measure. To configure navigate to Inventory Control >> I/C Items and Price List >> Item pricing

Also Read: Order Entry Transaction flow in Sage 300 ERP

1. In Item Pricing screen, select base price type. In case of single unit of measure based prices you can simply chose the default option in drop down for base price type as Unit of measure and then enter the price for single unit of measure, however to enter it for multiple UOM you need to select option as ‘Base price for multiple unit of Measure’.
2. After selecting the option, click on blue triangle, which would popup ‘Base Price for Multiple Units of Measure’ Screen.

3. In this screen, enter price for multiple units of measure.
4. Once done, close the window. Hence, you are ready to use the defined prices.

In OE Sales order entry or shipment entry the unit price will be picked up from system on the basis of selling unit of measurement selected for single item.

This way you can configure pricing in multiple units of measure and sell items at various prices with ease.

This feature helps user select multiple UOM at the time of sales with simple click of button in the Order Entry screen. This way the Order Entry becomes simpler without the sales person having to calculate and translate the prices in various UOM.

Related Posts:

1. Choosing Vendor Contract Cost over IC Vendor Detail Cost in Sage 300 ERP
2. Vendor Pricing Analysis in Sage 300 ERP
3. Create new Items by copying existing items in Sage Accpac ERP
4. Display Item Master Optional fields at Transactional Level in Sage 300 ERP

Data Activation Error in Sage 300 ERP

$
0
0

In this blog, we will be discussing about data activation error, which might occur while restoring database in Sage 300 ERP.

Error message: Sage 300 has detected module update inconsistencies that require activation. The following applications need to be installed and activated:

Bank Services 6.1A or newer version
Purchase Order 6.1A or newer version
Order Entry 6.1A or newer version

Also Read: Installation of Sage 300 ERP Workstation Setup

Sometimes after restoring data in Sage 300, when we try to re-open Sage 300 company desktop, we get the above mentioned error.

Following the instructions displayed in error, if we try to activate modules using Data Activation tool (Administrative services>>Data Activation), you may not find the concern modules in the activation list.

Reason:  The reason for this error message, is due to the difference between data level (product update) in the present installation of Sage 300 and the product updates mentioned in the recently restored database.  For e.g.; you have PU2 in present installation whereas the database that you restored is having PU1.  As a result of this you will not be able to open the company.

Solution:  In order to solve this follow below mentioned steps:

1. Install the product update compatible with the recently restored database.
2. Again restore the database.
3. Try to activate the modules (as shown in the error) from the Data Activation program.

4. Re-open the company.  Once opened verify the product updates from Help>> System Information.

Hence, by following the given steps users would be able to solve the data activation error occurred due to variation in product update of data and the system.

Related Posts:

1. IIS 405 PUT Method Not Allowed in IIS Manager
2. Cannot Login to Sage 300 ERP due to User Limitation
3. Data Integrity Check in Sage 300 ERP

Profit Margin Analysis in Sage 300 ERP

$
0
0

One fine feature of any business system is to generate profitability report in simple format for the decision makers in order to decide products or business segments to focus on. Sage 300 ERP does take care of this effortlessly using Selling Price/Margin Analysis Report in Inventory Control Module.

Let’s have a look at the working on this report in detail. Hence to view IC Selling Price/Margin Analysis Report screen navigate to Inventory Control >>I/C Price/Sales Analysis Reports >>Selling Price/Margin Analysis report.

1. Report sorting criteria has multiple options like Item Number, Category, Item Segment, Price and many others including the master level optional fields (additional attributes) that you have defined for the items.

Hence, once you have selected an appropriate Sort option; select the From and To criteria, the desired Price List.

This way, you can shortlist the specific Price Lists to be printed and can analyze the margins against those price lists.

Say for an example, you have a separate price list defined for Retail Customers as against the wholesale ones. Here, you can print reports only for the specific price list and check the margins that you are able to generate for the mentioned prices.

It will help you to plan pricing strategy for the future dates and analyze the trends in Sales, based on the changes in prices.

2. Then, select Location[s] for which you wish to run the report.

Here you can select to print a specific set of items and price lists, where the margin appears below a certain level.

For an example; you can set ‘Print Items with Margin Less than’ to a specific percent to view the items which are giving you lesser margins as compared to others.

An efficient purchase manager can certainly try and reduce the costs to attain higher margins based on this data.

3. Further, select calculate margin by option; which would calculate Margin against Average Cost, Standard Cost or Landed Cost etc. by selecting the check boxes.

After selecting the right criterion you can print the report and check the output.

Also Read: Vendor Pricing Analysis in Sage 300 ERP

Report shows the summary of the fields as follows:

1. The top part of the report shows details such as Company name, date and time along with the criteria selected before printing the report.
2. Report displays Item wise, price list wise and location wise costs along with respective costing unit of measure.
3. Next to that, column named ‘Type’ displays the costing method specified for that item.
4. Base price is printed for each item UOM wise and then the Margin Percent against Unit Cost is displayed. Margin Percent is calculated based on costing method defined for the item.
5. The Margin percent displays your margin for the items that you are selling on Base Price. Whereas costing method would be displayed in Type column.
6. Then, Discounts or Markup Price column, will display the Markup price defined for the 5 sets (A to E) defined in Price Lists of I/C.
7. Finally, the last column shows the Margin % that is calculated on Markup Prices at all the 5 sets.

Having such exemplary report helped us make necessary changes in our pricing strategy; hence helping us to increase our margins.

Related Posts:

1. Display Item Master Optional fields at Transactional Level in Sage 300 ERP
2. Item Pricing based on Multiple Unit of Measurement
3. Replace Optional Fields in GL Accounts of Sage 300 ERP
4. Propagating Optional Field Value from Posted AR Invoice into GL Entry in Sage 300 ERP

Shipping Labels in Sage 300 ERP

$
0
0

A simple but useful feature for a warehouse-based company is the easy availability to print out various labels and stickers that can be used while shipping consignments against customer orders. This seemingly small but noteworthy element helps reduce the time invested in writing down the addresses manually and adding up chances of human errors.

This follows the JIT principles (also known as Just in Time), which emphasize on importance of reducing human intervention in repetitive jobs and automating them to the maximum extent.

Say for an instance; To fit a bolt into a nut it only takes 2 rotations, the rest of the rotations are completely nonproductive and hence nut bolts with precisely 2 threads are invented and are being used in majority of automobile industries among others.

Similarly, in a regular trading/manufacturing company we can automate such data entry efforts (like printing shipping labels) and concentrate on the core processes that lead to value creation to the entire business.

Coming back to the subject, printing labels from systems helps us reduce the time invested in repetitive processes and can be utilized to more productive processes. Hence to print, Shipping Label navigate to Order Entry >>O/E Forms >>Shipping Labels

Also Read: Order Entry Transaction flow in Sage 300 ERP

1. Here, in ‘Select’ criterion, select shipping labels based on shipments, invoices and sales orders.

The intuitive screen gives a drop down to select document based on which the labels are to be printed. The default selection remains Shipment, but users can select Sales Order or Invoices to print labels.

2. To Reprint label[s] already printed, User can use the check-box named include labels already printed.

3. If the ‘Print only labels marked as required’ menu is checked, then system checks for any existing flags set for Shipping Labels Required in Order Entry Module. These flags are marked on by the users while printing picking slips in Order Entry (Order Entry>OE Forms>Picking Slips).

- Sort Items by Picking Sequence In Order Entry Screen -

This way you can print the shipping labels in Sage 300 ERP and make your packaging process faster and less time consuming.

Related Posts:

1. Landed cost in Sage 300 ERP
2. Profit Margin Analysis in Sage 300 ERP
3. Print Customer Statements in Sage 300 ERP

Paste Command in Financial Reporter of Sage 300 ERP

$
0
0

Financial statements are Excel worksheets with special Sage 300 functions that let us display account balance, currency exchange rates and company financials in wide variety of formats. Each financial statement is defined in a report specification.

The specification tells the Financial Reporter what data is to be included in the statement and how it should be formatted. Hence, to print Financial Reports in Sage 300 ERP, navigate to General Ledger >> Financial Reporter >> Print Financial Statements/Statement Designer

Also Read: Greytrix Extended Report Pack for Sage 300 ERP

Financial Reporter form contains two Financial Reporter icons:

Print Financial Statements – Lets you select and print financial statements using a large variety of print options. General Ledger uses Microsoft Excel to generate and print Financial Statements

Statement Designer – Lets you create, edit and test financial statement specifications using Microsoft Excel.

The statement designer has the following FR menu commands that make it easier to create and edit the Financial Reporter specifications:

- FR Paste: Inserts Financial Reporter functions, account numbers, and selection criteria.
- FR View: Generates financial statements from report specifications.
- FR Clear: Clears a previously generated financial statement.
- FR Options: Lets us specify whether the statement carries forward opening balances for budgets and quantities.
- FR Drilldown: Allows to drill down to the associated transaction.

Let us have a look on FR Paste Command  in detail.

In statement designer, FR Paste lets you paste the following items in the spreadsheet cells: Account Numbers, Account selection criteria, Financial Reporter Functions (FRACCT, FRAMT, FRDEBIT, FRCREDIT, etc.)

In FR Paste form, choose a function, account reference or expression from the Function list.

The details of each function individually are as follows:

1. FR – The FR function provides information stored by the Common Services Company form, the Calendar form, and the G/L Options form.

2. FRACCT – It includes account data including account optional fields data
3. FRAMT, FRAMTA, FRDEBIT, FRCREDIT – Includes fiscal set data, balances and net changes
4. FRPOST – Retrieves transaction records including transaction optional field data from posted transactions and account optional fields data from the specified account in the transaction record
5. FRTRN, FRTRNA – Retrieves data from transaction details
6. FRTRNDR, FRTRNCR – Retrieves transaction data for stated fiscal period
7. FRFISCAL – Retrieves fiscal calendar dates
8. FRRATE – Retrieves exchange rate
9. FRSDESC – Retrieves segment code descriptions

Hence, the FR Paste command inserts a function in the current cell, and prompts for each parameter of the function so that the parameters don’t have to be memorized.

Related Posts:

1. Financial Reporter made reporting tranquil in Sage 300 ERP 
2. Financial Reporter in General Ledger Module of Sage 300 ERP
3. Statement Designer Error in Financial Report of Sage 300 ERP

Financial Reporter Commands in Sage 300 ERP

$
0
0

In our previous blog, we discussed about “Paste Command in Financial Reporter of Sage 300 ERP”.

Now, we will discuss about other command options in detail: FR View, FR Clear, FR Options, and FR Drilldown.

1. FR view is used to test the financial statement specifications. It can be find in FR Menu of Financial Statement Designer (Excel).

When you select FR View, it displays a dialog box from which you can choose various report generation options.

2. FR Clear command deletes the Report range from specification spreadsheet. It is usually used before saving final version of a specification after developing and testing it.

Also Read: Order Entry Reports in Sage 300 ERP

3. FR Options command specify whether the opening budget or opening quantity amounts on a financial statement should be carried forward from the year prior to the year being inquired. In FR option;

- Use Budget Opening Balance – is used to display the budget amount carried forward from the previous year.

- Use Quantity Opening Balance — is used to display quantities carried forward for accounts that use the Maintain Quantities option.

Note: These options are not selected as defaults.

4. FR Drilldown command lets us view original transactions after a report has been generated in the Financial Statement Designer. It works only with formulas that contain the following transaction functions:

- FRTRN
- FRTRNA
- FRTRNCR
- FRTRNDR

To view the transaction(s) that is accumulating this balance in the account, we can right click the balance amount cell and then click on ‘Drill Down’. This will open transactions, which are accumulating this balance in the account.

To use The ‘Drill Down’ function we need to mark the check-box ‘Drill Down Information’ (as shown in the image below) while printing the report.

Thus FR Reports not only help us build various GL Based reports all by ourselves, but also enables us to view the details of each of the transactions and analyze the data better.

Related Posts:

1. Financial Reporter made reporting tranquil in Sage 300 ERP
2. Financial Reporter in General Ledger Module of Sage 300 ERP
3. Statement Designer Error in Financial Report of Sage 300 ERP


Generate Reports for Slow Moving Items in Sage 300 ERP

$
0
0

In Sage 300 ERP (formerly Sage Accpac ERP), you have an option to generate report for Slow Moving Items i.e. items which are not selling well in organization so that you can focus on items which need more attention from the point of sales and marketing.

To run this report in sage 300 ERP, navigate to Inventory Control >> I/C Stock Control Reports >> Slow Moving items

Here, you can sort report in many ways like Item Number, Category, Item Segment, Price and many others including optional fields of item master that you have defined for the items.

Then, depending on the criterion that you have selected in ‘Sort By’, you have to define the range in ‘From’ and ‘To’ options to list out the items in output report otherwise by default Sage 300 ERP will generate the report for whole range.

Also Read: Shipping Labels in Sage 300 ERP

Further, you can put some more constraints on items to get slow moving item’s report in exact format which user desires and that are :-

a. No Sales for More than –  It defines the number of days for which no shipment of slow moving items were posted in Inventory Control or Order Entry of Sage 300 ERP.

b. Year-To-Date (YTD) Turnover Less than – It includes items, which have YTD turnover less than the number of times entered by the user.

And, YTD turnover of particular item can be calculated as:

c. Period-To-Date (PTD) Turnover Less than – It includes items, which have PTD turnover less than the number of times entered by the user.

And, PTD turnover of particular item can be calculated as:

d. PTD Units Sold Less than YTD Average by More than – Include items with fewer sales in the current period than the year-to-date average, by the percent you specify. Where,

e. YTD Units Sold Less than Last Year’s Average by More than – It Include items with lower average sales in the current year than the last year’s average amount, by the percent you specify

f. Average Days between Shipments Greater than – It includes items for which no quantity has been shipped for the average number of days defined by the user.

Before Printing Report for Slow Moving Item’s Report, you should check beforehand that the ‘Keep Item statistics option’ is checked in Inventory Control >> I/C setups >> Options, to generate report for inventory.

Hence, after selecting appropriate options, we would get output in following format.

You can export this report in excel format by navigating to the export option which is present in the top left most corner of the output report.

Then, select OK to export the file.

Hence, report of Slow Moving Items helps organization to keep track of all goods/items which needs attention i.e. by analyzing this report you can decide whether you want to have this inventory from the next time or not; or it needs some marketing to be done.

Related Posts:

1. Profit Margin Analysis in Sage 300 ERP
2. Item Pricing based on Multiple Unit of Measurement
3. Display Item Master Optional fields at Transactional Level in Sage 300 ERP

Enter Quantity against Account Number in GL Journal Entry of Sage 300 ERP

$
0
0

In Sage 300 ERP (formerly Sage Accpac ERP), GL Journal Entry provides a simple way of managing transactions from all module like AP, AR, OE, PO etc. It lets user keep statistical as well as financial information for accounts.

Whenever user sold or purchase goods and generate invoice for the particular transaction in Sales/Purchase Order module, the same in turn get reflected in General Ledger. General Ledger saves the transaction amount based on account no instead of item no., qty etc. as in SO/PO. Here, it may happen that user want to include number of quantity against the specific GL account to indicate the number of units purchased or sold in Sales/Purchase Order module.

Also Read: Material Requirement Planning in Sage 300 ERP

To do the same you can follow below mentioned steps:

Select “Maintain Quantities option” in 2 different places as mentioned below.

1. Account Tab of G/L Option: Turn on the Maintain Quantity option and enter no of Decimal places as shown above. If user wants, then he/she can only increase the no of decimal places (up to 3).

Note: Once this option is checked, it cannot be turned off again.

 2. Detail Tab of G/L Account: Once Maintain Quantity option is checked in G/L Option, go to Detail tab of G/L Accounts and Select Maintain Quantities.

  You can also assign unit of measure to those account for which you need to enter quantity.

Once the above two options are checked, user will be able to enter value in quantity field of GL Journal Entry against the particular GL Account.

This way “Maintain Quantity option” helps user to indicate no of units sold or purchased against a Specific Account No.

Related Posts:

1. Monthly Audit Methodology in Sage 300 ERP
2. Fiscal Set Comparison in Sage 300 ERP 2012
3. Configure Reverse Charge Mechanism for Service Tax in Sage 300 ERP

Provisional Posting in Sage 300 ERP

$
0
0

Once a GL Batch is posted permanently then there is no option available to edit the posted batch. Sometimes user may want to check the effect of transactions in Journal Ledger, before posting them permanently in order to avoid any mismatch in transactions or to check whether all entries have been made correctly. In such situations Sage 300 ERP provide an option for temporary posting of GL Batches i.e. Provisional Posting.

Provisional Posting simply means Temporary Posting. In order to user this feature User need to select “Allow Provisional Posting” option in GL Options >> Posting Tab.

Once the above option is ticked, they can see a new button Prov. Post in GL Batch List UI.

Also Read: Year End process in Sage 300 ERP

Using the Prov. Post button, user can post the batch temporarily and its status shows Prov. Posted. After Provisionally posting the batch, user can edit  and again post it either provisionally or permanently.

In case user want to provisionally post all batches or a range of batches, they can do the same from GL Transactions >> Post Batches.

This feature become useful especially when you are doing period end adjustments etc. to ensure that you have entered all transactions correctly before post them permanently.

Related Posts:

1. Propagating Optional Field Value from Posted AR Invoice into GL Entry in Sage 300 ERP
2. Restrict users access of GL Accounts in Sage 300 ERP
3. Replace Optional Fields in GL Accounts of Sage 300 ERP
4. Exclude Inactive Accounts option in GL Chart of Accounts Report of Sage 300 ERP

Change Print Destination in Sage 300 ERP

$
0
0

After login to Sage 300 ERP as Non ADMIN user, sometimes we face problem while printing reports, if proper rights are not set. Hence, to overcome this problem;

1. Navigate to Administrative Services >> User >> Create or select user. For instance, we have selected ADDON.
2. Then go to Security Group and create Group ID, for an instance: ADDON.

3. Now, go to User Authorization >> Select User ID as ADDON and give access rights.

Now, login to Sage 300 ERP by user ADDON, and try to print Purchase Order Entry report. It will not allow you to print report using Print Destination functionality. However, by default in bottom left corner you will see Printer option. Hence, Go to File menu and you can see, Print Destination option is disabled.

Also Read: Closing Procedure Checklist for Sage 300 ERP

For using Print Destination, you need to give rights to the user if logged in other than ADMIN.

Follow below steps to give Print Destination rights:

1. Login as ADMIN in Sage 300 ERP and follow above steps 1, 2, 3
2. In Security Groups select Application as Administrative Services and check Change Print Destination icon.

3. Now re-login to Sage 300 ERP with user ADDON, and check for File menu header and left bottom, double click on highlighted icon [below], Print Destination screen would popup.

Hence, with the above mention simple settings, user can provide rights in security groups for Print Destination.

Related Posts:

1. Print Customer Statements in Sage 300 ERP
2. Generate Reports for Slow Moving Items in Sage 300 ERP
3. Customer Transaction and Aged Trial Balance Report in Sage 300 ERP
4. Account Receivable Transaction Reports in Sage 300 ERP

Set Print Destination in Sage 300 ERP

$
0
0

In our previous blog, we discussed about “Change Print Destination in Sage 300 ERP”. Now, we would discuss about the Print Destination in detail.

Sage 300 ERP (formerly Sage Accpac ERP) provides various features for Reports; users can print report, preview, export, make a file for it or can directly send report through an email. Users can also manage paper size as per their organisational needs.

Hence, follow below mentioned steps for printing reports using different destinations:

1. In Sage 300 ERP, navigate to File menu >> Print Destination or user can use bottom left hand side corner print icon to change Print Destination.

2. A standard Print screen will appear where users can select Print Destination.

Whenever, user click on any one of the print options a screen pop-ups. Here they can set printing destination as per their requirement.

Printing Destinations:

1. Printer: You can print reports using this option. After selecting Print Destination as Printer, navigate to Purchase Order module >> PO Forms >> Purchase Order Report and Print purchase order

Click OK button and select path of Printer to Print report.

Note: Printer should be installed on your machine. It also works for printer linked to other networks.

2. Preview: You can view Standard Sage 300 ERP reports using this option. Hence to view,

a. Select Preview option and navigate to Purchase Order module >> PO Forms >> Purchase Order Report and Print purchase order.
b. You can view Sage 300 ERP’s standard report as shown below

Also Read: Email Standard Order Entry Invoice Report in PDF or RTF Format

3. File: Here you can view report in any file format provided by Sage 300 ERP. Hence,

a. Select File option and navigate to Purchase Order module >> PO Forms >> Purchase Order Report and Print purchase order
b. Here you can export a report at path you want and in formats specified. Eg. Adobe Acrobat (PDF), Microsoft Excel 97-2000(XLS), etc.
c. You have option to select Destination for file, where you want to export the report

4. Email: Using this option, report can be email as an attachment provided you have Microsoft Outlook configured. As a result, to send report as an attachment,

a. Select File option and navigate to Purchase Order module >> PO Forms >> Purchase Order Report and Print purchase order
b. You can email report in either PDF format or Rich Text format.
c. Once selected report is attached directly to the Outlook as per the file format selected.

Note: Microsoft Outlook should be installed proper on your system for using this functionality.

The above explained is just an example given for printing Purchase Order; you can use these functionalities for almost all modules in Sage 300 ERP as this is an Inbuilt functionality. These features are reliable and flexible, also it is provided in all editions of Sage 300 ERP. It also works if you have added any customisations in Sage 300 ERP.

Related Posts:

1. Print Customer Statements in Sage 300 ERP
2. Generate Reports for Slow Moving Items in Sage 300 ERP
3. Customer Transaction and Aged Trial Balance Report in Sage 300 ERP
4. Account Receivable Transaction Reports in Sage 300 ERP

Viewing all 1489 articles
Browse latest View live


<script src="https://jsc.adskeeper.com/r/s/rssing.com.1596347.js" async> </script>