Quantcast
Channel: Sage 300 ERP – Tips, Tricks and Components
Viewing all 1486 articles
Browse latest View live

Use Multiple Windows in Sage 300 ERP

$
0
0

Sage 300 ERP has various basic features that users are unaware of; one of those features is using multiple windows in Sage 300 ERP.

Say for an instance, it can be very annoying in a situation, where you have client who require information about more than one O/E Order at a time. Hence, it becomes tedious, to go through Order Numbers and provide information to him. To avoid these situations, Sage 300 have provided a solution of using more than one screen for OE Order entry.

As a result, to open multiple screen, instead of left click, right click on Order Entry icon >> go to Properties below screen will popup

Also Read: Material Requirement Planning in Sage 300 ERP

Check Start Multiple Copies Check-box and click on Apply. Now, you would be able to open more than one OE screen at a time.

This multiple screen opening is for almost every screen in Sage 300 ERP, but we have highlighted OE Order Entry as it is most often used. This is very useful while finding information for same screen but for different order, giving support to client, etc.

Related Posts:

1. Differentiate Sage 300 Companies with different Color Screen
2. Hide fields or object in Sage 300 ERP
3. Reverse Transaction feature in Sage 300 ERP
4. Creating Purchase Orders from Order Entry screen in Sage 300 ERP


Enhanced features in Greytrix Document Attachment for Sage 300 ERP

$
0
0

In our previous blog, we discussed about “The release of latest version Document Attachment for Sage 300 ERP 2012”.

In this blog, we would discuss about various features that it provides such as;

1. User wise default source directory path setting for Sage 300 ERP 2012
2. User wise security with UI customization to Hide/Unhide different buttons according to user rights

A] User wise default Directory path: In latest version of Document attachment module for setting user wise default source directory path, new setup screen User wise Document Directory path is provided. With this setup screen, user will be able to set user wise source directory path, from where he/she can attach documents in all transaction screens. Admin user can set access right for this screen in Security group.

- You can find User Wise Directory path UI from Greytrix Document Attachment >> Setup >> User Wise Directory path

- To set default source directory path, you need to select Sage 300 user ID and path for that particular user; then click on Save button.

- Also, you can set default source path with by checking enable default path check-box. This path will be used for those users for whom you have not set source document path.
- If Default source path is not set on the setup screen, then on the transaction screen Document path will remain blank.
- Now, when you login with this USER in Sage 300 and open document attachment transaction screen this source path will be defaulted to doc attach tab.

Also Read: Set Document Numbering for Sage 300 ERP on the combination of Account Set and Location

B] Security Access Rights to customize the UI user wise: Customize Doc Attach menu option is provided under File Menu for customizing UI for security access rights. Similar menu is available on all the Document attachment UI’s.

- If you want to hide delete button from particular user, then you need to select the UI Profile and uncheck delete button.
- Save this profile and assign it to user for which you want to hide delete button from Document attach tab on the order entry UI. This is similar to the standard Sage 300 customize UI option.

Note: This menu is only accessible to the Admin users.

- Hence, if you now login with user for whom you have assigned the profile. You can see delete button is not present on doc attach tab on Order Entry screen.

Hence, you can set proper security access to user like Add/Modify/Delete/View user wise and also default source path for transaction screen for each user which will save time for searching the path to attach the documents to transactions.

Related Posts:

1. Greytrix Document Numbering Series for Sage Accpac ERP
2. Configuring Document Numbering for Sage 300 ERP
3. Grouping feature in Document Numbering Series for Sage Accpac

Sales History Report in Sage 300 ERP

$
0
0

It is very important to keep track of sales, revenue that a Sales team has generated and the amount of commission payable to Salesperson. This information is very crucial for any organization to maintain record for sales staff performance by territory or location, and to indicate the strengths and weaknesses in company sales, which will help to identify the areas where they have to work to raise their sales.

Sage 300 ERP has brought this crucial information together in form of a report, which is known as “Sales History”, where you will find Order Entry module/OE reports.

Sales History report provides summarized or detailed sales information, including sales totals by customer, inventory item, or by primary salesperson.

1. Report Type: Detail

OE Sales History Report provides filter criterion for following;

Customer: To identify who are our regular or loyal customers.
Salesperson: To record performance of a particular Salesperson.
Item Number: To record, which particular item has higher Sales numbers as compared to others.

User can also select sales history by year, period or by document date. If we sort by item or customer, we can include invoice details too.

Detail report prints details of invoices, debit notes, and credit notes, sales returns and cost amounts for each invoice.  With Invoice detail actual output can be viewed as below,

Also Read: Greytrix Extended Report Pack for Sage 300 ERP

2. Report Type: Totals

When user select report type as Total, along with the option provided such as Select By, From and To Year etc., user get an option named ‘Show Comparison’ check box. This checkbox helps user to compare sales sorted by item or customer period wise.

If we refer to above report where sales for particular customer is compared based on period.

For Example: Sales amount Period One displays $ 62.50 and Sales amount period two $ 522.53 and the last column shows variance in percent i.e. 88.03874%. Hence, this data conclude that the sale in period one is less than period two for 1100 customer.

As a result, based on data user can efficiently track and record sales, which will forms the basis of “Sales Journal”.

Related Posts:

1. Generate Reports for Slow Moving Items in Sage 300 ERP
2. Shipping Labels in Sage 300 ERP
3. Profit Margin Analysis in Sage 300 ERP
4. Financial Budgeting in Sage 300 ERP

Migrating your Sage Pro Company Database to Sage 300 ERP using GUMU Migration services

$
0
0

Moving data from a legacy system to a new enterprise system is always a challenging job, especially when it is historical information. Sage Pro ERP is one of such systems from whom moving historical data require expertise hands.

We [Greytrix] have been working on Sage Pro ERP since its SBT days. We have been awarded Sage 300 (formerly Accpac) Development Partner of the Year and have a Sage Certified Solution for migration to Sage 300 ERP. Thus, we know in and out (both in terms of technical architecture and functional behavior) of both Sage Pro and Sage 300 ERP systems.

Thus, to help Sage Pro users move to Sage 300, we have developed GUMU migration solution, wherein we convert all the historical data of AP and AR modules along with GL module. GUMU convert data from all the standard modules of Sage Pro system to Sage 300 system without any limitation on the number of historical years.

Also Read: GUMU – A Sage Certified migration solution by Greytrix

Our migration services include one test and one live conversion so as to make the live data is accurate. All this is provided at a fixed cost. To know more in detail of what’s migrated download feature list from our website.

In data migration, most users are concerned as how can they change the existing masters? For this, we have a very simple process, in which we extract all the master information from Sage Pro into a spread sheet and ask users to provide the proposed master code to be entered in the new system.

Data/record merging is also one of key features wherein we merge duplicate records into a single record along with their transaction details.

Before we proceed further, let’s have a glance at some advantages of GUMU Migration service for Sage Pro – Sage 300 ERP;

1. Data inconsistencies: We correct data related issues and make the data consistent with the destination ERP.
2. Support all Sage Pro versions: There is no version related limitation to it. We convert data from almost all Sage Pro versions to Sage 300 ERP.

The above discussed is our standard migration process, however, if you wish to convert data from User defined custom fields in Sage Pro ERP; then we honor those requests as well and convert them into Sage 300.

Hence, by selecting Greytrix as your migration partner, you don’t have to take pain of migrating data yourself; we would take care of it so that you can devote your valuable time to other important tasks.

To know more about our migration services, drop us a mail to erpmig@greytrix.com.

Related Posts:

1. What do you want to migrate to Sage ERP
2. Migrate data from Sage 100 to Sage 300 ERP with GUMU Solution
3. Migration of Banks from QuickBooks to Sage 300 ERP
4. Migration of Purchase Payment from QuickBooks to Sage 300
5. Modification of Balance sheet Report in Sage 300

Hide and Restore columns in Sage 300 Grid

$
0
0

Since Sage 300 ERP v5.0 onwards, it has becomes easier to hide and show columns in a data entry grid. It makes user speed up data entry process and makes it easier to view important information.

For example, in Purchase Order Entry UI if user don’t want to see Drop Ship, Unit of Measure etc. columns then, Sage 300 provide very simple but very useful functionality called as Hide and Restore columns.

PO Purchase Order Entry

Also Read: Use Multiple Windows in Sage 300 ERP

To hide the Drop Ship column place the mouse cursor on column to be hide and right click on it. Option will appear as shown in above image. Select the option Hide Drop- Ship; this will hide the drop ship column in grid. In the same way users can hide multiple columns.

PO Purchase Order Entry

To restore hidden columns put mouse cursor, on any column and right click on it; options will appear as shown above. User can restore all the columns in one click by selecting option Restore Defaults or can restore particular hidden columns by select that particular option.

Hence, this option will hide unwanted column in grid and to restore them as and when required by the user. As Sage 300 retains column preference by User Id and Transaction screen, any changes made to column sequence will be remembered next time User uses it. However these changes will not affect any other user or any other transaction UI.

Related Posts:

1. Hide fields or object in Sage 300 ERP
2. Hide Inactive records in Sage 50 US Edition
3. How to hide customized screens and Reports for some users
4. How to hide custom control when relevant tab is not active

GUMU Sage ERP Migration Services – An Overview of Process

$
0
0

Data migration is a key element which you consider before adapting to any new system. It can be a fairly time-consuming process and can be painful at times. That’s where our Fixed Cost, No effort migration services come in picture. We provide 1 test and 1 live migration at a Fixed Cost so you are doubly sure of the data which is being migrated with no worries on cost over-run.

We migrate complete (Sales, Purchase and GL) historical data from legacy system to target system of all the standard modules. We try our best to keep data conversion downtime (i.e. couple of working days) at the most minimum, so you can kick start using your new system right away and start doing business. All this said, let’s have a walk through the migration process that we follow in order to convert the data.

Also Read: GUMU – A Sage Certified migration solution by Greytrix

Our GUMU™ Migration Utility converts data from various legacy system to Sage ERP Systems such as Sage 100 (formerly known as Sage MAS 90/200), Sage 300 (formerly known Sage Accpac ERP) and give users a smoother data conversion experience.

- Migrate data from Sage 100 to Sage 300 ERP with GUMU Solution -
- Migrating your Sage Pro Company Database to Sage 300 ERP using GUMU Migration services -

A Migration project consists of two Stages i.e. 1 test and 1 live. We follow this approach to make the live data conversion as accurate and smooth as possible. The timeline for standard migration (which includes migration of GL, AR, AP, IC, SO and PO modules) depends on factors like size of data etc.

Now, let’s have a quick glance to find out as why we do two conversions -

>> Test Migration: During this, we convert source data and migrate it to specified Sage ERP system. Below given are some benefits of doing the Test Migration –

a. We note all the migration hiccups, data ambiguities that need’s massaging.
b. Exact time-estimate for the Live conversion
c. Planning the Schedule of the live conversion to minimize the downtime
d. We make note of all the suggestions/correction that users will have after the test conversion so that we can implement them during the live conversion.

>> Live Migration: Once you are done with the verification of the Test converted data, we proceed with the live conversion. Process is similar to what you have followed during the test.

In order to start with the migration, we require following;

1. Details of source ERP system’s version and edition (e.g. QuickBooks enterprise 2013) so that we can accordingly make preparation to fetch data from the system.
2. Details of target ERP System version and edition (e.g. Sage 300 Premium 2012) so that we can create similar set up accordingly to legacy system and bring in the source data.
3. List of modules to be converted (such as GL, AR, AP, IC, SO and PO)
4. Years of History needs to be converted, if interested in historical information
5. Live conversion schedule so that we can accordingly plan the data migration
6. Any specific mapping sheet (for more details read this); or otherwise we bring in the source master data as it is.

GUMU™ makes your worry less and provides a smooth and accurate data migration to your Sage ERP system. For more details on data migration, drop us a mail at erpmig@greytrix.com.

Related Posts:

1. What do you want to migrate to Sage ERP
2. Data migration from your accounting system to Sage ERP
3. Migration of Purchase Payment from QuickBooks to Sage 300
4. Migration of Banks from QuickBooks to Sage 300 ERP

Sellable and Non-sellable items in Sage 300 ERP

$
0
0

In Sage 300 ERP, user can add new items from Inventory Control >> Items and Price List >> Items. Here in Item master, user can create various types of items such as Stock Items, Non Stock Items, Sellable Items, Non Sellable Items, Kitting Items, etc.

In standard Sage 300 ERP, there are both Sellable and Non Sellable items present. For sellable items, Unit Price and Unit Cost is defined in Item Pricing and Location Details. As for Non Sellable items, it can be considered to be free of cost.

Consider an example; if you are buying two items and one of which you are getting free. Here, item which you are buying is sellable items and free item is non-sellable.

Also Read: Generate Reports for Slow Moving Items in Sage 300 ERP

Let us consider, F2-100/L item is a non-sellable item. Hence, go to Item master, you can view Sellable option is unchecked.

IC Items

If user makes any OE Order Entry transaction using this item F2-100/L, error message would be given.

OE Order Entry

This is because you cannot make Order Entry and Purchase Order against non-sellable items. To make this item to be used in OE and PO transactions it is mandatory to make item sellable. For this navigate to Item master and check Sellable option.

IC Items

Now, users can use this item F2-100/L for making transactions.

As a result, item can be converted in sellable or non-sellable items allowing user to provide restrictions on items that can be used while transactions in Sage 300 ERP.

Related Posts:

1. Item Pricing based on Multiple Unit of Measurement
2. Display Item Master Optional fields at Transactional Level in Sage 300 ERP
3. Shipping Labels in Sage 300 ERP
4. Sales History Report in Sage 300 ERP

Manufacturing Order Process in Sage 300 ERP

$
0
0

Sage 300 ERP provides an efficient Manufacturing Operation Flow covering material consumption, processing manufacturing orders, work in progress, routing cost calculation, material scrap. It also provides up-to-date item statistics, including on-hand quantities, current purchase orders, work orders, transfer orders, and other elements that affect planning decisions.

Say for an instance; if company gets an order from a customer for 1000 units of item (say Table lamps), then the concerned person in the company will first check if the required quantity is there in the stock. If he finds that the required Quantity is not in hand, he will have to manufacture the order.

He can then calculate the raw material required to create the finished goods (BOM) in the masters and send the same to the warehouse for production. Once the raw materials are available for production, it can be assembled into finished goods. These finished goods have to be sent back to the warehouse for shipment to the customer.

Also Read: Using BOM and Assembly to Convert Items in Sage 300 ERP

Hence, for setting these Manufacturing Order process in Sage 300 ERP, we need to start with setting up BOM (Bill Of Material) in the system.

Bill of Material [BOM]: Production Entry provides bill of materials, and real-time costing from Inventory Control. As a result, to create BOM (Bill of Material), assemble items has to be created in “master items” to sell. To define BOM, navigate to Inventory Control-> I/C Items & Price List-> Bills of Material.

Defining Bill of Material (BOM) includes the following steps:

1. Input FG Item number in the master Item NO field.
2. Input BOM No
3. Insert Build Quantity (the quantity that would be produced or minimum production of quantities)
4. Enter Variable Cost ( Overhead cost per 1 Build Quantity)
5. Input Component Item No to produce the Build quantity and the respective units that would be used for this component item.

Image

Sage 300 ERP can synchronize manufacturing with purchasing, sales and receivables, and accounting business and put your business on the road to continuous improvement. Thus, Sage 300 ERP supports bills of material levels and real-time costing from Inventory Control.

Let us see how to use this process in Sage 300 ERP in our next blog…

Related Posts:

1. Simplify Assembly using Sage 300 ERP
2. Shipping Labels in Sage 300 ERP
3. Transfer of Excise duties along with Inventory Transfer in Sage 300 ERP


Invoice Retention in Sage 300 ERP

$
0
0

Many a time customer withholds payment for part of an invoice until certain terms are met with the organization working on a project. Customer may retain amount until the project is completed, or until the project reaches a specified stage of completion.

Sage 300 ERP allow us to setup these settings in the system, so that working with this type of invoices becomes easy and efficient.

Below steps demonstrate how to set customer for retention Invoices.

1. Setting at Master Level:

AR Customers

To set-up any customer for retain age payment, firstly we need to define some fields in customer master as mentioned below,

a) Retainage %: We have to define, what % of total invoice amount the customer is retaining with him. For Instance, Suppose Invoice total is 10,000$ and Customer is retaining 2,000$ with him that makes 20% of total invoice. Here we will define 20%.
b) Retention Period: Here we need to define the number of days after which fresh invoice of retained amount to be send to the customer. Say for an instance; System will create a fresh invoice of amount 2000 $ after 60 days from invoice date.
c) Retainage Terms: Here define due term of fresh invoice.

Also Read: Profit Margin Analysis in Sage 300 ERP

2. Setting at Entry Level:

OE Order Entry

To apply retainage functionality to a particular entry we need to check two check boxes at header level named as Job related and Retainage in order tab of order entry

As we click Retainage check-box a new tab “Retainage” would appear.

OE Order Entry

3. Create Retainage Batch:

We will find “Create Retainage batch” option in Account Receivable >>A/R Periodic Processing

When we run this utility a retainage invoice will automatically get created, provided that particular customer has exceeded his Retention Period.

Retainage invoice will be of amount the customer has retained.

4. Aged Retainage Report

Navigate to Account Receivable >>A/R Transaction Reports >>Aged Retainage, to print Retainage Report.

AR Aged Retainage Report

The Aged Retainage Report form lets you print reports of outstanding retainage amounts, including retainage that is overdue and retainage that is due in future.

Hence, if you follow these procedures retention invoices can be handle very efficiently in the Sage 300 ERP.

Related Posts:

1. Account Receivable Transaction Reports in Sage 300 ERP
2. Customer Transaction and Aged Trial Balance Report in Sage 300 ERP
3. Print Customer Statements in Sage 300 ERP

Different Costing methods in Sage 300 ERP

$
0
0

An inventory valuation allows a company to provide a monetary value for items that make up their inventory. Inventories are usually the largest current assets of any business, and proper measurement of them is necessary to assure accurate financial statements. If inventory is not properly measured, expenses and revenues cannot be properly matched and a company could make poor business decisions.

In Sage 300 ERP, there are “8” costing methods defined for inventory valuation. Let’s discuss about all costing methods in detail:

Costing Methods

Also Read: Closing Procedure Checklist for Sage 300 ERP

1. FIFO (First In, First Out): In Sage 300 ERP, we will find this costing method in I/C account sets. In this costing method, it is assumed that the individual units of items are consumed in the same sequence as they are purchased. This type of costing can be used in scenarios where item does not lose its value over time with storage and there is regular flow of items in the warehouse.

Note: It is not necessary that the units are actually consumed in the same sequence of their arrival into the system, but for costing purposes it is assumed that the consumption pattern is same as receiving pattern.

Say for an instance; if a Company buys 10 qty. of item “X” for $10/unit cost and then buys 5 more qty. at $15/unit cost.  So, by FIFO Method Company would assign $10/unit cost of 10 items at the time of sell. Then would assign $15/unit cost for next 5 items to be sold.

2. Weighted Moving Average Methods:  In this method, based on every transaction of the item, cost of item will get updated with the latest cost. Formula used is (Current Quantity * Current Cost + New Quantity * New Cost) / (Current Quantity + New Quantity).

Weighted average cost method overcomes the drawback of FIFO method of not considering inflation in Costing. Weighted average method reflects market cost better than FIFO.

For example; if a Company buys 10 qty. of item “X” for $10/unit cost and then buys 5 more qty. at $15/unit cost.  So by average costing method costing will be (10*10+5*15)/ (10+5) = $11.66

3. LIFO (Last In, First Out):  LIFO method is not used in India, but is widely used in US and European Countries. This method assumes that the items, which were received last, are consumed first. (This method is not used in Indian accounting system; but this method is widely used in Vegetable market in India, as all consumers want ‘Fresh’ stocks and price of vegetables are updated with the latest cost. Classic LIFO). As can be seen, this method approaches closest to the current cost.

For example, if a Company buys 10 qty. of item “X” for $10/unit cost. Then buys 5 more qty. at $15/unit cost.  So by LIFO Method Company would assign $15/unit cost of 5 items at the time of sell. Then would assign $10/unit cost of 10 items in next sell.

4. Standard Costing: In Sage 300 ERP, Standard Cost is the simplest inventory valuation method. In this method, cost is determined by value assigned for the item in the Standard Cost field in Item Maintenance Main tab. Standard cost does not change unless you manually enter a new cost for the item.

The total inventory value of each item equals the quantity on hand multiplied by the standard cost. As items are sold, standard cost is used to determine the cost of goods sold. This method is appropriate only if the standard cost for each item does not change frequently.

Disadvantage of Standard Costing: It does not consider the ‘actual’ costing and hence if the revision in Standard cost in system is not done on regular basis the variance between Actual and Standard/system cost can be high and can result in misleading data in system.

5. Most Recent Cost:  In Sage 300 ERP, this costing method is determined by the recent cost for that item. Inventory will update with most recent cost at the time of purchase.

For example,  if a item “X” is purchased for $10/ unit; first time inventory will update $10 Cost for that item, if that same item is purchased second time at $12, then inventory will update with $12 for that item from the logic of most recent costing method.

6. Lot number method:  In Sage 300 ERP, if you have procured Serial and Lot tracking module you will see this option in IC accountàcosting method option

Items can be grouped and identified by lots for costing and tracking purposes. Lot Number method is appropriate for items that must be identified in groups of units and is often used by food, drug, and chemical manufacturers or distributors. The quantity and cost associated with each lot is retained for each item.

In addition, a lot identification number must be used whenever units received or issued (sold) out of inventory. If more than one lot is involved in a receipt or issue, each lot number and quantity of the transaction must be entered. Because lot number is specified when units are sold, the cost of goods sold matches exactly the purchase cost of the items in the lot.

7. Serial Method:  In Sage 300 ERP, if you have procured Serial and Lot tracking module you will see this option in IC accountàcosting method option

The Serial Number method allows you to identify each item with a unique serial number, and retain purchase cost of each item separately. This is often required for large-ticket items such as appliances, computers, furniture, and stereo equipment. Because serial number is specified when units are sold, the cost of goods sold matches exactly the purchase cost of the items in the lot.

8. User Specified costing method: – In Sage 300 ERP, this costing method is generally used for non-stock items but can be used for stock items too. With User Specified Costing, we have to enter unit costs at the time of shipping. While using this costing method, you have to define cost on every transaction.

Hence, depending on the costing method, financial management team can choose preferred costing method. The costing methodology employed can cause significant variations in your financial results. The organization should identify how its inventories are utilized and match this movement with the method that best mirrors its flow.

Related Posts:

1. Profit Margin Analysis in Sage 300 ERP
2. Project Invoicing Feature in Sage 300 ERP
3. Create Jobs related Sales Orders in Sage 300 ERP

User Role and Security Application in Sage 300 ERP

$
0
0

Sage 300 ERP System provides different users to login to same desktop with different security features provided by administrator. By doing so, an administrator can manage different users with different access rights.

Suppose; if a user has access right to only Account Payable Module in Sage 300, then he can’t access Account Receivable or any other module. The impact of this facility has a great role in an ERP system for the security purpose.

Let’s see how User Roles and Security Application can be applied in Sage 300 ERP;

1. At first; Admin User in Sage 300 ERP System has to create different users and set password through Administrative Services Users function.

Users

2. Later Administrator can create or assign created security groups to particular users depending on their role and function. For example; administrator here creates a user JOHN which has been granted with several access rights through Group ID –APUSER as shown in the following screen shot.

Security Groups

3. Users assigned with that particular Group ID –APUSER are authorized to use only those particular modules which have been assigned to them

User Authorizations

Also Read: Material Requirement Planning in Sage 300 ERP

4. Now, whenever User login to Sage 300 ERP, Sage 300 system asks user to provide password while login as set by admin.

Open Company

Note: Authorization features will only work if enabling application security option in the database setup has been checked in the following screen shot:

SQL Server Database Profile

Now, if User John login to Sage 300 workstation, he will only see the following screen as per the permission provided.

Sage 300 ERP Company

Now, to make security applications more effective there is one more feature included i.e. Advance Security Setting.

Advance Security Settings of Sage 300 provide users with various security options in database set up such as mentioned below;

Advance Security Settings

1. Administrator can use Require complex passwords option – which ask user to set password in combination of Alphabets, Numbers & Special character. Hence, would provide more strength to the user security.

2. By setting Require passwords to change option –  Users are asked to change their system password within the set period of day (a range between 1 to 999 days)

3. Administrator user can also restrict the length of password (A range between 4 to 64 characters) using “Require minimum password length” option.

4. Administrator can also protect Sage 300 system by setting the Lock out user option. Say if Admin user has set lock out user option after 3 attempts and user makes three consecutive wrong attempts, system would lock out that user. Thus the user will be locked by Sage 300 until ADMIN sets the respective user to Unlock. Admin User can set the number of attempts before lock out between 1 to 999 times.

5. Enable locked out user:  This option will only enable, if Lock out user option is checked. Locked out user can be unlocked automatically after a stipulated time period specified here, between a range of 1 to 30000 minutes.

6. Use time server: For calculating Lock Times, one can specify which server needs to be connected for referring to as system clock.

Thus, Sage 300 ERP security is a good mechanism to assign users to their appropriate roles and as a result simplify their workspace. This is important in accounting where separation of duties is an important necessity to prevent fraud.

Related Posts:

1. Cannot Login to Sage 300 ERP due to User Limitation
2. “Windows has blocked this software because it can’t verify the publisher” error in Sage 300 ERP
3. “You do not have a license to use this product” Error in Sage 300 ERP
4. Security Application in Sage 300 ERP

GL Account Code Change in Sage 300 ERP

$
0
0

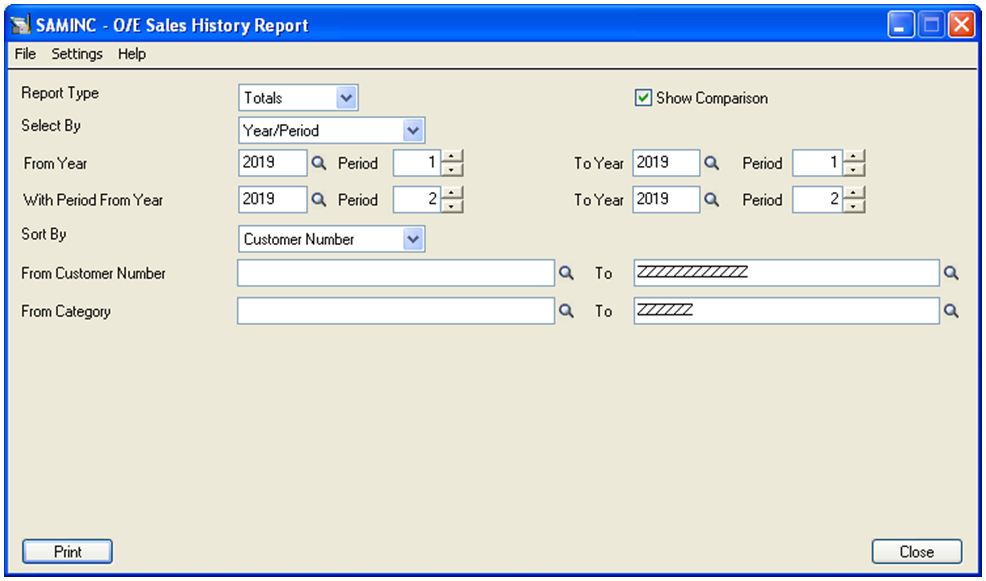
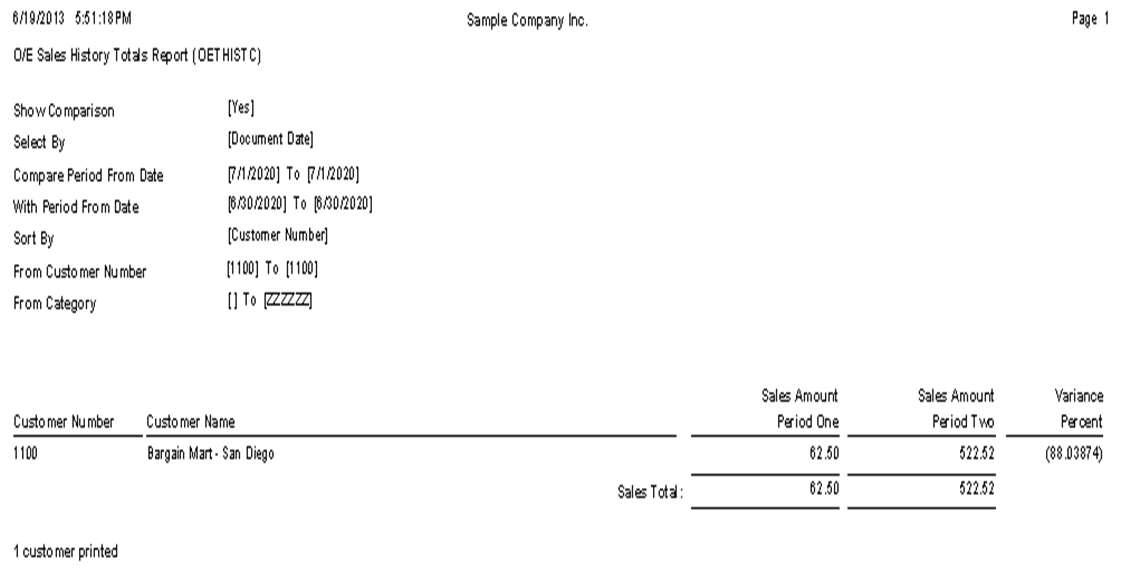
Many-a-times it happens that there is requirement to change Name/Description of a General Ledger Account. Say for an instance, there is an account named ‘Motor Car Expenses’ where you debit all your Vehicle expenses till now. However, to keep a better track of Vehicle wise expenses you require accounts to be separate, hence you may rename  first account from ‘Motor Car Expenses’ to ‘Motor Car Expenses – ‘Car Number1’ ’ and open a new account for another vehicle say ‘Motor Car Expenses – ‘Car Number2’ ’.

However, if you wish to change account number instead of account description, then it has to be handled through a separate utility called “GL Account Code Change in Sage 300 ERP”.

This utility comes with 3 options to cater 3 separate functional requirements. Let’s go through each one of them in detail:

Change

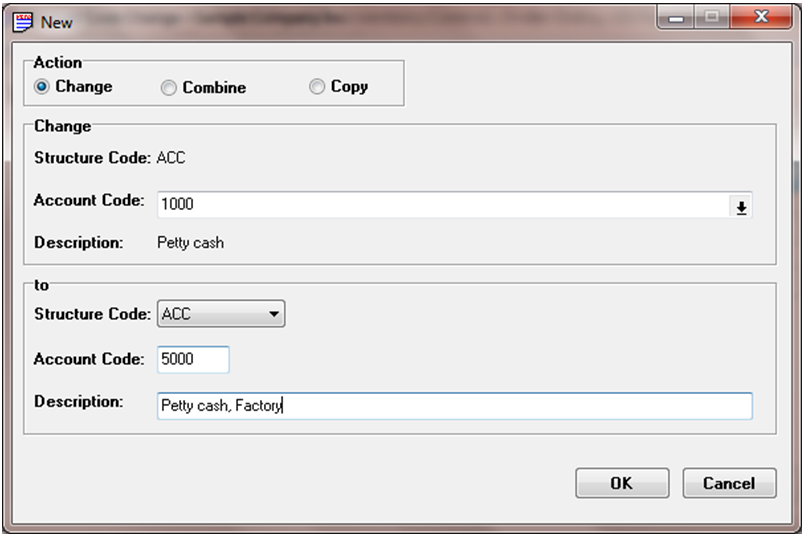
1. Change – In this option, you can change Account number of an account to a new number. For example: consider a case, where we have a GL account as 1000 Petty Cash for our factory and store location.

Say, now we want to split this location into 2 separate locations and hence require maintaining 2 separate accounts instead of 1. Also, we require all similar type of accounts in Sage to be in sequence i.e. all assets and liabilities should be in sequence.

This would help in viewing reports using simple from and to filters to have category wise Trial Balance.

Now, in order to do so, we have to change account number and description of the above said account to, say 5000 Petty Cash, Factory. Then, To Process this in Sage 300 GL Account Code Change, one has to mention the source account and the destination account.

Once done, you can create a new account, say 5001 Petty Cash, Store.

There is also an option to change the attributes of account, like the Structure Code. If structure code is to be changed then decide on new Structure Code by clicking on the List Button beside the Structure Code field. Then enter new Account Code and change Description as required.

Also Read: Fiscal Set Comparison in Sage 300 ERP 2012

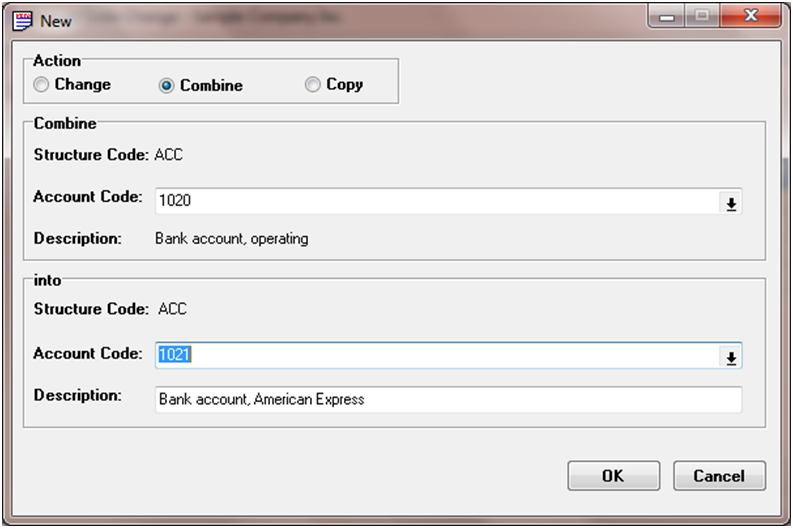
2. Combine – This option allows us to combine one account and all its relevant details into the second account. In this case, initial account will get combined in second account and will get disappeared from chart of accounts list.

Say for example, we have merged 2 of our bank accounts into 1 account in system or accounts were a duplicate of each other and hence need to be merged. In this case, we can use combine feature.

Combine

In above example, Sage 300 combines account 1020 into 1021.

After this process all the transactions present in account 1020 will get combined in account 1021 and then the account 1020 will not be visible in Chart of accounts list.

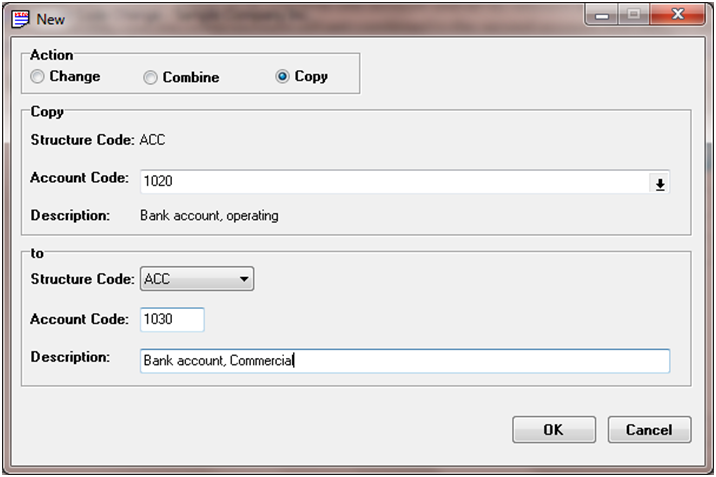
3. Copy – This feature is used to copy the contents of one account to the newly created account. In the below screen as specified 1020 is the account whose details has to be copied in the new account 1030.

Copy

Unlike ‘Change’ and ‘Combine’, this old account code will also be visible in GL Chart of Accounts after changing its account code but transaction that would be done in future will show its effect in new account only i.e. old account will record transactions till date you have copied it to the new one.

This option is useful in case, where you earlier had 2 entities but had maintained only 1 account for one of them and had maintained the other account out of your books. Since, entries in both accounts were supposed to be same you can copy transactions from old account to new account and maintain both the accoounts here onwards.

Using above three feature you can easily manage changes that needs to be done at GL account level.

Above all applies to changes in only 1 account code at a time, but if you want to change account code for multiple accounts then it would be a better practice to use anyone of the following two options:

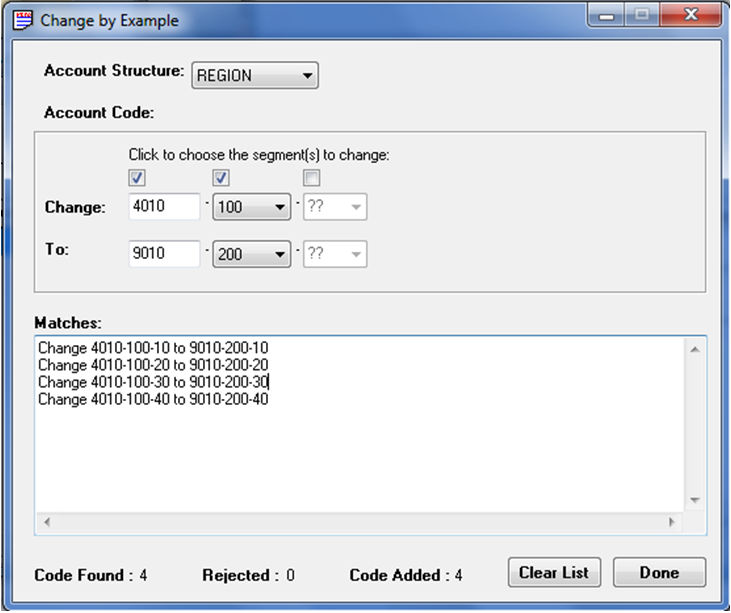
4. Change by Example - You can access this field in Edit option of  ‘Account Code Change’. This is useful in case when you have made the change to 1 account manually and require system to do the same to a list of accounts referring this account.

For Example: We have created accounts with code starting with 4010-100 which fall under Profit and Loss. Now, we have restructured our Chart of Accounts and hence need all P&L accounts to be in Series starting with 9010, here we can change the structure for 1 such account using ‘Change’ option from above and then use the ‘Change by Example’ option to change the rest of series.

Change by Example

Once confirmed you can click on Post to make the changes in GL chart of accounts.

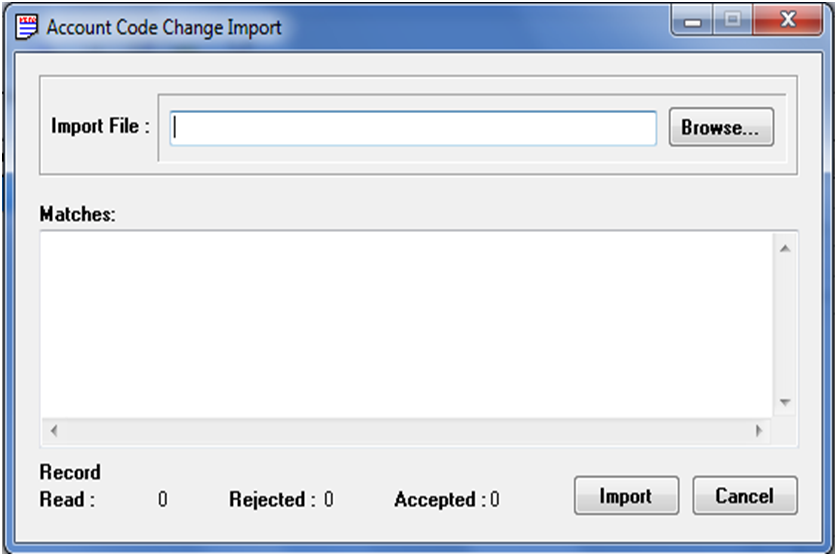
5. Import Accounts File - This option enables user to Change, Copy or Combine multiple accounts at a single go by importing them using an excel or csv file.

This option is very convenient in case there are more than few accounts to be changed at 1 go. The simple way is to create a list of all such accounts in a spreadsheet or csv format and then import this into system to complete the procedure.

Account Code Change Import

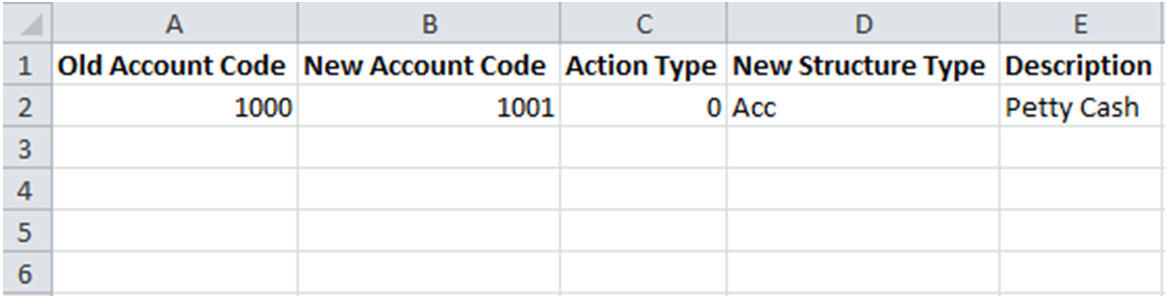
Format of file should be ‘Microsoft Excel 97-2003 Worksheet (.xls)’ with same columns as mentioned in below excel sheet.

Excel

Here, in column C of ‘Action type’, can have any of the following values as per your requirement:

0 for ‘Change’
1 for ‘Combine’
2 for ‘Copy’

After selecting of the file and clicking on Import will list all accounts to be changed in screen of ‘Account Code Change’.Then, you can post all accounts to get their code changed in GL Chart of account.

Note: Before doing any change in Account code, make sure all Sage 300 users are logged off and take back up of database.

This would help Users in changing account codes with ease and will reduce manual work.

Related Posts:

1. Replace Optional Fields in GL Accounts of Sage 300 ERP
2. Exclude Inactive Accounts option in GL Chart of Accounts Report of Sage 300 ERP
3. Monthly Audit Methodology in Sage 300 ERP
4. Customer Number Change in Sage 300 ERP
5. Customer Number Merge in Sage 300 ERP

Create Manufacturing Order Process in Sage 300 ERP

$
0
0

In our previous blog, we discussed about configuring “Manufacturing Order Process in Sage 300 ERP”. In this blog, we will discuss how to use this Process in Sage 300 ERP.

Steps for creating Manufacturing Order Process are mentioned below;

Service People will be creating Sales Order for Finished Goods to be sold to customer, when he/she (customer) orders for the same.

1. Create SO (Sales Order): While creating Sales Order by selecting items, which is defined in BOM masters. For an instance; there is Sales Order for 100 Qty of Master Item say (Image 1500 Series Desk Accessories) and the committed quantity is 80. Now, the required Qty to produce would be 20.

1. OE Order Entry

2. Print this Pending Order Report (Order Action) to obtain the list of pending/Outstanding Orders for identifying the quantity of Raw Material required for the Finished Good Production. Report would display the Master Item along with the Raw Material Component required to produce the Finished Goods.

2. OE Order Action Report

3. Once done, we can print the BOM report to obtain details of the outstanding BOM and can view raw materials required to produce the finished goods.  This report would list the BOM Master Item along with the Raw Material details. To print this report navigate to Inventory Control >> IC Setup Reports >> BOM Reports

3. BOM

4. BOM Report

Also Read: Using BOM and Assembly to Convert Items in Sage 300 ERP

Output displays that to produce 1 quantity of BOM item (Image 1500 Series Desk Accessories), it requires 25 units of A1-103/0 (Fluorescent Desk Lamp), 25 units of A1-655/0(Pen), 25 units of A1-656/0(Pencil) and 25 units of A1-750/G(Stapler – Image-1500 Series). Thus, to produce 1 Qty of BOM item, we need to identify the quantity of RM required.

5. BOM details

One can also automate this calculation by building a report, which takes into consideration all these points and prints the quantity of raw materials required to fulfill order with and without taking the Stock on hand.

Once the raw material required to produce 20 Qty of finished goods is identified, we can then transfer Raw Material to Warehouse for Production.

4. Transferring RM (Raw Material) from Warehouse location to Production location for production. To do so, user has to make a transfer entry, hence navigate to Inventory Control >> IC Transactions >> Transfer.

6. IC Transfer

5. Then, Run assembly once you are done with the production. Enter the quantity to assemble (i.e. 20 units in the above case).

7. IC Assemblies_Disassemblies

6. After Assembly, run day End processing to calculate the costing of the item. Further, Run Inventory Movement Report to check the costing.
7. After these things are taken care, transfer finished goods from Production location to Warehouse location.

8. IC Transfers

8. If raw material supplied for production was more than actual consumption, then pass an IC adjustment entry for Stock Adjustment.

9. IC Adjustments

Thus, Sage 300 ERP tracks the production cost and manage order works. By directing the entire cycle of order processing, it is possible to build a business that is both customer-driven and profitable.

Related Posts:

1. Transfer of Excise duties along with Inventory Transfer in Sage 300 ERP
2. Simplify Assembly using Sage 300 ERP
3. Provisional Posting in Sage 300 ERP

GL Clearing Module for Sage 300 ERP

$
0
0

General Ledger (GL) module is heart of any finance package such as ERP system. Hence, to give an upper hand to user while using GL, we have developed a custom module named GL Clearing Module for Sage 300 ERP, which will help users to carry out internal reconciliation of GL Accounts i.e. to match Debit and Credit side of Transactions in GL.

Say for an instance, when user creates a PO Receipt Transaction, it will debit Inventory and Credit Payable Clearing Account. Thereafter, PO Invoice will debit Payable Clearing and Credit Payable Account.

Hence, after Day end Processing these transaction are reflected in GL. User can view debit, credit balance for a particular account and map the same as desired using our GL Clearing module.

GL Clearing

The New Stuff: Greytrix Extended Report Pack for Sage 300 ERP

Once user select a GL Account No, he/she will be able to view GL Details  (Batch/Entry No, Line no,Transaction Date, PO Transaction Document No., Debit/Credit Amount in both source and Functional Currency)

User can select individual detail line manually for mapping. There is also a provision of mass clearing by importing an excel file in a specific format, which will select multiple detail line at once for mapping.

System will allow not allow Users to save any entry that is out of balance; it will only save document when credit and debit are matching.

Users can also print GL Clearing Report to view Reconcilled transaction/Non-Reconcilled transaction/Both for specific GL Account.

Before periodic closure of a GL Account, Accounting staff must ensure that entries in the general ledger need to be correct and are in balance. Thus, GL Clearing Module comes handy for user and become really useful when user needs to store mapping of GL Accounts transaction.

Also Read:

1. Replace Optional Fields in GL Accounts of Sage 300 ERP
2. Exclude Inactive Accounts option in GL Chart of Accounts Report of Sage 300 ERP
3. Financial Reporter made reporting tranquil in Sage 300 ERP
4. GL Account Code Change in Sage 300 ERP

Pending Order Aging Report in Sage 300 ERP

$
0
0

It’s very important to keep track of pending sales order for any organization/company. Sometimes, organization needs to know how many sales orders are pending and how to estimate future probability of sales; so they can measure efficiency of staff performance at a particular interval of time.

Hence, to cater those needs, we have developed “Pending Order Aging Report” Add-on, which is useful in tracking number of sales order pending from any client at a particular interval of time.

For this, we simply provide an installable file, which can be started on a single click. The following screen will appear;

Pending Order Aging Report

a) Select Excel File: User has to browse the desired path, wherein they want to print the Pending Order Aging report.
b) Customer No.: User has to select “From and To” range of customer name, for which they want to print the report.
c) Sales Order Date: Similarly, user has to select “From and To” date range for which they want to print the report for select Customer Number.
d) Ship Via Code:  User has to select the drop down for selecting ship via code as filter criteria.

Note: Filter criteria can be customized as per customer’s requirement

The New Stuff: 5 Steps to Intelligent Reporting using Sage 300 ERP

Once the above details are filled, click on export to print the report at the desired location. In the following example, Report shows the detailed outlook:

Order Report

An organization has a client – ABC. The number of sales order pending to the client are 100. The word TAT in the given figure represents the sales order date i.e. The number of pending sales order within 10 days are  shown as 60 while the next column % represents the percentage of sales order pending within 10 days which are shown as 60% . Similarly the remaining fields represent the pending sales order between 10 to 15 days, 15 to 21 days and above 21 days and thus maintain the aging concept in the report.

So, the Pending order Aging Report includes the summarized value for each client and total value of pending sales order for all the clients in its report. Thus, “Pending Order Aging Report” is able to make clear visualization of pending orders for each client.

Also Read:

1. Stock Status Report in Sage 300 ERP
2. Auto Generate OE Confirmation Report in PDF format in Sage 300 ERP
3. Sellable and Non-sellable items in Sage 300 ERP
4. Greytrix Extended Report Pack for Sage 300 ERP
5. Email Standard Order Entry Invoice Report in PDF or RTF Format


Export Items with Criteria on Optional Fields

$
0
0

In Sage 300 ERP, we have the concept of optional fields where in we can store non standard data at the item master and then extract them in reports we require.

There might be a case where you are having a big list of items in your item master and each of the items is having an optional field associated with it, let’s call it ‘BIPARTNO’ standing for a Part No of the Item. Going further, there might be a situation that for some of the items the optional field value has not been set. So it might be necessary for you to extract a list of such items for which the optional field value is not been set.

Consider we are having an optional field called as ‘BIPARTNO’ set at the item master level. Further we have to get the list of all such item from the item master for whom the value for this optional field is not been set. Following are the steps which will help you to generate a list of items for which the value of optional field ‘BIPARTNO’ is not set.

1. Go to Inventory Control -> I/C Items and Price List -> Items

1

         The New Stuff: Item Pricing based on Multiple Unit of Measurement

 2.  Click on File Menu and then click export sub menu.  Click on Item_Optional_Fields as shown below and then click on set criteria.

3.  After Clicking on Set Criteria the below screen will get displayed where you can filter the parameters and optional field you want.

3

 4.  Select Item Number and click on Add button which will add the parameter in the grid.

4

 5. Double click on the cell just below Optional Field which you want to filter and enter the name of optional field as shown below and click OK.

6

 6. In the similar way, add the Value parameter to filter it as shown below and double click on the cell below value to add the  filtering details as shown below  and then click on OK.

9

 7. Then click on OK button on Set Criteria screen, which will further start the process. Once the export process is done you will  get a message showing the details as shown below.

10 11

 Note: In the above example we have considered, that the ‘BIPARTNO’ optional field value will be numeric.

Hope this helps in exporting items with no value for specific optional fields.

Also Read:

1. Different Costing Methods in Sage 300 ERP
2. Stock Status Report in Sage 300 ERP
3. Sellable and Non-Sellable Items in Sage 300 ERP
4. Slow Moving Items Report in Sage 300 ERP

Handling Additional Costs and its Variations in Sage 300 ERP

$
0
0

While processing Purchases, Sage 300 ERP provides an option to define additional costs against purchase receipts and Invoices.

Let’s take a case wherein the goods receiving person is only responsible to receive quantities against PO and the finance team is responsible to do the overall costing. The goods received are fast moving items.

The cost of the item generally depends on 2 factors:

1. The Vendor Cost
2. The Additional Costs like Handling Charges, Freight, Custom Duty etc.

When the user receives the goods against the PO, the vendor cost will automatically get calculated and allocated to the item but the additional cost might not be known to this user.

The New Stuff: Different Costing methods in Sage 300 ERP

Since, the good is fast moving it might happen that, this item is already shipped without taking the additional cost into account and hence affecting the COGS and valuation of the remaining inventory with only the Vendor Cost.

Now it can happen that, we have booked an additional cost at time of receipt of goods based on approximation. Later we come to know that the actual additional cost is lesser than the cost apportioned earlier.

Let’s take an example:

Say we apportioned an approximate of additional cost as 5000 at the GRN level. At the time of invoicing the actual additional cost amount was 4500 i.e. the variation is on the lower side.

By following below mentioned process we can make sure:

1. To make resultant receipt adjustment smaller

2. The impact on the remaining stock shouldn’t be so large and the amount variance can be adjusted very easily.

Let’s have a look in detail how do we handle this in Sage 300 ERP

When a company requires purchasing some item from his vendor, the user will book the Purchase order. At the time of PO receipt  entry, user will do the GRN [Good Receipt Note] and select appropriate additional cost.

Say for an instance, we are doing GRN of a Laptop, whose cost is 50000 and there is an additional cost of 5000 on the purchase.

Once a PO receipt is done, following will be the GL effect considering that the additional cost is being expenses out.

3

 In below example: Intercontinental Electronics.  In addition, at cost front of GRN level, user will select additional cost actual vendor.

After selecting vendor, the user will enter the additional cost, say 5000.

1

Going forward, Invoice for the main vendor will be created but invoice for the additional cost vendor will be done only when we receive the actual invoice from the vendor.

Considering we receive an additional cost vendor invoice of amount 4500 for the above said GRN, In this case now we will be reducing the amount of invoice from 5000 to 4500.

We require booking an invoice of 5000 in PO module. Once an invoice is booked, we will open the same invoice in AP module and do the necessary changes to adjust the variance. Below screen shot will help you understand the AP invoice entry.

Note: Make sure that the GL Integration should be set in such a way to not to auto post the AP Batches created from PO Invoices.

2


Post the above entry to get the GL affect. Once we adjust the variance amount in the respective expense account, we get the following GL Effects:

5

 This way we can handle the additional costs that are not known exactly at the time of Material receipt, and vary slightly at the time of Invoice booking.

Also Read:

1. Landed Cost in Sage 300 ERP
2. Stock Status Report in Sage 300 ERP

Handling Additional Costs and its Variations in Sage 300 ERP – II

$
0
0

In the last blog, we saw how to ‘handle additional cost at the time of receipt of goods‘ based on approximation in which later we come to know that the variation in the additional cost is on the lower side.

In this blog, we will have a look in detail how do we handle the variation in the additional cost which is on the higher side.
Consider a case where we have booked an additional cost of 5000 at the GRN level, but at the bill booking time we came to know that the additional cost actual invoice amount is 5500. In this case, while booking the invoice in PO module we have to create an additional cost as variance in masters and add one detail line selecting the variance in the additional cost and then change the invoice amount to 5500 as shown below.

1

The New Stuff: Different Costing methods in Sage 300 ERP

Once you post the entry system will create the following GL affect.

2

3

This way the variance in the additional cost can be handled in Sage 300 ERP thus enabling us to prorate the additional cost either on Inventory or some Expense accounts and adjust the variance in the required clearing accounts.

Also Read:

1. Landed Cost in Sage 300 ERP
2. Stock Status Report in Sage 300 ERP

Adjustment Entry in Inventory Control

$
0
0

In Sage 300 ERP, need of adjustment entry arises when you want to make adjustment between two similar items defined in item master like you can do adjustment of a item which is short in stock  against the one which is not .You can do these adjustments for Both quantity and Cost or only cost or quantity of the items depending on your requirement.To understand this in details let’s consider one example:

Suppose,you have raised sales order for one item,say  ‘LAPTOP1’ with 4GB RAM but you don’t have inventory stock for the same .On the other side, you have 10 quantities on hand for ‘LAPTOP2’  with 2GB RAM with rest of configuration same. So,in that case you can ship LAPTOP2 of 2GB RAM with extra 2GB RAM in place of LAPTOP1.

The New Stuff: Different Costing methods in Sage 300 ERP

Now to attain this in system, you must first process inventory adjustments to decrease the stock of LAPTOP2 and 2GB RAM and increase that of LAPTOP1.

Ideally we must check the number of quantities available for both items in Inventory Movement to do the adjustments accordingly. To check inventory movement in sage, go to Inventory Control  >> I/C Stock Control reports >> Inventory movement

1

After checking stock, you can run the following process to do the adjustment.

1. Navigate to Inventory Control >> I/C Transactions >> Adjustments

2

2. Decrease both quantity and cost of both ‘LAPTOP2’ and ‘2GB RAM’ in adjustment entry for desired quantity.Increase both

3. quantity and cost of  ‘LAPTOP1’ in adjustment entry for desired quantity.

3

4. Post the the entry and run Day End processing to get updated status of items in inventory movement report.

 Note: While doing adjustment entry ,adjustment amount for ‘LAPTOP2’ and ‘2RAM’ (which you want to decrease) will appear automatically multiplying unit cost by the number of quantities you entered but for another item (which you want to increase) you have to enter the adjustment amount.

Also note, by default one account number appears in detail line under adjustment account which is actually an Adjustment write Off  acount that you defined in Account Set. So,make sure that the accounts appearing for both adjustments should be same.

Adjustment entries can be used for multiple other purposes like Stock Take, Damaged Goods, reflecting the effect of any misfortunes like theft etc. It serves as a very convenient tool for management of large quantities of stocks for accurate reflection of costs and quantities in system.

Also Read:

1. Landed Cost in Sage 300 ERP
2. Stock Status Report in Sage 300 ERP
3. Handling Additional Costs & Its Variations in Sage 300 ERP
4. Adding Provisional Additional Costs to Inventory
5. Inventory Reconciliation for Inventory Values

Set Document Numbering based on Bank Code for Sage 300 ERP

$
0
0

Greytrix Document Numbering Add-on for Sage 300 ERP allows user to assign numbers for any transactions based on pre-defined structures. Hence, provides user with the flexible to create Order numbers as per their Numbering Structures.

Earlier user was able to assign documents numbers based on ‘Account Set, Location or in Combination of both’. Now in addition to the given options, they would also be able to create document number based on “BANK CODE”. The only thing user has to do is select Bank Code as a numbering method, while mapping transaction in “Numbering Mapping” screen.

Say for an instance; User wants to create document number based on Bank code for AR receipt entry. Then, user has to select Bank code as Numbering method and then need to select the Bank code [in our case its CCB] on which he/she wants to generate the number.

The New Stuff: Greytrix Document Attachment for Sage 300 ERP v6.1

1. Numbering Mapping

So when user is creating the AR Receipt entry for CCB bank code, document Numbering module check for the mapping done in the numbering mapping screen. If mapping is found for the CCB bank code then it generates the document number based on Bank code.

2. AR Receipt Entry

Thus, now user will have an option to generate Document number based on Bank code in Sage 300 ERP using Document Numbering Module.

Note: Number Generation based on Bank Code is currently available only for AR Module. 

Also Read:

1. Introduction of Document Numbering for Sage 300 ERP
2. Configuring Document Numbering for Sage 300 ERP
3. Set Document Numbering for Sage 300 ERP on the combination of Account Set and Location
4. Grouping feature in Document Numbering Series for Sage Accpac

Viewing all 1486 articles
Browse latest View live


<script src="https://jsc.adskeeper.com/r/s/rssing.com.1596347.js" async> </script>