Quantcast
Channel: Sage 300 ERP – Tips, Tricks and Components
Viewing all 1487 articles
Browse latest View live

MRP Report in Sage 300 ERP

$
0
0

It’s very important to predict requirement for materials on a daily basis and plan for procurement accordingly. Sometimes, organization needs to know their; On hand quantity, transferred quantity, quantity required etc. for assembling stock and non-stock items.

Hence, for these situations, we have developed report for Sage 300 ERP known as “Material Requirement Planning”, which gives user a brief idea about inventory item information.

In MRP Report, there are two type of reports i.e. [1] MRP-Raw Material (RM), [2] MRP-Finishing Goods (FG). In this blog, we will discuss about MRP Report for Raw Material in detail.

MRP report is designed to assist production managers in scheduling and placing orders for items on demand.

Say for an example; if a company purchases excessive quantity of Raw Material to assemble an item, then they have to invest some amount for it, which means it becomes an expense to the company. Similarly, if raw material purchased is not used then it will remain as idle stock and may never even be used. So in these cases, MRP Report helps the decision maker by providing an idea about the Raw Material required for that particular unit.

1. IC MRP Report

The New Stuff: Stock Status Report in Sage 300 ERP

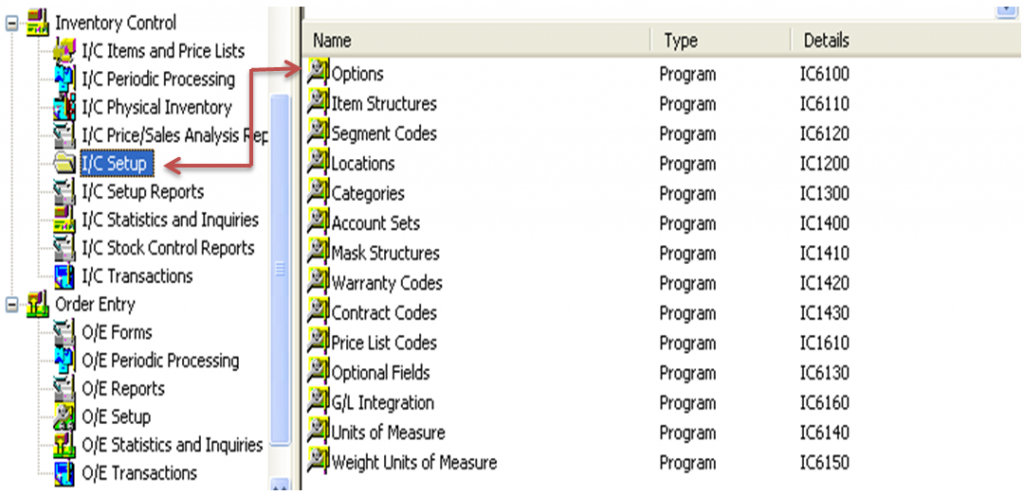
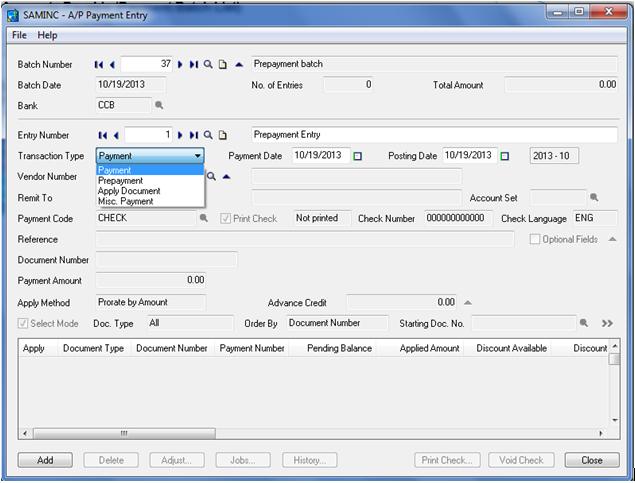
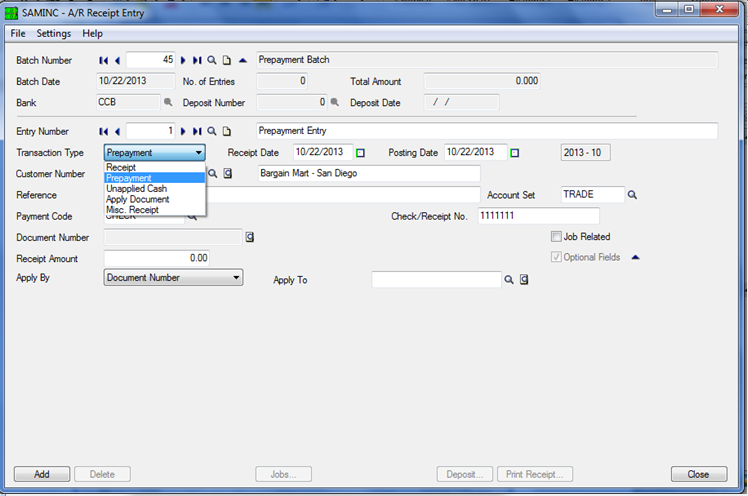
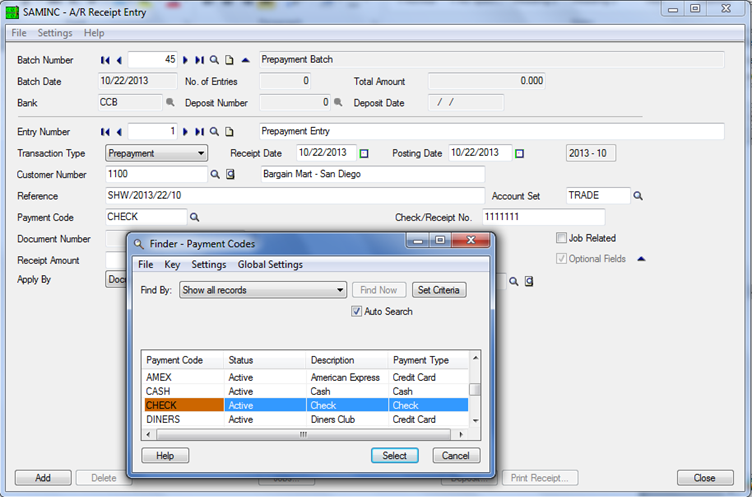
After, you start IC MRP Report; you can select options depending on the type of report required;

1. As On Date: Select the period for which you want to view the report.
2. Item Type: This option allows you to select the type of Item for which you want to print the report e.g. Raw Material, Finished Goods, etc.
3. Item: Select the range of item in “From & To” option, for which you want to print the report.
4. Report Type: It allows you to select the report type i.e. Raw Material (RM) Or Finishing Goods (FG)
5. Location: Select the range of item in “From & To” option, for which you want to print the report.
6. City Prefix: When City Prefix is selected, user will be able to select from and to location for that particular city.

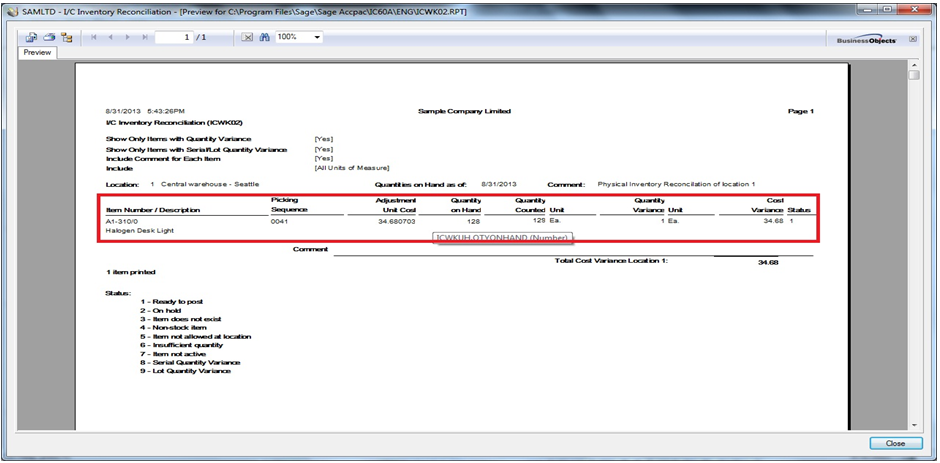
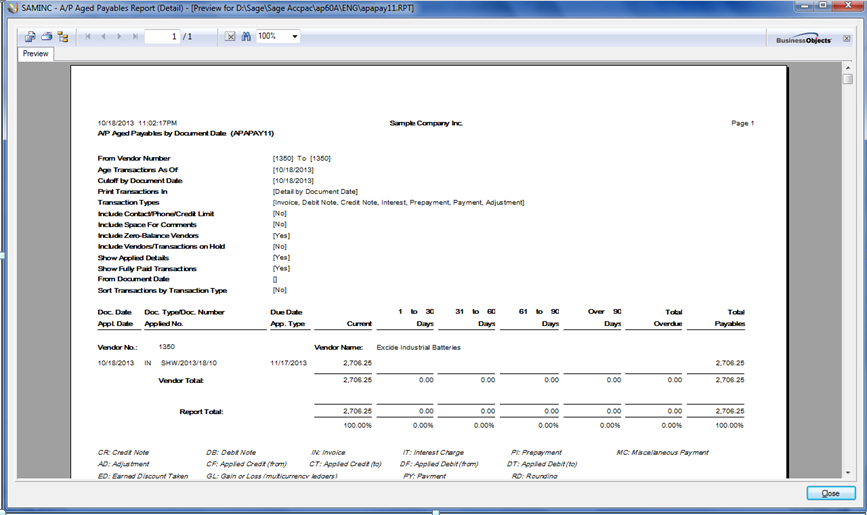
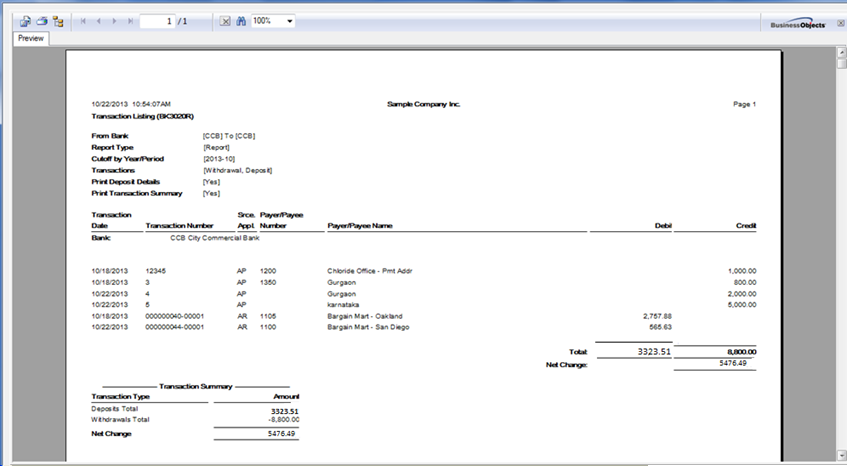
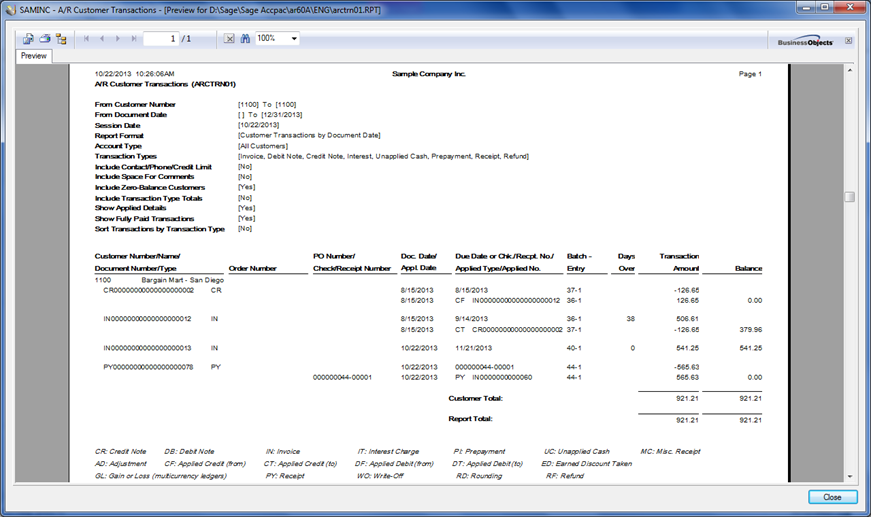
After selecting desired options click on Print button it will print report in following format:

2. Report

Report you will get clear idea about the Quantity on Hand, Reorder quantity, Quantity required etc. for assembling items. This report helps user to overcome problems like;

a) What items are required?
b) How many are required?
c) When are they required?

Hence, saves money, time and also meets customer’s deadlines on time without any delay.

Also Read:

1. Adjustment Entry in Inventory Control
2. Export Items with Criteria on Optional Fields
3. Auto Generate OE Confirmation Report in PDF format in Sage 300 ERP
4. 5 Steps to Intelligent Reporting using Sage 300 ERP
5. Generate Reports for Slow Moving Items in Sage 300 ERP


Auto Generate Document Number in GL Clearing module for Sage 300 ERP

$
0
0

In our previous blog, we introduced “GL Clearing module for Sage 300 ERP. Now, we will be discussing about how to generate Document Number automatically with pre-define structure in Document Number Generation screen in GL clearing module.

There are some mandatory fields like “Fiscal Year”, “Prefix” and “Next Number” to generate document number. So, user has to set these values before generating document number.

- MRP Report in Sage 300 ERP -
Pending Order Aging Report in Sage 300 ERP -

Document Number Generation

Module automatically selects current fiscal year from Session Date for generating document number. As a result, user has to set PREFIX and Next number in “Document Number Generation” screen. Once, entire configuration is done in the Document Number Generation screen, module generates number based on the configuration done.

Say for an instance; current fiscal year is 2013, user has entered prefix as DOC and next number as 1. Hence, when user does a GL Audit through GL clearing module DOC-2013-00000001 will be generated.

GL Clearing

Now, user does not have to worry about the next document number, the module automatically generates the next document number during the next GL auditing through GL clearing module.

In our next blog, we will discuss on the reporting part for GL clearing module.

Also Read:

1. Greytrix Extended Report Pack for Sage 300 ERP
2. 5 Steps to Intelligent Reporting using Sage 300 ERP
3. Stock Status Report in Sage 300 ERP
4. Auto Generate OE Confirmation Report in PDF format in Sage 300 ERP
5. Exclude Inactive Accounts option in GL Chart of Accounts Report of Sage 300 ERP

Clear Sales History from Account Receivable Module in Sage 300 ERP

$
0
0

Many a times, users come across situation where they found the legacy data is no more useful for organization and keeping such large data becomes quite expensive task. Hence, in this blog, we would be discussing how to clear Sales history from Account Receivable.

Steps for clearing Sales history from AR Module are as follows:

1. To clear obsolete data: navigate to A/R Periodic Processing >> Clear History.

1. Clear History
2. Then, select Account Receivable >> A/R periodic Processing >> Clear History. The below screen would appear.

2. AR Clear History

Follow below steps to clear records;

a) Select the types of records you wish to clear
b) Specify the ranges for each type of record.
c) Type the dates or fiscal year and period for which you want to clear the data and click on Process.

The New Stuff: Data Integrity Check in Sage 300 ERP

Say for an example, we want to clear Fully Paid Documents Through:  Select the Fully Paid Documents option in Clear History form; Through field would appears.

3. AR Clear History

1. Select the document you want to clear in “From & To” option.
2. Enter date from which you want to clear fully paid documents and click on Process.

Accounts Receivable would clear invoices, credit notes, and debit notes that were fully paid on the Clear Transactions Through date if:

a) The balance for each document is zero.
b) The AR receipt that applied on open documents and has cleared the bank account.
c) AR also removes all receipts and refunds associated with the fully paid documents.

Hence, using this option Admin user would be able to reduce the Sage 300 database size and get rid of irrelevant data in ERP accounting system.

Note – This task is preferred to do be done by your Sage 300 Consultant/Admin User of Sage 300. Please ensure to take proper backup of your Sage 300 company database before proceeding.

Also Read:

1. Monthly Audit Methodology in Sage 300 ERP
2. New Features in Accounts Receivable Module of Sage 300 ERP 2012
3. Sales History Report in Sage 300 ERP
4. Closing Procedure Checklist for Sage 300 ERP
5. Stock Status Report in Sage 300 ERP

I/C Physical Inventory Reconciliation Process

$
0
0

In Sage 300 ERP (formerly known as Sage Accpac ERP), Inventory Control allows you to enter the results of physical counts into your system and helps you reconcile the differences between the physical count and the calculated quantities-on-hand in system.

One important aspect of ensuring that your business runs smoothly is to periodically compare written inventory records against the actual physical stock on the shelves and in the warehouse. If there is a difference between the number of items your records indicate and the actual stock, you will need to reconcile that difference by finding the source of the error. This will help improve your inventory tracking procedure and prevent theft.

Here are the steps to do Physical Inventory Reconciliation in Sage 300 ERP.

1. I/C Generate Inventory Worksheet: This screen will process Inventory Worksheet based on selection criteria and after completion of process, it will prompt a message “Inventory reconciliation has been generated”.

1

2

The New Stuff: Stock Status Report in Sage 300 ERP

2. I/C  Inventory Worksheet: After Inventory generation process, we have to print I/C Inventory worksheet from Inventory control > I/C Physical Inventory > Inventory worksheet.

This will print quantity on hand, unit cost and UOM of stock item location wise. So based on this worksheet we can match physical stock with system calculated stock

3 4

3. Physical Inventory Quantities: After inventory worksheet generation process, we will be able to reconcile the stock item. For example :- we can see in above Inventory worksheet report, system has calculated 128 quantity on hand of item A1-3100 “Halogen Desk Lamp” at location  1 “Central Warehouse”.

But after physical inventory count of item A1-3100 “Halogen Desk Lamp” at location 1”Central Warehouse” we came to know that quantity physical inventory count is 129. So we have to set quantity as 129 in quantity counted column as shown below.

5

4. Inventory Reconciliation: After updating quantity counted column, we have to run Inventory reconciliation from Inventory control > I/C Physical Inventory > Inventory Reconciliation to check whether quantity counted has been updated or not? And how much variance is showing for every item Reconciled.

As we can see in below screen shot, quantity counted set as “129” for item “A1-3100”, quantity variance is showing “1”

6

5. I/C Post Inventory Reconciliation: After verification of Inventory reconciliation, we have to post the reconciliation from Inventory Control I/C Physical Inventory Post Inventory Reconciliation; this will update quantity at location.

7 8

Hope this blogs provides insight on how Physical Inventory reconciliation process works and how we can reconcile our stock item system calculated with Physical count.

Also Read:

1. Adjustment Entry in Inventory Control
2. Inventory Reconciliation of Sage Accpac ERP
3. Generate Reports for Slow Moving Items in Sage 300 ERP
4. MRP Report in Sage 300 ERP

Shortcut Keys in Sage 300 ERP – II

$
0
0

In our previous blog, we discussed about shortcut keys of Sage 300 ERP. Here, are few more shortcut keys user can use while using Sage 300 ERP.

1. F4 – Populates Calendar in transaction screen.

F4

The New Stuff: Material Requirement Planning in Sage 300 ERP

2. Alt + Down Arrow/F4 – Displays the list of entire items in drop down.

Alt+Down

3. Space Bar – User can use Space Bar to check/uncheck check-boxes

Space Bar

4. F1 key – If user want to view information about the screen, say for an instance purpose or functionality of a screen, what each fields should have, etc. then user can use F1 key to open help menu.

5. Ctrl + End – To navigate to last record in the finder screen. Suppose if an Order have 500 records in the database, so when user click on finder button in the document number and want to navigate to last Order then he/she  can use Ctrl + End keys to do the same.

6. Alt + Character Name – Is used to navigate to button, Tabs and file menu. Each button has its own short cut key. Hence, to navigate through the buttons on UI user can use Alt + Character Name to directly go to that button and to perform its action.

Say for an instance, Post button can be clicked using ALT+ S. Also menu bar can be access by Alt+ Character Name i.e. file menu can be access by pressing ALT+F.

Also Read:

1. Use Multiple Windows in Sage 300 ERP
2. User Role and Security Application in Sage 300 ERP
3. Security Application in Sage 300 ERP
4. Cannot Login to Sage 300 ERP due to User Limitation
5. “You do not have a license to use this product” Error in Sage 300 ERP

AP Check Stock setting in Sage 300 ERP

$
0
0

Many a times, Users come across a situation wherein checks are not printed in a proper sequence in AP Module of Sage 300 ERP. The issue normally occurs, while printing vendor checks that span multiple check stock.

Hence, if there are other checks in the same batch, then subsequent checks will not bear sequential numbers. As a result, user has to ensure that they have properly configured Advice Lines Per Page setting for check stock.

Advice Lines Per Page indicates the number of printed detail lines that will fit in advice section of the check form for stock type Combined Check and Advice.  Using this number, system allocates the check number.

Banks

The New Stuff: Greytrix Extended Report Pack for Sage 300 ERP

Say for an instance, if your check spec can print 10 detail lines per check, but you have configured Advice Lines Per Page as 7.  Now, if you print check having 8 lines of detail then this will cause the system to consume 2 checks and subsequent checks in a same batch will not bear correct check number.

To ensure that your check spec matches Advice Lines Per Page setting, the default number of detail lines for standard check should be set as 16 or higher in order to generate proper checks with its number.

Also Read:

1. Recurring Payables in Accounts Payable module of Sage 300 ERP 
2. Closing Procedure Checklist for Sage 300 ERP
3. Data Integrity Check in Sage 300 ERP
4. Monthly Audit Methodology in Sage 300 ERP
5. Purchase Order Transaction Flow in Sage 300 ERP

Quick Shipment feature for Sage 300 ERP

$
0
0

Sometimes, users come across a scenario where they need to Ship multiple orders or Print selective range of picking slip at once to facilitate bulk shipment process for orders from multiple customers.

Hence, for catering to this sort of requirement, we have designed Quick Shipment for Sage 300 ERP, using which user would be able handle shipments process in bulk.

This add-in feature assists shipping personnel to view all the open orders and post shipment for desired orders.  They can even print picking slips after processing the shipment.

1. Order Ship All

The New Stuff: Generate Reports for Slow Moving Items in Sage 300 ERP

Program selects all open and partially shipped orders.  In order to ship; orders needs to be individually selected, and then clicking on Ship All button, will process for shipment of all the selected orders.

2. Order Ship All

Any errors during the process can be easily interpreted using log report generated by the program. After shipment is done; users can print the Picking Slip from the interface itself.

Note: This customization is done using Sage 300 SDK, as a result easy to deploy and it works with Sage 300 ERP 2012 and Sage 300 ERP v6.0A

Also Read:

1. Auto Generate OE Confirmation Report in PDF format in Sage 300 ERP
2. Use Multiple Windows in Sage 300 ERP
3. Shipping Labels in Sage 300 ERP
4. Copy Order Functionality in Sage 300 ERP
5. Advanced Features in Order Entry screen of Sage 300 ERP 2012

TRANSACTIONAL ANALYSIS AND OPTIONAL FIELDS IN SAGE 300 ERP

$
0
0

In addition to numerous ways that Sage 300 ERP provides to customize your business solution, there is one more mechanism which contributes to its flexibility and that is through Optional Fields. And, this Optional field form will be available to you if you install Transaction Analysis and Optional Field module .This module allows a user to define unlimited number of attributes required by your business and then can be called in any of the module of Sage 300 ERP. Fortunately, this module is connected to each and every module present in Sage 300 ERP to define additional information fields required in particular module.

In Sage 300 ERP, Optional fields can be defined at master level as well as transaction level in every module as per requirement of a user and accordingly those optional fields can be printed on output reports.

Presentation1

The New Stuff: Export Items with Criteria on Optional Fields

Now, you can create unlimited number of Optional field using Optional Fields setup form in Common Services by clicking on new icon in screen of Optional field .For example, if you want to add colour code to the item master then you can create optional field with name COLOUR with different values for different colours like 01 for Blue, 02 for Red and so on as shown in below screenshot.

1

Here, in screen of Optional Field you have option to change type of optional field; for e.g. text, number, amount, date, time etc. depending on type of optional field defined like in case of optional field defined to capture item dispatch timing you can take its type as time.

Next, add the optional fields to the Optional Fields setup form in each application, and then assign them to transactions. For example, to add COLOUR attribute to items defined in item master in receipt you have to add COLOUR in I/C setup on the optional field tab.

2

In screen of Optional field set up, you have following privileges:

  • Select the transaction for which you want to have the optional field in front of ‘Optional field for’.
  • Define the default Value of optional field if required.
  • Make optional field required. If value under column ‘Required’ is Yes then it becomes mandatory for the user to define this field in value grid at the time of creating any transactions otherwise sage Accpac won’t allow the user to post the transaction. And, if it is ‘No’ then transaction can be posted without defining attached optional field’s value.
  • Mark any optional field as Auto insert ‘Yes’ or ‘No’ .if ‘Yes’ then defined optional will automatically attached to the master or transaction.

Finally, last step is to add required optional field in screen of the defined transaction if it is not marked as auto inserted.

Hence, we can say that this module provides comprehensive reporting and analysis capabilities across your entire accounting system. You can manage information more effectively and easily obtain necessary data for analyzing business operations and practices.

Also Read:

1. Item Master Optional Fields at Transaction Level
2. MO in Sage 300 ERP I
2. MO in Sage 300 ERP II


Set Fractional Quantities in Sage 300 ERP

$
0
0

Many a times, companies purchase materials or sell their product in fractional Quantities. So, it becomes necessary for user to enter item Quantity as fractional value rather than an integer value.

In Sage 300 ERP, user can enter Fractional Quantity in the transaction by taking care of minor settings.

Hence follow below steps for the settings;

1) Navigate to Inventory Control >> IC Setup >> Options Form.

IC Setup

The New Stuff: Quick Shipment feature for Sage 300 ERP

2) In Option form, Select “Processing Tab” and Check “Allow fractional Quantities” to allow fractional values and click on Save

Allow Fractional Quantites

3) Now users would be able to enter fractional quantities during transactions.

Note:

a) Once user checks this option, they can’t change it in future for that Company in Sage 300 .i.e. it is disabled for that company.
b) All integer values will display as decimal values by default.

Also Read:

1. I/C Physical Inventory Reconciliation Process
2. Adjustment Entry in Inventory Control
3. Handling Additional Costs and its Variations in Sage 300 ERP
4. BOM Setup for Manufacturing Company in Sage 300 ERP
5. Enter Quantity against Account Number in GL Journal Entry of Sage 300 ERP

Reverse Transactions – Payment Reversal Transaction in SAGE 300 ERP

$
0
0

Is there a chance there wasn’t enough money in your account and the overdraft protection glitches? Or could there have been an error on the check – for example dating it with the wrong month? Say you somehow dated it as March instead of February or something like that? Or they received the check but couldn’t cash it, or similar. Let’s see how these scenarios can be handled in Sage 300 ERP.
Use the Reverse Transactions form in SAGE 300 ERP to:

  • Reverse a posted payment entry.
  • Reverse a returned paid check from the Bank, and update Accounts Payable.
  • Reverse a single transaction or a range of transactions at a single time in SAGE 300 ERP as per the requirement.1

Also Read: Check Printing in Sage 300 ERP

When we do payment reversal in SAGE 300 ERP that was entered in Accounts Payable, Bank Services automatically updates the vendor account in Accounts Payable.
Firstly let’s analyze the Bank Current Balance.

2In SAGE 300 ERP we can review the Bank Book Balance. E.g. Balance for ICICI Bank can be viewed from the above form which is in Bank Master.

3

After that we have posted an A/P Payment entry of 1,500 CAD (Canadian Dollars) and the Payment Type is “Check”.

4

Let’s again check the Bank Current Balance.

Withdrawal has increased by 1,500 CAD and now it is 1,900 CAD.

Current Balance is decreased by 1,500 CAD and now it is 2,501 CAD.

Reverse Transactions (Payment Reverse):
See below the example of Reverse Transaction for A/P Payment (Accounts Payable) against vendor.

5

We can post the entry after selecting the appropriate values for Bank Code, Source Application, Reversal Date, Vendor and Check/Payment No. Next to that, it will create a GL transaction in un-posted status under General Ledger module. Then go to General Ledger module and post the GL transaction of the Reverse Transaction.

Just with a few clicks the Payment Reversal entry will be generated in SAGE 300 ERP, here no need to pass the manual entry for making Reverse Payment/ Receipt.

Now we can verify the Bank Book Balance, Bank GL Balance and Vendor Balance one by one.

Effect of Payment Reversal on Bank Book Balance in SAGE 300 ERP:

Bank Balance Status before A/P Payment Reverse Transaction

6

Bank Balance Status after A/P Payment Reverse Transaction

7

Withdrawal is decreased by 1,500 CAD and Current Balance is increased by 1,500 CAD.

SAGE 300 ERP takes care of both your bank as well as your accounting. It reduces the manual efforts of an end user thus making a payment reversal process automated through the SAGE 300 ERP.

Will see the G/L Effect of Payment Reversal in the next blog.

Related Posts:

1. Closing Procedure Checklist for Sage 300 ERP
2. Monthly Audit Methodology in Sage 300 ERP
3. Year End process in Sage 300 ERP
4. Financial Reporter in General Ledger Module of Sage 300 ERP
5. Lock – Unlock Fiscal Period Module wise in Sage 300 ERP

Process Customer Refunds in Sage 300 ERP

$
0
0

Sage 300 ERP (formerly named as Sage ACCPAC ERP) introduced Refund Entry process in 5.4 Version, where the user gets an option to payback his customer either in Cash, Check or Credit Card. There could be different reasons to pay back the customer, it could be short closure of an order for 100% advance paid, could be discounts on bad order delivery, cash back if the customer reaches a particular sales target etc. Let’s take an example where we have processed a credit note to the customer for any one of the reason mentioned above and now the customer wishes to have a refund instead of replacements.

The New Stuff: Order Entry Reports in Sage 300 ERP

This Credit Note will be used by the user to process Refund Entry. To process refunds, navigate to A/R à A/R Transactions àRefund Entry as illustrated in the below screenshot

1

Select the Customer by clicking on the Finder where one will be able to see list of all the Customers.

2

Refund Date is the date on which you are going to process the refund/print the check.

3

Then click on the Document Number to select the Credit Note against which you want to process the refund and put in the amount that you wish to refund in this entry.

4

Below screenshot shows the selection of the Credit Note based on which user will make the refund entry.

5

In the below screenshot user selects the mode of payments Cash/ Check/Credit Card by which user wishes to make the refund entry and also user will enter the Refund Amount in Payment Amount marked.

6

Here the user chose to make payment through cash so the selection is Cash in Payment Type and the refund amount is 20 in Payment Amount. The same amount is reflected in the Customer Cash Amount marked in the below screenshot. After following these simple process user can add and Post the Refund Entry.

7

If user wishes to make payment by two different modes of payments then the user should make two different Refund Entries. For e.g. if a user wishes to make some part payment by Check and the remaining by cash then user will have to make one entry for check and another entry for cash.

Related Posts:

1. Greytrix Extended Report Pack for Sage 300 ERP
2. Order Entry Reports in Sage 300 ERP
3. Purchase Order Reports in Sage 300 ERP
4. Customer Transactions and AR Aged Trial Balance Reports

Advance Payment to a Vendor

$
0
0

The intent of this blog is to help you in making advance payment in Sage 300 ERP with all possible scenarios. Here, in Sage 300 ERP, we call this advance payment as Prepayment and this prepayment can be done in both Account Payable and Account Receivable Modules. But at this moment we will be considering the Prepayment to a vendor only.

1

Let’s consider a case where we need to do an advance payment of Rs. 800 to a vendor against whom we already have one open invoice. Now, before creating prepayment entry we are printing following two reports just to check the effects of Prepayment entry before and after its posting:

The New One: G/L Segment Code Vs. G/L Optional Fields

  • The Transaction Listing Report of the bank which you are going to use at the time of creating Prepayment entry.

2

  • The Aged Payable Report for the vendor to whom you are going to do the advance payment.

3

————————————————————————————————————————————
Tips and Tricks for Sage ERP X3… Greytrix Sage ERP X3 Blog
————————————————————————————————————————————

To issue prepayment, open Payment Entry form under A/P Transactions of Account Payable Module and follow the steps given below:

  • Enter required bank code and Vendor number with all other details in prepayment screen.
  • Select Transaction type as Prepayment and remit to location where you want to send payment to vendor.

4

  • Enter Prepayment amount which you want to pay in advance in Payment Amount field.
  • Select Payment code defined in masters.

5

  • If you select a code that uses a Check payment type, fill in the following fields:
    • Print Check – mark the checkbox if you have check printing configured in system
    • Check Number
    • Check Language
  • If you select a code that uses a Cash payment type, enter the cash account from which to disburse the payment. If you do not enter a cash account, Accounts Payable credits the bank account.

Then, select Apply By as Document number, Order Entry number or PO number if you want to apply prepayment against any of them and accordingly select their transaction number in Apply To, otherwise keep Apply to field blank which will reduce the payable amount against selected vendor but does not knock off any balance from existing open documents.

6

Lastly, add and post the transaction to get its effect in Bank and Vendor’s account.

Now, it’s time to check out the effects of created Prepayment entry in our Sage 300 ERP system. To do this let’s print Bank’s Transaction Listing report and vendor’s Aged payable:

The Transaction Listing Report of the bank which shows Bank is credited by the amount entered in Prepayment Entry.

7

The Aged Payable Report for the vendor which shows vendor’s account is debited by prepayment amount

8

To see mentioned effects in one screen move to General Ledger’s Batch list and open the GL batch which is created during Prepayment posting:

9

Since we did not apply this prepayment against any open documents, it will appear under the open documents in Transaction Listing. If the document is applied against the said invoice, the transaction listing report would not display the Invoice and Prepayment under open documents but will appear only if show applied documents and fully paid transactions check-boxes.

10

Hence, with Sage 300 ERP we can create Advance Payments with every possible scenario like different Payment Mode and Apply Document.

Here we saw how to create prepayments (advance payments) to vendors using Sage 300 ERP. We would soon write about how to create AR Prepayments using Sage 300 ERP.

Also Read:
1. Print Customer Statements in Sage 300 ERP
2. Generate Reports for Slow Moving Items in Sage 300 ERP
3. Customer Transaction and Aged Trial Balance Report in Sage 300 ERP
4. Account Receivable Transaction Reports in Sage 300 ERP

Financial Effect of Payment Reversal Transaction in SAGE 300 ERP

$
0
0

In our previous blog we have discussed on the Payment Reversal transaction and the effect of it on Bank Book in SAGE 300 ERP http://www.greytrix.com/blogs/sageaccpacerp/2013/10/30/reverse-transactions-payment-reversal-transaction-in-sage-300-erp/

In this blog let’s understand the effect of Payment Reversal on Bank G/L and Vendor Balance. Scenario to understand the GL Effect is there is a Payment of 1,500 made to Coastal Heating of Ottawa – Vendor ID 1400 which is reversed using Bank Reversal screen on account of incorrect date selection.

Effect of Payment Reversal on Bank GL Balance in SAGE 300 ERP:

1 GL Transaction Listing

In the screen print above, have a look at the highlighted part of the report.  The report is the GL Transaction listing of the Bank Account.  The 2nd entry is coming from the A/P Payment Entry of 1,500 which is on credit side where as the first is the Reversal Entry of the A/P Payment of 1,500 which is on debit side. Please note the report is sorted on description and hence the reversal effect is seen first and then the originating entry.

New Stuff: Advance Payment to a Vendor

Now let’s see the Effect of Payment Reversal on Vendor Balance in SAGE 300 ERP:

1 AP Vendor transaction

In the above screen print, have a look at the highlighted transaction. We can see the selected part in the report out of which 1st is the A/P Payment Entry of 1,500 which is in negative (credit).

The 2nd is the Reverse Entry of the A/P Payment of 1,500 which is in positive (debit). One more thing you can see is before Payment No. R is added as a prefix which indicates the Reverse Transaction.

Through the reference of G/L Transaction Listing Report and A/P Vendor Transaction Report we can come on conclusion that our Bank GL and Vendor Balance are also properly affected. After posting Payment Reversal transaction, system automatically affects the accounting in SAGE 300 ERP.

Also Read:

1.  Reverse Transactions – Payment Reversal Transaction in SAGE 300 ERP
2AP Vendor Activity in Sage 300 ERP
3Check Printing in Sage 300 ERP
4Generate Separate Payment for each Invoice

Advance Receipt from a Customer

$
0
0

This is in continuation to our earlier post where we discussed about Advance Payment to a Vendor, in this blog lets see about Advance Receipt  in AR module.

In AR module, we will follow similar procedure to raise prepayment entry i.e. we will first note the balance of Bank as well as Customer in our books and then enter the prepayment entry so that we can see the entry effects to the relevant accounts.

Let’s consider a case where customer does advance payment of Rs. 800 in favor of your organization. Now, before creating prepayment entry we are printing following 2 reports just to understand the effects of Prepayment entry before and after its posted:

1. The Transaction Listing Report of the bank in which you are going to deposit the advance ( Prepayment) amount.

1 Transaction Listing

2. The Transaction Listing Report of the Customer who has done advance payment to you.

customer transacti

———————————————————————————————————————————
Tips and Tricks for Sage ERP X3… Greytrix Sage ERP X3 Blog
———————————————————————————————————————————

HOW:

To create prepayment, open Receipt Entry form under A/R Transactions of Account Receivable Module and follow the steps given below:

1. Enter required bank code and Customer number with all other details in prepayment screen like document date and posting date of the document.

2. Select Transaction type as Prepayment.

receipt
3. Enter Prepayment amount which you have received in advance in Receipt Amount field.
4. Select Payment code defined in masters to identify the types of payments you process and categorize receipts for the deposit slip.

2. receipt

5. Then, select Apply By as Document number, Order Entry number, PO number or Shipment number if you want to apply prepayment against any of them and accordingly select their transaction number in Apply To, or one can keep Apply to field blank if the source document is unknown or advance is against multiple document.

receipt

Right now as per ideal case, we are not applying customer’s advance payment to any of his existing open invoice considering that this advance payment is done for some other invoice for which he raised a PO .

New Stuff : Defining Specific Location for an Inventory Item in Sage 300 ERP

6. Lastly, add and post the transaction which will hit relevant Bank’s and Customer’s account.

Now, to check out the effects of created Prepayment entry in our Sage 300 ERP system print Bank’s and Customer’s Transaction Listing report:

1. The Transaction Listing Report of the bank which shows Bank is debited by the amount entered in Prepayment Entry.

transaction listing

2. The Transaction Listing Report of the customer which shows Customer’s account is credited by prepayment amount.

customer transaction

To see mentioned effects in one screen move to General Ledger’s Batch list and open the GL batch which is created during Prepayment posting.

GL JE

Now, we will create one invoice of Rs. 800 for same customer for which he did the advance payment and apply the advance paid amount to that invoice.

ar receipt

As you can see in below screen shot of Customer’s Transaction Listing report, prepayment amount gets knocked off  after applying it to the invoice raised against same customer:

customer transaction

In this blog we learnt that how to create Advance Receipts with different Payment Mode and then how to Apply them to the open Documents.

Also Read:
1Financial Effect of Payment Reversal Transaction in SAGE 300 ERP
2Advance Payment to a Vendor
3Reverse Transactions – Payment Reversal Transaction in SAGE 300 ERP
4AP Vendor Activity in Sage 300 ERP

Quick Journal Entry in Sage 300 ERP

$
0
0

The General Ledger in Sage 300 ERP (formerly known as Sage ERP Accpac) has a feature of Quick and Normal Entry Mode that controls the number of fields visited when you are adding transaction details. This feature provides users with an option either to auto copy common fields within the same entry saving data entry time.

New Stuff : Advance Receipt from a Customer

There are following two Entry Modes in General Ledger, to check the same navigate to General Ledger -> GL Batch List

GL JE

Normal Mode: When you check this option, the cursor goes to each field in the grid when the Tab key is pressed.

Quick Entry Mode: When this option is checked, the cursor visits each field in the detail grid for the first entry. For the next subsequent entries, the Reference, Description, Comment and the Detail Date Fields are auto filled from the information entered for the first detail. These fields are open to edit.

Let’s take an example to see how this feature in GL simplifies the task of the data entry operator. Consider that a GL Journal Entry is being passed for office expenses whose detail description, reference and comment fields data should be the same. In this scenario, the Entry Mode to be selected should be Quick.

2 GL JE

The details of the Reference, Description and the Comments needs to be entered in the first line. When the user clicks on the “Insert” key to start filling the necessary details for the next account, the system displays the same Reference, Description and Comments for the next Line. These details can then be changed by the user, if required.

Hence, now a user needs to key in the details only for the first detail line and once it is identified that the same details needs to be pasted for the subsequent detail lines, then it can be easily done through Quick Entry Mode in GL, reducing a lot of manual work and data entry efforts.

Also Read:

1. Auto-Reverse General Ledger Entries in Sage 300 ERP
2. G/L Segment Code Vs. G/L Optional Fields
3. Enter Quantity against Account Number in GL Journal Entry of Sage 300 ERP
4. Provisional Posting in Sage 300 ERP


Define Budgets in Sage 300 ERP

$
0
0

With Sage 300 ERP (Sage Accpac) we can upload up to five sets of budgets for an account either from Budget maintenance screen or using excel/excel macro. In this blog, we will be focusing on the way where will be uploading the budget using budget maintenance screen.

To use this option navigate to General Ledger >> G/L accounts >> budget maintenance and follow the following steps to load budget for an account:
a. Enter the account for which you want to load the budget.
b. Select the Budget set which is nothing but the budget fiscal set. You can define up to five budget fiscal set in Sage 300 ERP depending on your requirement. For example one for original budget, another for revised budget and so on.

You can select the budget set as per the settings done in Posting tab of the G/L Options form which tells you which budget sets (if any) are locked. You cannot add, change, or delete information contained in a locked budget set.

1 GL Options

c. Select the year for which you want to view, modify and define the budget.
d. Click the Go button to get the budget information appear in detail grid.

1 Budget Maintenance

e. Select the budgeting method which in turn will calculate the budget amounts based on specified amounts and percentages using any combination of budget methods.
f. Then, click on Add to at the bottom of screen which will modify the defined budget accordingly.
For example: if budget method is Fixed amount then then budget will get modify as follows:

2. Budget Maintenance

Where,

Amount supplied in Fixed Amount field got added to Budget Amount of defined account for all periods.

New StuffQuick Journal Entry in Sage 300 ERP

And, if budget method is Base percentage increase then budget will get modify as follows:

3 Budget Maintenance

Where,
In the Base Amount field, enter the base amount you want to begin with (that is, the base amount you want to use to calculate the budget for Period 1). In the % Increase field, enter the percentage (in decimal notation) by which the base amount should be increased.
g. Next, you can use Fiscal Set Look-up feature for any of the below mentioned purposes:
     i. To display actual and budget sets for any general ledger account selected in Account field.
    ii. To Copy Budget of an account displayed to the one selected at the bottom using any of the copying method.

4. Budget Maintenance

h. Further, Replace button can be used to replace the existing budget amounts in the budget set with the amounts displayed in the Inquiry Amount column or from the budget method fields.
i. In addition to this, you can use Delete function to remove a budget set from an account.
j. When the desired amounts are displayed for the fiscal periods in the Budget Amount column, click the Save button.
k. To clear all the period amounts for the displayed budget set:

In this blog we concluded how one can maintain budgets in Sage 300 ERP for any of the account defined in our Chart of Account. Next, we would be soon writing on the method by which you can use excel macro to upload the budget for multiple accounts at one shot.

Also read:

1.  Fiscal Set Comparison in Sage 300 ERP 2012
2Closing Procedure Checklist for Sage 300 ERP
3Sales History Report in Sage 300 ERP
4Financial Reporter Commands in Sage 300 ERP

Define Budget Using Macro

$
0
0

So far we’ve explored the way through which we can define the budget for individual accounts, check out the same on http://www.greytrix.com/blogs/sageaccpacerp/2013/11/11/define-budgets-in-sage-300-erp/. Now, we will look into another methodology which will be helpful in updating the budget for multiple accounts at one shot. Here, we will use a macro that comes with Sage 300 ERP which can be accessed through Macro folder present at Sage application path. Using this macro we can export and modify existing budget of GL accounts in excel sheet and then import the same in Sage application in single click.

Let’s consider an example where we are required to load a budget for range of accounts in fiscal period 2020:

First step to proceed with this is to open the excel macro with name BUDGET present at Sage application path. In opened excel sheet, click on Retrieve Budget to fetch the budget data defined for range of accounts. As soon as you click on Retrieve Budget, Open Company screen will pop up in which you have to enter the Admin password of the company with required company’s database name and session date.

1. Budget Macro

On clicking OK, system will ask for the range of accounts with fiscal year for which you want to retrieve the budget. So, enter the required details and retrieve the data.

After that, key in the new budget for every period of accounts as shown below:

2. Upload Budget

New StuffProcess Customer Refunds in Sage 300 ERP

Going forward click on Export Budget and enter the Fiscal year in which you want to update the new budget in Sage 300 ERP.

3. Enter Fiscal year

Finally, move to Budget Maintenance screen in Sage 300 ERP and review the updated budget.

Hence, we can say that this way of uploading budget in Sage 300 ERP is faster and simpler than the one where we need to load the budget individually for each and every account. However, uploading the budget in Budget Maintenance screen has its own significance when it comes to updating the budget for single account for particular fiscal period because in that case it will be time taking task to retrieve and export the budget using excel.

Also read :

1. Quick Journal Entry in Sage 300 ERP
2. G/L Segment Code Vs. G/L Optional Fields
3. Financial Reporter Commands in Sage 300 ERP
4. Fiscal Set Comparison in Sage 300 ERP 2012

“Error code: 713, Class not registered” on opening customized screen in Sage 300 ERP

$
0
0

In Sage 300 ERP, user can come across some complicated error messages while opening screens (UI) with no clue as to what these error could be. In this blog we will discuss on one of the common error while opening the customized screen or a third party module. Many times when Standard Sage 300 screen is customized by third party by adding some additional functionality in it; user came across some  issue while opening the customized screen.

Refer below screenshot, where Standard sage 300 PO receipt screen is customized by third party module where additional functionality is added into it. When user tries to open this customized PO Receipt screen user get an error “error code: 713, Class not registered”. Refer the below screen shot.

New Stuff: Define Budget Using Macro

Error1

Click on OK button error popup

Error2

User will again get error popup showing that View ID cannot open. Close this error popup, user will receive below error popup.

Error3

This error is due to the customized screen is not registered in the registry

To overcome this error,

1. Register the particular .ocx file by running regsvr32 command

a. Go to Start >> Run >> write regsvr32  >> space >> drag drop .ocx file >> Click OK

2. Or user can run Regacc command

Also read :

1. Data Activation Error in Sage 300 ERP
2. Database Profiles table error on Sage 300 Workstation
3. Error 13 opening record file Occurred in Sage 300 ERP
4. Error Occurred while Opening View

AR Customer ledger/ Transaction

$
0
0

Transaction is a communication between buyer and seller to exchange goods or payments. User can view all the transaction of customer in a single report (AR Customer Transaction Report) whether it is an invoice or credit note or debit note in Sage 300 ERP. We have developed a similar report AR Customer ledger/ Transaction Report with some additional features like opening and closing balance which is a part of Greytrix Extended Report Pack for Sage 300 ERP.

Also Read: Greytrix Extended Report Pack for Sage 300 ERP

Standard AR Customer Transaction Report keeps track on current status of a Customer’s Account and list of transactions that were posted to customer accounts over a particular period.

Our custom report is almost similar to standard Customer Transaction report. It provide different filtering option like Customer No/Group, Date range, different transaction types, different report type like Summary, Detail, Applied Summary etc. as in standard one.

Additionally we have provided more option in report UI to display Adjustment and Bank Reversal entry. Also it displays Customer Wise opening and closing balance over a period of time.

AR_Cust_UI

After printing report, the format of report will be as follows:

Customer Transaction

This report can also be further used to get running balance of a customer over a period of time.

Also Read:
1. Print Customer Statements in Sage 300 ERP
2. Customer Transaction and Aged Trial Balance Report in Sage 300 ERP
3. Account Receivable Transaction Reports in Sage 300 ERP
4. Propagating Optional Field Value from Posted AR Invoice into GL Entry in Sage 300 ERP
5. Order Entry Reports in Sage 300 ERP

Make Use of Custom Directory to Print Same Report in Different Formats

$
0
0

Sage 300 ERP (Sage Accpac) comes with Customization Directories form using which you can keep record of all customized reports along with the standard reports of Sage 300 ERP (Accpac). In addition to this it can be used where you want 2 or more users to print single report with different formats.

Let’s take an instance where you want PO receipt report (porcp01.rpt) to be printed as customized one when it is printed by user SMITH and as standard report when it is printed by rest of the Sage Accpac users.

To make this happen, create one folder anywhere in the system on which Sage 300 is installed and put your customized report in it with the same name and path as of standard report. For example, if you are printing any report of PO module then you have to keep the customized report at Temp/PO60A/ENG, where Temp is the folder created by you.

Reports folder

New Stuff : AR Customer ledger/ Transaction

 After that, provide the access of created folder to the required user.

1. Customization Directory

Now, if you print this PO receipt report with SMITH login then system will print the customized report from temp folder, whereas if same report would be printed by other users then system will automatically take default path of standard report i.e. D:\Sage\Sage Accpac\and will print the report.

Note: Customization Directory path is case insensitive.

In addition to this, one more point to take care is that if you are printing any report which has .dll file associated with it then; you have to place that .dll file in respective sub-ledger folder. For example: if you are required to print Purchase Order then you have to put POPORN.dll in PO60A folder as shown below:

dll report path

Hence, this feature of Customization Directory contributes to the flexibility of Sage 300 ERP by allowing multiple users to print same type of reports in different formats.

Also read:

1Custom Report would not print even after setting Customization Directory Path in Sage Accpac ERP
2How to hide customized screens and Reports for some users?
3. Change Print Destination in Sage 300 ERP
4How to hide customized screens and Reports for some users?

Viewing all 1487 articles
Browse latest View live


<script src="https://jsc.adskeeper.com/r/s/rssing.com.1596347.js" async> </script>