Quantcast
Channel: Sage 300 ERP – Tips, Tricks and Components
Viewing all 1489 articles
Browse latest View live

Standard cost functionality in Sage 300 ERP

$
0
0

Standard costing is an important aspect of cost accounting.Standard costs are usually associated with company’s cost of direct material, Consumables, Direct labor and overhead.

Rather than taking actual cost of direct material, Consumables, Direct labor and overhead many companies prefer taking expected or standard cost in their books of accounts.

By adopting standard costing method, inventories and cost of goods sold will reflect the standard cost, not the actual cost of product.

We can configure standard costing Method in Sage 300 ERP with few easy steps. We need to follow further step to configure standard cost in Inventor control module of Sage 300 ERP.

    1. Selection of Standard cost in Inventory account set.

Account Set

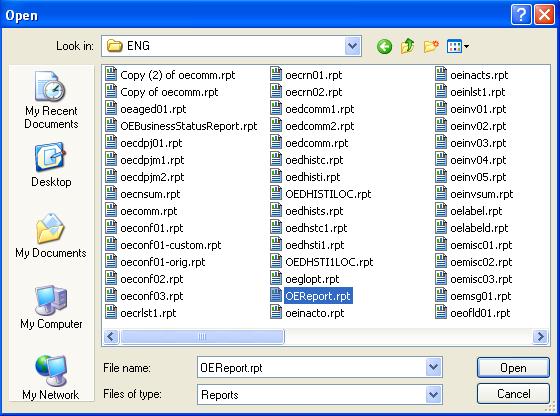
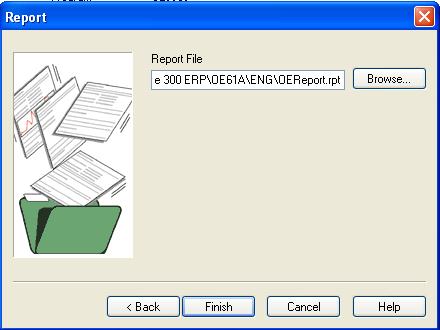
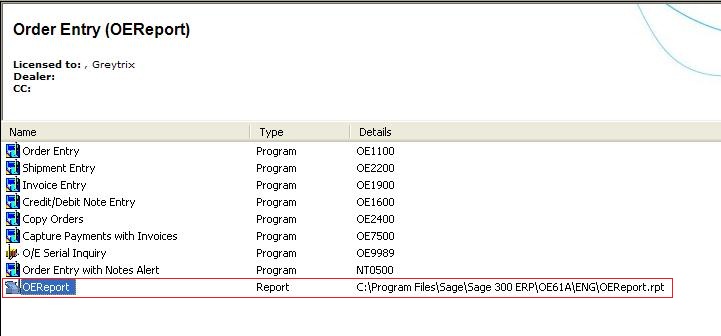
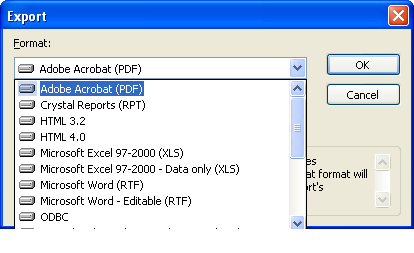
New Stuff : Make Use of Custom Directory to Print Same Report in Different Formats

In Account set we should create one account set by selecting Costing method Standard Cost from drop down.

      2. Mapping of Standard cost Account set for items for which you want to                  configure standard costing method.

Untitled

In Inventory module at the time of creation of IC items we should select account sets for which costing method configured by us as Standard Cost.

   3. Fixing of standard cost to Inventory items

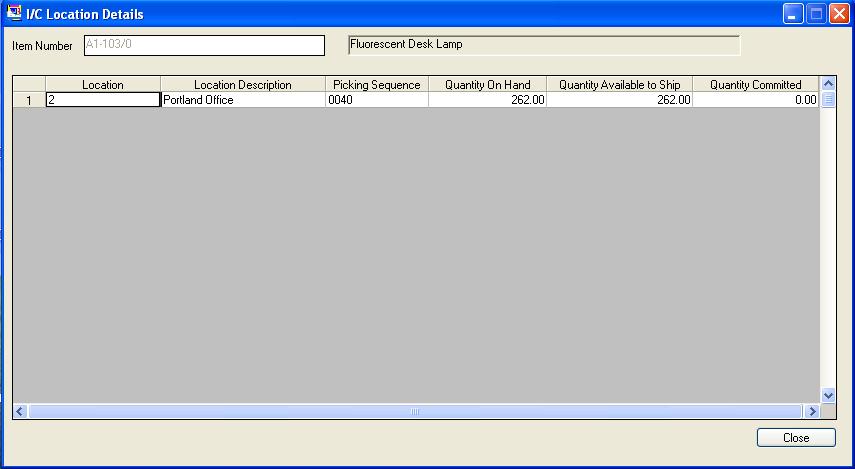
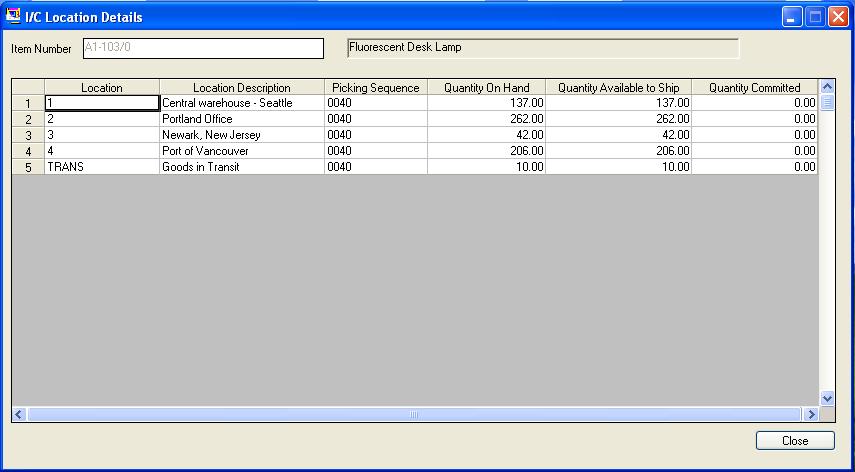
Inventory control >> IC Items and price list >> Location details.

Location details

In location detail we have to configure Standard cost of product as mentioned in above screen shot.

In respect of above example in Sage 300 ERP, company’s inventory will Debit on the basis of actual cost but cost of goods sold will be debited on the basis of configuration in location details under the column Standard cost.

We will visit  the effects of this costing method and cost variance analysis in our next post.

Also read:

1. Different Costing methods in Sage 300 ERP
2Sellable and Non-sellable items in Sage 300 ERP
3Location Wise I/C Item Details
4I/C Physical Inventory Reconciliation Process


Reverse Transactions – Receipt Reversal Transaction in SAGE 300 ERP

$
0
0

Posted receipts cannot be edited in any ERP. SAGE 300 ERP allows you to reverse them to correct errors.

One might need to reverse a receipt when his customer stops payment on a receipt or if a receipt comes from an account with non-sufficient funds or check no. mentioned in receipt was wrongly entered or if receipt is made against another customer or so on.

When we do receipt reversal in SAGE 300 ERP that was entered in Accounts Receivable, Bank Services automatically updates the customer account in Accounts Receivable.

For an e.g. firstly let’s have a look on the Bank Book Balance. Then after making Receipt entry we can analyze the Bank Book Balance and see the impact.

 Untitled


Now let’s post the A/R Receipt entry of 1,000 USD (US Dollars) and the payment method is “Check”.

Receipt Entry

Now you can see the impact of A/R Receipt entry on the Bank Book balance in SAGE 300 ERP.

 Untitled


A Deposit is increased by 1,000 USD and now it is 8,695.99 USD.

A Current Balance is also increased by 1,000 USD and now it is 9,696.99 USD.

Reverse Transactions (Receipt Reverse):

You can see below the example of Reverse Transaction for A/R Receipt (Accounts Receivable) against customer.

Reverse transaction

After selecting the Bank Code, Source Application, Reversal Date, Customer posts the entry.

After this your Bank Book and Bank GL balance both will be reduced.

Just with a few clicks the Receipt Reversal entry will be generated in SAGE 300 ERP, here no need to pass the manual entry for making Reverse Receipt.

New Stuff : Standard cost functionality in Sage 300 ERP

Now we can see the impact and verify the Bank Book Balance, Bank GL Balance and Vendor Balance one by one.

Bank Book Balance Status after A/R Receipt Reverse Transaction:

In below box you can identify the Bank Book Balance.

Untitled


A Deposit is remaining same but Withdrawal is increased by 1,000 USD and Current Balance is decreased by 1,000 USD.

G/L Effect of Payment Reversal Transaction in SAGE 300 ERP

Effect of Payment Reversal on Bank GL Balance in SAGE 300 ERP:

Transaction Listing

Here we can see the selected part in the report out of which second is the A/R Receipt Entry of 1,000 which is on debit side.

The first is the Reverse Entry of the A/R Receipt of 1,000 which is on credit side. 

Effect of Payment Reversal on Vendor Balance in SAGE 300 ERP:

Customer transaction

We can see the selected part in the report out of which second is the A/R Receipt Entry of 1,000 which is in positive (debit).

The first is the Reverse Entry of the A/R Receipt Entry of 1,000 which is in negative (credit); one more thing you can see is before Receipt No. R is added as a prefix which indicates the Reverse Transaction.

SAGE 300 ERP takes care of both your bank as well as your accounting. It reduces the manual efforts of an end user thus making a payment reversal process automated through the SAGE 300 ERP.

Through the reference of G/L Transaction Listing Report and A/R Customer Transaction Report we can come on conclusion that our Bank GL and Vendor Balance are also properly affected. After posting Receipt Reversal transaction, system automatically affects the accounting in SAGE 300 ERP.

Also read:

1. Reverse Transactions – Payment Reversal Transaction in SAGE 300 ERP
2.  Advance Receipt from a Customer
3Reverse Transaction feature in Sage 300 ERP
4Handling Additional Costs and its Variations in Sage 300 ERP

Transaction filtering and sorting feature under Reconcile Statements Form

$
0
0

Bank Reconciliation is one of the key processes of any business. Sage 300 ERP offers an excellent Bank Reconciliation module which automates and simplifies the reconciliation process.

Reconcile Statements Form (available in Bank Transactions folder) facilitates the reconciliation of bank account from the accounting records and statement from the bank. The Reconciliation tab on the Reconcile Statements form list all outstanding deposits and withdrawals. It has a function to reconcile the balances and record any adjustments.
Normally, you reconcile your bank accounts at the end of each fiscal period, when you receive the statement from the bank. There can be hundreds of transactions that need to be reconciled. Browsing individual transaction looking for transaction number, amount can be very tedious.
In this blog we will discuss about the standard transaction filtering/sorting options that Reconcile Statements Form provides to quickly locate the transactions.

Basically you can use the Display, Transaction Type and Sort By fields to filter outstanding deposits or withdrawals, and sort them by date or transaction number.

The New Stuff : Reverse Transactions – Receipt Reversal Transaction in SAGE 300 ERP

Now let’s looks at individual filter/sort options.

Display:
You can use this option to restrict the list of transactions to those that are outstanding or cleared.

Transaction Type:
This option allows to restrict the transaction by the type i.e.; withdrawals or deposits.

Sort By:
Use this option to sort the transactions either by transaction number or transaction date.

Let’s say; if you wish to list only outstanding withdrawal transactions. Then first you need to choose Outstanding option under Display, Withdrawals as Transaction Type and choose to sort by Date.
With this the filtering; Reconciliation tab will only list the desired transactions.

1

You can save your selections for these fields (Select Save Settings As Defaults from the Settings menu) so these selection will appear automatically the next time you use the form.

By using the above mentioned feature you can save the efforts in locating the transactions and accomplish the reconciliation on time.

Also Read :
1. Bank Reconciliation Reports in Sage 300 ERP
2. Create Bank Entry from Reconciliation Screen
3.Post Bank Entries from Reconciliation Screen in Sage 300 ERP
4.Working of Auto Bank Reconciliation in Sage 300 ERP
5.Auto Bank Reconciliation in Sage 300 ERP

Advance Search feature for Reconcile Statements Form

$
0
0

In our earlier post, we discussed about the standard filtering/sorting feature available on Reconcile statement Forms.
http://www.greytrix.com/blogs/sageaccpacerp/2013/11/18/transaction-filtering-and-sorting-feature-under-reconcile-statements-form/

In this article we will discussed about the enhancements that we made to search the transactions in conjunction with the standard filtering and sorting option.

Continuing with our earlier example; whereby we need to only list outstanding withdrawals transactions. This can be achieved using the standard filtering option. But now let’s say we need to locate a particular check using a check no. or find the all checks for a particular payee within the filtered transactions. With our Advance Search feature it is feasible to accomplish this type of complex searches.

We have provided Search By option on the Reconciliation tab under Reconcile Statements Form beside the standard selection fields.

The New Stuff : Reverse Transactions – Receipt Reversal Transaction in SAGE 300 ERP

Under Search By option we have provided search fields which are normally required for searching the transactions.

1. Transaction Number (i.e.; Deposit No. or Check No.)
2. Entry Number (Bank Entry No. or Transfer Document No.)
3. Amount (Withdrawals or Deposits Amount)

After selecting the required selection field; you need to enter the search value and by using the Go button all matching values can be searched from the listed transactions.

Considering our example; where we need to search the particular check. Here we will have to select Transaction Number under Search By selection and enter check no. as search value. The program will locate the exact withdrawal transaction having the entered check no. and still keeping other filtered records intact (i.e.; outstanding withdrawal transactions).

fig1

Hence using the combination of standard filtering/sorting option and search by fields; it’s easier to locate the transactions.

Note: This customization is done using Sage 300 SDK, as a result easy to deploy and it works with Sage 300 ERP 2012 and Sage 300 ERP v6.0A

Also Read :
1. Bank Reconciliation Reports in Sage 300 ERP
2. Create Bank Entry from Reconciliation Screen
3.Post Bank Entries from Reconciliation Screen in Sage 300 ERP
4.Working of Auto Bank Reconciliation in Sage 300 ERP
5.Auto Bank Reconciliation in Sage 300 ERP

Quantity On Hand Drilldown feature for OE Order Entry Screen

$
0
0

On Order tab of OE Order Entry screen the item quantities region displays item quantities for the currently highlighted line item – for the selected shipping location and for all the locations. Drilldown buttons are available besides Quantity on Sales Order, Quantity on Purchase Order and Qty Committed fields which provides detailed information.

Similarly we have provided a drilldown link for Quantity on Hand field. In this blog we shall review this enhancement.

Likewise other item quantities fields we have provided custom drilldown buttons to show the details for the location specified in the selected detail line and another one for all the locations.

Note: Item quantities are given in stocking unit of measure.

The New Stuff : Advance Search feature for Reconcile Statements Form

Order Entry

The drilldown button besides location specific (Qty. On Hand) quantities; display the item location details for the location specified in the selected detail line. The form lists the details such as Picking Sequence, Qty. On Hand, Qty. Available to Ship and Qty. Committed.

Location1

The drilldown button besides all location (Qty. On Hand) quantities; displays the item location details for all the locations.  The form lists the details such as Picking Sequence, Qty. On Hand, Qty. Available to Ship and Qty. Committed.

All Location
Thus the Qty. On Hand drilldown buttons provides useful information regarding item quantities from the item location details.

Note: This customization is done using Sage 300 SDK, as a result easy to deploy and it works with Sage 300 ERP 2012 and Sage 300 ERP v6.0A.

Also Read :
1. How to Calculate Current Quantity on Hand on Custom Reports in Sage Accpac ERP
2. Location Wise I/C Item Details
3. Defining Specific Location for an Inventory Item in Sage 300 ERP
4. How to set default reserved quantity in Sage 300 ERP
5. Advanced Features in Order Entry screen of Sage 300 ERP 2012


How To Add A Macro To Accpac Desktop of Sage 300 ERP

$
0
0

In our last blog on Accpac Macro, we discussed about Provide Icons to VBA Macro.

http://www.greytrix.com/blogs/sageaccpacerp/2013/10/19/provide-icons-to-vba-forms/

Following few easy steps you can add Macro to Accpac desktop:
1. For adding a macro to Accpac Desktop “Right Click” on Sage ERP desktop.
2. Then go to “New” and select the option “Macro…” as shown in the below screenshot.

1

The New Stuff : Quantity On Hand Drilldown feature for OE Order Entry Screen

3. A new dialogue box opens, where user provide the “Title” to the Macro, as shown in the below figure.

2

Note: Here if you select “All Users” option, then folder will be accessible to all users.
4. On clicking Next on the above screen, user will have to select the required Macro file using the browse button.

3

Note: This Option is used to provide the macro Web deployed Accpac desktop.
5. Next, select the desired macro which is needed to be added to the Accpac desktop as shown in the below screenshot.

4

6. Select “Finish” to end the process as shown in the screenshot.

5

7. After Selecting “Finish”, the macro is added to the Accpac Desktop screen in the blank space as shown in the screenshot below.

6

Hence, by following these simple steps a macro can be added to Accpac desktop screen of Sage 300 ERP.

Also Read:
1. VBA Macro Errors related to EXD Files
2. Macros in Sage 300 ERP
3. IIS 405 PUT Method Not Allowed in IIS Manager
4. Run VBA Macro without Logging to Sage 300 ERP
5. Define Budget Using Macro

How To Add A Report To Accpac Desktop in Sage 300 ERP

$
0
0

In our last blog on “How to add a Macro to Accpac Desktop”, we discussed about adding macro on Accpac desktop.

http://www.greytrix.com/blogs/sageaccpacerp/2013/11/20/how-to-add-a-macro-to-accpac-desktop-of-sage-300-erp/

In this blog we will discuss few easy steps to add a Report to Sage 300 ERP desktop.

The New Stuff : Quantity On Hand Drilldown feature for OE Order Entry Screen

Following few easy steps you can add Report to Accpac desktop:
1. For adding a Report to Accpac Desktop “Right Click” on Sage ERP desktop.
2. Then go to “New” and select the option “Report…” as shown in the below screenshot.

1

3. A new dialogue box opens, where user provides the “Title” to the Report, as shown in the below figure.

2

Note: Here if you select “All Users” option, then the folder will be accessible to all users.
4. After giving a suitable “Title” to the report. Select the option “Next>”.
5. On clicking Next on the above screen, user will have to select the required Report using the browse button.

Report

6. Next, select the desired report which is needed to be added to the Accpac desktop as shown in the below screenshot.

4

7. Select “Finish” to end the process as shown in the screenshot.

Report_finish

6

8. After Selecting “Finish”, the report is added to the Accpac Desktop screen in the blank space as shown in the screenshot above.

Hence, by following these simple steps a report can be added to Accpac desktop screen of Sage 300 ERP.

Also Read :
1. Email Standard Order Entry Invoice Report in PDF or RTF Format
2. How to Calculate Current Quantity on Hand on Custom Reports in Sage Accpac ERP
3. Custom Report error in Sage 300 ERP
4.Modification of Balance sheet Report in Sage 300
5. Make Use of Custom Directory to Print Same Report in Different Formats

Quantity and Cost restriction in PO Transaction

$
0
0

Sage 300 ERP allow user to receive more quantity than quantity ordered while doing Purchase Order Transactions. But requirement varies from organizations to organizations.

One of our clients comes with a requirement to restrict user for receiving quantity and cost more than that of PO. To facilitate this, we have developed an add-on which restrict user to enter more quantity and cost than PO while doing receipt entry.

New Stuff: How To Add A Report To Accpac Desktop in Sage 300 ERP

We have provided a setup screen using which you can set up the option whether system will warn you or give an error message or simply ignore it. 

Setup

User can also set the tolerance level. It means if tolerance level is set at 10% and PO Quantity is 100, it will allow receiving up to 110 qty.  

Setup-Tolerance

Customized PO receipt Entry screen restrict user to enter receipt quantity more than the quantity entered in P/O entry for the selected item.

Our program will check the item quantity and will popup message “Quantity receipt cannot be greater than Quantity in PO”, when the user has entered the quantity and leave the box.

Message box1

It also restricts user when PO Receipt Extended cost is greater than PO Extended cost.
Our program will check the PO Receipt Extended cost and will popup message “The extended cost cannot be greater than Actual cost”.

Message box2

This feature is available in both PO Receipt Screen and PO Invoice Screen.
For PO Invoice too, it will work the same way as in PO Receipt. Only thing is for PO Receipt, it will work only if user has selected the PO Number in PO Receipt Entry Screen.

PO Receipt Entry

So what we take away from this blog is; using this add-on one can restrict user to not to receive more than the PO quantity and cost. Just in case if the user wishes to have more quantity to be received, he could create an additional Purchase Order and receive additional quantity on that new PO.

Also Read:
1. Editable PO Number field on O/E Shipment Entry for Sage 300 ERP 2012
2. Set Fractional Quantities in Sage 300 ERP
3. Pending Order Aging Report in Sage 300 ERP
4. How To Add A Macro To Accpac Desktop of Sage 300 ERP
5. Quantity On Hand Drilldown feature for OE Order Entry Screen


How To Add A Program To The Accpac Desktop of Sage 300 ERP

$
0
0

In our last blog, we discussed about “How to add a report to the Accpac Desktop”

http://www.greytrix.com/blogs/sageaccpacerp/2013/11/22/how-to-add-a-report-to-accpac-desktop-in-sage-300-erp/

Following few easy steps you can add a Program to Accpac desktop:

1. For adding a program to Accpac Desktop “Right Click” on Sage ERP desktop.
2. Then go to “New” and select the option “Program…” as shown in the below screenshot.

The New Stuff : Quantity and Cost restriction in PO Transaction

1

3. A new dialogue box opens, where user provide the “Title” to the Program, as shown in the below figure.

4

Note: Here if you select “All Users” option, then folder will be accessible to all users.

4. On clicking “Next” on the above screen, user will have to select the required program file using the browse button.

2

5. Select “Finish” to end the process as shown in the screenshot.

3

6. After Selecting “Finish”, the program is added to the Accpac Desktop screen in the blank space as shown in the screenshot above.

Hence, by following these simple steps a Program can be added to Accpac desktop screen of Sage 300 ERP.

Also Read :
1. How To Add A Macro To Accpac Desktop of Sage 300 ERP
2. Auto Execution of EXE file using Windows Scheduler in Sage 300 ERP
3. How to hide customized screens and Reports for some users?
4.Adding a new Icon or Menu under a Group/Folder on your Sage Accpac Desktop Task Pane
5. Create custom startup folder in Sage 300 ERP

Configuring Sage CRM v7.2 – Sage 300 ERP 2012 integration

$
0
0

Recently Sage has released Sage CRM v7.2- Sage 300 ERP integration module. We will be explaining how to configure the Sage CRM v7.2 integration to Sage 300 ERP in a very easy manner.

You just need to make sure that Sage CRM integration component is installed on Sage CRM server and Sage 300 ERP 2012 integration component checkbox is checked while installing Sage 300 ERP.

A) Configuration in Sage CRM v7.2
B) Configuration in Sage 300 ERP 2012

The New Stuff : How To Add A Program To The Accpac Desktop of Sage 300 ERP

A) Configuration in Sage CRM v7.2
1) Login to Sage CRM.
2) Navigate to Administration |Sage 300 ERP Administration.

Note : These options will be visible only if the Integration component is installed on Sage CRM instance.

3) Initially only 2 options will be visible to you. i.e. Setup Integration and About Sage CRM Integration.

Img1

4) Click on Setup integration to configure Sage 300 ERP 2012 parameters. You will get below screen. Configure as mentioned below.
 Database Id: Database name of Sage 300
Sage 300 ERP Company Name: Name of Sage 300 Company
Sage 300 ERP Server Name: net://<<Server Name>>:9000

Img2

5) As soon as Save button is clicked, you will see below screen in Sage CRM with Synchronize Tables and Sage 300 ERP additional options.

Img3

6) Click on the Sage 300 Database Level Security options and click on New button to configure CRM Username, Sage 300 Company Name, Sage 300 ERP User ID and Password.

Img4

7) Once it is done, Sage CRM configuration for Integration is done. You can check the same by clicking on Synchronize Tables option and then Synchronizing all the Tables.

B) Configuration in Sage 300 ERP 2012
1) Login to Sage 300.
2) Navigate to Sage CRM –>Sage CRM Setup.

Img5

  Note : These options will be visible only if the Integration component is installed on Sage 300 server.

3) Click Sage CRM setup.

Img6

a) Sage CRM instance name
b) Sage CRM server name.
c) Sage CRM web Services URL:
URL automatically gets updated based on entered Sage CRM instance and Sage CRM Server name after clicking on the Sage CRM Web Services URL.
d) Click on Save button.

4) Now, navigate to Workstation Setup.
5) Click Workstation Setup. You will get below box.

Img7

6) Click Test to get the confirmation message saying Sage 300 is now setup to communicate with Sage CRM Web Services.

Img8

Once done, Sage CRM v7.2 and Sage 300 ERP 2012 integration has been completed.

Also Read :
1. CRM for Starters in Sage 300 ERP
2. Backup your Company Database in Sage 300 ERP
3. Sage Advisor Update for Sage 300 ERP 2012
4. Installation of Sage 300 ERP Workstation Setup
5. Integration of Infrasys POS with Sage 300 ERP

How To Record A Macro In Sage 300 ERP

$
0
0

Sage 300 ERP have the ability to record Macro. In this blog we will discuss about the simple steps to record a macro.

Following few simple steps we can record macro in Sage 300 ERP:
1. To start recoding the macro, goto Macro. Then click Start Recording as shown in the screenshot below:

1

The New Stuff : Configuring Sage CRM v7.2 – Sage 300 ERP 2012 integration

2. Alternatively User can also use short cut provided on the Sage 300 desktop provided on the tool bar just below the Sage 300 ERP desktop menu.

2

3. When user clicks on the Start Recording button, a large red circle on the right end side of the status bar of the Sage 300 ERP desktop appears indicating the macro recording has started.

4. After selecting the Start Recording button, a Start Recording Dialogue Box appears in which the user has to fill the following information :

• Macro File: Here the user need to give the desired name to the macro which he is recording. One can also Browse the location where he wants to save the macro . Here including the file extension i.e. “.avb” is necessary.
Note: Do not save your macros in a subfolder of Program Files\Sage ERP Accpac. If you delete the \Sage ERP Accpac folder to re install Sage 300 ERP, later, your macros will be lost.

• Record Mode: On the Start Recording Dialogue Box there are two record modes present. User need to select either of the two present modes:
a. Record only Fields that change : User can select this option to record only the key fields or all other fields that is changed or edited by him as shown in the screenshot:

4

b. Record all fields : User can select this option to record all the fields that user accesses as shown in the below screenshot:

5

5. After selecting the appropriate Macro File and Record Mode options click Ok.
6. Now carry out the task you want the macro to perform. Macros record all operations that update your accounting data.

Note:  Keystrokes and Mouse actions are not recorded by the macro in Sage 300 ERP.

7. After performing all the actions and getting the macro information , inorder to stop recording the macro goto Macro on the Sage 300 ERP desktop menu and then click Stop Recording as shown in the screenshot below:

6

8. Alternatively, user can also simply click the Stop Recording shortcut button provided on the tool bar or double click the large red circle on the right end of the status bar on the Sage 300 ERP desktop in order to stop recording a macro.

7

Note :  Sage 300 ERP also always you to control the access rights to allow record macro using Security group in Administrative service as shown below. By default all user have the rights execute the macro.

macro

Hence, with the following above simple steps user can record a macro in Sage 300 ERP.

Also Read:
1. VBA Macro Errors related to EXD Files
2. Macros in Sage 300 ERP
3. How To Add A Macro To Accpac Desktop of Sage 300 ERP
4. Run VBA Macro without Logging to Sage 300 ERP
5. Define Budget Using Macro

How to Validate Purchase Receipt and Invoice in Sage 300 ERP

$
0
0

Use checklist to keep a record of your ongoing task and the steps that you have been taken towards completing them. It helps to have a daily routine to make sure that your company runs smoothly.

By Process, Purchase GRN value and Invoice value should match. If not, then there can be a case where the items are received and shipped and then Invoice is raised at different cost or exchange rate. Make use of the below checklist to ensure that you follow a routine while doing data entry in Sage 300 ERP.

Checklist for GRN:

  1. Check if the Receipt and Posting date is correct.
  2. Check if the Exchange Rate entered is proper.
  3. Make sure that the Bill To and Ship To location is not blank. The default data will flow from the         respective PO.
  4. Check the Quantity and Cost after receiving the items.
  5. Check the Taxes details at both the header level and at Item level.
  6. If the Additional cost is liable on the GRN, then it should be entered with appropriate details.
If it has to be loaded on Inventory, the proration method can be either Proration by Cost, Prorate by  Quantity or Prorate by Weight. In case of expense, it should be No Proration and an expenses account should be selected.
  7. Check the totals in the Total tab (Tax amount, additional cost, GRN amount) before posting.

Checklist for Invoice:

  1. Check the Quantity Invoiced against the GRN and also the cost.
  2. Make sure that the Exchange rate for GRN is same as the Invoice.

Invoice entry

New Stuff: Make Use of Custom Directory to Print Same Report in Different Formats 

3. In case of additional cost, check there are no changes made in the Invoice for additional cost amount neither a new additional cost should be added at the time of invoicing. The variation in cost,if any, has to be adjusted in AP.
4. If there are additional cost that has to be expensed out that can be added at the time of Invoicing.

Some Additional Details:

1. Make sure that there are no changes made in the GRN, in case when the Items are shipped.
This would result in cost in Offset if the costing method configured is FIFO (First In First Out)

2. Consider a scenario, when there is a partial GRN raised against a PO and the Receive All button is clicked, and then the system by default makes the PO as complete. This has to be changed manually to No and require entering the Quantity to be received manually.

receipt entry

By using this checklist, the end user of Sage 300 ERP can make sure that the transaction details records are up-to-date, thus ensuring the consistency and completeness of the data entered in the system.

Also read:

1Quantity and Cost restriction in PO Transaction
2Check Printing in Sage 300 ERP
3Requisition Approvals in Sage 300 ERP
4. Set Fractional Quantities in Sage 300 ERP

Drill Down to Source Transaction from GL

$
0
0

Sage Accpac has feature of “Drill Down” which I would like to share here. With the help of this Drill Down one can easily track the source of the Entry by just clicking on the Icon. This can be better understood with the below example.

Consider a situation where a Batch has been posted with “Batch Number 000005”, but one wish to know the details of the Order Entry as ‘Who is the Customer’, ‘When was the Order entered’, ‘When the Shipment was made’ and all questions of similar types, How to answer these question???

GL Batch List

The answer to all the above questions is the “Drill Down” option.

GL JE

When one clicks on the highlighted icon it will take you to the window where the Shipment Entry was made which can be seen in the below picture and one will be able to know all the details for that Order Entry by switching between different tabs.

Shipment

New Stuff: How to Validate Purchase Receipt and Invoice in Sage 300 ERP

Now if one wants to check the Order Entry against which this particular Shipment was made can be done by just clicking on the “Drill Down” Icon again and this will lead you to the below screen of the Order Entry.

OE

Here one can see the complete details of the Order Entry and cross check if any wrong entry has been done at the source itself or somewhere on the way to post a Batch.

This feature was limited to the header level in the previous versions of Sage Accpac, but in the later versions we can even Drill Down the quantities in hand at different locations.

Also read:

1. Quick Journal Entry in Sage 300 ERP
2. GL Account Code Change in Sage 300 ERP
3. Define Budgets in Sage 300 ERP
4. Enter Quantity against Account Number in GL Journal Entry of Sage 300 ERP

General Ledger Period End Maintenance

$
0
0

The feature which lets you drain-out the unwanted records from the system, which indeed reduces the overhead of storing an unwanted data in the system, is called as “Period End Maintenance”.

Follow the path to find this feature: Open General Ledger > G/L Periodic Processing > Period End Maintenance.

GL period end

1. Delete Inactive Accounts: It may happen that we had an account configured in our system initially but now in span of time we have stop using that particular account or we no longer need that account. In this case we mark that account as inactive to restrict the users from using it.
There may be several such inactive accounts laying in the system, unnecessary consuming valuable data space.
Identifying and deleting these accounts one-by-one would be very time consuming.
To make this happen at one-click you need to just select “Delete Inactive Accounts” check-box and click on process, by running this process all accounts with Inactive status will be deleted from the system permanently.
System will restrict you for deleting an account if that account contains posted transaction though the account is inactive.

New Stuff: How to Validate Purchase Receipt and Invoice in Sage 300 ERP

2.Delete Transaction Detail History/ Delete Fiscal Set History: As per the statutory requirements of every country there are certain years for which historical transactions data needs to be maintained in system. This can be configured in Sage 300 ERP while doing company setup. In case the statutory requirements change and the size of database increases heavily then one can use this option to delete transaction details history.
We can delete these transactions just by selecting “Delete Transaction Detail History” check-box. Click “Process” button.
General Ledger deletes historical financial, quantity, and budget details that are older than the number of years you specified for the Years of Fiscal Sets.

3.Reset Batch Number. We can use this option to set the batch number back to 1.Ideally we run this process at the start of new financial/fiscal year.

Also read:

1. Drill Down to Source Transaction from GL

2. Closing Procedure Checklist for Sage 300 ERP

3. Define Budgets in Sage 300 ERP

4. Quick Journal Entry in Sage 300 ERP

Set Document Numbering based on Bank Code for AP Module in Sage 300 ERP

$
0
0

In our previous blog, we discussed about how to Set Document Numbering based on Bank code for AR transaction in Sage 300 ERP. We have taken a step ahead and come up with Document Numbering for AP module.

Transaction List supported by Document Numbering for AP Module

1. AP Payment
2. AP Prepayment
3. AP Misc. Payment

The only thing user has to do mapping in the “Numbering Mapping screen” and Greytrix Document Numbering will do rest of all the things.

New Stuff: General Ledger Period End Maintenance

In Numbering Mapping screen, select a document Type as A/P Payment; select a numbering method as Bank Code, select a bank for which user want to set numbering e.g. bank code as “CCB”; select a structure; assigned prefix and set next number.

Numbering Mapping

Now whenever user will make AP Payment transaction against CCB bank, the number will get generated (refer the below screen shot).

AP payment Entry

Also Read:

1. Greytrix Document Numbering Series for Sage Accpac ERP
2. Set Document Numbering for Sage 300 ERP on the combination of Account Set and Location
3. Grouping feature in Document Numbering Series for Sage Accpac
4. Configuring Document Numbering for Sage 300 ERP


Export Crystal Report in Multiple Formats

$
0
0

Sage 300 ERP is rich with different features which are user friendly and help user to make their work more convenient. Exporting the crystal reports in various formats is one of these features. In Sage 300 ERP you can export the report output to Microsoft Word, Microsoft Excel, Adobe Acrobat (PDF) etc. This helps user to avoid inconvenience when there are large range of columns and then the data could be used for further analysis.

New Stuff:Set Document Numbering based on Bank Code for AP Module in Sage 300 ERP

Few simple steps to export the Crystal Report:

1. Print the crystal report which you want to export.
2. Click on highlighted button as shown below.Report


3.  After selecting export button below box will appears this will give you various options of export like Adobe Acrobat (PDF), Excel, word etc.

Export Option 1

4. To export in PDF format select Adobe Acrobat (PDF) and click OK. This will provide you the option to select the range of pages to export.Export Option

5. After click on OK button it will provide you the dialogue box to save the PDF file at particular path. After saving the file it starts with exporting records in PDF format.

Choose Export File

Exporting Record

6. Once export complete, you can open the exported PDF.Exported file

Going through this blog we have learned how to export the crystal report outputs in different formats.

Also Read:
1. General Ledger Period End Maintenance
2. How To Record A Macro In Sage 300 ERP
3. Quantity and Cost restriction in PO Transaction
4. Advance Receipt from a Customer
5. New Unit Cost field on IC Lot Numbers Inquiry in Sage 300 ERP 2012

User Authorization Report in Sage 300 ERP

$
0
0

Greytrix introduces new Add-on called “User Authorization Report in Sage 300 ERP” to confirm and verify the  user rights. Let’s see in detail

Considering, real life business scenario in an organization there are users who have different rights for using and accessing Sage 300 ERP.

Admin user can simply print report by entering the user name in the report UI and check respective rights.

New Stuff: Export Crystal Report in Multiple Formats

User Authorisation

User Authorisation Report

By using this Report Administrator  and security officer can ensure that  users are having access to application as per their designation and permission.

This report allows Admin and Security officer to know employer rights of accessing Sage 300 ERP, rather than browsing through Sage 300 ERP’s Users, Security Groups, User Authorization and keeping track manually.

Also Read:

1. Change Print Destination in Sage 300 ERP
2. Create custom startup folder in Sage 300 ERP
3. Make Use of Custom Directory to Print Same Report in Different Formats
4. User Role and Security Application in Sage 300 ERP

Gain/Loss Accounting method in Sage 300 ERP

$
0
0

We all know that Sage 300 ERP offers a multicurrency option for the organization which deals with more than on currency. Thus in Sage we can have a functional currency and the rest can be our customer vendor currencies which can be different from the functional currency of the organization.

Secondly when we say multicurrency then our revaluation comes into picture wherein we reevaluate all our outstanding transaction and the exchange gains and losses that rise during this revaluation can be treated as permanent or temporary based on the Gain/Loss accounting method we specify in the common services option. The revaluation process all your transactions present in Accounts Payable, Accounts receivable and transactions preset in GL with non-functional currencies

New Stuff: Set Document Numbering based on Bank Code for AP Module in Sage 300 ERP

When we setup the company first time we have to make sure we do set up the multicurrency option accordingly in Sage along with the Gain/Loss Accounting method. We set this option in the common services wherein we have the option to select the exchange gain loss accounting method.

Company profile

Sage 300 ERP generally supports two kind of gain loss accounting methods as described in the subsequent paragraphs.

1. Realized and Unrealized Gain/Loss

Under this accounting method, exchange gains and losses that result from fluctuations in exchange rates are considered unrealized until the transactions are settled.

At each balance sheet date, you revaluate outstanding balances that are updated in foreign currencies. Any exchange gains or losses calculated during revaluation are posted to unrealized exchange gain and unrealized exchange loss accounts, and the balance sheet is stated using current rates. However, because exchange rate fluctuations are considered temporary, unrealized gains or losses are not taken into net income, and they are reversed in the next period. Thus the effect of such revaluation gets reversed in the immediate next day.

2. Recognized Gain/Loss

Under this accounting method, exchange gains and losses are recognized when documents are revalued using the exchange rate in effect at the revaluation date (usually the balance sheet date), or when they are settled. All exchange gains and losses are considered permanent, whether they arise during revaluation or upon settlement, and they are not reversed in the next period. They are posted

To exchange gain and exchange losses accounts and are included on the income side. Also ones we set this method in common services we cannot change the gain/loss method to other one.

Thus we have to make sure we chose a proper gain loss accounting method before we start evaluating the transactions.

Also read:

1. Sage ACCPAC ERP checks your postings
2. Closing Procedure Checklist for Sage 300 ERP
3. Set Document Numbering for Sage 300 ERP on the combination of Account Set and Location
4. General Ledger Period End Maintenance


Generate BOM and Kitting items on the fly from Order Entry screen in Sage 300 ERP

$
0
0

In our previous blog; we discussed about simple steps to setup Bills of Material in Sage 300 ERP. http://www.greytrix.com/blogs/sageaccpacerp/2013/07/29/bom-setup-for-manufacturing-company-in-sage-300-erp/

Ever wonder about setting up bills of material from Order Entry screen?

Most often customers requires to setup bills of material while they are taking an order from their customers. Say for e.g. your customer is selling customized kitchen cabinets. Every time they got an order for a new kitchen cabinet; it requires setting up a new BOM with the required components or making alterations to existing BOM. Similar needs arise for kitting items also.

The New stuff : Gain/Loss Accounting method in Sage 300 ERP

To cater these requirements we have designed a component for Sage 300 ERP which allows users to add/edit the BOM/Kitting Items from Order Entry screen itself. In this blog we shall discuss about these enhancements.

On Order Entry screen we have provided custom button “Update Kit/BOM”, which allows to add/edit BOM and Kitting items.

Now let’s see how the enhancement works with BOM items.

After selecting the Master Item and BOM No., Update Kit/BOM function will launch the new screen which will list the BOM and its components.BOM1

By default screen will load the components of selected BOM.

BOM 2

On this screen; users can either edit the component quantity, remove the components or they can even add a new component items. Upon saving; all these changes will be reflected in the current order and our program will also update the Master Item and BOM records.

In order to setup new BOM; enter a new BOM Number and then select the required components.

In given example; we are entering a new BOM Number 3 under Master Item A2(KINGS-5000)-B.

BOM3

Upon saving , a new BOM will be generated for the selected Master Item and the same will be reflected in order detail.

BOM 4

Similarly users can add/edit Kitting Items.

Note: This customization is done using Sage 300 SDK, as a result easy to deploy and it works with Sage 300 ERP 2012 and Sage 300 ERP v6.0A

Also Read :
1) Custom Bills of Material Report for Sage 300 ERP 2012
2) Order Process for Manufacturing Company in Sage 300 ERP
3) BOM Setup for Manufacturing Company in Sage 300 ERP
4) Simplify Assembly using Sage 300 ERP
5) Using BOM and Assembly to Convert Items in Sage 300 ERP


Custom Fields for Bills of Material in Sage 300 ERP

$
0
0

In the absence of Optional Fields for Bills of Material; we have designed an enhancement for Sage 300 ERP; which offers additional custom fields at the component (detail) level.

We have added 10 custom fields at the component detail level. These fields are available while setting up Bills of Material from I/C Bills of Material and I/C Component’s Bill of Material.

The New Stuff : Generate BOM and Kitting items on the fly from Order Entry screen in Sage 300 ERP

ADD1

These new custom fields are stored at the database level. The data from these fields is saved along with the bills of material records and can be easily retrieved for reporting and other references.

Using these custom fields; users can store any additional information at the component level.

ADD2

Note: This customization is done using Sage 300 SDK, as a result easy to deploy and it works with Sage 300 ERP 2012 and Sage 300 ERP v6.0A.

Also Read :
1) Custom Bills of Material Report for Sage 300 ERP 2012
2) BOM Setup for Manufacturing Company in Sage 300 ERP
3) Order Process for Manufacturing Company in Sage 300 ERP
4) Simplify Assembly using Sage 300 ERP
5) Using BOM and Assembly to Convert Items in Sage 300 ERP

Viewing all 1489 articles
Browse latest View live


<script src="https://jsc.adskeeper.com/r/s/rssing.com.1596347.js" async> </script>