Quantcast
Channel: Sage 300 ERP – Tips, Tricks and Components
Viewing all 1487 articles
Browse latest View live

Clear/Consolidate Posted Entries in Sage 300 ERP

$
0
0

At the time of period end or Year end, it is required to delete or merge unwanted data in your system so that it would be easy for the users to manage the data by reducing the number of transactions posted in your ERP system.

So, let’s have a look on all screens in Sage 300 ERP which can be used to clear/consolidate the database which you don’t want to keep record of:

1. G/L Consolidate Posted Entries: This screen can be accessed through Periodic Processing menu of General Ledger. Using this feature all transactions in General Ledger Accounts can be consolidated or summed up for particular period as per the information entered by the user. Hence processing this activity can reduce the disk space consumed by transactions by permanently combining all general ledger transactions together.

GL consolidate

New Stuff: Gain/Loss Accounting method in Sage 300 ERP

2. G/L Period End Maintenance: Using this screen you can wipe out unwanted data from your system just in one click. Here, there is a provision to select different sets of data so that you can select and process the one which is not required by you.

GL periodic

3. Clear Tax Tracking Information: To access this feature navigate to Common Services >> Tax services >> Tax Reports >> Tax Tracking Report. If you print this report for individual or range of tax authorities keeping the clear tax information ticked, then all the transactions incurring tax amount for mentioned tax authority will goes off from the system.

Tax Tracking

4. Clear History: This feature of clearing history is majorly used by the admin at the time of doing period end processing to delete unwanted transactions happened in last period. Hence, you can access this screen in Periodic processing menu of any financial or operational module procured by you to clear the transactions of that particular module.

Thus, by the end of this blog I hope you have understood the importance of mentioned features in Sage 300 ERP. But, make sure rights of these screens are not given to all users because without knowing the complete functionality of Sage Accpac ERP you may come across a situation of unintentional database loss. So, it is highly recommended to take database back up of Sage 300 ERP before using any of mentioned features which can alter your database because the data altered by these features won’t be recovered from Sage 300 ERP screens and hence you have to recover your database from already taken sage database dump or your server backup files.

Also read:

1Backup your Company Database in Sage 300 ERP
2General Ledger Period End Maintenance
3. Merge your multiple company databases into one Sage ERP
4Closing Procedure Checklist for Sage 300 ERP


Consolidate Transactions in Sage 300 ERP

$
0
0

In our previous blog we saw the options available in sage 300 ERP to clear and consolidate posted transactions, http://www.greytrix.com/blogs/sageaccpacerp/2013/12/05/clearconsolidate-posted-entries-in-sage-300-erp/. Here, we will have a detail view of GL Consolidate Posted transactions which allows the users to consolidate of sum up all the transactions posted in particular account or range of accounts for particular period. This feature can be accessed by navigating to General Ledger >> GL Periodic Processing >> GL Consolidate Posted Transactions.

Before consolidating any transaction in General Ledger lets print a Transaction Listing report for period 1 of Account 1020 which we will bring up later on to discover the changes done by GL Consolidate Posted Transactions

1. GL Transaction Listing

Let’s move on to GL Consolidate Posted Transactions screen, put filter on Account Type for account 1020 and enter all required details with Consolidate By option:

GL consolidate

New Stuff: Set Document Numbering based on Bank Code for AP Module in Sage 300 ERP

Going further, reprint the Transaction Listing report for same account 1020 to check out the changes made by Consolidating feature.

2. GL transaction Listing

After consolidating all the data you will find following changes in Transaction listing report:

  a. The Batch-Entry number used on reports is CNSLD.
  b. The Description/Reference fields are set to CONSOLIDATED.
  c. The new posting sequence number is 0
  d. Source code is the one selected in GL Consolidate Posted transactions screen.
  e. Transaction date is last date of selected period.

In this blog we learnt that how we can make use of GL consolidate posted transactions to save disk space and reduce detail in reports by consolidating (combining) details in the accounts for which you do not need a permanent record of every transaction.

Also read:

1Backup your Company Database in Sage 300 ERP
2General Ledger Period End Maintenance
3. Merge your multiple company databases into one Sage ERP
4Closing Procedure Checklist for Sage 300 ERP


Auto Revise Quote Number in Sage 300 ERP

$
0
0

Greytrix introduces new Add-on called “Auto Revise Quote Number in Sage 300 ERP” to make revised quote entries without entering same detail manually several times. Let’s see in detail
Auto Revise Quote Number allows user to generate similar quote multiple times with same Quote Number to know its parent Quote.

Auto Revise Quote is one click time saver process

Assume, user has already created quote with quote number as “QT0000000000001”. Now, to create Revised Quote user just have to click on “Revised Quote” button refer the below screenshot

New Stuff: Consolidate Transactions in Sage 300 ERP

Revised Quote 1

Our program will create a new quote as “QT0000000000001-1” and will put previous quote i.e. “QT0000000000001” On Hold. User can make changes in this new quote as per his/her requirements.

Revised Quote 2

In similar way, user can revise a quote many times as he/she wants based on parent quote.

Also Read:

1.  Creating Single Sales Order from Multiple Sales Quotes in Sage 300 ERP
2.  User Authorization Report in Sage 300 ERP
3.  Auto Generate OE Confirmation Report in PDF format in Sage 300 ERP
4.  Quantity On Hand Drilldown feature for OE Order Entry Screen

Create GL Accounts Feature in Sage 300 ERP

$
0
0

In Sage 300 ERP; you can automatically generate new general ledger accounts that have the same characteristics as existing set of accounts.

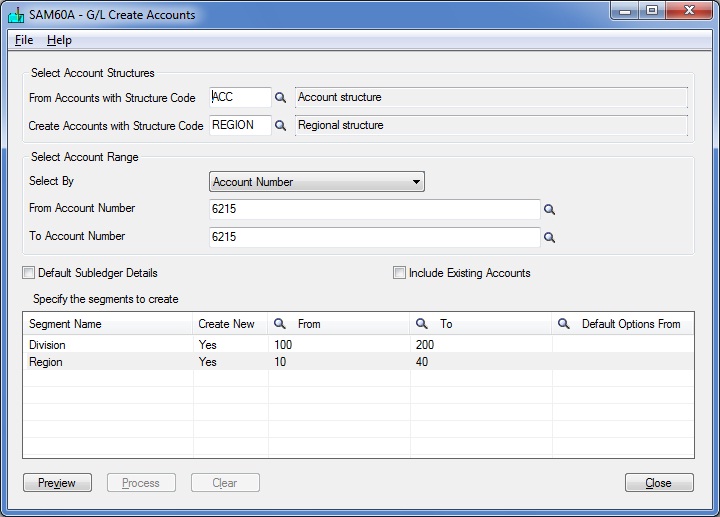
Let’ take a scenario; as an accounts clerk you have been ask to add new expense account for Employee Tuition Fees. The account needs to be added for all the existing Divisions and Regions (account segments). Your organization has two divisions and four regions; so you need to create eight new expense accounts. It will be tedious to create each account manually using G/L Accounts screen.

The New Stuff : Auto Revise Quote Number in Sage 300 ERP

Sage 300 ERP has an inbuilt tool; Create Accounts (General Ledger >> G/L Accounts >> Create Accounts) that automatically generate new accounts. Before you use the tool you need to examine your existing chart of accounts and select account that can be used as a base account and then determine the criteria for creating new accounts.
As a first step you need to setup a base account; in given example we have setup account 6215 – Employee Tuition Fees. Then by using Create Accounts tool you will be able to generate additional accounts with required division and region segments.

1_CreateAccounts

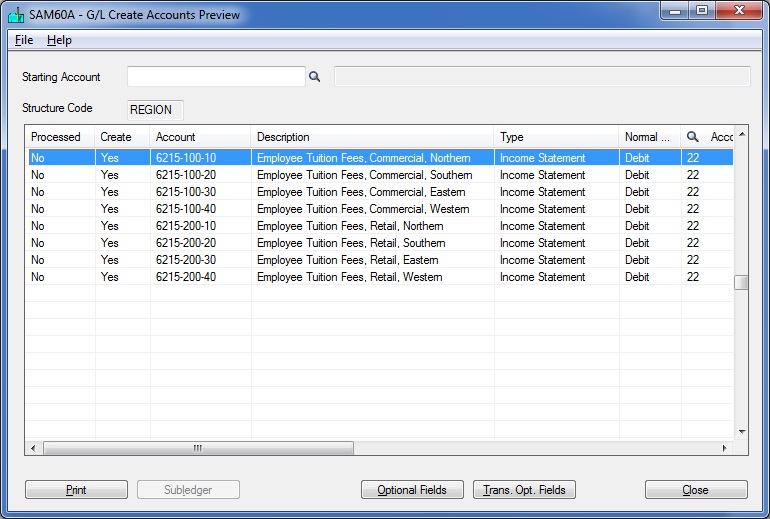
After confirming the segment; the program lists all the accounts that will be created.  Here you can verify Optional and Trans. Optional fields for the generated accounts.

2_CreateAccounts

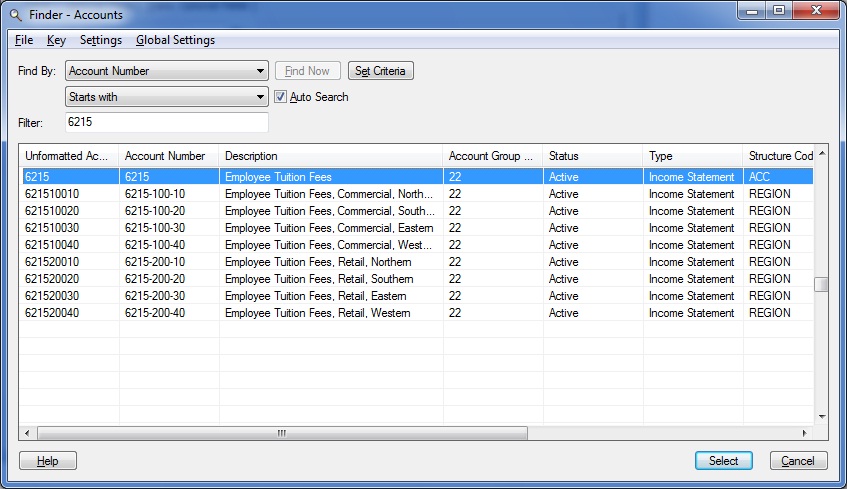
After confirming the accounts; new accounts will be created in chart of accounts.

3_CreateAccounts

You can use Create Accounts program to generate new accounts by range of accounts, accounts group or by specific segment code.

Also Read :
1. Quick Journal Entry in Sage 300 ERP
2. GL Account Code Change in Sage 300 ERP
3. Exclude Inactive Accounts option in GL Chart of Accounts Report of Sage 300 ERP
4. GL Auto Allocation of Account Balances in Sage 300 ERP
5. Drill Down to Source Transaction from GL
6. Auto-Reverse General Ledger Entries in Sage 300 ERP
7. Create Recurring Entries in General ledger of Sage 300 ERP
8. General Ledger Security in Sage 300 ERP

How to handle Purchase Return in Sage 300 ERP

$
0
0

Goods/Stocks purchased from the suppliers and returned back to them for various reasons is a universal process in businesses. There can be various instances such as defects in goods, quality not matching, difference in specifications, not needing the stock, etc. This blog covers how a Purchase Return is recorded in Sage 300 ERP.

Let’s have a look on how to deal with a scenario to return the purchase items when the Invoicing is done against the receipt. In this scenario, you need to make a return against the receipt navigate to PO -> PO Transactions -> Return. For Ex, say if we need to return the entire Item received against the receipt 89 due to items being damaged. Select the GRN and return the items either through manually entering the quantity to return in the “Quantity Returned” column or click on Return All Button if all the items in the receipt have to be returned.

PO return

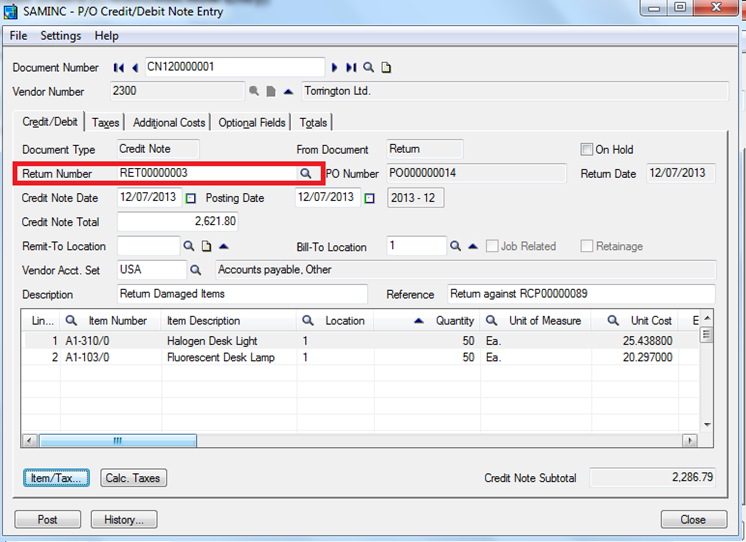
Since, the Invoicing has been already done you need to raise a credit note against this return to do the same navigate to PO -> PO Transactions -> Credit/Debit Note Entry. Select the Return document and check the Credit Note total and post the same.

New Stuff: Create GL Accounts Feature in Sage 300 ERP

PO credit/debit

This would reverse the GRN. Once reversed, raise a new Purchase Order; navigate to PO -> PO Transactions -> Purchase Order Entry

Consider another scenario in which the Purchase Items needs to be returned but the Invoicing is not done. In this scenario, you only need to make a return against the receipt. In both the scenarios, ensure that the Return date is the same as the GRN date.

Also read:

1Requisition Approvals in Sage 300 ERP
2Purchase Order Transaction Flow in Sage 300 ERP
3. Creating Purchase order from an Existing Sales Orders in Sage 300 ERP
4Quantity and Cost restriction in PO Transaction
5Editable PO Number field on O/E Shipment Entry for Sage 300 ERP 2012


Purchase Order Tiers Add-On for Sage 300 ERP

$
0
0

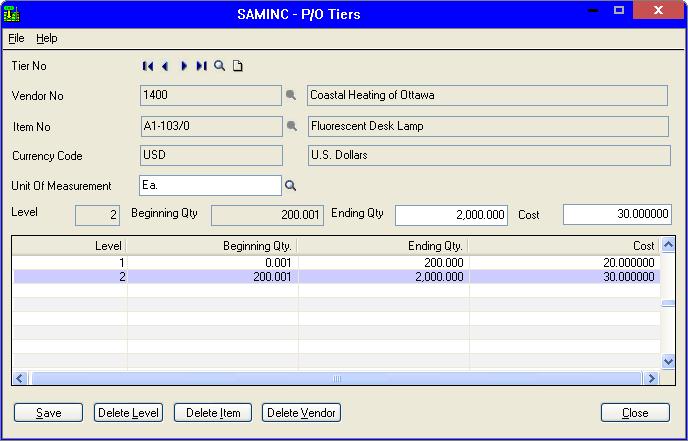
P.O. Tiers is an add-on developed for Sage 300 ERP which empowers the users to set quantity discounts to vendors while making volume purchases.

P.O. Tiers consists of functionality that enables the users to setup costing tiers for vendors and its corresponding items. It assists in maintaining the discounted cost for items in case of bulk purchase are done with the particular vendor.

The New Stuff : How to handle Purchase Return in Sage 300 ERP

With PO Tiers maintenance; we can easily configure different levels of quantities and a cost at each level by Vendor and Item. Here we have the ability to setup different tiers; not only for vendors and its corresponding items but also on the same item depending on the quantity ordered.

PO1

At any given point; levels can be deleted or new levels can be added.  Similarly cost can be changed depending upon the requirement.   If required; Item or Vendor can be removed from the particular tier.

Purchase Order program appropriately populates the cost as per the configured tier.

PO2

Note: This extended solution is developed using Sage 300 SDK, as a result easy to deploy and it works with Sage 300 ERP 2012 and Sage 300 ERP v6.0A.

Also Read :
1. Quantity and Cost restriction in PO Transaction
2. Choosing Vendor Contract Cost over IC Vendor Detail Cost in Sage 300 ERP
3. Purchase Order Reports in Sage 300 ERP
4. Handling Additional Costs and its Variations in Sage 300 ERP
5. Purchase Order Transaction Flow in Sage 300 ERP

GL Drill Up from Transaction UI

$
0
0

Sage 300 ERP (Accpac) has feature of “Drill Down” which helps user to easily track the source of the Entry by just clicking on the Icon.

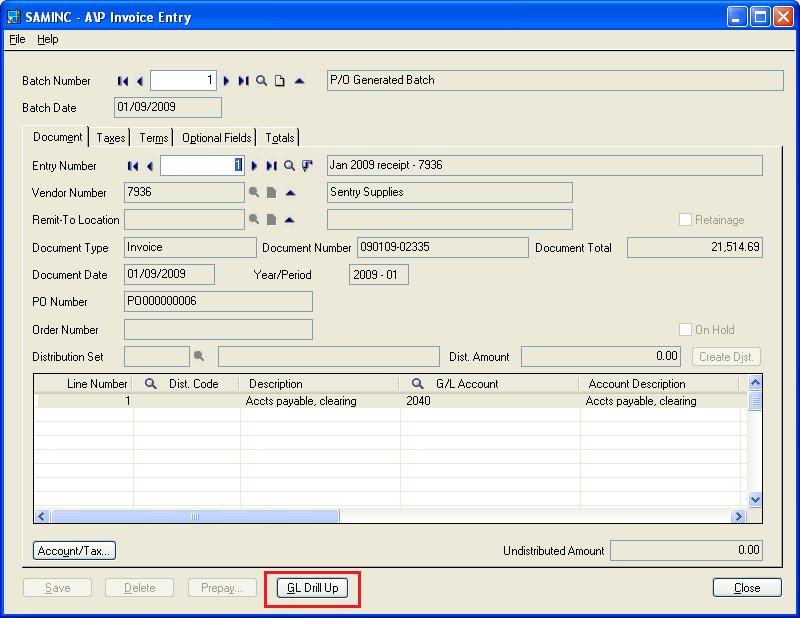
Consider a situation where a PO Invoice is posted and in turn an AP Invoice Transaction will be generated. If user wish to know the details of the PO Order as ‘Vendor No, ‘Invoice Date’ etc. they just need to click on the Drill down button, it will take you to the window where the Invoice Entry was made.

But, in case if user wants to check the Journal Entry against the particular AP Invoice to know the accounting effect like which GL account get debited, which account get credited, and all questions of similar types., then user need to go to the GL Batch List screen, manually search for the batch and then find out the details.

To make ease of use, we have customized the standard AP/AR transactions UI from where user can view the GL Details using a drill up button.

Here is an example of how this customization will work for AP Invoice Entry:

If you have created an Invoice for an item or Account No and you want to see the accounting information for the same invoice, than you just need to click on the GL Drill Up button in AP Invoice Entry screen. (Refer the below screen shot.)

New Stuff: Purchase Order Tiers Add-On for Sage 300 ERP

APInvoice

Now it will take you to the Journal entry created in General Ledger for the particular Invoice.

The GL Drill Up button will get enabled only after a transaction is posted.

As of now this facility is available only in AP/AR transaction UI.

AP Invoice entry

This customization will allow user to view accounting details of any AP/AR Transactions from the transaction screen instead of searching the data manually in GL.

Also Read:
1. Drill Down to Source Transaction from GL
2. How to handle Purchase Return in Sage 300 ERP
3. Create GL Accounts Feature in Sage 300 ERP
4. Auto Revise Quote Number in Sage 300 ERP
5. Consolidate Transactions in Sage 300 ERP

How to handle Inventory Receipt in Sage 300 ERP?

$
0
0

An Inventory Control’s Receipts form will serve the purpose for receiving items into inventory and for returning items to suppliers in Sage 300 ERP.

If suppose your company does not have the Purchase Flow process means the Purchase Order and GRN (Goods Receipt Note) is not the part of your company activity. Then in that case without having PO (Purchase Order) Module of Sage 300 ERP you can make the material receipt by using Inventory Module of Sage itself, and invoicing and payment will be done by A/P (Accounts Payable) module of Sage. This will save the cost of the company.

The I/C Receipt window lets you increase the inventory level in situation that is not the direct result of adding a purchase document.

Use this form for the following:

1. Enter and post new receipts of items.
2. Enter returns and adjustments to incomplete receipts you posted previously.
3. Change the status of incomplete receipts to Complete to make it close.
4. Assign serial and/or lot numbers if you have the Serialized Inventory and Lot Tracking license   installed.

Let’ see the screen shot of I/C Receipts in Sage 300 ERP.

IC receipt

You decide whether to post each new receipt as you enter it, or save the receipts to post them later      in a batch using the Post Transactions form. Once after posting the above entry, stock is increased in location 2 by 5 Qty.

For verification let’s see the I/C Inventory Movement Report:

Inventory Movement

Have a look on the below screen shot after posting I/C Receipt, a field “Type” will appear on the screen. Using which you can post returns and adjustments to incomplete receipts in Sage 300 ERP.

If you select Return then at the row level you will get two additional columns that are Qty. Returned and Return Cost. Similarly for type Adjustment also, you will get columns named Adjusted Cost and Total Adjusted.

2. IC receipt

New Stuff: GL Drill Up from Transaction UI

For an e.g. let’s see the return against the above receipt entry.

3. IC receipt

Qty Returned is 1 and the Return Cost is 100. Let’s post the entry and see the effect on the Inventory for that see the I/C Inventory Transaction Report in the Sage 300 ERP.

IC movement

After having a look on the above report we can verify that the Qty is reduced from the location 2.

By having a view on the above entries and the reports we can conclude that from the single screen we can directly make the receipt from the Inventory module without going to Purchase module and also we can make the return and adjustment too against the receipt made from the same screen which is the one of the unique feature of Sage 300 ERP.

Also read:

1. Standard cost functionality in Sage 300 ERP
2. Defining Specific Location for an Inventory Item in Sage 300 ERP
3. How to set default reserved quantity in Sage 300 ERP
4. Manufacturers Item Number in Sage 300 ERP
5. Set Fractional Quantities in Sage 300 ERP


Quickly verify converted data between two ERP systems

$
0
0

Enterprise applications are quite huge as they are designed to cover whole process of a migration. Though the data migrations are complex and tedious task, but are quite useful if carried out correctly. They help in building the confidence of the users in the system and at the same time, helping users to access historical information quickly in the new existing system.

Sage Certified GUMU Migration solution is one such solution which converts the data from various source legacy enterprise systems to other target enterprise systems. It helps in migrating the data from QuickBooks, Sage Pro, Sage 50 (US, UK and Canada editions) to Sage 300 ERP systems.

Also Read: GUMU – A Sage Certified migration solution by Greytrix

As we all know that an ERP data is quite complex, but one can quickly verify the converted data by following the below processes –

General Ledger :

  • Comparing the no. of active and in-active accounts. 
  • Comparing the Opening Balances of both the systems 
  • Comparing the Trial Balances of both the systems

Accounts Receivable :

  • Comparing the no. of inactive and active customers
  • Comparing the current aging value of the customer 
  • Verify the count and sum of Invoices, Credit Notes, Prepayments, etc.

Accounts Payable :

  • Comparing the no. of inactive and active value of supplier / vendor
  • Comparing the current aging value of the value of supplier / vendor 
  • Verify the count and sum of Invoices, Credit Notes, Prepayments, etc.

Inventory Management :

  • Comparing the no. of inactive and active items 
  • Comparing the no of stock, non-stock items 
  • Comparing the no of service, miscellaneous charge type of items 
  • No of UOMs 
  • Current item-on-hand value of the item. 
  • Note: Item valuation may differ a bit the two systems.  

Sales Order :

  • Count of Open Sales Orders 
  • Total sum of Open Sales Orders

Purchase Order :

  • Count of Open Purchase Orders 
  • Total sum of Open Purchase Orders

Note: Apart from the above one should take out a record from each of the above listed modules and verify if the data is correct or not.

By following the above steps you can determine if your converted data is accurate. Obviously, there is no alternative to in-depth verification and checking of the data as they help in making the converted data more clear.

Related Posts:

1. What do you want to migrate to Sage ERP
2. Data migration from your accounting system to Sage ERP
3. Migration of Purchase Payment from QuickBooks to Sage 300
4. Migration of Banks from QuickBooks to Sage 300 ERP

Merging multiple ERP company databases into one Sage ERP

$
0
0

In this blog, we are going to discuss about the merging multiple companies into one Sage ERP Company. In our earlier blog, we discussed about need of the data migration. You can read this blog here.

Data merging & migration is a serious task because each application data is uniquely defined, structured and identified within the source and target Sage ERP. To complete the data merging and migration, one has to look at various points –

  • List of legacy company databases to merge 
  • List of Modules / application to be migrated and merged 
  • Type of Transactions such as Invoices, Payments, Return, etc. 

ALSO READ:  GUMU – A Sage Certified migration solution by Greytrix

While merging data, there are various strategies that are adopted. One has to follow a best approach / process in order to merge the data. Before merging we assign a number to each source legacy company. We do this so that we can avoid any document number conflict. In the data migration, various steps are involved. The most important and common ones are listed below –

  1. Assigning a Number to each database: We will do this in order to ensure that the data does not get merged or we get any duplicate record related error. We make use of this in 3rd step.  
  2. Merging Multiple Masters into One: In this, we merge master’s data using the mapping file. This also helps us in removing the master’s data ambiguities during the conversion. 
  3. Transaction Merging : For this, we re-number the transaction document numbers before importing them into target Sage ERP. We prefix, each document number with the database code (that we have assigned in the first step). This re-numbering helps in identifying the transaction after the target conversion is over.

E.g. If we have 4 companies to merge named ABC, DEF, GHI and XYZ, then during the merging process, we assign a number i.e. 01-ABC, 02-DEF, 03-GHI and 04-XYZ. So when we merge the transaction from these companies into one Target Company, we prefix/suffix (as per user choice) each company code to each transaction document number.

At the end, when the migration gets completed, we check the following details to ensure the consistency.

  • Accounting: COA count, Trial Balance, Balance Sheet, Profit and Loss Statement, etc.
  • Sales: Aging Report and customer counts
  • Purchase: Aging and vendor count
  • Item: Stock Value and item count
  • Bank: Opening balances and bank count

In this way we can merge the multiple source companies into one target Sage ERP company database.

For more information on the data migration, drop us a mail at erpmig@greytrix.com.

Related Posts:

1. What do you want to migrate to Sage ERP
2. Data migration from your accounting system to Sage ERP
3. Migration of Purchase Payment from QuickBooks to Sage 300
4. Migration of Banks from QuickBooks to Sage 300 ERP


Customer Item Numbers in Sage 300 ERP

$
0
0

Often large customers prefer to use their own stock numbers when ordering from you.  In Sage 300 ERP, you can associate customer item numbers with inventory items.

In this blog we shall provide guidelines in setting up the customer item numbers and using the customer item number to enter orders instead of your own part numbers.

Greytrix Document Numbering : Set your own numbering for transactions in Sage 300 ERP 

1) Setup Customer Item Numbers

Customer Item Numbers are setup by using Customer Details screen (Inventory Control>>IC Items and Price Lists folder).

You may setup any number of customer item numbers associated with a single item in your inventory. Customer item numbers are particular to the customer and also specify the customer’s unit of measure, so different customers can use the same number for different items.

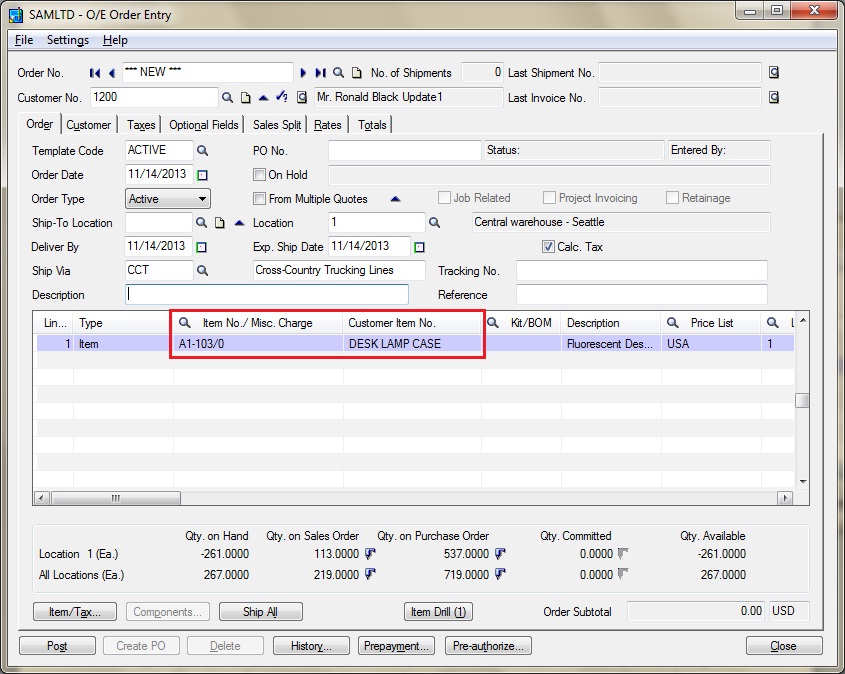
In given example we have setup customer item number as DESK LAMP CASE for customer 1200 and item A1-103/0.

Cust1

2) Using Customer Item Numbers in Order Entry

You can use customer item numbers to enter the item number on detail lines; Order Entry will replace the customer’s item number with your inventory item number, and automatically insert the customer’s item number in the Customer Item Number field.

cust2

Cust3

 By using Customer Item Number feature you can simplify your order entry process and accurately book the orders for your customers.

Also Read :
1. Generate BOM and Kitting items on the fly from Order Entry screen in Sage 300 ERP
2. Manufacturers Item Number in Sage 300 ERP
3. Creating Purchase Orders from Order Entry screen in Sage 300 ERP
4. Using BOM and Assembly to Convert Items in Sage 300 ERP
5. Sort Items by Picking Sequence In Order Entry Screen

Sales Invoice Reversals in Sage 300 ERP

$
0
0

Sage 300 ERP has an inbuilt functionality to reverse the Sales Invoice either due to incorrect data punched in the system or due to various other reasons such as defects in goods while transporting Inventory to the customers, quality not matching with customer specifications, etc. Sometimes, users mistakenly key in the incorrect data in the system as mentioned below and post the documents
  1. Incorrect Posting date entered in the Invoice
  2. Incorrect Location entered in the Invoice
  3. Incorrect Tax details selected
  4. Incorrect Exchange Rates entered
  5. Incorrect Customer Selected
  6. Incorrect Shipment Number Selected
  7. Incorrect Miscellaneous charges loaded in the Invoice

Image 1

There are two ways to reverse the Sales Invoices in Sage 300 ERP;
  1. Manually reverse the documents
  2. Automate the reversals via macro

Let’s have a look in the manual process
Raise a Credit Note from OE; navigate to OE Transactions -> Credit/Debit Note Entry. Select the Document Type as Credit Note. Select the customer and the Invoice no

Image 2

New Stuff: Customer Item Numbers in Sage 300 ERP

There are three types of Credit:
  1. Items Returned to Inventory – If the Items need to be returned to the Inventory, then this type Items Returned to Inventory should be selected in which Inventory would be debited. This would return the items back to inventory which can again be shipped and Invoiced.
  2. Damaged Items – If the items that have shipped to the customer (in transit) have been damaged during transportation or some other reasons, then the Credit type selected should be Damaged Items. This would have a credit effect on the customer and no effects on the Inventory.
3. Price Adjustments – If the item that has been shipped to the customer has a price negotiation, then the credit type should be Price Adjustments, wherein only the Item Sales Amount would be affected and has no implications on Inventory.

Once the relevant type is selected, you need to check other details like quantity, cost and post the same. At this step, the Invoice reversal is done. Create a fresh Sales Order, Shipment and Invoice with appropriate details.

For auto-reversals, Sage 300 ERP provides a macro which automates the process of reversing an Invoice by Auto-generation of Credit Notes and also the shipment.
1. Run the macro from the following path
Go to Menu bar -> Macro -> Click on Run

Image 3

 2. Once we click on Run Macros, the following UI will open

Image 4

3. Once done, select the Invoice to be reversed and click on Proceed.

Image 5

4. This would reverse the Invoice by auto-generating Credit note and shipment as well. The details of the document generated would appear in the Results

Image 6

Thus, by following the above mentioned steps users can reverse the Sales Invoice either manually or through automation in Sage 300 ERP. 

Also read:

1. Order Entry Transaction flow in Sage 300 ERP
2. Creating Single Sales Order from Multiple Sales Quotes in Sage 300 ERP
3. Creating Single Shipment entry from Multiple Sales Orders in Sage 300 ERP
4. Return Material Authorization in Sage 300 ERP
5. Create Jobs related Sales Orders in Sage 300 ERP

Create significant item name with separator and prefix in sage 300 ERP

$
0
0

Consider a scenario where user wants to create an item code which should symbolize the item description. For e.g. The Item Code could contain Item Category, style and color. The benefit of this would be that the user identifies the item by just reading the code and need not lookup in the Item Master.

Sage 300 ERP delivers a very powerful and user friendly feature to do this.  Let’s have a look at the steps involved in achieving the above task.

We shall consider the example of an item code containing Item Category, style and color. I.e. 3 segments to be used in 1 single item code.

First of all we need to create an Item structure code in sage 300 ERP.

Item structure can contain a separator character between consecutive segments and a prefix character in front of the first segment. For example, item number A1-101/B contains two separator characters i.e.:  – and / (please refer the below screen shot)

In item number “A1-101/B”:
“A1” is a Category which explains that item is from category Accessories, “103” is style and “0” is color code like 0 for red, 1 for blue etc. Separators help us to create appropriate item structure. Just by seeing the item code you can get the idea about item.

jjj

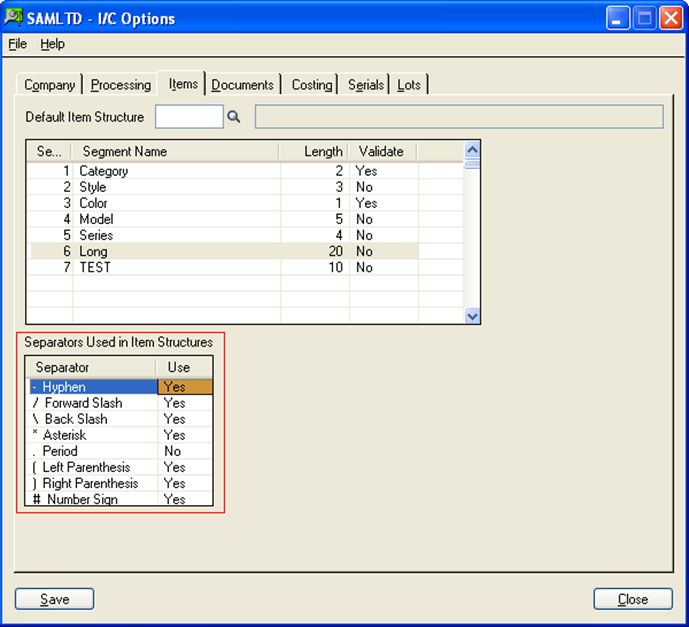
To use a separator while creating item structure, user needs to select the same in I/C Options –> Items Tab (please refer the below screen shot):
Navigate to Inventory Control –> I/C Setup –>Options –>Item Tab

ICOption

Mark the Use column as YES for the separator which you want to use in item structure.

When you are dealing with separator keep it in mind that if you change the value of “Use” column to “NO” then you cannot reset it to “YES”. It will remain “NO” for rest of the time. To use character as separator keep value of Use column to “YES”.

Note that if you specify particular character as a separator then it cannot be used elsewhere in an item number.

You can also use prefix character for creating item.

let’s construct an Item code(refer the below screen shot):

Item

Hope, the above information will help you to get the information about characters that you can use as separators and Prefix Characters in your item number structures.

  Also Read:

  1. Quantity and Cost restriction in PO Transaction
  2. OE Sales Register Report for Sage 300 ERP
  3. Generate Separate Payment for each Invoice
  4. Integration of Infrasys POS with Sage 300 ERP
  5. Hide or Remove Presentation Strings from Drop Down Controls in Sage 300 ERP


Alternate Amount in Inventory Control module of Sage 300 ERP

$
0
0

Inventory Control module of Sage 300 ERP has a provision to setup additional cost amount fields (Alternate Amount 1 and Alternate Amount 2) which can be used as a base for discount pricing, marking up an alternate cost by percentages or by amounts.

The New Stuff : Create significant item name with separator and prefix in sage 300 ERP

In order to use these fields; you need to first assign the name under Processing tab of I/C Options screen (Inventory Control>>IC Setup>>Options). Provide names to Alternate Amount 1 Name and Alternate Amount 2 Name fields.

Note: If you leave these fields blank, they will not appear in other screens.

Alternate 1

Note : You can change the field names of Alternate Amount 1 Name and Alternate Amount 2 Name at any time.

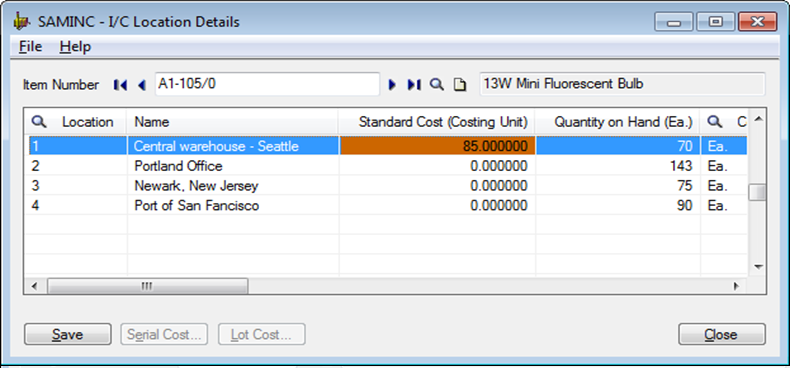
After setting up the field names; these fields will be visible on Location Detail screen where you can enter cost amounts (Costing Unit).

Alternate 2

These alternate amount fields can be setup as the base for discount pricing, marking up an alternate cost by percentages or by amounts.

Alternate 3

 You can store costs for items in Inventory Control that Sage 300 ERP Order Entry can then use as the basis for tax calculations. (Order Entry uses the tax base you specify in Tax Services.)

Alternate 4

The alternate amount fields also appear on Inventory Control reports such as: Location Details, Item Status, Markup Analysis, and Selling Price/Margin Analysis.

Also Read :
1. Standard cost functionality in Sage 300 ERP
2. Different Costing methods in Sage 300 ERP
3. Handling Additional Costs and its Variations in Sage 300 ERP
4. Set Fractional Quantities in Sage 300 ERP
5. Choosing Vendor Contract Cost over IC Vendor Detail Cost in Sage 300 ERP

Compilation Error for A4wFldEdtCtrl.dll fieldedit control

$
0
0

In this blog we will discuss about solution for the error message while opening the Customized screen (OCX) i.e. “Unexpected error in: Name of the usercontrol |UserControl_Initialize”.

Sometimes when any standard Sage 300 ERP screen (OCX) is customized by any third party; user encounters issues while opening the customized screen.

The New Stuff : Alternate Amount in Inventory Control module of Sage 300 ERP

In this blog we take an example of a customized OE Order Entry Screen and when user tries to open the customized screen the following error is shown. Refer the below screenshot for the error:

A4wFldeditcontrol Error

Reason:

The reason for the above error is that the OCX was compiled on the system with higher product update for Sage 300 ERP, but the system on which it is deployed is having lower product update for Sage 300 ERP.

Solution:

Simple solutions to the above error are:-

1. Re-compile the above OCX, with the PU installed at client.

2. Or Install the Latest product update at clients end.

Also read :
1. Data Activation Error in Sage 300 ERP
2. Database Profiles table error on Sage 300 Workstation
3. Error 13 opening record file Occurred in Sage 300 ERP
4. Error Occurred while Opening View
5. “Error code: 713, Class not registered” on opening customized screen in Sage 300 ERP


Goods Receipt Register Report

$
0
0

Goods Receipt Note is a document used to record the inward entry of any goods received at the premises of the organization.

The practice of preparing GRNs is important as it promotes proper inventory control and restricts the unwanted, unauthorized entry of goods in the organization. The GRN preparation is a part of effective Inventory Control Management.

We have developed a GRN Report which will help to print the details for each PO Receipt.

The report consists of the details of Items, Quantity Received, Quantity Rejected, Supplier Details, P.O. Number and also we are showing prorated additional cost of all detail lines(you can refer the below report).

For proration of additional cost included for the receipt, report creates dynamically columns for the “Additional Cost” and “Taxes” with their Respective amount.

This report will also display the “net cost amount”. This will be the cost which is going into the inventory for every item.

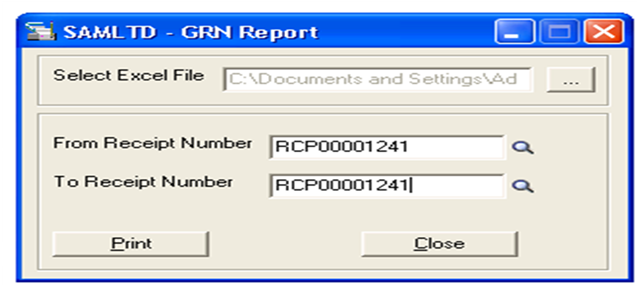
Thus to print this report we have created a Report UI (please refer the below screen shot).

GRN

The report will print on the basis of Receipt Number, We need to select the “From” and “To Receipt Number” and It will print the report in excel format.

The printed report will look like this:

Untitled1      

Also Read:

  1. How to set default reserved quantity in Sage 300 ERP
  2. Stock Status Report in Sage 300 ERP
  3. Item Master Auto Synchronization between Two Systems
  4. Integration of Infrasys POS with Sage 300 ERP


3 Way Matching PO Receipt

$
0
0

In real business Scenario, it may happen that we do not want to allow user to receive (PO receipt) more quantities or more cost than in PO (purchase order).

So to have this feature in our Sage 300 ERP, Greytrix introduces new Add-on called “3 Way Matching PO Receipt”. In this Add-on, we have customized the “PO Receipt screen” and “PO Invoice” screen such that it doesn’t allow user to enter PO receipt quantity and PO extended cost to be greater than the PO quantity and PO extended cost.

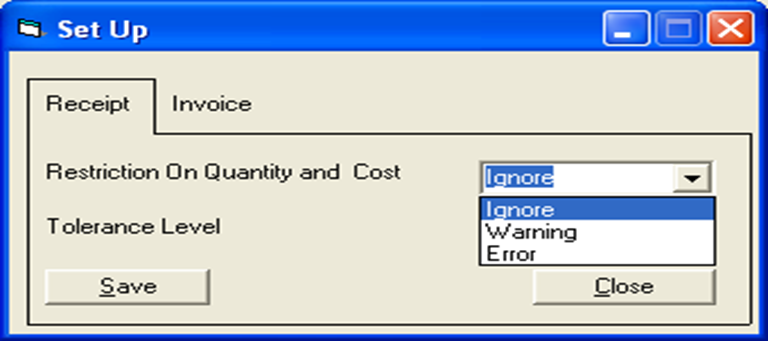
We have provided a setup screen where user can set up the option whether system will warn you or give an error message or simply ignore it.

New Stuff: Goods Receipt Register Report

Set Up

User can also set the tolerance level. It means if tolerance level is set at 10% and PO Quantity is 100, it will allow receiving up to 110 qty.

Customized PO receipt Entry screen restrict user to enter receipt quantity more than the quantity entered in P/O entry for that selected item. Our program will check the item quantity and will popup message “Quantity receipt cannot be greater than Quantity in PO”, when the user has entered the quantity.

This feature is available both in

1. PO Receipt Screen
2. PO Invoice Screen

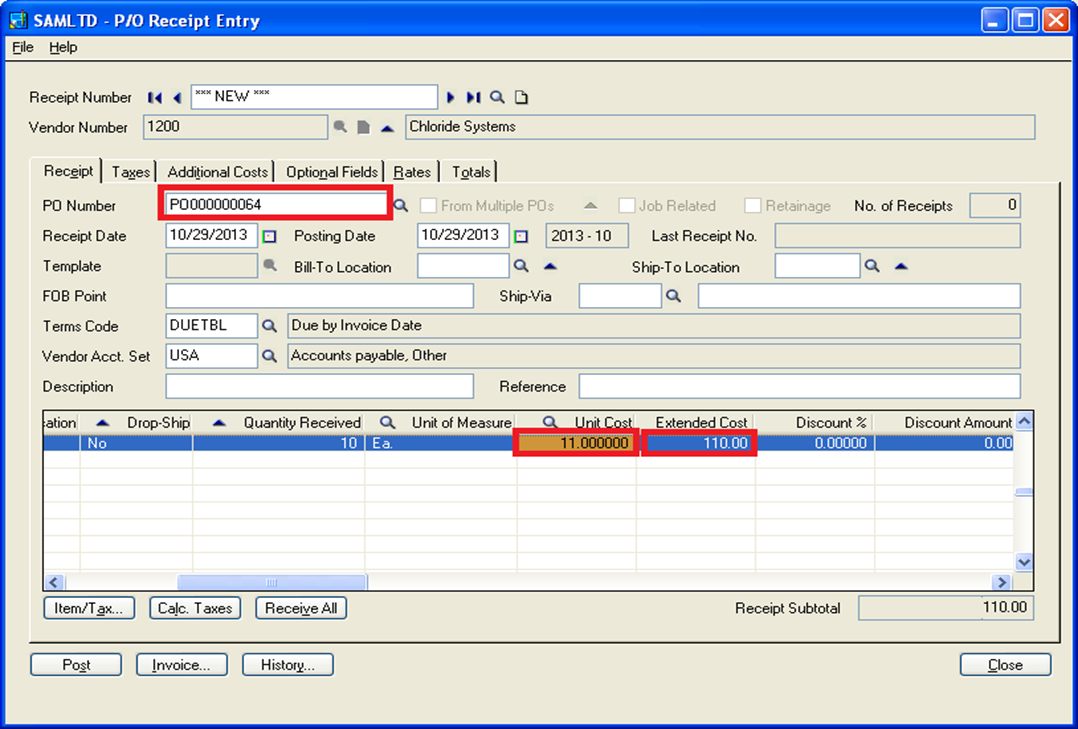
Suppose user have created a purchase Order with 10 Quantity with Extended cost of 100 and trying to create Po receipt against that Purchase Order with 10 Qty. and trying to modified the Extended cost from 100 to 110. Our program will throw message that “The Extended cost cannot be greater the actual cost.”

PO Receipt Entry

PO Receipt EntryMessage

Similar ally, our program checks for the changed quantity in PO Receipt.

In the same way, our program checks case user trying to modify Invoice Qty. and extended cost, and throw a message.

Also Read:

1. Purchase Order Tiers Add-On for Sage 300 ERP
2. Purchase Order Transaction Flow in Sage 300 ERP
3. How to handle Purchase Return in Sage 300 ERP
4. Purchase Order Reports in Sage 300 ERP

Multicurrency in Greytrix TDS

$
0
0

Greytrix – Tax Deducted at Source (TDS) is based on Indian taxation that helps user to make TDS transactions in just few clicks. To know more, visit our previous blogs on Greytrix TDS.
Considering business scenario where user want to use more than one currency.
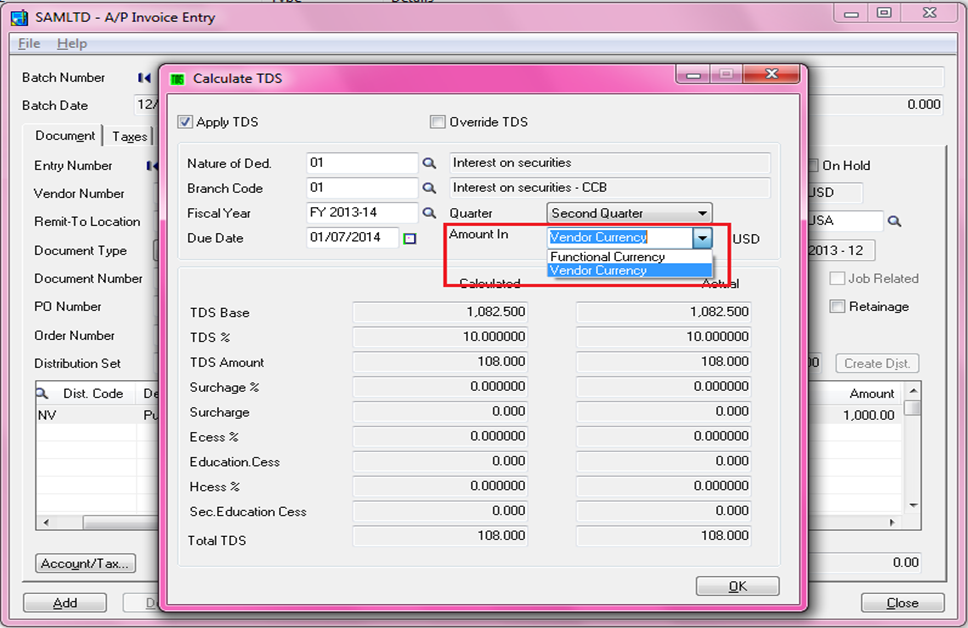
Let’s take an example, there are organizations that do transactions in foreign currency as well as using National currency. Say India uses Indian currency INR, USA uses US Dollars, etc. Here users do not have to check the TDS transaction by converting them into current rate. Greytrix Add-on provides leisure way to check this. On View TDS button click, user can see Amount In as highlighted in below screenshot
Let’s say user wants to deduct TDS on foreign currency vendor using AP Invoice entry.

New Stuff: 3 Way Matching PO Receipt

Calculate TDS

Note: This functionality works only for multi-currency database
Here user can check both Vendor and Functional currency by selecting Amount In drop down. User does not have to calculate it manually (i.e. Vendor Currency * Rate)
It is available for AP Invoice, Debit Note, Credit Note, Pre-payment, Misc. Payment

Also Read:

1. Greytrix TDS v2.2 for SAGE 300 ERP
2. Configuring Greytrix TDS in Sage 300 ERP – I
3. Configuring Greytrix TDS in Sage 300 ERP – II
4. Configuring Greytrix TDS in Sage 300 ERP – III

Setting up Price Inclusive of Taxes in Sage 300 ERP
$
0
0

In Sage 300 ERP, you can setup prices inclusive of taxes.  In this article we will provide guidelines on setting up price inclusive of taxes.

The New Stuff : Multicurrency in Greytrix TDS

First of all you need to setup or identify the tax authority where taxes charged by authority can be included in selling price.

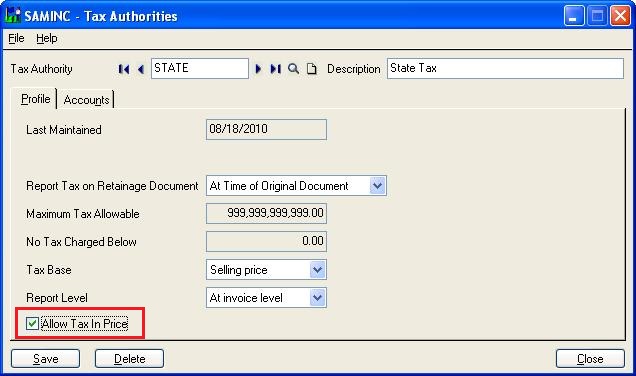
1) In order to configure the Tax Authority to allow tax in price; go to Common Services Module>>Tax Service>>Tax Authorities

2) Select Allow Tax in Price option. In the given example we have configured Authority State for allowing the tax in prices.

Tax1

Note: Do not select this option if you have customers who are tax exempt, because tax is not extracted from the item price. You would need to adjust the price for the customer.

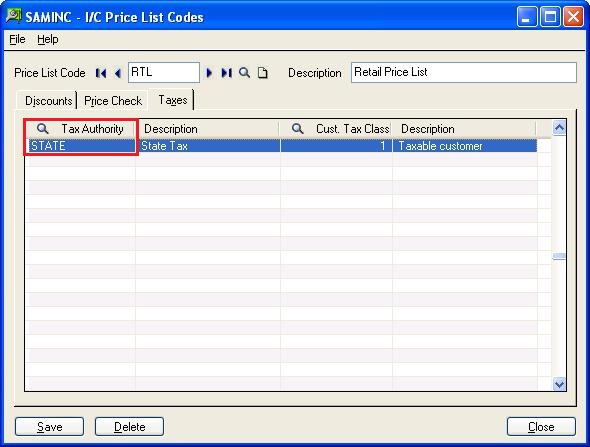
3) Now you need to setup Price Lists and add tax authorities which allow tax in prices.
(Inventory Control>>IC Setup>>Price List code)

Tax2

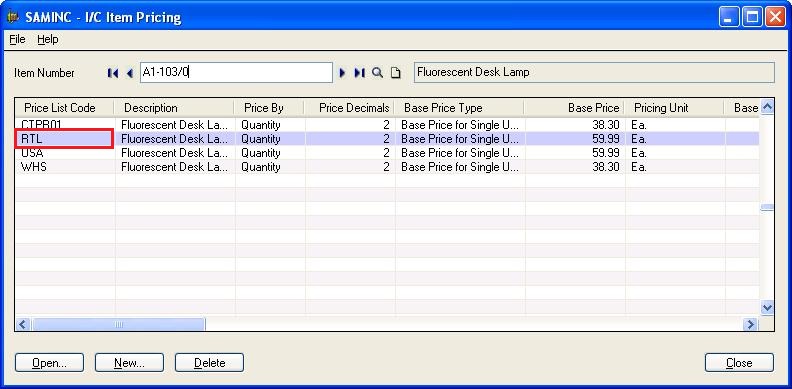
4. Assign the price list to the desired Items.
(Inventory Control>>I/C Items and Price Lists>>Item Pricing)

Tax3

Now you are able to setup item prices inclusive of taxes.

5. For A/R Items; you need to attach tax authorities which allow tax in prices.
(Accounts Receivable>>A/R Setup>>Items)

Tax 4

Also Read :
1. Tax Calculation on the basis of Quantity in Sage 300 ERP
2. Item Pricing based on Multiple Unit of Measurement
3.Choosing Vendor Contract Cost over IC Vendor Detail Cost in Sage 300 ERP
4. Vendor Pricing Analysis in Sage 300 ERP
5. Create new Items by copying existing items in Sage Accpac ERP

Cost Variance Analysis in Sage 300 ERP

$
0
0

Cost Variance analysis is control system that is developed by organizations to detect and correct variance from expected level in Inventory costs. Variance analysis is usually associated with derived difference between actual cost and the standard cost defined by organization for good output. There can be multiple factors contributing to form these variances like, Difference in Material costs can be due to material price variance and material usage variance. Similarly the difference between labor cost and standard labor cost can be due to rate variance and efficiency variance.

Variance analysis helps management to understand the present cost and then to control the future cost of material, labor and overheads and also prepare pricing strategies accordingly.

With the help of following configuration you can track cost variance in Sage 300 ERP.

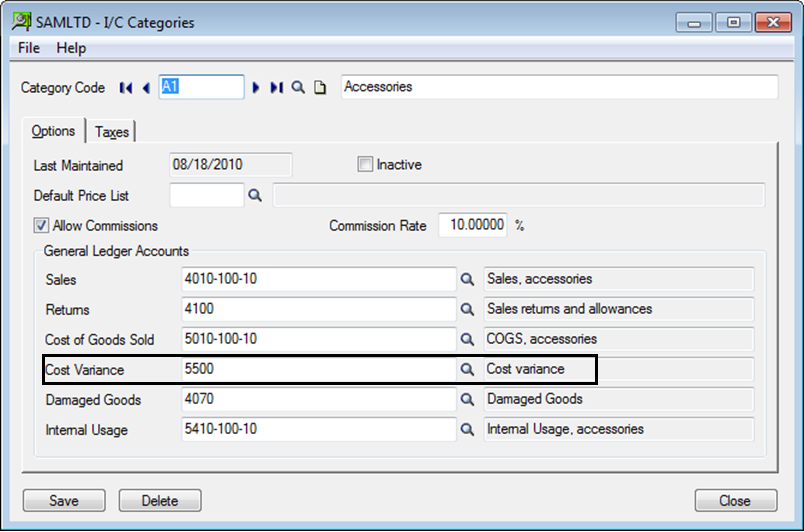
1. Configuration of Cost Variance account in Category

Cost Variance

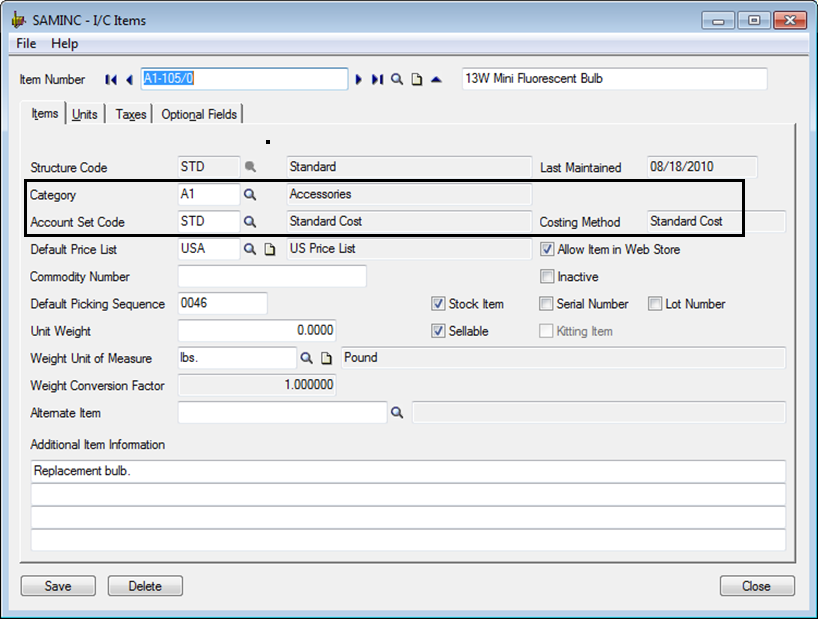
2. Mapping of Standard cost Account set and Category for items for which you want to configure standard costing method.

Items

3. Fixing of standard cost to Inventory items

Inventory control >> IC Items and price list >> Location details.

Location details

Following are the example of Journal entry posted by Accpac ERP for Cost Analysis.

In above case the standard cost defined by company for respective product is $ 85/-, but due to drop in demand and excess supply in market the same material was purchased by company at $ 80/-.

In this scenario following are the Journal entry created by Accpac on posting of PO Receipt entry.

2

New Stuff: Setting up Price Inclusive of Taxes in Sage 300 ERP

The same material sold by company with price $ 90/-. Following are the Journal entry created by Accpac on Posting of OE Shipment entry.

Now since the standard cost defined for this item is 85 but actual cost incurred is 80 the variance of 5 needs to be adjusted. Here is how Sage 300 takes this variance to balance the debits and credits on both sides of entry.

1

Cost variance analysis is vital for controlling cost and identifies ways for improving efficiency and profitability of organization.

Over a period of time this cost variance records can serve to analyse the trends of material cost and landed cost variations and factors that contribute to it to plan product pricing, and positioning strategies.

Also read:

1. Adjustment Entry in Inventory Control
2. How to handle Inventory Receipt in Sage 300 ERP?
3Standard cost functionality in Sage 300 ERP
4Defining Specific Location for an Inventory Item in Sage 300 ERP
5. Different Costing methods in Sage 300 ERP

Viewing all 1487 articles
Browse latest View live


<script src="https://jsc.adskeeper.com/r/s/rssing.com.1596347.js" async> </script>