Quantcast
Channel: Sage 300 ERP – Tips, Tricks and Components
Viewing all 1487 articles
Browse latest View live

How to Record Internal Usage (Consumed) Entry in Sage 300 ERP

$
0
0

Through Internal Usage in Sage 300 ERP, you can record the transactions that consume the items from inventory for your own company’s use.
For example, an office supply store could take a desk from inventory for a new employee. Or it could take laptop, data card, and mobile phone from inventory for office supplies.

To enter internal usage transactions:

Double-click the Internal Usage icon under the I/C Transactions folder in Sage 300 ERP.

Let’s see an e.g. of Internal Usage Entry in Sage 300 ERP. Suppose Admin Dept. got Requisition from Sales Team for 5 Laptops.

Then Admin Dept. will pass the Internal Usage entry through which Inventory of Laptop will get reduced by 5 Qty. from Location 1.

This entry will not affect your Sales or COGS accounts because this is not your Sales entry (not sold to the customer) where this inventory is consumed internally by the company or company employees.

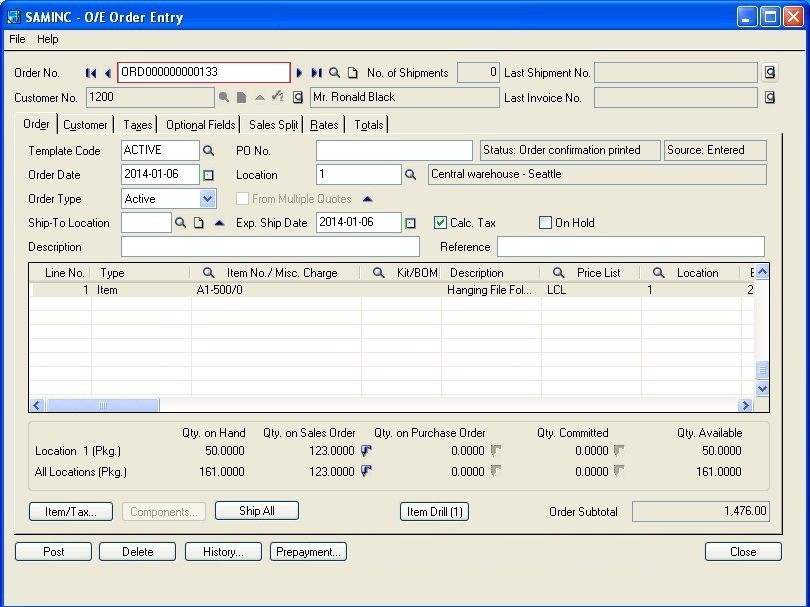
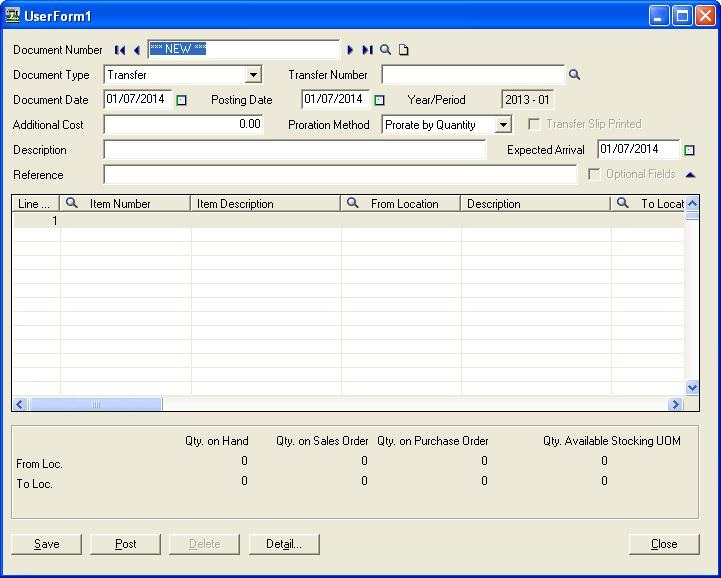
You can see the I/C Internal Usage Entry of Sage 300 ERP screen shot below:

Internal Usage

By using new button you can create the new entry and new document no. will be assigned by the system automatically. Then select the Item at the detail level and mention Qty. required. Here cost will be calculated by the system based upon the Costing Method assign to an item, so no need to enter the cost.

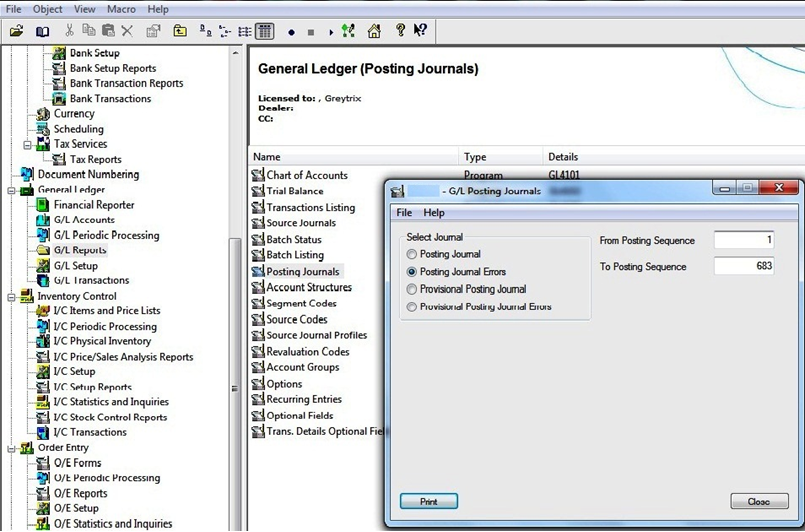
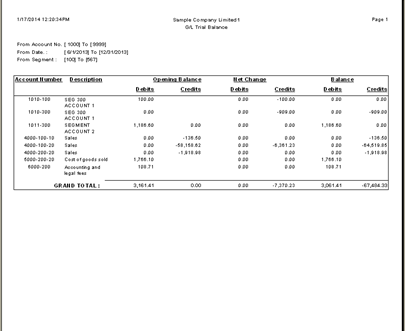
Let’s see the G/L Effect of the Internal Usage Entry:

GL-JE

Here Inventory (Asset) is Credited and Internal Usage Accessories (Expense) is Debited.

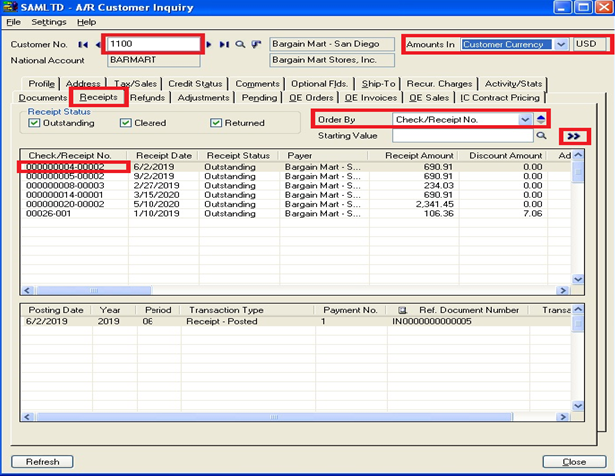
You can refer various stocks report in Sage 300 ERP out of which find I/C Stock Transactions Inquiry report screen shot below:

Stock Transaction

New stuff: Cost Variance Analysis in Sage 300 ERP

From the above report you can see the Opening, Total Receipts, Internal Usage and Closing of an item.

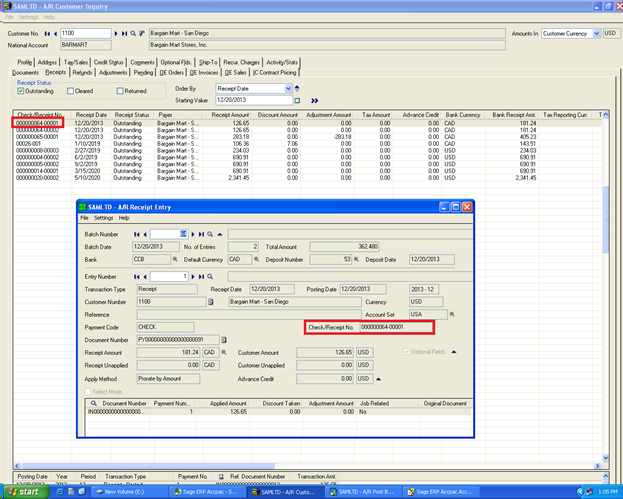
When you double click on Internal Usage you will get the transaction wise detail in Sage 300 ERP as you can see in the below screen shot. When you click on the entry you will be able to see the entry form.

Inquiry detail

From the above e.g. we can conclude that in Sage 300 ERP we have this unique feature called Internal Usage by using which we can easily record our internal consumption entries. Many times Admin Dept. do not come to know properly that how much we spend on company expense, but here you will simply analyze and make control on it.

Also read:

1. How to handle Inventory Receipt in Sage 300 ERP?
2Adjustment Entry in Inventory Control
3. Standard cost functionality in Sage 300 ERP
4. Different Costing methods in Sage 300 ERP
5Set Fractional Quantities in Sage 300 ERP


How to Solve GL Error Batch in Sage 300 ERP

$
0
0

Have you come across GL Error Batches while using Sage 300 ERP and are unable to understand and solve them? Something Like ‘ERROR BATCH – Entries from batch ‘0000001’’ are Error batches generated by Sage 300 as a record of the entries which couldn’t be posted due to some wrong selections/settings by the users.

These batches serve 2 functions, 1 to notify the user that his/her batch is not posted and hence there is no Financial Impact on the General Ledger, 2 to serve as a replica of the entry/s for posting after rectification of the wrong selections/settings.

New Stuff: Item Price/Cost inclusive of tax in Sage 300 ERP

Lets’ see how to find and solve a GL error batch

Once you see a batch with Description starting with ‘Error Batch’ you can run posting journals report.

In sage 300 ERP, Navigate to General ledger ->GL Reports -> Posting journals -> Posting Journal errors and click on print button.

GL Posting Journals

When you click on print button, system will generate a report which will show all Journal posting errors.

Print posting journal

In Above screen shot, we can see [Entry no. 1] in [batch no 1609] Posting was failed because Period 9 (Month “Dec”) was locked for General Ledger in common services ‘Fiscal Calendar 2014’ and  after posting of batch No 1609, system has created an error batch No. “1610”.

Now first we have to identify, whether we are posting batch in correct date or not? If posting date is Right, then we have to unlock the fiscal Period 9 and post the error batch “1610”.

If wrong posting date is set in batch, then correct the posting date in Batch No “1610” and post batch.


Common General Ledger Posting Errors and Fixes in Sage 300

Error: – Posting to a locked fiscal period

Fix: – Review all GL batch entries and confirm that you are posting the entries in correct fiscal period. If you are posting in correct period and period is locked then unlock the fiscal period in common services->Fiscal calender

Error: – Invalid Input, Account code is not defined in General ledger

Fix: – Mostly this type of error comes through sub ledgers like “AP”,”AR”,”PO”,”IC”,”OE”, check If you have set segment override functionality in IC location master and for that particular location GL account is not created then system will create an error batch.

Create account code in chart of account master for that particular location and post the error batch.

Error: – Cannot Post to an Inactive Account

Fix: – Review the GL batch entry and confirm that you are not posting the entries in the account, which is inactive in chart of account.  If you have selected wrong GL account then correct it in error batch and repost the batch.

Error: – Debit credit amount is not matching.

Fix: – Review the GL batch entry and confirm that debit credit amount is matching. If debit credit amount is not matching then system will not post the batch and always create an error batch.

Error: – Cannot post to a future year

Fix: – Create a new fiscal year in fiscal calendar in common services

Error: – Journal detail source ledger XX is not on the control account’s XXXX eligible list

Fix: – Review the GL Account setup and add the source ledger that you want to post to the control account.

Thus, by following the above mentioned steps users can find the actual cause of GL posting error and can solve the error batches.

 Also read:

1Reverse Batch feature in Sage 300 ERP
2GL Drill Up from Transaction UI
3Consolidate Transactions in Sage 300 ERP
4General Ledger Period End Maintenance
5Define Budgets in Sage 300 ERP


I/C Receipts Functionality in Sage 300 ERP

$
0
0

Sage Accpac 300 ERP offers an option for Receipts in Inventory Control module for those Inventory Receipts which are not routed through the Purchase Module.

When a Company does not have a Purchase Orders module and still wishes to receive the Materials into the Inventory from the Vendor, they can make use of I/C Receipts.

Note: Unlike PO Receipts system will not Auto Apply Tax portion and that has to be taken care of while raising A/P Invoice.

I/C Receipts can be made in Functional or Source Currencies based on the actual Purchase currencies. If you have defined Vendors in AP Module then those can also be tagged in the I/C Receipt screen along with the additional cost which was incurred in the Purchase.

The additional cost will get prorated on the Items which are selected in the detail line.

Note: The additional cost currency must be the same as either the receipt currency or the company’s functional currency.

Below is the screenshot of I/C Receipt for your ready reference.

IC receipt

New stuff: How to Solve GL Error Batch in Sage 300 ERP

Once you post the I/C Receipt following G/L effect will take place.

1

Going forward the Second step will be to book Accounts Payable Invoice in order to zero out the Payable Clearing account. Below will be the G/L effect once you post the A/P Invoice.

2

Apart from the above we can even execute the following feature
 1. Adjust (Increase/Decrease) the cost of the I/C Receipt posted earlier instead of making a new entry altogether.IC receipt

Following will be the G/L effect once this entry is posted in case the adjustment is of type Increase.

3

2. Return the materials back to the Vendor from the Inventory against the I/C Receipts.
This will Credit Inventory and Debit Payable clearing Account.

IC receipt 3

Below will be the G/L effect after this posting.

4

This is how I/C Receipts can serve multiple functionalities and are effective for Inventory Management especially in the absence of a Purchase Order Module.

Note: After this user has to book an A/P Credit Note against the particular I/C Receipt and selecting the same Payable Clearing account at the detail level.

Also read:

1. How to handle Inventory Receipt in Sage 300 ERP?
2How to Record Internal Usage (Consumed) Entry in Sage 300 ERP
3Adjustment Entry in Inventory Control
4. Different Costing methods in Sage 300 ERP
5Set Fractional Quantities in Sage 300 ERP

Item Quantities Drilldown feature for PO Purchase Order Entry Screen

$
0
0

Earlier we discussed about our Quantity On Hand drilldown component for Order Entry Screen in this article

Quantity On Hand Drilldown feature for OE Order Entry Screen

We have now designed item quantities drilldown for Purchase Order Entry screen. Using this blog we shall describe the useful features of this enhancement.

The New Stuff : I/C Receipts Functionality in Sage 300 ERP

Order Entry screen has the ability to display the item quantities (Qty On Hand, Qty on Sales Order, Qty on Purchase Order, etc.) for entered line item. We have provided similar feature on Purchase Order Entry Screen.

PO1

On Order tab of Purchase Order Entry screen; we have added item quantities region which displays the item quantities for the selected receiving location and for all the locations.

This enhancement will allow the users to view Qty. on Hand, Qty. on Sales Order, Qty.on Purchase Order and Quantity Committed for the selected receiving location and for all location.

Drilldown buttons are also added besides Qty. on Sales Order, Qty. on Purchase Order and Quantity Committed using which location details can be easily viewed.

Note: This customization is done using Sage 300 SDK, as a result easy to deploy and it works with Sage 300 ERP 2012 and Sage 300 ERP v6.0A

Also Read :
1. How to Calculate Current Quantity on Hand on Custom Reports in Sage Accpac ERP
2. Location Wise I/C Item Details
3. Defining Specific Location for an Inventory Item in Sage 300 ERP
4. How to set default reserved quantity in Sage 300 ERP
5. Quantity and Cost restriction in PO Transaction

Sage 300 ERP Intelligence Components

$
0
0

In our earlier post, we discussed using the standard reports in Sage 300 ERP Intelligence module. http://www.greytrix.com/blogs/sageaccpacerp/2013/08/16/5-steps-to-intelligent-reporting-using-sage-300-erp/

In this article we will provide further insights on components/modules of Sage Accpac Intelligence.

The New Stuff : Item Quantities Drilldown feature for PO Purchase Order Entry Screen

Sage Accpac Intelligence comprises of components/modules each of them serves a distinct purpose.

components

Also Read :
1. Goods Receipt Register Report
2. Sales History Report in Sage 300 ERP
3. Export Crystal Report in Multiple Formats
4. Invoice Retention in Sage 300 ERP
5. Generate Reports for Slow Moving Items in Sage 300 ERP

Open Orders Inquiry for Sage 300 ERP Order Entry Screen

$
0
0

We have designed a component for Order Entry screen which provides the ability to quickly view open orders for the selected customer from the Order Entry screen itself.

The New Stuff : Sage 300 ERP Intelligence Components

On selection of customer; our customized order entry screen loads the Open Order Inquiry screen which lists all the open orders for the selected customer.

Selecting customer

The Open Orders Inquiry screen also has filters which provide the ability to filter the data by Order Number, Order Date and Expected Ship Date.

Besides this users can launch the order document with a single click.

Selectd Order

The enhancement serves following purposes:

• Quick inquiry on open orders
• Staff can follow-up on previous orders
• Quickly launch the order for editing
• Staff can decide whether they would like to enter a new order or edit previous order
• Staff can further query the open orders data

 Note: This customization is done using Sage 300 SDK, as a result easy to deploy and it works with Sage 300 ERP 2012 and Sage 300 ERP v6.0A.

Also Read:
1. Auto Generate OE Confirmation Report in PDF format in Sage 300 ERP
2. Quick Shipment feature for Sage 300 ERP
3. Shipping Labels in Sage 300 ERP
4. Copy Order Functionality in Sage 300 ERP
5. Advanced Features in Order Entry screen of Sage 300 ERP 2012

AR Customer Receipt Enquiry

$
0
0

The Sage 300 ERP provides you AR Customer Inquiry screen which consolidates customer information from all different core modules within Sage 300 ERP. This feature helps you to get Customer valuable information at our fingertips.

In this blog we are going to focus on the tab which relates to the Payments made by the customer. This tab/page is termed as Receipts. This tab provides customer’s receipt information such as  Bank, Check/Receipt Number, Doc Date, Transaction Amount, Exchange Rate, Discount Amount, Payment Code, Currency, Batch and Entry No, Transaction Type, Reconciliation status etc.

To inquire about a customer’s receipt, one needs to select the customer in the AR Customer Inquiry screen as shown in the following Screen shot:

New Stuff:  Open Orders Inquiry for Sage 300 ERP Order Entry Screen

ARCustomer Inquiry

Go to Account Receivable –> A/R Customers–> Customer Inquiry.

For Example, consider customer number 1100 and go to receipt tab as shown above.

The Receipts tab lists all customer payments that are posted for an Accounts Receivable customer, including information about the documents to which the receipt was applied. It also lets you view posted miscellaneous receipts for customers.

It also allow user to filter data on basic of Receipt status.

A user can also look the receipt in either Functional currency or home currency by selecting the field “Amounts in:” as highlighted in the above screen shot.

It allows user to view transactions on basis of either Receipt Date or Receipt/Check no using the Order By field.

User can also drill down to view source documents in Accounts Receivable entry forms by double-clicking lines on Customer Inquiry tabs.

AR

Just to summarize, the Customer Inquiry form provides a ready reference to all the information that exists for a customer in your Sage ERP 300 system.

Also Read:

  1. Quantity and Cost restriction in PO Transaction
  2. AR Customer ledger/ Transaction
  3. Item Master Auto Synchronization between Two Systems
  4. OE Sales Register Report for Sage 300 ERP
  5. AP Vendor Ledger Report for Sage 300 ERP


Provide File Menu to VBA Forms

$
0
0

In our last post article we discussed about Providing Icons to the VBA Form. In this blog let us take a step ahead and discuss about adding File Menu to the VBA forms.

http://www.greytrix.com/blogs/sageaccpacerp/2013/10/19/provide-icons-to-vba-forms/

In this blog we will take an example of the IC Transfer screen which has been customized once for our clients using a VBA Macro. VBA Macro does not have inbuilt feature of Menu Editor through which we can create Menu in the form.

The New Stuff : AR Customer Receipt Enquiry

1

By following a simple workaround, you can Add Menu to a VBA macro and in turn call the standard File Menu of the Accpac OCX File menu in VBA Macro.

Step 1:  Take a label on the VBA Form

2

Step 2: Give the name of the Label as lblShowMenu1 (user can provide any name) as shown in the below screenshot:

3

Step 3: Next step is to write the below code on the click of the lblShowMenu1,

<SNIP>
Private Sub lblShowMenu1_Click ()
AccpacIC3410UICtrl1.ShowMenus
End Sub
<SNIP>

After adding the above code snippet and execution of the program you can notice that the File Menu has been added to the VBA form as shown in the below screenshot:

4

Also Read :
1. VBA Macro Errors related to EXD Files
2. Macros in Sage 300 ERP
3. How To Add A Macro To Accpac Desktop of Sage 300 ERP
4. Run VBA Macro without Logging to Sage 300 ERP
5. Define Budget Using Macro


New Security Feature in Greytrix Document Attachment for Sage 300 ERP

$
0
0

Greytrix Document attachment is a comprehensive add-on that helps users to attach, refer and view the related documents that they want to see floating along with the transaction screens Viz. Order Entry, Invoice Entry, Journal Entry, etc.

The New Stuff : Provide File Menu to VBA Forms

In our earlier post; we have already discussed about the availability of this add-on for Sage 300 ERP 2012 and its new released features.

http://www.greytrix.com/blogs/sageaccpacerp/2013/06/24/enhanced-features-in-greytrix-document-attachment-for-sage-300-erp/

In earlier version of Greytrix Document Attachment module; users were having complete access to document repository i.e.; they were allowed to remove the files attached to the transactions or replace the files. The new release of add-on resolves these issues and concerns.

We have now added a crucial security feature with which permissions can be well define for Sage 300 users. The new security enhancements will allow administrators to configure the security for files repository for other users.  A new interface is provided wherein permissions (to Delete or Overwrite) can be setup for Sage Accpac users.

A. Document delete authorization:
Select this option to authorize the user to delete the documents attached to the transactions.

Document1

Note : In this release; if the documents are removed from the transactions then they are physically removed from the system.

B. Document override authorization :
This option will restrict/allow the user to overwrite the documents if the file with same name is already present in the file repository.
As a default; Administrative users will have both Document delete and override rights.
Based on the above two security options administrators can manage the security of the attached documents to the transactions. The new security feature is available for following transactions screens of Sage Accpac:
AP –Invoice Entry, Adjustment Entry, Payment Entry
AR – Invoice Entry, Receipt Entry, Adjustment Entry
GL – Journal Entry
OE – Invoice Entry, Shipment Entry, Order Entry
PO – Invoice Entry, Receipt Entry, Order Entry

Also Read :
1. Enhanced features in Greytrix Document Attachment for Sage 300 ERP
2. Greytrix Document Attachment for Sage 300 ERP v6.1
3. New release of Greytrix Document Attachment for Sage 300 ERP
4. Document Attachment Solution for Sage Accpac ERP
5. Sage 300 ERP Intelligence Components

Date wise GL Trial Balance Report

$
0
0

General Ledger module takes care of all your financial records, whatever the size and complexity of your business may be. All the financial transaction you post in sage 300 ERP through sub ledger module hits the “General Ledger”.

Sage 300 ERP gives you a report which display account balances as of a “specified fiscal period”. In some business scenarios, user might need to print the report for a date range. We have developed a custom report called “Date wise GL Trial Balance Report”.

This report prints a trial balance report or worksheet that lists selected account balances for a specified date range. You can print this report for a given date range and check your account balance.

This report includes Opening balance, Net change and closing balance and further bifurcated in credit and debit column(Please refer the below report format which will gives you an idea how it look likes).

This program will help you to filter the data on account, segment & date range, please refer the below screen shot.

New Stuff:

1

The format of report is as follows:

GL

The report is particularly useful when you need the trial balance on a date range. You can also export this report in Excel or PDF as per your convenience.

Also Read:

  1. Document Attachment Solution for Sage Accpac ERP
  2. Stock Status Report in Sage 300 ERP
  3. Purchase Order Transaction Flow in Sage 300 ERP
  4. Define Budget Using Macro
  5. Enhanced features in Greytrix Document Attachment for Sage 300 ERP

How to create PO from I/C

$
0
0

Sage 300 ERP provides a choice of creating Purchase Order for an item on the basis of its quantities maintained in inventory stock. Depending on the Maximum and Minimum quantities of an item in reorder screen, system calculates the number of quantities needs to be reordered. Let’s discuss this in detail with the help of an example:

Suppose you need to create a purchase order for an item in fiscal period 1 for location 2 where item has minimum quantity 10 and maximum quantity 20 in Reorder Quantities screen:

Reorder Quantities

To create PO from I/C follow the path given below:

Purchase Orders >> P/O Create Purchase Orders >> Create POs from I/C

Create PO from ICNew stuff: Date wise GL Trial Balance Report

In screen of Create PO from I/C, there is an option to create PO by putting filter on following selection criterions:

1. Vendor: If we purchase same item from different vendors and maintain this in Vendor Detail screen then in that case we can choose if we want to create PO for one or more Vendors of that particular item.

Vendor details

2. Reorder: Using the options given under Reorder box we can sort out our transactions on the basis of items by deciding the range of items for which we need to raise the Purchase Order. If the quantity on hand for selected items is greater than the Reorder Quantities then PO will not be created in that case.

Location Details

3. Reorder Quantity: Here we gets a choice of putting filter on number of quantities i.e. for how many quantities we want to raise the Purchase Order. In taken example if we select up to maximum then the quantities in PO will be ‘10’ (equals to reorder quantity) otherwise in case of Above maximum they would be ‘20’ because upper limit of reorder quantities can be maximum quantity. In the same way, PO can be raised projected sales.

Finally, click on Process to proceed with PO creation.

Below is the screenshot of Purchase Order which is generated on selecting Reorder Quantity as “up to maximum”:

PO Entry

In this blog, we saw how we can raise Purchase Orders from I\C with brief view of reorder quantities, location details and vendor detail screen. Soon we will post a blog on significance of Reorder Quantities covering other scenarios also.

Also read:

1. Requisition Approvals in Sage 300 ERP
2Purchase Order Reports in Sage 300 ERP
3. Purchase Order Transaction Flow in Sage 300 ERP
4. How to handle Purchase Return in Sage 300 ERP
5. Item Quantities Drilldown feature for PO Purchase Order Entry Screen

Set Up Non Stock Items in Sage 300 ERP

$
0
0

Services or specially ordered items which are not normally kept in inventory are considered Non-Stock items Eg could be Services, Expenses, Assets. Non-Stock item can be received and shipped, but it is the user responsibility to identify the cost of the item at each transaction. Therefore, Non-Stock Items must be assigned an account set with User-Specified costing method. The Non-Stock Account does not use the Inventory Control account defined in the Account Set instead it uses the Non-Stock Clearing account.

GreyMatrix (Grid inventory system) – Apparel Solution integrated with Sage 300 ERP

For Non Stock Item Creation, we need to configure the following masters in Sage 300 ERP.

1. G/L Account for Non Stock Items

Create one GL account if all non stock items are to be kept in 1 account, many if each need to be recorded separately. Recommended is Many.
    a. E.g. a Commission Item and Service Charge item can have 2 different account sets yet same G/L account. If we need to see in G/L we would not be able to track how much sales we made for 2 items separately. The ultimatum is we need to create separate accounts for this.
    b. And 1 Non Stock clearing account (similar to Payable/Receivable Clearing Accounts).

2. I/C Account Sets for Non Stock Items

    a. Preferably it is advisable to create separate account sets for each item. Select the costing method as User Specified.
     b. In the Non Stock Clearing account, select the non-stock account created in GL.

Account set

   New Stuff: How to create PO from I/C

    c. If we need to create only a single Non stock inventory account then create only a single account set. Create multiple Non Stock Inventory Account in GL if need to track by different Account Set E.g: If there is a non stock account called Asset, which includes various assets such as furniture, tables, etc then either we can create a single account set for Asset or multiple for furniture, tables, etc. It is recommended to create multiple since at the transaction level it will by default populate the individual account sets, whereas in case of single it has to be manually changed which may be prone to errors.

3. I/C Non Stock Items

  a. Create Items for each service/commission.
  b. To create the non-stock items, navigate to IC -> IC Items & Price List -> Items
       i. Select the account sets created for the non-stock items, the costing method should be user specified.
      ii. Uncheck the Stock Item checkbox.
     iii. Uncheck the Sellable checkbox.

items

4. Go to Inventory Setup Options and make sure the option, allow Receipt of Non-Stock Item is checked.

IC options

In case of Single Account Set created, the Non Stock Clearing account has to be changed manually at the transaction level. E.g. If we select a non stock item at the detail level for which the Account set is asset and say if we want furniture instead of Asset, then select furniture account in non-stock Clearing account field.

The Non-Stock Item does not reflect in IC valuation report since it does nottrack quantity or cost for such items. It can be seen in other forms such as standard Sales and Purchase Invoice forms.

Also read:

1Sellable and Non-sellable items in Sage 300 ERP
2Stock Status Report in Sage 300 ERP
3. Different Costing methods in Sage 300 ERP
4. Setting up Price Inclusive of Taxes in Sage 300 ERP
5. Create significant item name with separator and prefix in sage 300 ERP

Top Line Margin in Sage 300 ERP

$
0
0

Top line Refers to company’s gross sale or Revenue. A company’s income statement shows the sales, revenue, expenses and profit for an accounting period. The top line represents the gross sales which is the total functional currency value of sales and revenue during an accounting period.

The word “top” relates to the logic that on a company’s income statement the first line of the financial statement is generally reserved for gross sales or Revenue. A company that increases its revenue is said to be “growing its top line” or “generating top line growth”.

Sage 300 ERP Order Entry Module can provide you report to analysis Top line of your products.

You can view Top line through Order entry >> O/E Reports >> Sales History.

Sales history

New StuffSet Up Non Stock Items in Sage 300 ERP

Sales History report

In the above report sales amount column indicate top margin of your company. You can analysis this top margin by document wise, customer wise,product wise and salesperson wise. You can get this margin in summary as well in detail level.  You can make comparison of Top margin for your company between to period also.

Another important column of this report is Margin Percent which displays your gross margin based on Product/ Production Cost and Selling Price details entered in system.

This way you can view your Top Line as well as Gross Margin and decide on the right strategy to increase the Top Line and/or the margins on specific product lines and attain growth.

Also read:

1Open Orders Inquiry for Sage 300 ERP Order Entry Screen
2. Sales Invoice Reversals in Sage 300 ERP
3Sales History Report in Sage 300 ERP
4. Auto Insert associated Item in Order Entry Detail
5. OE Sales Register Report for Sage 300 ERP

Partial Shipments using Sage 300 ERP

$
0
0

Sage provides afeature of Allow Partial Shipmentsin A/R Customer master by using which one can allow shipments in phases. One can select this option to selected Customers if one wish to, by default the option is checked in the master,one need to uncheck the same if one wishes to restrict any partial shipments for any customer.

This feature is available in the A/R Customers and below is the screenshot of the same.

Customers

The function of the feature can be better explained with help of an example.

Consider a customer by the name ACME Plumbing and have checked the feature“Allow Partial Shipments”, then Order Entry lets you ship partial orders only for this particular customer. Below is the screenshot of Order Confirmation entered for that particular customer.

Order Entry

New Stuff: Top Line Margin in Sage 300 ERP

When onedoes shipment entry against this Order Confirmation, the entry effect would be as per the below screenshot.

Here as one can see the value of column Completes Order is NO because the complete quantity is not shipped.

Shipment entry

So Sage would allow one to go ahead with the entry and will be able to post this entry. Then the remaining amount can be shipped in the next phases.

But if one would had unchecked the feature“Allow Partial Shipments”, then software would not allow to do any partial shipment entries. This can be seen in the below screenshot where one tries to do a partial shipment for the same customer.

Shipment Entry

Here, as one can see that the value of column Completes Order has been changed to Yes even though complete shipment is not done. And if one tries to post this entry one gets an error as shown in the below screenshot.

shipment

So, this feature lets us to make multiple shipments against single order confirmation. The use of this option is when one have a bulk order and the complete quantity cannot be shipped in one go.

Industries where this option is very much useful can be Engineering, Automobile, Automation where the Manufacturing time is high and goods cannot be shipped in one go.

Also read:

1Open Orders Inquiry for Sage 300 ERP Order Entry Screen
2. Sales Invoice Reversals in Sage 300 ERP
3Sales History Report in Sage 300 ERP
4. Cannot Issue an OE Credit Note to return a serialized item to a different location
5. OE Sales Register Report for Sage 300 ERP

Macro did not run for unknown reasons (Error code -2147747072)

$
0
0

In our last blog on Accpac Macro, we discussed about Provide File Menu to VBA Forms.

In this blog we will discuss about a general error that we face while running a macro from Sage 300 desktop as shown in the below screen shot.

The New Stuff : Top Line Margin in Sage 300 ERP

error

There are scenarios, where we develop macro and test it on the developer machine in the edit mode, where we do not face the above issue and the macro runs fine. But as we deploy the macro on the Sage 300 desktop, we encounter a situation wherein, the macro fails to open and the above message is displayed.

Instruction to be noted:

When the macro is executed from the Sage 300 desktop, it expects the module “MainModule” to be present in the macro, along with the subroutine “MainSub()” which acts as the starting point for macro execution.

You need to ensure that these instructions are followed in order to execute the macro from Sage 300 desktop.

Also Read :
1. VBA Macro Errors related to EXD Files
2. Macros in Sage 300 ERP
3. How To Add A Macro To Accpac Desktop of Sage 300 ERP
4. Run VBA Macro without Logging to Sage 300 ERP
5. Define Budget Using Macro


Sage 300 ERP for Ceramics Industry

$
0
0

1

The word Ceramic comes from Greek word ‘Keramikos’ which means ‘for pottery’ / ‘of pottery’. Unlike the origin of the word ceramics industry touches more than 1 aspect of our day to day lives, may it be utensils, sanitary ware, tiles, tooth implants, artwork, insulators or bad conductors for electricity ceramics are widely used.


Sage 300 ERP provides several ways to cater to ever-growing needs of the ceramics industry companies starting from Raw Material Producers or miners till end users of the Finished goods. Some of the key areas of importance for Ceramics industry businesses are reduction of Freight and Transportation costs, capturing Landed Costs, Increasing repeat customers by on time delivery and best product quality and upturn in margins by reducing the supply chain length.

For Example, Sage 300 ERP captures various costs and expenses involved in the procurement cycle to arrive at the specific Landed cost. Apart from defining Raw Materials, we can define Non Stock Items like Road Freight, Ocean Freight, THC Charges, Seal Charges, BL Charges, Palletisation and many more. There can be Additional Costs and Expenses based on whether they add to the cost of Product or are to be kept separate as Expense.

In several locations Freight and transportation is an unorganized sector and hence it comes with all the draw backs of an unorganized sector like uncertainty of service availability, delays, drop in quality of service, sudden price rise. Due to these the freight component becomes one of the pain points for the businesses and contributes heavily to the costs of material.

graph

Sage 300 (Accpac) not only captures these transaction level data, but also provides the information to build reports like the ‘Sales Report’ here.

Our X3 Blogs: Sage ERP X3 – Tips, Tricks and Components

Another important aspect of the business is capturing Exchange Rate fluctuations and their effect on business. Due to fluctuations in exchange rates, many a times Sales Margins may plunge in local currency. This also results in affecting the Sales Person wise commissions if they are calculated in Local currency. One needs to make sure that these numbers are evaluated keeping Exchange Rate fluctuations in mind.Sage 300 ERP provides fields to store exchange rate data and also captures exchange rates at each transaction starting from Purchase Orders and Sales Orders.

Ceramics

Sage 300 also stores data which can be pulled out for Realization Reports which give the exact picture of sales, purchase, logistics and exchange rate variations. The report details the revenue per Metric Ton of material sold and then various expenses incurred on that 1 unit per sales. This way the customer wise, region wise and product wise profitability can be arrived at. Factors like fuel rate hikes, transport strikes and exchange rate variations contribute to these figures and it is considered while taking decisions based on the report.

This way Sage 300 ERP provides one stop solution for exhaustive needs of various businesses in Ceramics Industry for dealing in Manufacturing, Trading and Purchases or Resale in Domestic or International Markets.

Also read:

1. Order Entry Transaction flow in Sage 300 ERP
2. Purchase Order Transaction Flow in Sage 300 ERP
3. Set Print Destination in Sage 300 ERP
4How To Add A Macro To Accpac Desktop of Sage 300 ERP
5Drill Down to Source Transaction from GL

Customer Interest Invoice

$
0
0

When a customer’s payment is overdue, then the customer is subjected to interest cycle based on what interest profile defined to him/her in Customer master.

Sage 300 ERP provide us an easy way to calculate/track customer’s accumulated interest amount. By creating an interest invoice batch just by clicking a button. Now let us see how we can do this.

Follow the path: Account Receivable—–>A/R Periodic Processing——>Create Interest Batch.

Create interest batch

Our X3 Blogs: Sage ERP X3 – Tips, Tricks and Components

This screen lets you Create batches of interest invoices for ranges of customer numbers, customer groups, or billing cycles.

You create one batch of interest invoices at a time, but you can have as many open batches of interest invoices as you need.

Run Date:  The date which you enter here is assign as document date for all interest invoices in the batch.

Posting Date: Here you can enter the date to which you want to post interest invoice to General Ledger

Select By: There are 3 options available here.

  1. Customer Number: To create customer-wise interest Invoices
  2. Billing Cycle: To create invoices for all the customers who are assign billing cycle you specify here.
  3. Customer Group: To create invoices for all the customers who are assigned customer group you specify here.

Age Document: when you select this option program will exclude all the transaction dated after the run date.

We can also insert header level and detail level optional field if we require them in interest invoice entry.

After clicking on process button an un-posted Invoice entry will be created in AR invoice batch list. After you verify the entry you can post the entry.

In this way we can create Interest Invoices for the customers.

Also read:

1AR Customer Receipt Enquiry
2Customer Credit Limit in Sage 300 ERP
3. Invoice Retention in Sage 300 ERP
4. Create Write-off Batches for Open Invoices in Sage 300 ERP
5Auto Apply Option for AR Receipt in Sage 300 ERP

How to handle Inventory Shipment in Sage 300 ERP

$
0
0

An Inventory Control’s Shipment form will serve the purpose for shipping items from inventory and for returning items fromcustomers in Sage 300 ERP.

If suppose your company has a very simple Sales Process means where there are no Quotations, Sales Order and Delivery Challan but only movement of goods and invoicing. Then in that case without having OE (Sales) Module of Sage 300 ERP you can make the material shipment entry by using Inventory Module of Sage itself, and invoicing and receipt will be done by A/R (Accounts Receivable) module of Sage. This will save the license cost.

Use this form for the following:

• Enter and post new shipment of items.
• Enter sales returns against the shipment or delivery of items.
• Assign serial and/or lot numbers if you have the Serialized Inventory and Lot Tracking license installed.

Let’ see the screen shot of I/C Shipments in Sage 300 ERP.

IC shipment

You have to decide whether to post each new shipment as you enter it, or save the shipments to post them later in a batch using the Post Transactions form.Once after posting the above entry, stock is decreased in location 1by10 Qty.

For verification let’s see the I/C Inventory Movement Report:

Inventory movement

Our X3 Blogs: Sage ERP X3 – Tips, Tricks and Components

There will be an accounting effect for I/Cshipment entry:

1

Let’s see how to make Return Entry using I/C Shipment screen:

Suppose your customer returned the goods due to receiving damaged goods.

Have a look on the below screen shot where by using I/C Shipment you can also make thesales return, just you need to select the type as Return in Sage 300 ERP.

IC shipment

Here Qty. Returned is 5. Let’s post the entry and see the effect on the Inventory for that,have a look onthe I/C Inventory Movement Report in the Sage 300 ERP.

Inventory movement

After having a look on the above report we can verify that the Qty is reduced from the location 1 by 5 Qty.

There will be an accounting effect for I/C shipment entry:

2

From G/L Journal Entry screen you can drill down and see the source document window in Sage 300 ERP, means the shipment or return window can be viewed directly from the G/L Journal Entry window.

By having a view on the above entries and the reports we can conclude that from the single screen we can directly make the shipment from the Inventory module without going to Sales module and also we can make the return against the shipment from the same screen which is the one of the exclusive feature of Sage 300 ERP.

1Standard cost functionality in Sage 300 ERP
2Quantity On Hand Drilldown feature for OE Order Entry Screen
3. Cost Variance Analysis in Sage 300 ERP
4. Adjustment Entry in Inventory Control
5Stock Status Report in Sage 300 ERP

Default settings for Receipts in Account Receivable in Sage 300 ERP

$
0
0

There are various default settings available at the Company as well as Module level in Sage 300 ERP which makes the data entry easier and time saving.

The New Stuff : How to handle Inventory Shipment in Sage 300 ERP

In this blog we will discuss about the default settings available in Account receivable for Receipt entry where the same Bank is used to deposit Receipt for your company or Transaction Type is ‘Apply Document’. These settings are most suitable for industries where there are advance payments and the invoices are made at a later stage and then applied to these advances.

Let’s see these options which once set, can make the AR process simpler. Once these options are set, they will appear as default on the AR receipt screen.

1) For setting the default options, navigate to Account Receivable –>A/R Setup Options. Under the “Transaction” tab in “Receipt Options” you can set below defaults options.

• Default Transaction type
• Default Payment Code
• Default Bank code
• Default posting Date
• Default order of Open Documents

Ar1

Note: You can change your choices for these options at any time, provided no other Accounts Receivable forms are in use.

2) After this setup when you will open new receipts, at that time, these default options which were set will be available on receipts with Posting Date same as the Receipt date. You can modify these default options if needed.

Ar2

Note: If you consolidate G/L transactions, the posting date for consolidated entries is the last date of the fiscal period.

Also Read :
1. AR Customer Receipt Enquiry
2. Advance Receipt from a Customer
3. Auto Apply Option for AR Receipt in Sage 300 ERP
4. Customer Interest Invoice
5. Reverse Transactions – Receipt Reversal Transaction in SAGE 300 ERP

VBA Forms Macro in Windows Taskbar

$
0
0

In our previous blogs on Accpac Macro, we discussed about features like providing icons to macro, Minimize/Maximize buttons, executing macro without logging in sage 300.

In this article, we will discuss about how we can enable macro to be displayed in the taskbar.

The New Stuff : Default settings for Receipts in Account Receivable in Sage 300 ERP

When we run macro from Sage300 desktop, it does not have a handle in windows task bar as other applications appear, due to this; often the user launches the same macro many times.

Fig1

By adding the below code snippet, you can show the macro in windows taskbar.

Step 1: Variable declaration in the main module file.

<SNIP>
Public Declare Function FindWindow Lib “user32″ Alias “FindWindowA” _
(ByVal lpClassname As String, ByVal lpWindowName As String) As Long
Public Declare Function GetWindowLong Lib “user32″ _
Alias “GetWindowLongA” _
(ByVal hwnd As Long, _
ByVal nIndex As Long) As Long
Public Declare Function SetWindowPos Lib “user32″ _
(ByVal hwnd As Long, _
ByVal hWndInsertAfter As Long, _
ByVal x As Long, _
ByVal y As Long, _
ByVal cx As Long, _
ByVal cy As Long, _
ByVal wFlags As Long) As Long
Public Declare Function SetWindowLong Lib “user32″ _
Alias “SetWindowLongA” _
(ByVal hwnd As Long, _
ByVal nIndex As Long, _
ByVal dwNewLong As Long) As Long
Public Const SWP_NOMOVE = &H2
Public Const SWP_NOSIZE = &H1
Public Const GWL_EXSTYLE = (-20)
Public Const SWP_NOACTIVATE = &H10
Public Const SWP_HIDEWINDOW = &H80
Public Const SWP_SHOWWINDOW = &H40
Public Const WS_EX_APPWINDOW = &H40000
Public Const HWND_TOP = 0
</SNIP>

Step 2: Define method “AppTasklist” in the user form.

<SNIP>
Private Sub AppTasklist(myForm)
‘Add this userform into the Task bar
Dim WStyleAs Long
Dim Result As Long
Dim hwnd As Long
hwnd = FindWindow(vbNullString, myForm.Caption)
WStyle = GetWindowLong(hwnd, GWL_EXSTYLE)
WStyle = WStyleOr WS_EX_APPWINDOW
Result = SetWindowPos(hwnd, HWND_TOP, 0, 0, 0, 0, _
SWP_NOMOVE Or _
SWP_NOSIZE Or _
SWP_NOACTIVATE Or _
SWP_HIDEWINDOW)
Result = SetWindowLong(hwnd, GWL_EXSTYLE, WStyle)
Result = SetWindowPos(hwnd, HWND_TOP, 0, 0, 0, 0, _
SWP_NOMOVE Or _
SWP_NOSIZE Or _
SWP_NOACTIVATE Or _
SWP_SHOWWINDOW)
End Sub
</SNIP>

Step 3: On form activation; call the method to add the macro to task bar:

<SNIP>
Private Sub UserForm_Activate()
AppTasklist Me
End Sub
</SNIP>
After execution you can notice the macro has been added to the taskbar.

Fig2 -

Using above instructions VBA forms (macro) can be added at task bar.

Also Read :
1. VBA Macro Errors related to EXD Files
2. Macros in Sage 300 ERP
3. How To Add A Macro To Accpac Desktop of Sage 300 ERP
4. Run VBA Macro without Logging to Sage 300 ERP
5. Define Budget Using Macro

Viewing all 1487 articles
Browse latest View live


<script src="https://jsc.adskeeper.com/r/s/rssing.com.1596347.js" async> </script>