Quantcast
Channel: Sage 300 ERP – Tips, Tricks and Components
Viewing all 1475 articles
Browse latest View live

Automatic SMS system in for Negative cash balance in Sage 300

$
0
0

We all knows that, in today’s world automatic system adoption for any process is the norm. Even for a process like negative cash balance, Sage 300 has come up with a useful automation. To achieve this we have made utility which will run automatically or you can set scheduler for that, which will run after particular time interval.

Requirements which you have before using it.

– You should have SMS provider link, through which we can send the SMSs.

– You need to add one optional field in which you have to add BANK CODEs with their mobile numbers. This optional field will use at the time of executing our Auto SMS utility.

Working: While executing utility, it will initially check all the Bank Accounts for only those banks which are defined into the optional field. Refer the below screen shot for more clarification.

New Stuff: Migrating Item Unit of Measure from Sage Business Works to Sage 300 ERP

Blog1


Blog2

Our utility will check the balance of the particular accounts for that particular period only. Please refer the below screen shot.

Blog3

SMS matter would be like:

There is negative balance of Rupees XX/- in account no …

Benefits of Auto SMS Utility:-

– Up-to-date about Account current available balance.
– Helps to maintain the account status.
– To avoid above screen step (Sage Accpac–>General ledger–>General ledger Account–>Account History)

Also Read:
1.Sage 300 ERP for Trading and Logistic Industries Part II
2.E-Commerce/Loyalty Marketing through ERP
3.Automatic insertion of Item Wise Detail Tax
4.Automatic Tax Calculations Option in Sage 300 ERP
5.Data Migration to Sage Live Accounting


Enhanced feature in Account Payable – Payment Post All batches in Sage 300 2016

$
0
0

New release of Sage 300 i.e. Sage 300 version 2016 facilitates many enhanced features. These features are definitely going to help in overall business growth by enabling efficient, faster and smarter data processing.
In this blog we are going to discuss about the additional feature provided in Sage 300 2016 on A/P Payment Bach List screen. This feature allows posting of multiple batches at a time.

New Stuff : Automatic SMS system in for Negative cash balance in Sage 300

In order to access the screen navigate to Account Payable–>A/P Transactions–>Payments Batch List screen. kindly refer the screenshot for the same.

APMultipleBatchPost


There is additional button provided labeled as “Post All” which will allows user to post multiple batches at a time. The “Print/Post” button allows user to post individual batch i.e. one selected batch at a time
As per screenshot above since there is no batch set to “Yes” for “Ready to Post” field hence this button is disabled. This will get enabled as soon as user sets “Yes” for one or more batches.
Example :
As shown in below screenshot user can post A/P Payment batches 56 and 57 by just clicking “Post All” button once.

APMultipleBatchPost1


Also Read:
1. How to Audit a Payable Clearing Account
2. Default Settings for Accounts Payable Payments in Sage 300 ERP
3. Recurring Payables in Accounts Payable module of Sage 300 ERP
4. General Ledger (GL) Accounts Distribution in Sage 300 ERP
5. Sage Accpac ERP Control Account Feature comes to rescued

Migrate Item’s Unit of Measures from Sage Business Vision to Sage 300 ERP

$
0
0

GUMU™ for Sage Business Vision to Sage 300 ERP is a Sage certified Migration solution. Greytrix provides Migration services at its Sage Migration Centre and fulfils the business requirements.

New Stuff: Migrate A/P Payment Terms from Sage Business Vision to Sage 300 ERP

This blog is in continuation to our series GUMU™ ERP Migration services. In our previous blog, we had discussed about Migrating Items from Sage Business Vision to Sage 300 ERP. In this blog, we will discuss about how Item UOMs gets migrated from Sage Business Vision to Sage 300 ERP (Formerly known as Sage Accpac) using GUMU™.

We can create and observe Item UOMs as per below screenshort in Sage Business Vision by referring below path:
Sage Business Vision –> Edit –> Inventory –> Details –> Unit of Measure tab .

BV_UOM

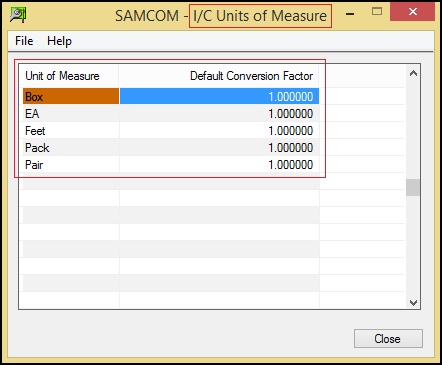
While migration from Sage Business Vision to Sage 300 ERP, distinct UOMs of all Items gets migrated. Refer below path to check those Item UOMs as shown in below screenshort:
Sage 300 ERP –> Inventory Control –> I/C Setup–> Units of Measure

Sage300_Master

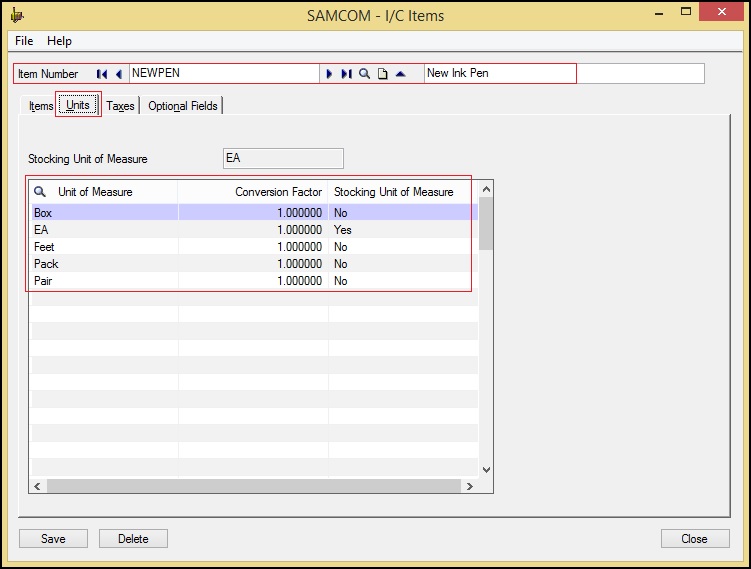
You can navigate through the below mentioned path to check migrated UOM of an specific item into Sage 300 ERP –
Sage 300 ERP –> Inventory Control –> I/C Items and Price Lists–> Items  –> Units tab .

Sage300

After data migration from Sage Business Vision, the field values of Item UOMs gets migrated with the following mapping.

Map

In this way, Item UOM is migrated into target ERP (Sage 300 ERP) from company database of source ERP (Sage Business Vision). For more information on ERP data migration, drop us a mail at erpmig@greytrix.com.

Also Read:
1) Migrating Ship-Via Codes from Sage Business Vision to Sage 300 ERP
2) Migrate GL Transaction from Sage Business Vision to Sage 300 ERP
3) Migrate Item On Hand Quantity from Business Vision to Sage 300 ERP
4) Migrate Sales Order Shipment from Sage Business Vision to Sage 300 ERP
5) Migrate Credit Note from Sage Business Vision to Sage 300 ERP

Document Security for Sage 300

$
0
0

Every Organizational structure comprises of lots of departments and each department in turn have a number functional teams which take care of a whole lot of activity from recruiting to sales to accounting to take care of activities and workflows, compliances. These departments have a lot of important documents that need to be maintained and protected at the department and individual level.

To provide a solution for Document Security, Greytrix has come up with Document Security module. Document security is a Greytrix Add-on integrated with Sage 300 which will allows the organization to map and provide full or limited authorization of data to the users and maintain confidentiality to the departments. Document security will be applicable on the data such as Account set, GL account, Bank, Location, Item master, Tax group and documents etc.

New Stuff: Migrate Item’s Unit of Measures from Sage Business Vision to Sage 300 ERP

Document security will provide the security on below documents,

1. Account Set
2. GL account
3. Location
4. Item
5. Bank code
6. Tax Group

Document security module allows the organization to provide the rights of only those documents which are related to or required to the user.

Let’s see an example,

If Organization has following list of Locations,

1. Mumbai
2. Pune
3. Chennai
4. Delhi
5. Bangalore

User A has rights of Pune and Delhi then user he/she can only able to see and use Pune and Delhi locations and other locations will be hide.

Also user can enable security on the basis of the segment code.

Let’s see e.g. for GL Account,

GL Account has below structure:

table

So that accounts will be look like,

1. 10020201004000
2. 10020201004000-01-111-10-001
3. 10020201004000-01-111-10-002
4. 10020201004000-01-222-10-001
5. 10020201004000-01-222-10-002

If the Security is based on Business unit and User A has rights of “111” then user can only see or use below GL accounts in all the transaction,

1. 10020201004000-01-111-10-001
2. 10020201004000-01-111-10-002

Features:

1. Improves Security.
This will provide the document with an extensive and a deep level of data security such as interdepartmental data protection and also restrict the user from updating unauthorized documents.

2. Limited access to user
User will get the access of only those data which are permitted by organization.

3. Restrict and hide unauthorized data:
The designated user will be able to use only those Account set, GL account, Bank, Location, Item, Tax group which are strictly authorized to him / her. Also Hide the Account set, GL account, Bank, Location, Item, Tax group which are not authorized.

4. Improvement in the speed of execution:
Sage 300 increases the speed of execution of documents and invoices since it gives specific access to the users and this helps the admin an the management to clearly see what process is important and which should be given more priority over the others.

5. Minimize the time of searching documents
The user has limited access means limited data, hence, it will be highly unlikely that he cannot find his document. They are mapped to the particular employee, hence, search filtration also increases helping the admin to search documents faster.

This will help organization as well as users to maintain confidentiality. Also minimize time and stress of user. In our next blog we will see how to assign the security rights to the users.

Also Read:

1. Business Intelligence Security and License Managers in Sage 300
2. Restrictions and Security for GL Account
3. Unit Price Override option in Security Groups
4. New Security Feature in Greytrix Document Attachment for Sage 300 ERP
5. User Role and Security Application in Sage 300 ERP

Deleting Inactive records in Inventory Control

$
0
0

Sage 300 comes with many useful features for streamlining all process, one of them is removing inactive records i.e. obsolete items, account sets, categories, locations and BOMs from Inventory Control. This feature helps the administrator to delete the unnecessary data from system which is not required anymore and takes up a lot of space. This also helps the user to get a precise output in the report and makes the report more readable without considering inactive records in it. The form removes records only if they currently have Inactive status and had that status in the range of dates you specify.

To identify the inactive Items print the Item Status Report by navigating to:

Inventory Control  –> I/C Stock Control Reports –> Item Status

New stuff Document Security for Sage 300

Item status report

On printing this report, you will get the list of inactive Items as show below:

test

To delete the inactive records go to:

Open Inventory Control –> I/C Periodic Processing –>Delete Inactive Records

IC delete inactive

1. As shown above, you can find the number of options to delete inactive records. You can delete all records of the selected type, or use the ‘From’ and ‘To’ fields to specify ranges of inactive Items, account sets, categories, locations and BOMs.  The Inventory Control selects the records that have a status of Inactive and a corresponding “inactive” date within the range of dates you specify  By default, the ‘To date’ is the current session date. If you do not want to delete all the records for the same range of inactive date’s process each set of records.

2. After selecting the appropriate range of data, click on the process button to delete the inactive records.

3. Repeat these steps to select other ranges of records to delete.

4. This will delete the inactive records from the database so when user will print the inventory control reports, you will see there will be no records found for the inactive Items.

Hence, this feature is very useful for keeping your data up to date by deleting the unnecessary details from your system.

Also Read:
1. Restrict Posting to Inactive G/L Account through Sub-Ledger
2. Inactive Items option in IC Reports of Sage 300 ERP 2012
3. Populate Items on Order Entry Screen using Template Code
4. Set Up Non Stock Items in Sage 300 ERP
5. Sellable and Non-sellable items in Sage 300 ERP


Password Protecting the Sage Intelligence output Book

$
0
0

Consider a situation where we need to send our Sales information to any audit or survey authority, we will need to keep it locked so that no one can edit the information. To handle such cases, Sage Intelligence Reporting has a useful feature called “Protect output Book”.

New Stuff : Deleting Inactive records in Inventory Control

Following the mentioned simple steps we can protect output Book:-
1. Go to Report manager and select the desired report. For example, let us choose Custom Sales Master.
2. On Properties tab, you will need to select Show Advanced check box viewing the additional properties.
3. Select “Protect The Output Book” and click on Apply.
4. We can also provide our own password into the “Output Book Protection Password” field.

1

5. In order to verify the setting Run the report as normal.
http://www.greytrix.com/blogs/sageaccpacerp/2014/02/26/how-to-run-a-sage-intelligence-report/

6. Notice that no changes can be made to the Microsoft Excel Workbook after this setting.
7. To unprotect the sheet, select the sheet and then select Unprotect Sheet. Also you can select the same option on click of Review menu.

2

3

8. The following screen will open:

4

9. Insert the password and select OK
10. The worksheet is now unprotected and can be edited.

So this option would be helpful to protect the output Excel file from being edited by unauthorized persons

Also read :
1. Account Range Selection Made Simpler in Business Intelligence
2. Business Intelligence Security and License Managers in Sage 300
3. Scoping Sage Intelligence Reports in Sage 300 ERP
4. Creating a Union Report in Sage Intelligence Reports
5. How to move columns up or down in Sage Intelligence reports

Significance of using Default Posting Date option of I/C Options in Sage 300 ERP

$
0
0

The posting date is the transaction date used by Day End Processing in Inventory Control when it creates journal entries for the general ledger. The posting date determines the fiscal year and period to which transactions are posted in the G/L.

New Stuff : Password Protecting the Sage Intelligence output Book

In Sage 300 ERP we have an option “Default Posting Date” in Inventory Control –> I/C Setup–>Options under “Processing” tab [Refer below screen shot].

1

You can specify the default date that will appear as the Posting Date for new enter receipt, shipment, internal usage, adjustment, transfer, and assembly transactions.

The “Default Posting Date” dropdown contains following two values:
1. Document Date
2. Session Date

Document Date :
You can select this option if you usually want the posting date and fiscal period to match the document date. If you select this option, the program will automatically change the default posting date if you change the date in the associated date field on the document entry screen.
Let us consider an example, suppose you have set the “Default Posting Date” as Document Date.
So while creating new I/C Receipt, when you change the “Receipt Date”, the “Posting Date” field value will change automatically to the same date as the Receipt Date as below screenshot :

2

You can check the same for the I/C Shipments, Internal Usage, Adjustments, Transfers and Assemblies.

Session Date :
You can select this option if you usually want the posting date and fiscal period to match the current session date. If you select this option, the program keeps the session date as the default posting date even if you change the document date.
Let us consider an example, suppose you have set the option for the “Default Posting Date” as “Session Date”. As shown below the session date is set to “12/13/2015”.

3

So now while creating new I/C Receipt entry, “Posting Date” field will show the session date as a default date. When you change the “Receipt Date”, the Sage 300 ERP keeps the “Posting Date” field value as session date :

4

You can check the same for the I/C Shipments, Internal Usage, Adjustments, Transfers and Assemblies.
This is how you can set the default Posting Date while creating the new entries of I/C Shipments, Internal Usage, Adjustments, Transfers and Assemblies using the “Default Posting Date” option of I/C Options.

Also Read :
1. Default Create OE Invoice in Sage 300 ERP
2. Create Invoice directly from Shipment Entry
3. How to send Emails from OE invoice to customer via Sage 300 ERP
4. Item description in Order Entry Screen defaulting to blank in Sage 300 ERP
5. Customer Wise Item filter on Order Entry screen in Sage 300 ERP

Business Security in Sage 300

$
0
0

Security measures in any business is key factor, which is monitored and managed by the administrator. Especially when you have implemented ERP, Administrator’s main concern are the security measures present in software and the security levels which can be assigned to different level of personnel’s in the organization.

Sage ERP Security

Need to implement the security module wise? Means each department needs to access only the area in ERP in which they are intended to work.

Need to implement User level wise security? Means Admin level user needs Read/Write permission.

Non Admin user require only read level access to the data.

Sage 300 ERP, provide composite level security which helps to configure module level, screen level, field level, user level security.

Only the Admin level user can configure and modify the security rights within Sage 300 ERP. Where in the Admin can configure user security according to the role in the and level of access allowed to the particular user in Sage 300 ERP.

Module level security can be controlled and monitored using the Security groups and User Authorization. Once the security groups for each module is configured, Admin can provide access of the module to the users using the user authorization. By which each user gets access to the section in which the user is intended to work and is not allowed to view or edit the data for which they are not granted access to. Here you can provide Admin level access for all module to the Administrative users which allows them to view and modify data for all the module. This can configured and changed any time as per the need to the organization.

Once we have configured the module and screen level security using the Security groups, Admin can also control the field level security using which the you can control which fields access you need to provide to the user so that they can have rights only to work with limited fields which are necessary to complete the successful data entry in any screen.

With Sage 300 ERP, you are assured that the data is protected and secure as Sage 300 provides user level, module level, and field level security. Using the complex security levels you are can implement a robust ERP.

About Us:

Greytrix is one stop solution provider for Sage ERP and Sage CRM needs. We provide complete end-to-end assistance for your technical consultations, product customizations, data migration, system integrations, third party add-on development and implementation expertise.

Greytrix have some unique solutions of Sage 300’s integration with Sage CRM, Salesforce.com and Magento eCommerce. It also offers best-in-class Sage 300 customization and development services to Sage business partners, end users, and Sage PSG worldwide.

For more details on the component, please contact us at accpac@greytrix.com . We will be glad to assist you.


eCommerce Promotions and Marketing

$
0
0

Promotion is a powerful tool to entice and encourage your customers to buy from your store. A wisely designed promotion campaign helps online retailers in marketing their products, increase customer traffic on their store and pull down cart abandonment rate. As holiday season is approaching; internet is full of offers, attractive discounts and a pool of promotional emails. In such frenzy; retailers needs to evaluate customers, their likes/dislikes, what competitors are offering, why customers are leaving your store without buying and how to encourage them to spend more.  Simply emailing the customers or posting a link in a social media it’s not going to work.  Promotional campaign differs business to business, market trends and products hence requires a right strategy.

Ecommerce Promotions and Marketing

eCommerce software offers promotion tools which assist online retailers to design and manage promotional activities for their store. Magento eCommerce is a feature-rich eCommerce platform solution and offers powerful marketing tools which assist merchants to effectively design and execute their promotional activities.

Below mentioned are marketing, promotions and conversion tools offered by Magento eCommerce:

  • Up-sells, cross-sells and related products
  • Promotional pricing – Magento offers pricing rules with which merchants can effective implement discounted pricing.  Can target specific group of customers, type of product, volume of purchase and duration within which discounted pricing is active.
  • Coupons Management – Merchant can easily manage the shopping coupons, distribute them to customers and track their usage.
  • Compare products – Enables to compare two or more products and assist in selecting the right product.
  • New item promotions – Display new items in promotional and landing pages.
  • Free shipping feature – Rule based free shipping options.
  • Newsletter management – Enables the store administrator to setup email distribution list and send emails to registered customer, their friends and emailing of wish lists.
  • Managing Polls – Easily create polls to get customer opinions on products, services, likes and dislikes.

In addition to eCommerce platform promotion tools; merchants needs an integrated system witch which they can integrate products with precise pricings and process orders with accuracy.  Greytrix eCommerce integration assist Sage ERP users to integrate their system with eCommerce store (Magento) and offer them right features which helps them to manage their promotional activities.

  • Synchronize products and pricings – New products are integrated automatically.  Base sale price, discounted pricing and customer specific pricing are appropriately synchronized. Merchants always get an accurate prices and can define appropriate pricing rules using base price or group price.
  • Synchronize registered customers – Ability to synchronize registered customers as customers in Sage ERP with which customer activities can be tracked in ERP.
  • Synchronize orders – Orders placed on your store includes discounted prices, application of coupons, free shipping.  Merchants can accurately synchronize the orders back into the ERP with accuracy of totals and eliminates any errors in processing.

About Us

Greytrix eCommerce integration provides an excellent solution to E-commerce business to integrate their ERP with E-commerce marketplace; helps them to overcome challenges and assist them in making their business successful.

For more information on eCommerce Magento integration with your ERP, please contact us at sage@greytrix.com.We will be glad to assist you.

Database Error 49153 in Sage 300 ERP

$
0
0

While accessing any Sage 300 Company, at times user may encounter error such as -”Cannot access database (error=49153). See Help for More information.”

New Stuff : Significance of using Default Posting Date option of I/C Options in Sage 300 ERP

Database1When the user reports error to System Administrator, the system admin team checks if User able to access the SQL Database.

database 2To resolve the above error one needs to follow simple steps mentioned below:
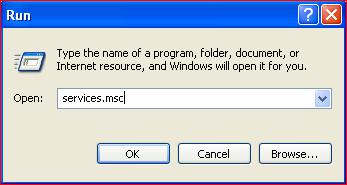
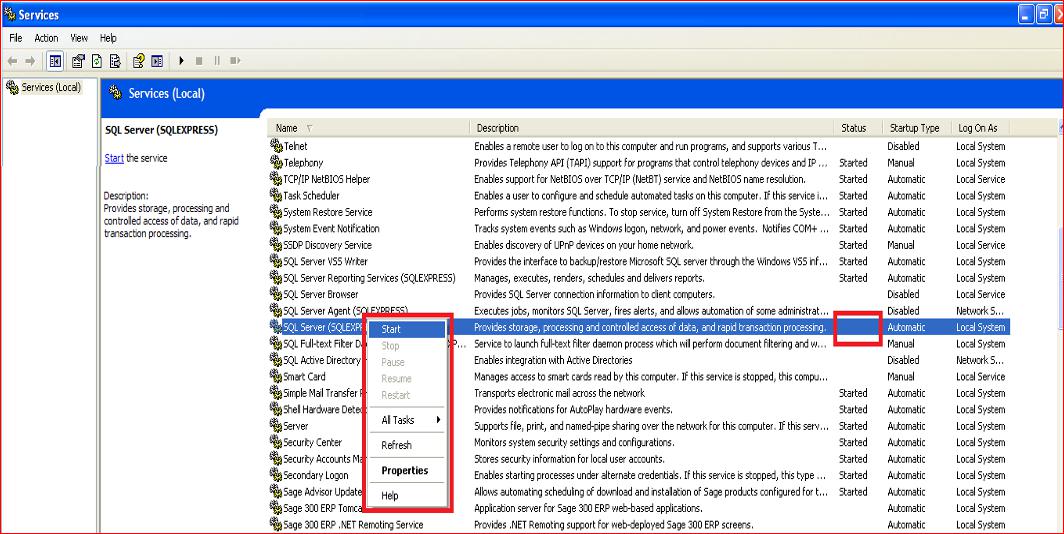
1. In Run Type “Services.msc”

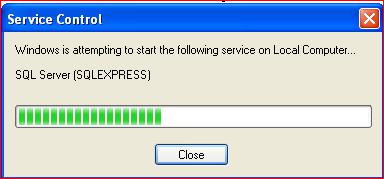
Database 32. Search for SQL Server (SQL Express). If the status is not started then manually right click and click on “Start“ to start the process.

Database 4

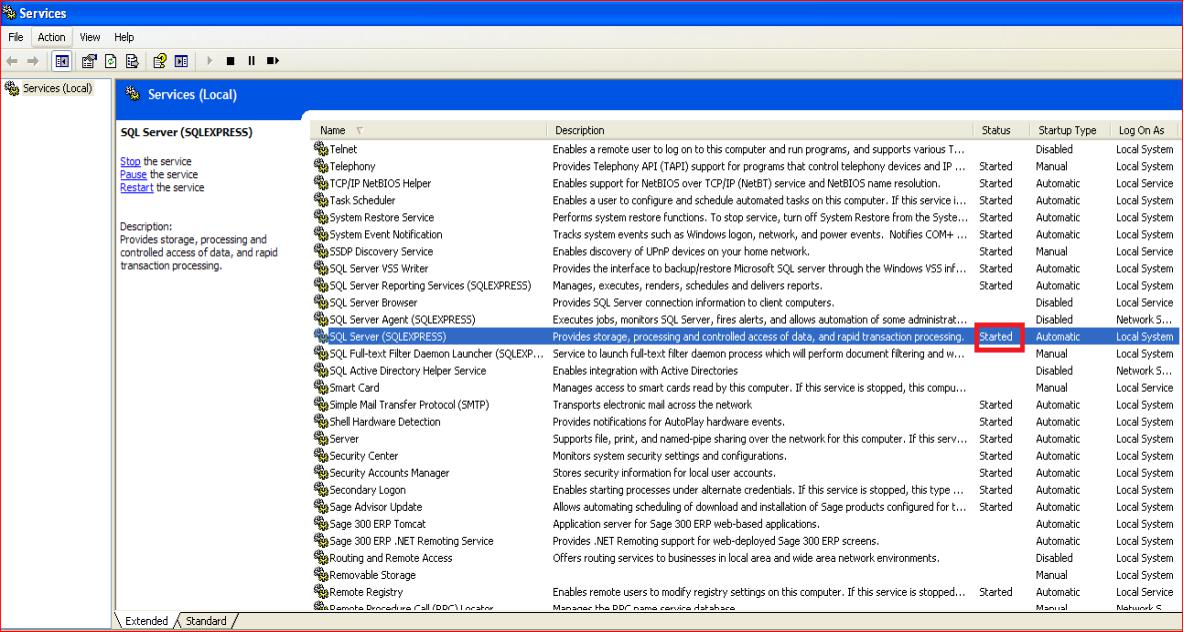
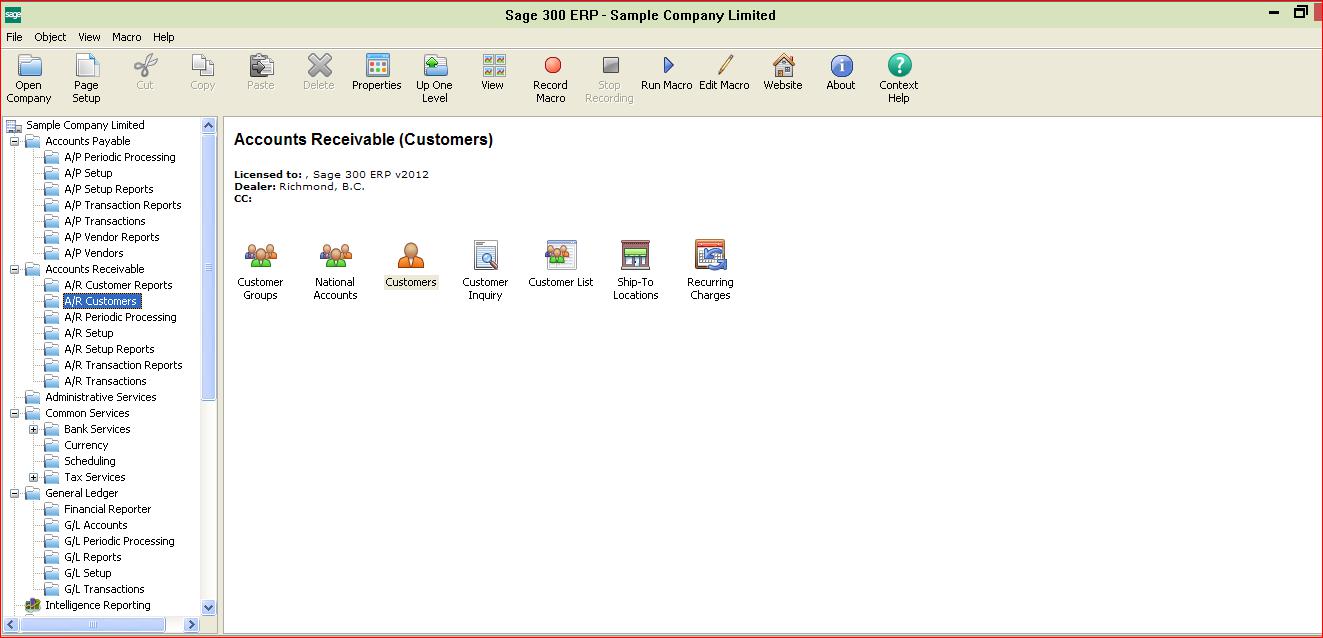
Database 53. Once the Service control Pop up gets automatically closed following screen will be displayed with status as Started.Database 64. Now login to Sage, User will be able to log into Sage 300 ERP.

Databse 7Also Read:

1. Restoring your Sage 300 ERP Company Database Backup
2. Error: Sage 300 ERP UI Container has stopped working message occurs when printing reports
3. Error 13 opening record file Occurred in Sage 300 ERP
4. Database Profiles table error on Sage 300 Workstation
5. Database Error 98

Migrate Customers Custom Fields from Sage 50 CAD (Simply Accounting) to Sage 300 ERP

$
0
0

GUMU™ for Sage 50 CAD (Simply Accounting) to Sage 300 ERP is a Sage certified Migration solution. Greytrix is a pioneer in providing Migration services at its Sage Migration Centre and catering end-user business requirements.

New Stuff: Migrate Item Locations from Sage 50 CAD (Simply Accounting) to Sage 300 ERP

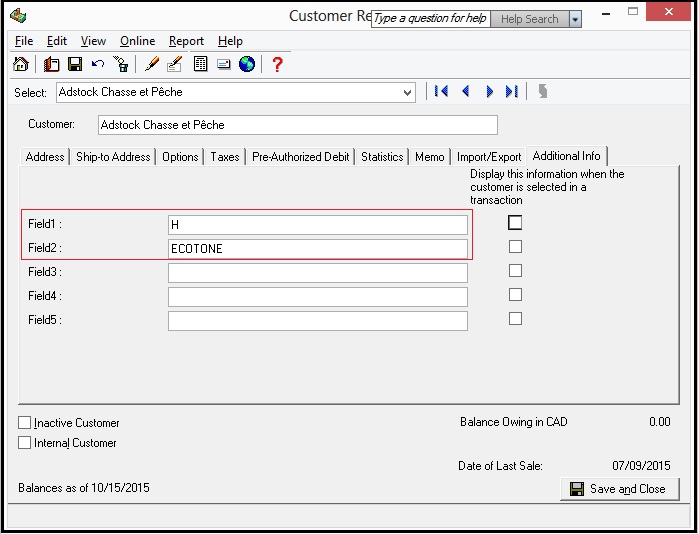
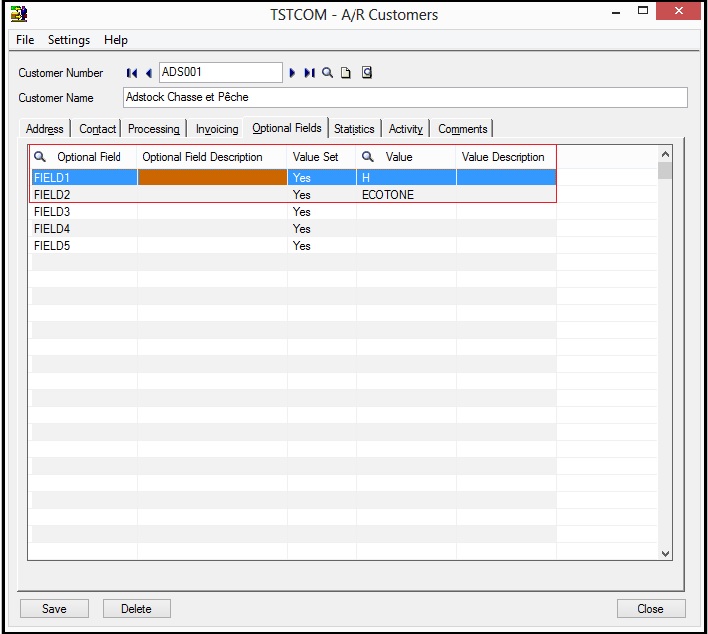
In this blog, we will discuss about how Sage 50 CAD (Simply Accounting) customers custom fields are migrated to Sage 300 ERP (Formerly known as Accpac) using GUMU™.

Below is the screenshot of Sage 50 CAD Customers additional info which we convert in optional Field of Sage 300 ERP.

SA1

As mentioned above we convert Additional info of Sage 50 CAD in customers optional field in Sage 300 ERP (Refer below screenshot).

SA2

Hope the above topic provides you sufficient information about conversion of Customers optional field values between the two diverse ERP systems.

For more information on the data migration, drop us a mail at erpmig@greytrix.com

Also Read:
1) 
Migrate Sales Person from Sage 50 (CAD) to Sage 300 ERP
2) Migrate Items from Sage 50 (CAD) to Sage 300 ERP
3) Migrate Sales Invoice from Sage 50 CAD to Sage 300 ERP
4)Migrate Customer ShipVia Code from Sage 50 US (Peachtree) to Sage 100 ERP
5) Migrate Open Sales Order from Sage 50 (US) to Sage 100 ERP


Migrate Customers Notes from Sage 50 CAD(Simply Accounting) to Sage 300 ERP

$
0
0

GUMU for Sage 50 CAD (Simply Accounting) to Sage 300 ERP is a Sage certified Migration solution. Greytrix is a pioneer in providing Migration services at its Sage Migration Centre and catering end-users business requirements.

In this blog we will discuss about how Sage 50 CAD Customers Notes are migrated to Sage 300 ERP (Formerly known as Accpac) using GUMU.

New Stuff: Migrate Customer Notes from Sage Business Vision to Sage 300 ERP

Below is a screenshot of a customer note in Sage 50 CAD (Simply Accounting)

SA Notes - 1

After the conversion, the data is converted as below in Sage 300 ERP. Below is a screenshot of the converted Customers Notes in Sage 300 ERP.

AAS Notes - 2

In this way, Sage 50 CAD (Simply Accounting) Customers Notes are migrated into target Sage 300 ERP company database.

For more information on ERP data migration, drop us a mail at erpmig@greytrix.com

Also Read:

1) Migrate Customer Notes from Sage Business Vision to Sage 300 ERP
2) Migrate Item Locations from Sage 50 CAD (Simply Accounting) to Sage 300 ERP
3) Migrate Sales Person from Sage 50 (CAD) to Sage 300 ERP
4)Migrate GL Accounts from Sage 50 CAD to Sage 300 ERP


Document Attach for Sage 300 ERP 2016 released now

$
0
0

Sage 300 ERP 2016 is available now. With the release of Sage 300 ERP 2016 we are pleased to announce the release of Greytrix Document Attachment for Sage 300 ERP 2016 to our customers and re-sellers.

Greytrix Document Attachment is a comprehensive add-on that helps users to attach and view documents from transaction screens Viz. Order Entry, Invoice Entry, Journal Entry, etc. We have listed all the features present in our product Greytrix Document Attachment. Our product is compatible with Sage 300 ERP version 5.6 to 6.3.

New Stuff : Significance of using Default Posting Date option of I/C Options in Sage 300 ERP

Product Features:
* Allows you to attach scanned documents/ reports/ fax/ images on the following transaction screens in Sage 300 ERP.
1. AP – Invoice Entry, Adjustment Entry, Payment Entry
2. AR – Invoice Entry, Receipt Entry, Adjustment Entry
3. GL – Journal Entry
4. OE – Order entry, Shipment entry, Invoice Entry
5. PO – PO Order Entry, Receipt entry, Invoice Entry.

* We have introduced new User Security feature to authorize user to “Override” or “Delete” document.
* We also have feature for User wise source document path setting.
* We have also provided our document attach feature Master screen such as
-Customer master
-Vendor master
-Item master

Also read:
1. Attach documents to Item Master Screen

2. Enhanced features in Greytrix Document Attachment for Sage 300 ERP

3. Document Attachment Solution for Sage Accpac ERP

4. Greytrix Document Attachment for Sage 300 ERP v6.1

5. New Security Feature in Greytrix Document Attachment for Sage 300 ERP

Migrate Banks from QuickBooks to Sage 100 ERP

$
0
0

GUMU™ for QuickBooks to Sage 300 ERP is a Sage certified Migration solution. Greytrix provides migration services at its Sage Migration Centre and fulfils the business requirements.

New Stuff: Migrate QuickBooks Company Database to Sage 100 ERP

In this blog, we will discuss about how Banks gets migrated from QuickBooks to Sage 100 ERP (Formerly known as Sage Mass 90) using GUMU™.

We can create and observe Accounts Lists with their types. Here we are observing Accounts with type Bank as per below screenshort in QuickBooks by referring below path:
QuickBooks –> Lists –> Chart of Accounts.

1.List

You can navigate through the below mentioned path to check migrated Banks in Sage 100 ERP –
Sage 100 ERP –> Modules –> Common Information –> Main  –> Bank Code Maintenance.

sage100

After data migration from QuickBooks, the field values of Banks gets migrated with the following mapping.

Map

In this way we can observe, migrated Banks into target ERP (Sage 100 ERP) from company database of source ERP (QuickBooks). For more information on ERP data migration, drop us a mail at erpmig@greytrix.com.

Also Read:
1) Migrate Banks from Sage 50 US to Sage 100 ERP
2) Migrate GL Accounts from Sage 50 US to Sage 100 ERP
3) Migrate Item Locations from QuickBooks to Sage 300 ERP
4) Migrate data from Sage 100 to Sage 300 ERP with GUMU Solution
5) Migrating your Sage 50 US (Peachtree) Company Database to Sage 100 ERP using GUMU Migration services

Streamlined Order Entry Process

$
0
0

In some industry we require the data entry user needs to manually convert ordered quantity into required UOM, which is actually shipped to the client. This conversion is troublesome process which a data entry operator has to perform for every order.

To overcome this scenario we have developed a component on the order entry screen. This component helps users to enter quantity in which a customer order’s products and how it is further converted and updated with the required order quantity on packing UOM.

Streamlined order entry process

Let’s take an example of Tiles industry.

In Tiles industry, customers walking in and place orders for tiles, but the order is placed according to the Sq. Ft. area. In this case the tiles are available in packets or boxes, but the customer orders in Sq. Ft.

For this the data entry operator needs to manually convert the ordered quantity in packets or boxes, according to the number of tiles present in box or packet. Also, conversion needs to round off to the nearest whole number as tiles are not sold loose.

So, in our routine packing UOM conversion will be automated in which the Sq. Ft. to packing UOM conversion will be done and also rounded off to the nearest whole number, this will save ample time of the data entry operator.

Using this component you can have accurate and streamlined order entry process for tiles industry.

About Us:

Greytrix is one stop solution provider for Sage ERP and Sage CRM needs. We provide complete end-to-end assistance for your technical consultations, product customizations, data migration, system integrations, third party add-on development and implementation expertise.

Greytrix have some unique solutions of Sage 300’s integration with Sage CRM, Salesforce.com and Magento eCommerce. It also offers best-in-class Sage 300 customization and development services to Sage business partners, end users, and Sage PSG worldwide.

For more details on the component, please contact us at accpac@greytrix.com . We will be glad to assist you.


Post Reconciliation from Reconcile statement screen in Sage 300 ERP 2016

$
0
0

Various new features and changes have been introduced in Sage 300 ERP 2016.In this blog, we will be discussing about new feature i.e.; On the Reconcile Statements screen, a new Post button allows user to post bank reconciliations.

New stuff: Streamlined Order Entry Process

On the Reconcile Statements screen, a new Post button allows user to post bank reconciliations. Previously, user could post reconciliations only from the Post Reconciliation screen.

1

Note: This button allows you to post one reconciliation at a time. To post reconciliations for all banks, or for a range of banks, use the Post Reconciliation screen.
Example:

In below example when bank is balanced then you can post the current reconciliation from the reconcile statement screen itself.

2

Also Read:
1. Bank Transfer Entry In Sage 300 ERP
2. Accurate Bank Reconciliation
3. Create Bank Entry from Reconciliation Screen
4. Auto Bank Reconciliation in Sage 300 ERP
5.Set Document Numbering based on Bank Code for Sage 300 ERP

How To Allow User To Enter The Timecards For Specific Payroll Employees

$
0
0

Sometimes for the security purpose in an organization user needs to restrict from entering the Payroll time cards for particular employees.

New Stuff : Post Reconciliation from Reconcile statement screen in Sage 300 ERP 2016

In this blog we will be discussing about how to restrict the user from entering timecards for particular employees.With below set up you can enter a time cards for more than one employee without consuming the lanpack license

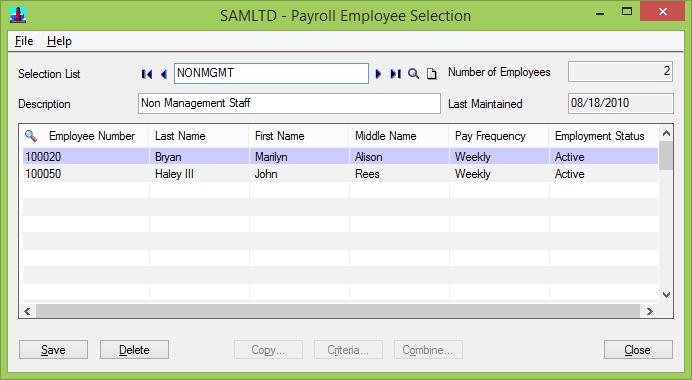
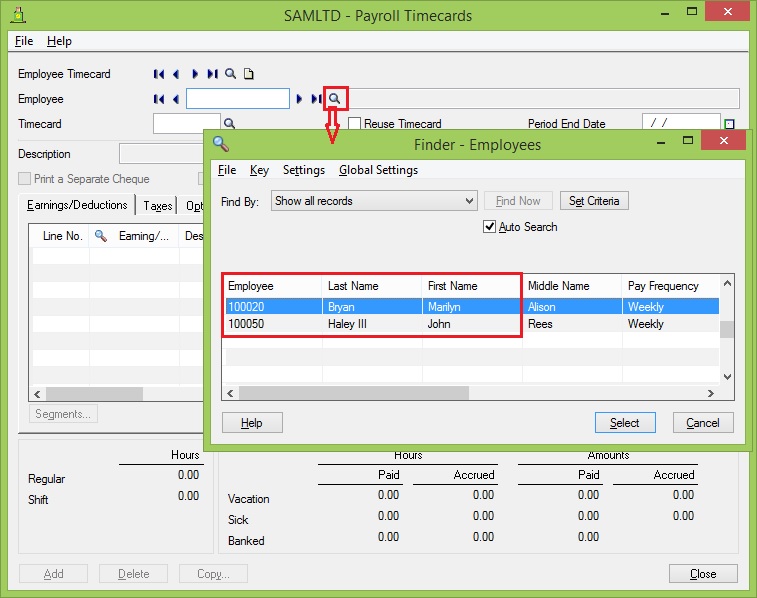
Go To Payroll Employees–>Payroll Employee Selection. Create a selection list and add employee to that selection list for whom you want to enter the time cards.

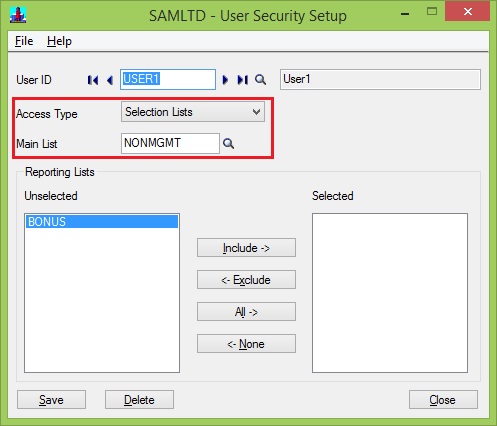
Payroll Employee SelectionNow go to Payroll Employees–>User security setup. Here you need to select the user ID of the user with whom you are going to enter the timecard and also the selection list for those employees for whom the user is going to enter the timecard.

Access Type: In the access type selects the access type as “Selection lists” so that user will be able to enter time cards only for the employees from the main list selected.

Selection ListNow login with “User1” in Sage 300 and enter the timecard. USER1 will only see the employee under the “NONMGMT” selection list.

EmployeeWith single user can enter timecards for more than one employee without extra lanpak .

Note: This functionality will work with both Canadian as well as US Payroll module.

Also Read:
1. Greytrix TDS with PJC Integration
2. Project/Contract Maintenance in Sage 300 ERP
3. Contract Summary Report
4. Changing the Contract Level Names
5. Project Invoicing Feature in Sage 300 ERP

Are you Attending Sage Business Partner Conference -2016? Yes, we are!

$
0
0

Sage Business Partner Conference – South Africa begins next week starting 26th January and we are excited to be exhibiting there once again this year.

Greytrix – known for its award winning GUMUTM Integration framework would be showcasing its flagship products and services i.e. Sage X3 integration with SalesforceeCommerce (Magento), Sage CRM  which are built on robust GUMU™ framework along with Sage 300 ERP solutions and Sage X3 Development and Consulting Services .

 Do Drop by at our Booth No.16 at Sage Business Partner Conference 2016 – South Africa

social-media-img-10

Apart from exhibiting, we also look forward to meeting our Sage Partner Friends and Sage Team at the event.


About Greytrix

Need to discuss more strategic initiatives? Our Executive team, Kumar Siddhartha – CEO & Nitin Chandure – Sr. VP Operations are attending and can participate in 1:1 deep dive conversations. Need a demo or in depth understanding of Greytrix Development and Engagement model for Sage X3 needs? This is the right place to interact with the team in person.

Greytrix team is also pleased to provide you with live demo and insights about outside the box solution for taking Customer Interactions to the next level using its GUMU™ integration with eCommerce Magento and Salesforce.com.

Contact us at sage@greytrix.com to secure a convenient 1:1 time with our experts or the management team at Summit.

Meet us at our Booth no.16 to know more about our Sage ERP and CRM IntegrationMigration, Outsourced Development and Consulting Services. Greytrix works globally with +350 Business partners and has a dedicated team of +250 Sage Developers and Consultants.

For more information on our Sage ERPs related services, contact us at sage@greytrix.com

So with our hearts filled with anticipation and excitement, we conclude for now until we meet at Sage Business Partner Conference – South Africa!!


Think Greytrix, grow big!!

Account Roll Feature

$
0
0

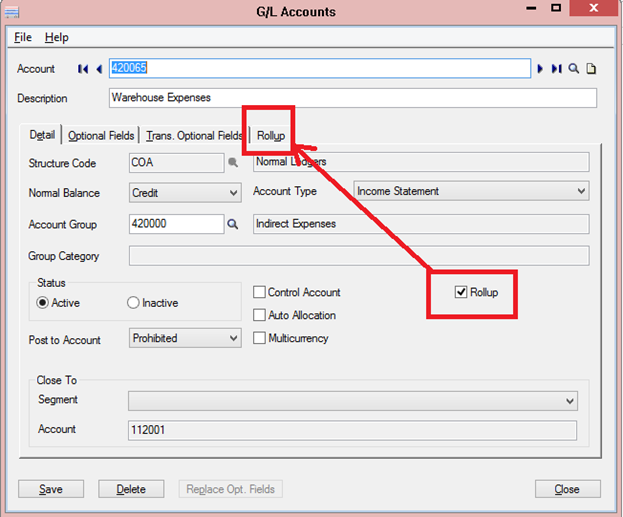
In this blog we will discuss the about the account roll up feature. SAGE 300 has a very good feature “ROLLUP”. In this module, we can define multiple accounts / COA under once account. If we want to view the data / value of multiple accounts into a single account. Then we can easily use this feature. First of all user needs to be selected the main account under which multiple accounts want to tag in “Account” master. Please refer to the below screen shot for ready reference.

New Stuff: Are you Attending Sage Business Partner Conference -2016? Yes, we are!

Insurance Claim

We have to make true the check box rollup, then system will show a Rollup tab as shown in the above screen. In rollup tab, we can tag multiple accounts. Please refer below screen

Insurance Claim

When we will make transaction against the tagged accounts in rollup tag, the value of these accounts will auto rollup by system to the main account. Please refer below report. Here two reports are given for reference. One report for the accounts which have been tagged under the main account. The second report the main account.Insurance ClaimAlso Read :
1. Create GL Accounts Feature in Sage 300 ERP
2. Quick Journal Entry in Sage 300 ERP
3. GL Account Code Change in Sage 300 ERP
4. GL Auto Allocation of Account Balances in Sage 300 ERP
5. Auto-Reverse General Ledger Entries in Sage 300 ERP
Vendor Outstanding Report by Optional Field Value in Sage 300 ERP
$
0
0

Optional Field is one of the best features in Sage 300 to capture various information at any level. It means we can link the Optional Fields at Masters as well as Transaction Level though the optional Field cannot be linked to the Bank Services (For Masters as well as Transactions).

By using this feature we can generate many reports without any additional efforts. In previous blog we understood how to generate Customer Outstanding Report by using Optional Field value. Going further, in this blog we will check how we can generate Vendor Outstanding Report by Optional field value.

New Stuff: Account Roll Feature

We have to map the required Optional Field to each Vendor at Master Level. After posting all transactional Batches successfully, we are in the position of generating report with Optional field without any extra efforts.

For using this functionality follow the below steps:

1) Creation of Optional Field.

2) Link Optional field to Account Payable (Vendor) Masters and Transactions as per your requirement.

3) All transactions should be posted successfully before printing Vendor Outstanding Report.

Prefer below detail process with screen shots to execute this operation successfully.

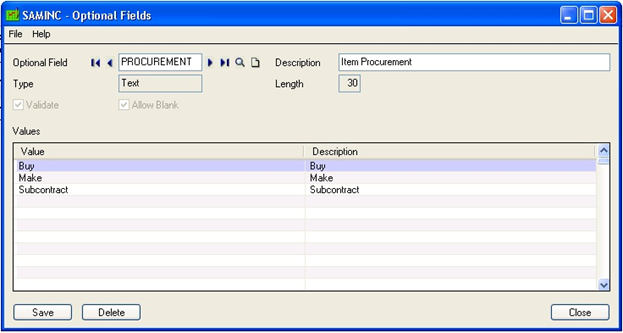
1) Creation of Optional field :

Path: Common Services: Optional Field

Here we are defining Optional Field.

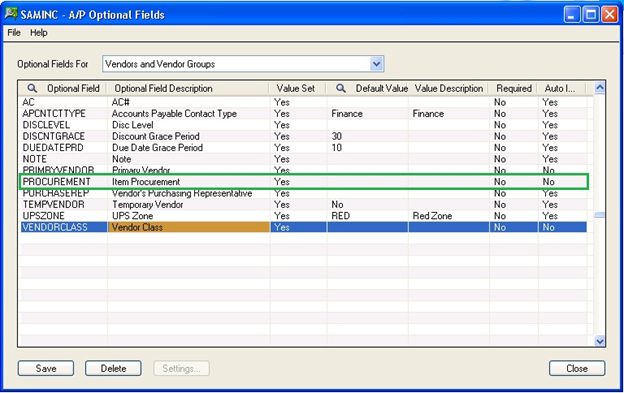
2) Linking of Optional Field to Accounts Payable Masters :

Path: Accounts Payable -> A/P Setup -> Optional Field.

aaaaaaaaaaaaaaaaaaaaaaaaa

Here we can link Optional Field to the specific Transaction / Master.

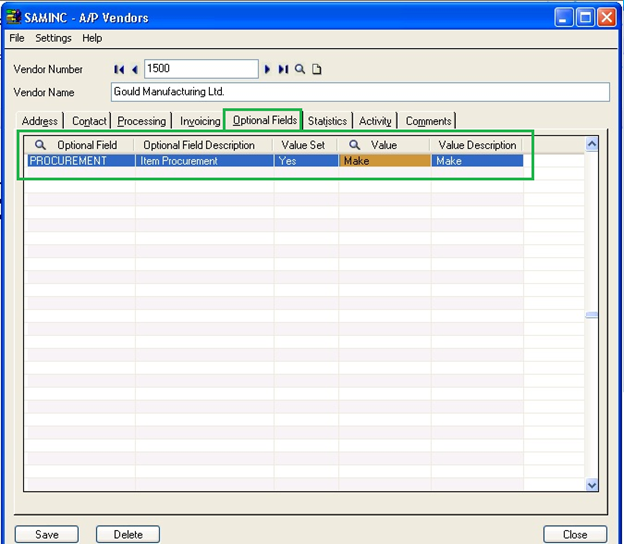
3) Linking of Optional Field value at Vendor Master :

Path: Accounts Payable -> A/P Vendor -> Vendor.

aaaaaaaaaaaaaaaaaaaaaaaaa

Here we can create / update Vendor details. In Optional Field Tab we are updating Optional Field Value. It’s treated as Master. At any time we can change this Value.

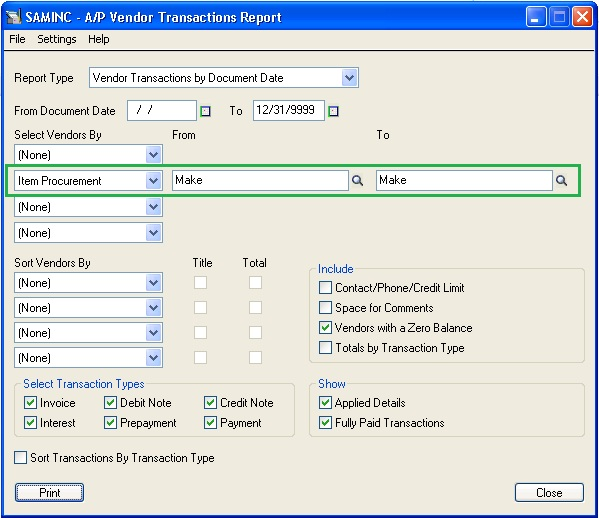
4) Customer Outstanding Report :

Path: Accounts Payable -> A/P Transaction Reports -> Vendor Transactions.

aaaaaaaaaaaaaaaaaaaaaaaaa

Here we generate Vendor Outstanding Report by selecting appropriate options.

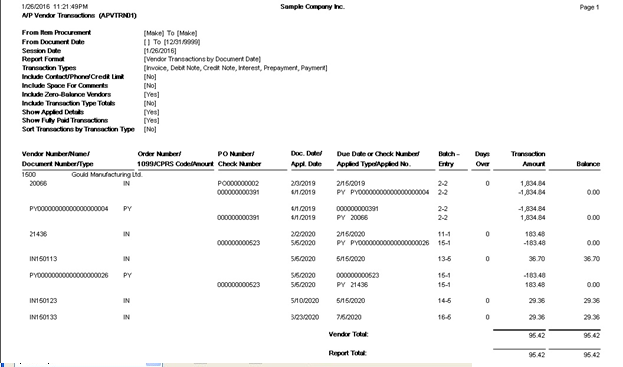
Sample Report:

aaaaaaaaaaaaaaaaaaaaaaaaa

Same feature will applicable for Accounts Receivable (Customer Master) to generate Customer Outstanding Report.

Also Read:-
Retainage Accounting

Cleanup Accounts Using Apply Document Feature in sage 300 ERP
Email BOL reports to specified persons in Sage 300 ERP

Dunning Messages

AP Vendor Ledger Report for Sage 300 ERP

Viewing all 1475 articles
Browse latest View live


<script src="https://jsc.adskeeper.com/r/s/rssing.com.1596347.js" async> </script>