Quantcast
Channel: Sage 300 ERP – Tips, Tricks and Components
Viewing all 1475 articles
Browse latest View live

Aspect of PO Type and Order Type “Future”

$
0
0

SAGE 300 has a very useful feature in purchase order entry and order entry, which is PO and Order type “FUTURE”. If the user/s wants to enter the Purchase order and sales order in advance instead of scheduled forth coming date and the effective date of orders should auto effect as per the mentioned date of orders, it will be easily handled with SAGE 300. User/s can enter the purchase and sales order in current period / date with future and system will take care, its effective or will auto replace the order status with “Future” to “Active”.

We are taking an example. Suppose, an user has to enter an order on 01-Nov-15 and he is on current date which is 31-Oct-15 and wants to enter the order on current date, but order active for further transaction on 01-Nov-15 only.

New Stuff: Migrate Open Sales Orders from QuickBooks to Sage 300 ERP

Then he has to enter the order with PO or order type “Future”. If, user selects order type “Future”, then the respective order will not come for selection in further transaction which are PO Receipt and Shipment Entry. Please refer below screen shot for more clarity.

AR Receipt Entry

In the above screen you can see, a user entered an order on 31-Oct-15 and mentioned order date 01-Nov-15 and the same order is not coming for selection for further transaction. One case is cover with this step. Now the second case is how system will auto convert future order to active order. As we aware in SAGE 300, we run Day End Process every day. When “day end” process would be run on 01-Nov-15. Then system will auto convert “Future” order type to “Active” order type of current and back dated orders.

First of all please refer below screen shot, which is showing before running day end process.

AR Receipt Entry

You can see still order type “Future” not replace with “Active and the respective order is not coming for further transaction.

Now, we will run day end process from the option Inventory ControlèI/C Periodic ProcessingèDay End Processing.

After Day end processing, system will auto replace order type as “Active” with “Future” and the respective order will come selection as well. Please refer below screen shot for more clarity.

AR Receipt Entry

In the above screen you can clearly see, that after day end process order are coming for selection.

“It is also possible to change the order type from Future to Active for singly order and can use in further transaction. But it will very useful, when order would be in bulk numbers or we are planning for future leaves”.

Also Read:
1. Migrate Open Sales Orders from Sage BusinessWorks to Sage 300 ERP
2. Migrate Vendor Notes from Sage BusinessWorks to Sage 300 ERP
3. Migrate Item Warehouses from Sage BusinessWorks ERP to Sage 300 ERP
4. Migrate Remit-To-Address from Sage BusinessWorks to Sage 300 ERP
5. Migrate Price Lists from Sage BusinessWorks to Sage 300 ERP


Added features in Sage 300 2014 in the USER screen

$
0
0

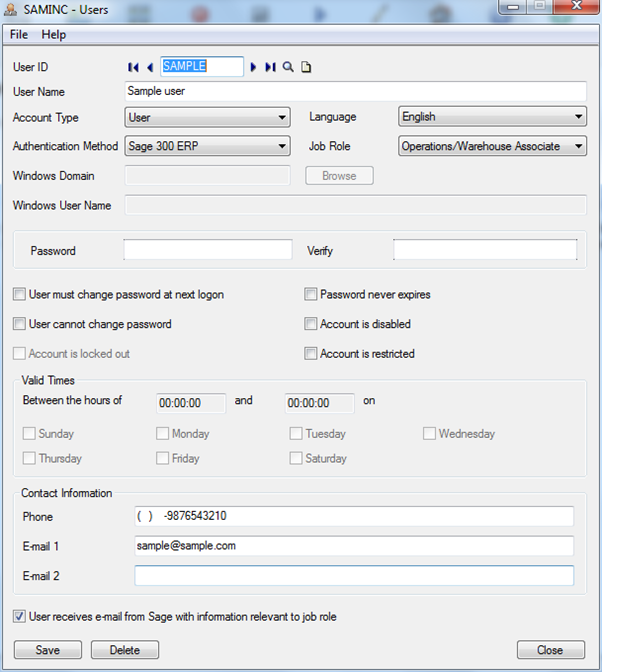
The new sage 2014 user screen has additional features which helps the administrator to keep a better control and check over the users. During the time of taking down time for maintenance activity it was essential for the administrator to communicate with every user to log out.

The fields marked in the red block are newly added.

AR Receipt Entry

New Stuff: Aspect of PO Type and Order Type “Future”

As you can see in the above red marked area,

  • Job Role – Now we can assign the role to the user on the basis of the user’s job profile. There is a list of roles which can be assigned to the users.
  • Contact information– The users contact information such as his phone number and email ids can be stored. This helps the administrator to communicate with the end users.
  • Check box – the check box should be checked so that the users can receive an email from SAGE regarding the new features or special tips on the email id specified in the contact information. For this feature it is compulsory to assign a JOB ROLE.

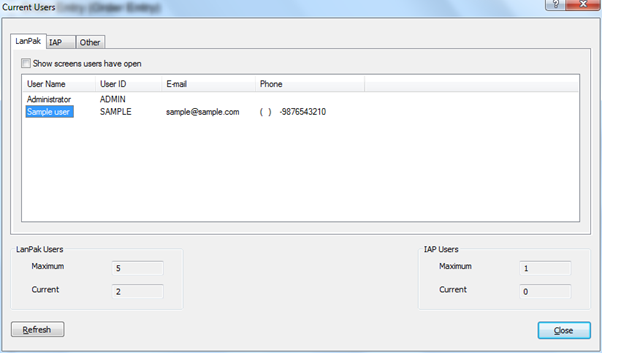
After the user is created now lets we see how the administrator can view the user’s details. The Administrator can view the users which are connected in sage 300 on the current users screen. Here the administrator can view the users Contact details which will enable him to contact him in case any communication needs to be made.

AR Receipt Entry

This additional feature helps the administrator for establishing contact with the users in case of any maintenance activity.

Also Read:
1. Quantity entered differs from the Serial number assigned in transaction for Sage 300 ERP v2014
2. How to assign unique serial Number to Individual Items in Sage 300 ERP Versions 2014
3. How to restrict use of Expired Stock in SAGE 300 ERP
4. How to allocate a Serial and Lot number at Order Entry screen in Sage 300 ERP
5. How to adjust the Serial-Lot quantity variance in Inventory Control in Sage 300 ERP

Webinar : Magento with Sage 300 “Key to successful Online B2B and B2C Business” on 19th Nov, 2015 at 1 pm EST

$
0
0

Do you have a successful eCommerce Storefront integrated with your ERP system? If your answer is “No” then this could result into all new set of Challenges in your online store. Often Business owner use e-commerce platform and ERP system separately and they miss out the benefits of an integrated system. Greytrix’s GUMU integration between Sage 300 and Magento eCommerce Solution can provide you with 360⁰ customer interaction and interfaces for seamless operations of front office, back office and portal activities.

Integrating your online store/ eCommerce portals with the backend ERP systems provides benefits like increased high order volume, reduced inventory cost with updated sales information, high customer satisfaction with less errors or delays and real time information flow.

Register Now

Date – 19th Nov 2015 | Time: 1:00 PM US Eastern Time

magento-webinar-image

Webpage | Blog

See you in the Webinar!!

GL Posting Journals Report in Sage 300

$
0
0

In our previous blog, we had discussed about OE Posting Journal report from Order Entry module. Going further, in this blog post we will discuss about GL Posting Journal report under General Ledger reports.

GL Posting Journals report contains the account wise detail record as per posting sequence with accounts credit & debit amount. This report fetches the data from all transactions like GL journal entry, Purchase Order transactions, Order entry transactions, Accounts payable & Accounts Receivable transactions.

To print this report, navigate to:

General Ledger–>GL Reports–>Posting Journals Report

This report is used to print the posted transactions which arise from any other module which effect display in General Ledger after posting batches.

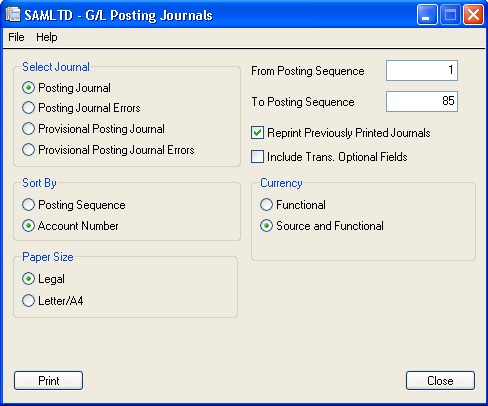
Once any Order entry, Purchase order, Accounts payable & Accounts receivable batch is created, then you need to run the Day End Processing before printing this report to get the effect in GL module or else you need to create GL batch for any transaction manually. We have multiple selections in UI, refer below screenshot:-

New Stuff: Webinar : Magento with Sage 300 “Key to successful Online B2B and B2C Business” on 19th Nov, 2015 at 1 pm EST

Blog1

You can also print the report with various ranges as from & to posting sequence. In the above screen, you have to select any one of journals like posting journals or errors or previous posting journals & errors. The advantage of this posting journal report is that you can print errors also while generating error batch at the time of posting GL batch. You can also print previous posting journals. Another filter criteria is depend on your journals selection.

The report can be sorted by posting the sequence as well as account number, also report can print in source & functional currency, this all filter criteria can set by user as per his requirements.

The report selected by sorting the account no & only posting journal will be displayed in the source as well as in functional currency, Refer below screenshot:-

blog2

In posting journal report you can also see the credit & debit amounts in the source as well as in the functional currency for all bathes in all modules. If you use multicurrency accounting then, posting journal report displays some additional information like currency, transaction total in source, exchange rate, & functional currency etc. In above report you had selected currency source as well as functional so you can see the credit & debit amount in both currencies for particular GL account.

Also Read:
1.PO Posting Journals Report in Sage 300 ERP
2.Posting Journals Report in Sage 300 ERP
3.GL Custom Report
4.G/L Integration in A/P module with options for creating G/L transaction by (Creating and Posting a New Batch)
5.GL Clearing Report in Sage 300 ERP

Migrate Ship to Address from Sage 50 US to Sage 300 ERP

$
0
0

GUMU™ for Sage 50 US ERP to Sage 300 ERP is a Sage certified Migration solution. Greytrix provides Migration services at its Sage Migration Centre and fulfils the business requirements.

New Stuff: Migrate Item Pricing from Sage 50 US (Peachtree) to Sage 300 ERP

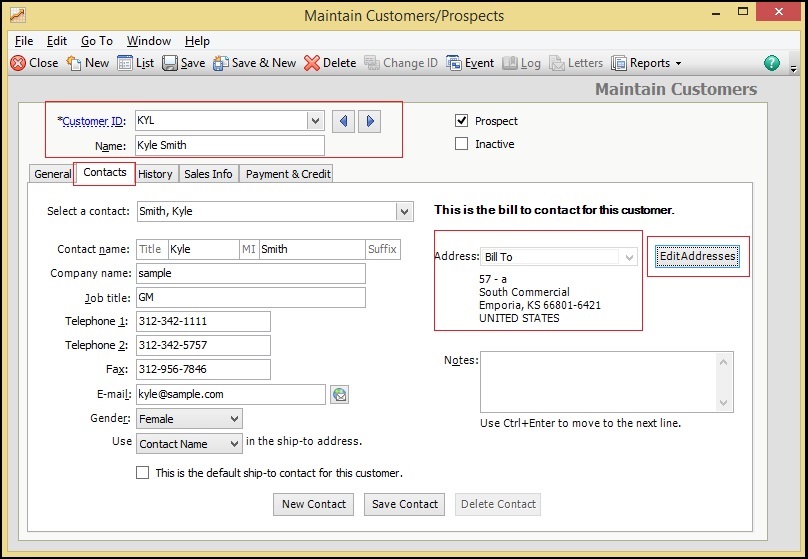
In this blog, we shall explore upon the migration of Ship to Address from Sage 50 US (formally known as Sage Peachtree) to Sage 300 ERP( formally known as Sage Accpac). Let’s consider Ship to Address of Customer “Kyle” in Sage 50 US ERP system. We can view customer’s ship to address in Sage 50 US by referring below path:
Lists –> Customers & Sales –> Customers –> Double click on specific Customer

Peach_Cust

Go to Contacts tab and click on EditAddress button, new window gets opened in which we can review Ship to Address as shown in below screenshort –

Peach_Ship_to

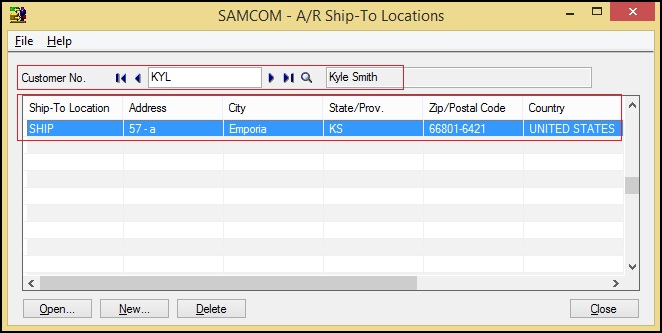
After migration from Sage 50 US to Sage 300, you can check Ship to Address of a customer in Sage 300 ERP as shown in below screenshort.
You can navigate through the below mentioned path to check migrated customer’s ship to address into Sage 300 ERP –
Account Receivable -> A/R Customers -> Ship-To Locations

sage300

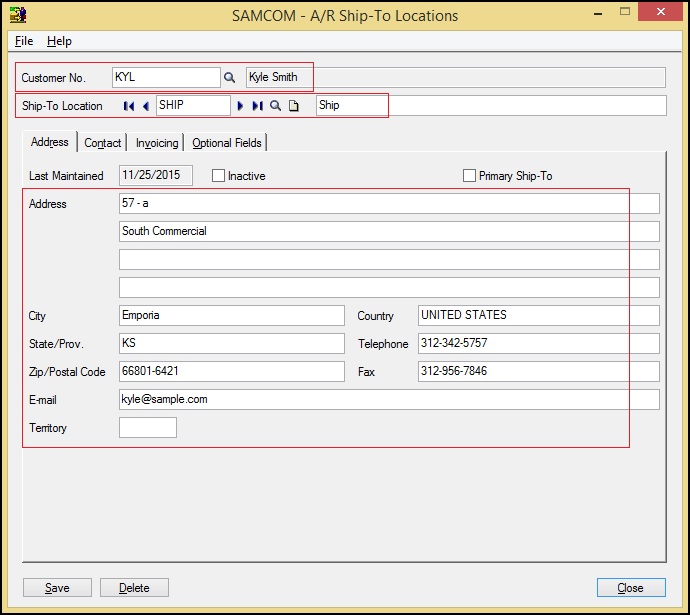
Click on Open button to review Ship to address in full view, as shown in below snapshot –

Sage 300_2

After data migration from Sage 50 US, the field values of Ship to address gets migrated with the following mapping.

Map

In this way, Ship to Address is migrated into target Sage 300 ERP from company database of source ERP Sage 50 US. For more information on ERP data migration, drop us a mail at erpmig@greytrix.com.

Also Read:
1) Migrate Ship to Address from Sage 50 CAD (Simply Accounting) to Sage 300 ERP
2) Migrate Sales Invoice from Sage Business Vision to Sage 300 ERP
3) Migrate Remit-To-Address from Sage BusinessWorks to Sage 300 ERP
4) Migrate Inventory On Hand Quantity from Sage BusinessWorks to Sage 300 ERP
5) Migrating Open Purchase Orders from Sage PRO ERP to Sage 300 ERP

Migrate Item Locations from Sage 50 CAD (Simply Accounting) to Sage 300 ERP

$
0
0

GUMU™ for Sage 50 (CAD) to Sage 300 ERP is a Sage certified Migration solution. Greytrix provides migration services at its Sage Migration centre and fulfils the business requirements.

We at Greytrix help the end – user in implementing new Sage 300 ERP system through our various successful migration and integration solutions.

This blog is in continuation to our series GUMU™ ERP Migration services. In our previous blog, we had discussed about how to Migrate Items from Sage 50 (CAD) to Sage 300 ERP. In this blog, we are going to discuss about how Item Locations gets migrated from Sage 50 CAD (formally known as Simply Accounting) to Sage 300 ERP (formally known as Sage Accpac) using GUMU™.

New Stuff: Migrate Open Sales Orders from QuickBooks to Sage 300 ERP

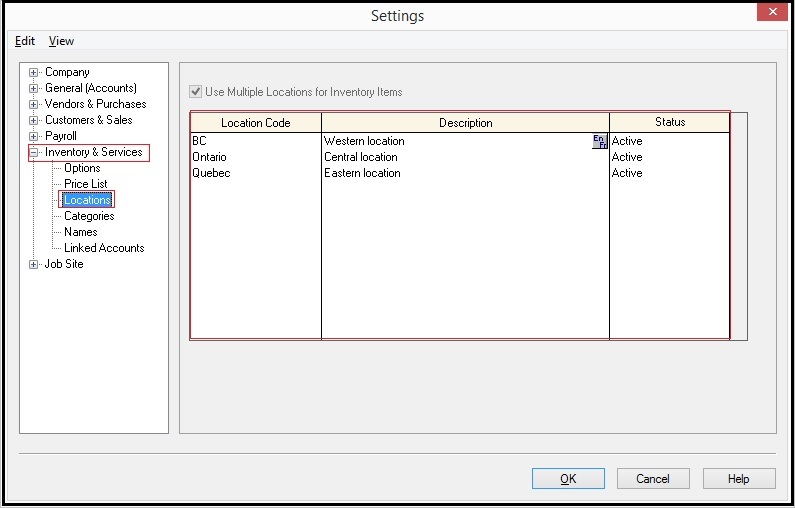
We can view item locations in Sage 50 (CAD) at the following path,
Sage 50 (CAD) –> Inventory & Services –> Settings –> Locations

Now, let’s say Item location “BC”; the item location master screen in Sage 50 (CAD) system looks like this:

Simply_Location

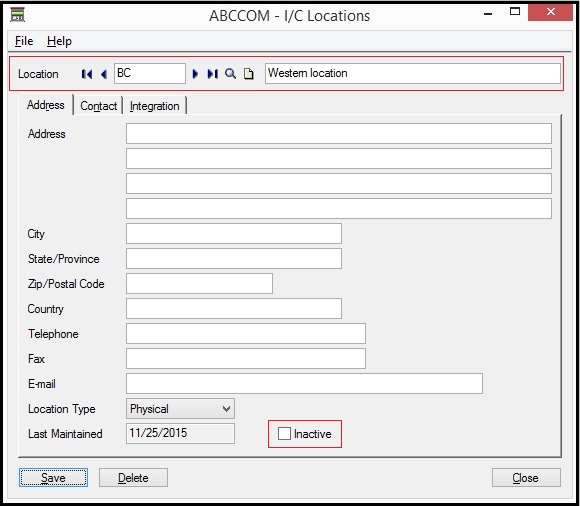
We can check migrated Item locations data in Sage 300 ERP as shown below. Path for Sage 300 ERP is,
Sage 300 ERP –> Inventory Control –> I/C Setup –> Locations

Sage300_Location

After data migration from Sage 50 (CAD) the field values of item location gets migrated with the following mapping.

Mapping

In this way, Sage 50 (CAD) Item Locations gets migrated into Sage 300 ERP company database. For more information on ERP data migration, drop us a mail at erpmig@greytrix.com

Also Read:
1) Migrate Sales Payment from Sage 50 (CAD) to Sage 300 ERP
2) Migrate Purchase Invoice from Sage 50 (CAD) to Sage 300 ERP
3) Migrate Sales Person from Sage 50 (CAD) to Sage 300 ERP
4) Migrate Vendor Notes from Sage PRO ERP to Sage 300 ERP
5) Migrate Item On Hand Quantity from Business Vision to Sage 300 ERP

Acknowledgement Number Entry in TDS for Sage 300

$
0
0

Tax deducted at Source (TDS) is one of the modes for collecting income tax from assesses. Such collection of tax is deducted at the source itself when income arises. Tax deducted at Source (TDS) is one of the most important add-on that we have developed for Sage 300 for the Indian market. Using this module we can do the E-filing using NSDL which is a tax return process. Tax return is required to be filed by the assesse who has deducted the TDS and needs to be filed on a quarterly basis. Using the TDS module we can process the tax return for payments of domestic purchase (FORM 26Q) and NRI/Foreign purchase (FORM27Q) other than salary.

TDS return which are required to be submitted electronically are prepared with the help of NSDL utility FVU (File Validation Utility). At the time of submission of return, if the return is complete in all the aspects, a provisional receipt/token number would be issue. This provisional receipt/token number is an acknowledgment of the fact that the return has been filed.

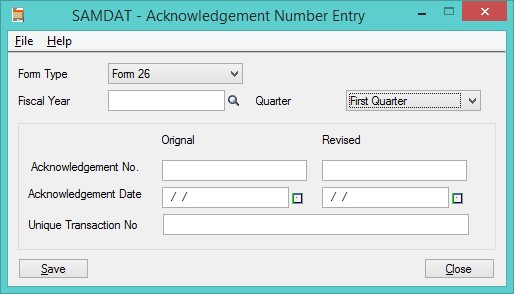
We can maintain the Receipt number in Sage 300, ERP for SMEs in India using Acknowledgement Number entry in TDS module. Here, we can save the Acknowledgement number, Acknowledgement Date, Unique Transaction No. (Please refer the screen shot)

New Stuff: Migrate Item Locations from Sage 50 CAD (Simply Accounting) to Sage 300 ERP

ANE in TDS

1. Acknowledgement number.

The provisional receipt/token number is an acknowledgment number which is issued after TDS e-filing process. Acknowledgment is to be treated as statement and is forwarded to the Assesse only if a Refund is to be made or if the Assesse make’s a special demand for intimation.

2. Unique Transaction number (UTN).

Every transaction which have to be distinguished uniquely for that UTN is provided to deductee. If the government has allotted a TDS Unique Transaction Number (UTN) then the user can have all recent transaction details.

Also Read:

1. Maintain TDS accounts Location or Branch wise
2. Manual TDS Posting in Greytrix TDS Module for Sage 300 ERP
3. TDS Screen popup blank for TDS Vendor
4. Financial Budgeting in Sage 300 ERP
5. Configure Reverse Charge Mechanism for Service Tax in Sage 300 ERP

Data Migration to Sage Live Accounting

$
0
0

Data migration is one of the most tedious job to perform during implementing the new ERP system in work environment. It contains plenty of hypercritical business scenarios and processes to be taken care. Above all, users won’t accept the data along with new system if the converted data quality is comparably poor.

Greytrix is a pioneer in providing Migration services at its Sage Migration Center and catering end-user business requirements. We at Greytrix have come up with migration into new ERP. Sage Live is new online cloud based ERP Accounting system introduced by Sage Software. Greytrix has a techno functional team of experts who analyzes the existing source ERP and defines the strategies in order to move the data into Sage Live ERP system from source ERP’s like QuickBooks.

Data Migration to Sage Live Accounting

In Migration process, we would be migrating data into below Sage Live entities;

Company Settings


Companies

A company is a legal entity that belongs to one legislation and is required to file tax and accounting returns to the relevant legislation authority. The chart of account is shared by all companies in the org, whereas journals, the ledger, and all transactions and balances it contains, belong to the individual company

Currencies

Currencies are object to define the different currencies necessary for your company to conduct business. The Currencies gets migrated along with Currency conversion rates.

Tax

Sage Live has a flexible tax engine that controls the calculation and settlement of a variety of taxes such as sales and use taxes, goods and services taxes (GST), and value added taxes (VAT). It also caters for special scenarios such as bracket system, Nexus, VAT reverse charges, distance selling, MOSS, and the integration with third-party tax services

Tax Treatments

The tax treatment determines the transaction type covered by the regime. Typically these relate to the customer or supplier, and the sales or purchaser invoice header.

Tax Codes

The tax code determines whether a particular goods or services item is taxable or not. In more complex scenarios it will contain a product taxability code. On an invoice the tax code is assigned to the line item

Tax Rates

The applicable tax rate is determined by evaluating the tax treatment and the tax code

Ledger Settings


The ledger is the basic unit of management of Sage Live. Its essential constituent parts are the chart of accounts (ledger accounts), dimension, and the rules governing the use of dimensions for each account.

Chart of Accounts

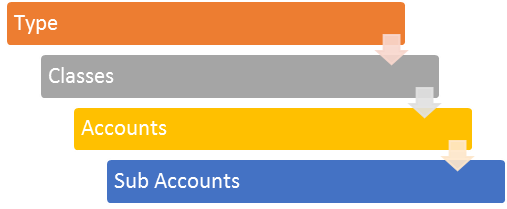
Ledger accounts and subaccounts (designated dimensions) make up what is commonly referred to as the chart of accounts. Ledger postings are made to accounts. Accounts belong to account classes. Classes belong to account types. Sage Live maintains total-to-date (TTD) and year-to-date (YTD) balances for all accounts so that there is no need to explicitly distinguish between permanent and temporary accounts. Accounts can also be used to record statistical units such as energy consumption or headcount.

Data Migration

Dimensions

Dimensions object used to define what a customer needs to track at the highest level. For example, Cost Center, Department, Location, Customer, Product.

Units 

Unit objects are used to define the unit by which you are tracking non-financial data. Examples include Heat Count or SQFT.

Journals

Journals provide a generic way of supplying data to the posting engine. They can be used to represent many different accounting objects, for instance accounts payables, customer receipts, bank feeds, expense claims

Journal Types 

The journal type is an object that defines a class of journals, and defines their basic behaviour.

Dimensions (Mappings) 

As well as using dimensions to tag transactions and drive powerful analytical features, Sage Live also uses special types of dimensions to define journal type items and associates them with the appropriate posting rules. These are not dimensions in the conventional sense, they merely exploit the similarity with ledger dimensions.

Posting Rules 

Posting rules determine how the posting engine interprets a posting request coming from the journal or the API, and how to create corresponding entries in the ledger.

Journal Entries


Collaborative Journals 

Collaborative journals allow individual users to record expenses and other transactions at source, and thus contribute to the accounting process in real time.

Standard Journals 

General business transactions are recorded in standard journals, i.e. those transactions that are not attributable to individual contributors, and are not generated by feeds.

Feeds 

Feeds are journals that are connected to a data source such as a bank feed or a partner app and are processed in the background. Once set up, feeds will not normally need any attention as they happen automatically.

Inactive Journals 

Inactive journals are collaborative journals, standard journals, or feeds that have been used in the past and have been retired, or those that have been created for future use. A journal is made inactive by unchecking the active status in the corresponding journal type.

However during the data migration into Sage live, more focus would be on financial entities of Sage Live and give customer the integrated view of their QB financial activities with sub ledger entities.

About Us

Greytrix is one stop solution provider for Sage ERP and Sage CRM needs. We provide complete end-to-end assistance for your technical consultations, product customizations, data migration, system integrations, third party add-on development and implementation expertise.

Greytrix helps in migrating to Sage 100, Sage 300 and Sage ERP X3 from Sage Pro, Sage 50 US, Sage 50 CA, Sage 50 Usage Business Works, Sage Business Vision, QuickBooks and MS Dynamics Great Plains.

For more information on migration solutions, please contact us at erpmig@greytrix.com. We will be glad to assist you.


Storing unique attributes of vehicle by VIN for automobile industry

$
0
0

In our previous blog Sage 300 ERP for Automobile Dealer Industry we had given a brief introduction, now in this blog we will be focusing on how automobile dealers can retain vast data of unique vehicles on the basis of its Vehicle Identification Number or VIN


In automobile industry every single car is unique because every car has its own unique Vehicle identification number (VIN), Chassis number, Engine number, upholstery and every car has its unique set of accessories. Hence it gets difficult for the automobile dealers to keep a track of all this information when time goes by and sales is increasing.

New Stuff: Acknowledgement Number Entry in TDS for Sage 300

In the case of Luxurious cars, where the car manufacturer provides the customer with the flexibility to customise their car as per their preference, Sage 300 can handle this data effectively by storing all the required data uniquely with every item on its Vehicle identification number. For example: interior wooden panel textures, interior leather, etc. All this data needs to be recorded for quality checks and inspections. Sage 300 can efficiently manage all this data and help the automobile dealers to provide best service.

Now let us see how we can implement it.

Untitled

As you can see in the above screen of serial number of Inventory control module,

  • Serial number- a unique serial number is associated to the item.
  • Item number – it is the item number
  • Then in the serial number optional field tab, we can see the attributes which are allocated to the item number *A1-001-00001* which is a car and having serial number as “CAR__-00001”.

This is how same items can have multiple serial numbers, and every serial number can have its own unique set of attributes stored in Sage 300.

Also Read:
1. Service Invoice Import Routine for Automobile industries in Sage 300
2. Integration with DMS and SAGE 300 ERP for Automobile dealer industry
3. Integration with DMS and SAGE 300 ERP for Automobile dealer industry
4. Automobile Industry| Go green with doc attach feature of Sage 300 ERP
5. Sage 300 ERP for Automobile Dealer Industry


Migrate A/P Payment Terms from Sage Business Vision to Sage 300 ERP

$
0
0

GUMU™ for Sage Business Vision ERP to Sage 300 ERP is a Sage certified migration solution. Greytrix is a pioneer in providing migration services at its Sage migration centre and catering end-users business requirements.

In our previous blog we discussed about Migrate A/R Payment Terms from Business Vision to Sage 300 ERP. In this blog we will discuss about how GUMU migrates A/P Payment Terms from Sage Business Vision ERP to Sage 300 ERP (Formerly known as Accpac).

New Stuff: Migrate Item On Hand Quantity from Business Vision to Sage 300 ERP

We can create payment terms for vendors from the following path in Sage Business Vision.

Sage Business Vision → Edit → Terms

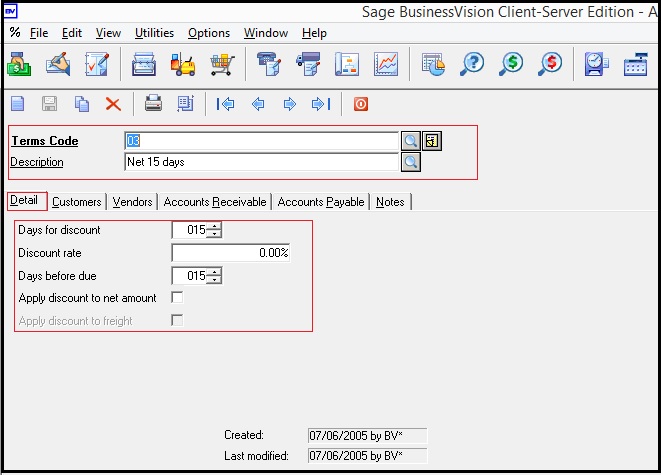
BV1

The above screen shot shows an existing payment term in Sage Business Vision

BV2

The above screen-shot shows the number of vendors that are assigned this Payment Term in Sage Business Vision.

You can create payment terms for vendors from the following path in Sage 300 ERP.

Sage 300 → Accounts Receivable → A/P Setup → Terms

Sage1

The above screenshot shows the converted A/P Payment Term in Sage 300 ERP

Sage2

In the above screen shot the vendor ‘CNCP’ is assigned the ’03′ Payment Term as in Sage Business Vision.

After data migration from Sage Business Vision ERP the field values of Sage Business Vision Payment Terms get converted with the following mapping:

Mapping

In this way, Sage Business Vision A/P Payment Terms are migrated into target Sage 300 ERP company database. For more information on ERP data migration, drop us a mail at erpmig@greytrix.com

Also Read:
1) Migrating Items from Sage Business Vision to Sage 300 ERP.
2) Migrate Open Sales Order From Sage Business Vision to Sage 300 ERP.
3) Migrate Sales Department Code from Sage Business Vision to Sage 300 ERP.
4) Migrate Remit-To-Address from Sage Business Vision to Sage 300 ERP.
5) Migrate Sales Person from Sage Business Vision to Sage 300 ERP.

Update Unit Cost with Base Price while creating Purchase Orders from Order Entry

$
0
0

We all know that the Purchase Order entry is a document which is sent by the buyer to the seller, which is usually send when the buyer wants to purchase the goods. The document contains the basic requirement like types, quantities, and prices for products. On the other hand Sales Order Entry, is issued by the business to customer. Both the Sales and purchase orders are indirectly linked with each other.

Sage 300 is rich with the many useful functionalities. “Creating Purchase Orders from Order Entry” is one of those rich functionality. Suppose that the Sales order is raised for an item with quantity 50, and you don’t have that much quantities at your inventory. In this scenario you will manually create new purchase order for that item, but by using “Creating Purchase Orders from Order Entry” screen of Sage 300 ERP you can automatically create purchase order of that sales order.

To run the Customization go to Purchase Orders –>P/O Create Purchase Orders –>Create POs from OE

New Stuff: Migrate A/P Payment Terms from Sage Business Vision to Sage 300 ERP

blog1

This will screen will create POs with the unit cost of item in standard way, but we have customized the screen in such a way that it will update the items unit cost with the “Base Price” of item on the basis of “Customer” and “Price List Code”.

blog2

This customization will be useful when your prices are frequently changing and you want your base price as unit cost while creating a Purchase Order.

Also Read:
1.Link General Ledger Entry to the Original Transaction
2.Aspect of PO Type and Order Type “Future”
3.Migrate Open Sales Orders from Sage BusinessWorks to Sage 300 ERP
4.How to allocate a Serial and Lot number at Order Entry screen in Sage 300 ERP
5.Creating Purchase Order By Using Sales Order details in Sage 300

Calculate Taxes on the basis of Item Tax in Sales

$
0
0

In our previous blog we learned about “Sales Order Action Report”, which gives us the basic idea about all the Sales Order that we have created.  In this blog we will discuss about the small customization on Sales Order Entry screen which was to calculate taxes on the basis of Item Tax in Sales.

Sales Order is a document that is given to the buyers before delivering the goods or services. Once you send sales order it means that the sale is now confirmed. The SO will give you a clear information about your sale. It can also help you to check the inventory that are listed in SO.

When you create the Sales order, it takes the customer Tax group by default. Tax authorities are taxable or Non-Taxable on the basis of Tax Group assigned to customer. If you want the Sales Tax Authorities to be taxable only on the basis of Items taxes, then here is the solution: We have customized Sales Order Screen in such a way that it compares the sales order detail tax authority with the item master tax authority.

To create Sales Order go to –>

Sage Accpac –> Order Entry–>O/E Transaction –>Order Entry

New Stuff: Update Unit Cost with Base Price while creating Purchase Orders from Order Entry

blog1

Consider the scenario where for the OE Order Detail level item tax authority is taxable and at the item master the same tax authority is Non-taxable for that item. In this case, the standard Order Entry will show OE Detail tax as taxable. But in the Order Created from our customized will show Non-Taxable tax as per the item master.

2

This customization is useful when you want to make the tax calculation automated. The one mandatory requirement for this customization would be that Calculate Tax check box should be checked for Order entry screen.
3

Also Read:
1.Update Unit Cost with Base Price while creating Purchase Orders from Order Entry
2.Change Document Number, Document Date and Posting Date of OE Shipment and OE Invoice before creating it from Order Entry Screen
3.Item description in Order Entry Screen defaulting to blank in Sage 300 ERP
4.Customer Wise Item filter on Order Entry screen in Sage 300 ERP
5.How to update large Instructions in Order entry screen

Hide non-sellable items from Item lookup on Order Entry in Sage 300 ERP

$
0
0

Are you fed up of seeing the non-sellable item in the item finder? Let us see how we can hide the Non-sellable item from the Item Lookup in transaction screen in order entry in Sage 300 ERP.

 New Stuff: Restrict users access of modifying the GL Imported batches in Sage 300
Take an example of Order entry screen
Go to Order Entry–>Order Entry Transactions–>Order Entry

Create new order and open item finder in the item detail line and click Set Criteria

6

On Set Criteria Select column Sellable from the drop down and add

5

4
Double click on the cell below the sellable and add criteria for sellable items=Yes

3

2
Now after saving these set criteria you can only see the sellable items in the item finder on order entry transaction screen

1

This will help user to avoid the selection non-sellable item in the order entry.

Also Read:
1.Default Create OE Invoice in Sage 300 ERP
2. Create Invoice directly from Shipment Entry
3. How to send Emails from OE invoice to customer via Sage 300 ERP
4. Item description in Order Entry Screen defaulting to blank in Sage 300 ERP
5. Customer Wise Item filter on Order Entry screen in Sage 300 ERP

Alternate Items on Order Entry screen in Sage 300 ERP

$
0
0

Want to use alternate items from Order Entry screen when the inventory level goes negative?
Usually in some industries they set alternate items for items which used as a substitute item that they can ship when the regular item is out of stock.

New Stuff : Hide non-sellable items from Item lookup on Order Entry in Sage 300 ERP

To cater these requirements we have designed a component for Sage 300 ERP which notifies users while doing the order entry that stock will go below negative and you can use alternate item for the same. When user selects to order alternate we add a new detail line in order entry with quantity that is not available for the main item. In this blog we shall discuss about these enhancements.

b1


On Order Entry screen when user enter a main item and quantity on hand is less than quantity order then we prompt the user with warning that inventory levels will go negative.

b2


When user commits this line we gave below message and ask user whether they want to order remaining quantity with alternate item.

b3


With this user can easily order substitute items for the item from order entry screen.

Note: This customization is done using Sage 300 SDK, as a result easy to deploy and it works with Sage 300 ERP 2012 on wards.

Also Read :

1. Populate Items on Order Entry Screen using Template Code

2. Generate BOM and Kitting items on the fly from Order Entry screen in Sage 300 ERP

3. Sellable and Non-sellable items in Sage 300 ERP

4. Sort Items by Picking Sequence In Order Entry Screen

5. Track the cost of Items those are issued for Free


How to post the AR Invoice batch from Invoice Entry in Sage 300 ERP V2016

$
0
0

With release of Sage 300 ERP 2016(formally known as Sage Accpac ERP) many new features and functionality is released to help user make business smarter and efficient. In this blog, we would be discussing about the new feature available in AR invoice Entry screen to post the AR invoice batch from the Invoice entry screen itself. With this new feature data entry operator or ERP admin person can easily post the invoice batch from invoice entry screen which will save time for data entry.

New stuff: Alternate Items on Order Entry screen in Sage 300 ERP

In the earlier versions of Sage 300, for posting the Invoice batch user has create new batch on invoice entry screen and has to go on the invoice batch list screen to post the batch.
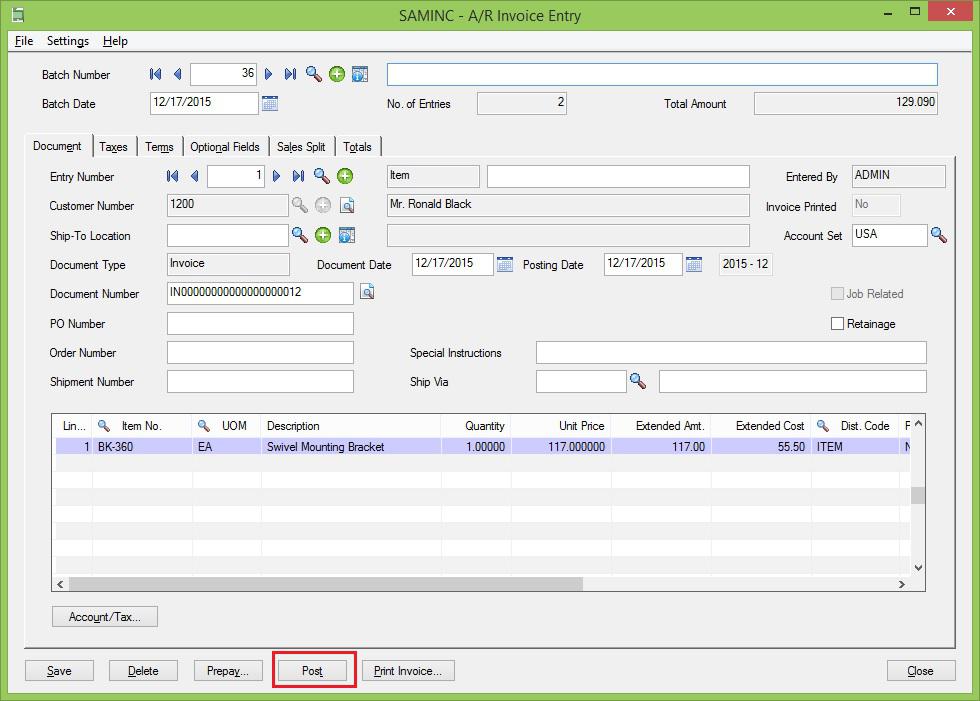
Now with Sage 300 ERP 2016 released, user can directly post the invoice batch from invoice entry screen itself.

To access the invoice batch list screen go to Sage 300 ERP desktop–>Account Receivable–>AR Transactions–>AR Invoice Entry screen
In below example invoice batch 36 is created is from invoice entry screen with two entries. After adding the entries the post button gets enabled with which user can post the batch.

Invoice1

Also Read:
1. Add Comments in AR Aged Trial Balance Report
2. Cleanup Accounts Using Apply Document Feature in sage 300 ERP
3. Restricting Order Posting, Possible?
4. Document Attach: Easy document referencing with Sage 300 ERP Add-on
5. Control your AR Receipt editing after being Printed


New feature to post all Invoice batches in Account receivable for Sage 300 ERP 2016

$
0
0

With release of Sage 300 ERP 2016(formally known as Sage Accpac ERP) many new features and functionality is released to help user make business smarter and efficient. In our last blog, we have discussed about the new feature available in AR invoice Entry screen to post the AR invoice batch from the Invoice entry screen itself.

New stuff: How to post the AR Invoice batch from Invoice Entry in Sage 300 ERP V 2016

In the earlier versions of Sage 300, for posting the multiple batches user has to post one by one as it was allowing posting a single batch at a time. Now with Sage 300 ERP 2016 released, user post multiple invoice batches at time whose status is ready to post.

To access the invoice batch list screen go to Sage 300 ERP desktop–>Account Receivable–>AR Transactions–>AR Invoice batch list screen.
In below example invoice batch 37 and 38 are created and set to ready to post. With post All button user can post the all the un posted batches whose status is Ready to post.

Ar Invoice batch list

Also Read:
1. Add Comments in AR Aged Trial Balance Report
2. Cleanup Accounts Using Apply Document Feature in sage 300 ERP
3. Restricting Order Posting, Possible?
4. Document Attach: Easy document referencing with Sage 300 ERP Add-on
5. Control your AR Receipt editing after being Printed

User Authorization report for Sage 300 ERP 2016

$
0
0

With release of Sage 300 ERP 2016(formally known as Sage Accpac ERP) many new features and functionality is released to help user make business smarter and efficient. In our last blog, we have discussed about the new feature available in AR invoice batch list screen to post the multiple un posted invoice batches from the Invoice batch list screen itself.

New stuff: New feature to post all Invoice batches in Account receivable for Sage 300 ERP 2016

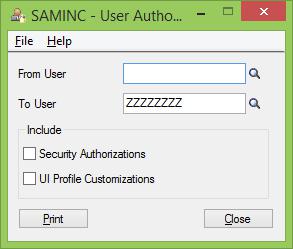
In this blog we will discuss about new User authorization report in Sage 300 ERP 2016. User Authorizations report lists security authorizations and screen customization for users. This report is useful when you want to list the modules assigned to user, UI Profile assigned i.e. screen and control (hidden) from the user.
Open Administrative Services– > Administrative Reports– > User Authorizations.
You can print the report for particular user as well as for the range of user.

user1

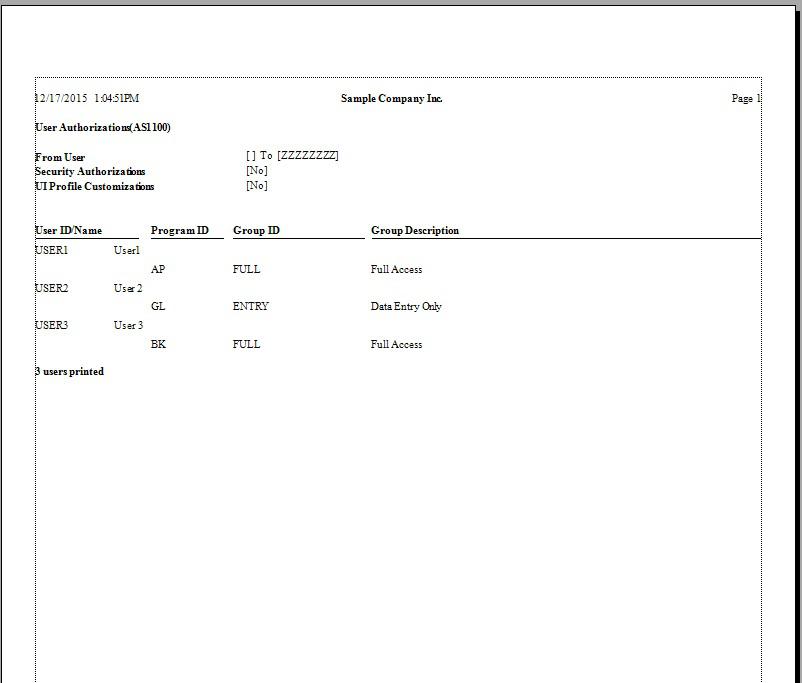
You can print the two formats of the user authorization report

  1. On the User Authorizations screen, you can print a report that lists the following for each user who is assigned to one or more security groups:

  • User ID

  • Company

  • Program ID

  • Group ID

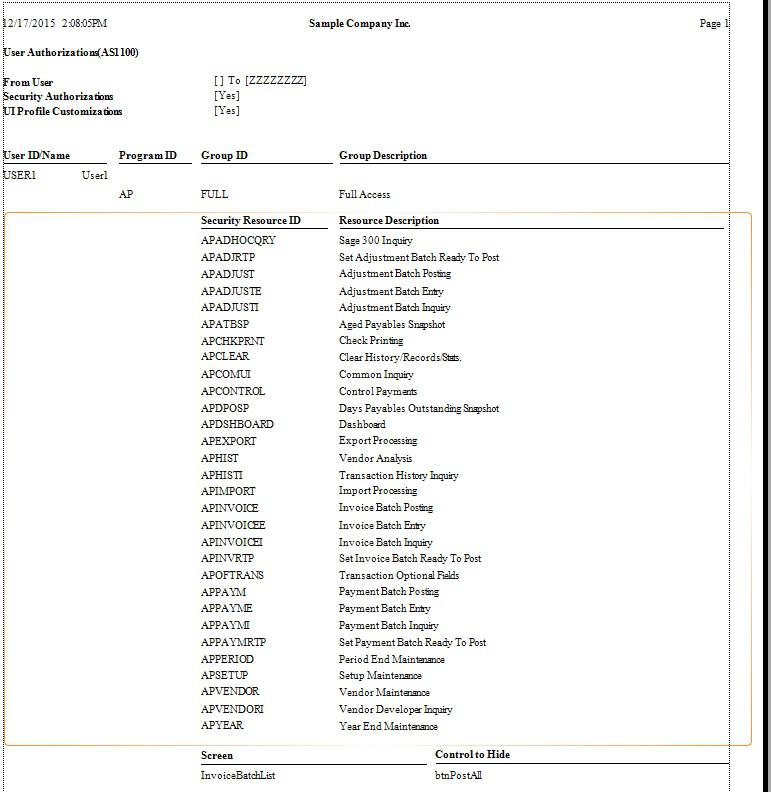
user22. You can print a detailed report that lists the following for each user in a range that you specify: For printing this report user needs to select Security authorizations and UI profile customization check box checked on report UI.

  • User ID and name.

  • Company.

  • Program ID.

  • Group ID and description.

  • ID and description for each security authorization that has been granted to the user.

  • Screen customization specified in the UI Profile that is assigned to the user.

user3

In this way User authorization report can help the admin to get information about all users in Sage 300 and their respective security levels.

Also Read:
1. User Authorization Report in Sage 300 ERP
2. Added features in Sage 300 2014 in the USER screen
3. Restrict users access of modifying the GL Imported batches in Sage 300
4. Update & Delete rights to specific Users
5. Evicting users from Sage 300 ERP 2014
6. Create and restrict user account access.
7. How to restrict user from using undefined UOM in inventory Control
8. IAP User login failure using Windows Authentication Method
9. User Role and Security Application in Sage 300 ERP
10. How to restrict user to enter specific character length in Sage 300 ERP Grid

Suppress expected ship date warning on Order Entry in Sage 300 ERP 2016

$
0
0

Various new features and changes have been introduced in Sage 300 ERP 2016. In this blog, we will be discussing about new feature i.e.; specify whether a message appears when you post an order with an expected ship date that is later than the Deliver By date.

New stuff: User Authorization report for Sage 300 ERP 2016

Many times user requires that there should not be any warning message when the expected ship date is later than the delivery by date.

In order to activate this new feature configure OE.INI file present under Sage 300 ERP installation path and follow below mentioned steps:
1. Navigate to Order Entry folder present under Sage 300 ERP installation directory (for e.g.; C:\Program Files\Sage\Sage 300 ERP\OE63A) and open the OE.INI file.

2. Append the below mention tag in the OE.INI file and set one of the below setting depending upon your business requirement:
 In order to validate the Expected ship date warning message – Add following code.

Order1


This configuration will validate the expected ship date with deliver by date and if the expected ship date is later than deliver by date then below message will appear on order entry screen.

Order 2

Turn off the message – Add following code.
If you want to turn off the message on order entry screen then turn off the ValidateREQUESTEDEXPSHIPDate flag.

Order 3

With above configuration user can suppress the warning message for expected ship date on order entry screen.

Also Read:

1. Aged Sales Order Report in Sage 300 ERP

2. Create Jobs related Sales Orders in Sage 300 ERP

3. Creating Purchase order from an Existing Sales Orders in Sage 300 ERP

4. Using Analysis Codes in Sage 200 ERP for Sales Order Processing

5. Creating Single Shipment entry from Multiple Sales Orders in Sage 300 ERP


How to Access database Utilities with Non Admin User outside Sage 300 ERP V2016

$
0
0

New release of Sage 300 ERP 2016(formally known as Sage Accpac ERP) has introduced many new features and functionality to help user make business smarter and efficient. In our last blog, we have discussed about the new user authorization report available in Sage 300 ERP 2016.

New stuff: Suppress expected ship date warning on Order Entry in Sage 300 ERP 2016

In this blog we will discuss about new feature available in Sage 300 i.e. Non-administrator users can use database utilities outside Sage 300.
Users with security authorization to dump, load, and copy databases can now use the DBDump, DBLoad, and DBCopy utilities outside of Sage 300 by running them from the Windows Start menu. Previously, regardless of security authorizations, only the administrator user could do this.

To use this feature non admin user needs security authorization to access these database utilities.

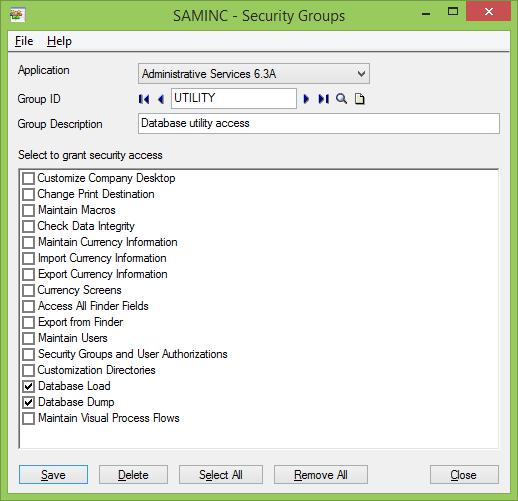
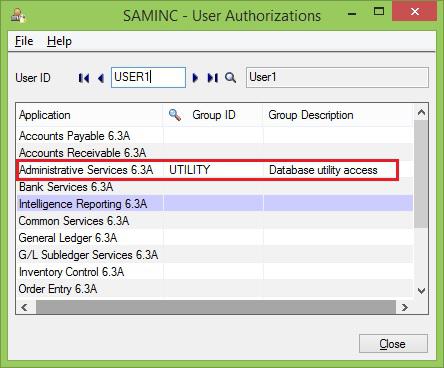
You need create a security group for providing the database utilities rights and needs to assign the security group to non admin user.
Go to Open Administrative Services–>Administrative Reports–>Security groups

Security groupAssign the security group to user. Go to Open Administrative Services–>Administrative Reports–>User Authorizations

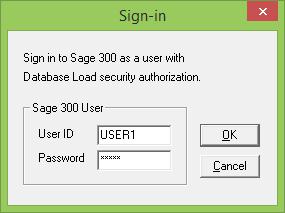
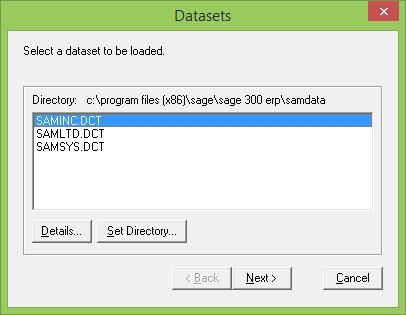
User AuthorizationNow go to windows menu and open these DBDump, DBLoad, and DBCopy utilities. Here you need to login with the user with whom you want to run the utilities.Sign in

Dataset

In this way with release of Sage 300 ERP 2016 non admin user can access database utilities outside Sage 300.

Also Read:
1. User Authorization Report in Sage 300 ERP
2. Added features in Sage 300 2014 in the USER screen
3. Restrict users access of modifying the GL Imported batches in Sage 300
4. Update & Delete rights to specific Users
5. Evicting users from Sage 300 ERP 2014
6. Create and restrict user account access.
7. How to restrict user from using undefined UOM in inventory Control
8. IAP User login failure using Windows Authentication Method
9. User Role and Security Application in Sage 300 ERP

Migrating Item Unit of Measure from Sage Business Works to Sage 300 ERP

$
0
0

GUMU™ for Sage Business Works ERP to Sage 300 ERP is a Sage certified Migration solution. Greytrix is a pioneer in providing Migration services at its Sage Migration Centre and catering end-users business requirements.

We at Greytrix help the end –user in implementing new Sage 300 ERP system through our various successful migration and integration solutions.

New Stuff: Migrating Open Purchase Order from Sage BusinessWorks to Sage 300 ERP.

In this blog, we will discuss about how Sage Business Works Item Unit of Measure are migrated to Sage 300 ERP (Formerly known as Accpac) using GUMU™.

Sage Business Works doesn’t have any specific module to add / create Unit of Measure. Generally user adds or changes Unit of Measure while creating Item in Sage Business Works. Due to this, during migration process GUMU™ finds distinct Unit of Measure records from Sage Business Works and creates the same in Sage 300 ERP.

Below is the screenshot of converted Unit Of Measure from Sage Business Works. (Note: we have manually set the diff. UOM in Sage Business Works before starting the migration.)

BW

In this way, Sage Business Works Item unit of measures are migrated into target Sage 300 ERP company database. For more information on ERP data migration, drop us a mail at erpmig@greytrix.com

Also Read:

1) Migrating Open Purchase Order from Sage BusinessWorks to Sage 300 ERP.
2) Migrate AR Payments from Sage BusinessWorks ERP to Sage 300 ERP.
3) Migrate Inventory On Hand Quantity from Sage BusinessWorks to Sage 300 ERP.
4) Migrating Ship-Via Codes from Sage BusinessWorks to Sage 300 ERP.

Viewing all 1475 articles
Browse latest View live


<script src="https://jsc.adskeeper.com/r/s/rssing.com.1596347.js" async> </script>