Quantcast
Channel: Sage 300 ERP – Tips, Tricks and Components
Viewing all 1475 articles
Browse latest View live

Tax Configuration in Sage 300

$
0
0

Sage 300 provides solution to maintain the sales and purchase of goods as per user requirements.

Major part of the Sales and Purchase Transactions is Inventory and Taxation.

In our previous blog “Taxes” and “Tax Classes in Sage 300 ERP” we had discussed about tax configuration and Tax classes, in this blog we will discuss about one of the feature of Tax Classes i.e. Exempt in detail.

The New Stuff: Tax Tracking Report in Sage 300 ERP

Tax classes are used to define multiple tax classes for sales item, purchase item, customer and vendor.

The following is the path to define the Tax Classes in Sage 300

Path: Common Services >> Tax Services >> Tax Classes

Vendor

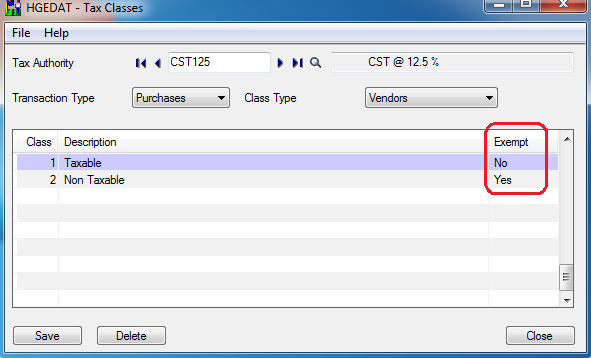
  • Exempt functionality is used to allow / deny input of Tax Rate in Tax Rate Master. (Refer the above screen shot.)

Vendor

After selecting Exempt – Yes. Then in Sage 300, the system will not allow to enter Tax Rate in Tax Rates Master.

(Refer the previous and above screen shot.)

Also Read:
1. Excise Module- Tax Configuration
2. Expense Separately Functionality for Tax in Sage 300 ERP
3. Automatic insertion of Item Wise Detail Tax
4. Subcontracting Process (57F4) in Sage 300 ERP
5. Transfer of Excise duties along with Inventory Transfer in Sage 300 ERP


Transit Transfer Entry in Sage 300.

$
0
0

In Sage 300 ERP, there is a provision to do transfer of inventory within the Warehouse or Branches.

There are certain scenario in Manufacturing and Trading Industries, where many time the warehouse manager complaints about materials not being received on location and on other hand, the material that is already been sent and delivered to the requested location. No one has the actual track of material when it’s in Transit mode.

The New Stuff: Tax Configuration in Sage 300

Management also does not have control over the Transfer Material from one location to another location within the company or outside the company.

Sage Software provides a pretty good solution to handle this situation.

Path: Inventory Control -> I/C Transactions -> Transfer.

For using this functionality we have to take care some of the points are as follows:

* Document Type.

a) Transit Transfer: It allow you to transfer your goods into Transit Location.

1b) Transit Receipt: It allow you to receive your goods from Transit Location.

1

By selecting Transit Transfer Document number, system automatically fetch data to Transit Receipt Transaction.

User has to update quantity for receiving material partially.

In Sage 300 ERP, we can get report of In Transit Stock as well. So it helps to identify where the material belongs to. Refer IC Transfer Slips Report.

Also Read:
1. Transit Transfer and Transit Receipt in GreyMatrix for Sage 300 ERP
2. I/C Transfer Slips Report
3. I/C Transaction History Report
4. I/C Transaction Listing Report
5. Inventory Locations in Sage 300

Item Serial Registration

$
0
0

Sometimes we often come across a scenario where an organization requires a type of a master or a report which displays say product master, that is, which item and serial number is sold to which customer and also from which sales location. This kind of data helps to maintain customer relationship and also to maintain or track warranty applied on that particular item which we will discuss in next blog.

Hence, Sage 300 offers us an exceptional feature to maintain the product info master it is named Serial Registration

New Stuff: Transit Transfer Entry in Sage 300

You will have to navigate Inventory control—> I/C Periodic Processing—>Serial Registration .

1

After selecting the required parameter, click on Register Button and the records gets saved. The saved data can be viewed anytime with the help of report named as Serial / Lot Stock Listing

1

Below is the report output

1

This feature can be used more efficiently used in Automobile industries where they require to track item wise vehicle wise customer record so that vehicle services , warranty on parts can be tracked. Hence, maintaining smooth customer relation.

Also Read:
1. I/C Serial number Inquiry in Sage 300 ERP
2. How to assign unique serial Number to Individual Items in Sage 300 ERP Versions 2014
3. How to allocate a Serial and Lot number at Order Entry screen in Sage 300 ERP
4. Serial/Lot Number Stock Report
5. I/C Transfer Slips Report

Auto Retention Amount Configuration in Sage ERP

$
0
0

In SAGE 300, a very useful feature helps in identifying the available retention money deduction at the time of AP Invoice. Most of the organizations practice that they book / deduct retention money from vendor invoice, which is refunded later on to vendor. In SAGE 300, this same function can be done easily.

You can maintain retention percentage (%), Retention Period and Retention Term “Vendor” wise separately and the system will auto deduct retention money at the time of vendor bill booking. First of all you have to mention retention percentage, period and term in Vendor master in Invoicing Tab.

New Stuff: Item Serial Registration

Suppose you have a vendor and want to deduct the retention amount from each invoice or random invoice at the rate of 10%. Then you have to mention the retention % in vendor master as shown in the above screen.

Now you can book an invoice of a vendor, if the amount of an invoice is INR 5000/-, then system will auto deduct retention amount from the AP Invoice INR 500/- (Retention Amount @ 10% as defined in vendor master) and actual vendor account will be affected by INR 4500/-. Please refer below screen shot.

1

When you will post the invoice, then its GL effects will be such as

Expense A/c                     5000 Dr.

Vendor Control A/C        4500 Cr.

Retention A/c                     500 Cr. (Mapped Ledger in Account Set)

When you will try to release payment of that particular vendor against that particular Invoice, then system will show only INR 4500/- due not INR 5000/- because INR 500/- adjusted with Retention A/c as explained above. Please refer below screen shot.

1

Later on you can generate / create a retention invoice against the same AP Invoice (890 as showing in above screen) for INR 500/- when you have to release the remaining amount to vendor. Please refer below screen shot

1

When you will post the retention invoice, then system will post the accounts such as

Vendor Control A/c         500  Cr.

Retention A/c                   500 Dr.

When you will try to release the payment to that particular vendor, then retention Invoice of INR 500 will also be shown in the list and you can release the payment against that invoice as well.

Here you have seen that after mapping few masters, system take care all about the retention money control over AP Invoices.

Also Read:
1. Retainage Accounting
2. Allow Non Inventory Item Option in PO
3. Allow Fractional Quantities in Purchase Order
4. Allow edit of System generated batches
5.  Allow Adjustments in Payment batches
 

Restrict users access of modifying the GL Imported batches in Sage 300

$
0
0

General ledger is one of the primary components of accounting. Hence G/L Batches are crucial activity as it enables the user to keep control over all the transactions of any enterprise. In some cases G/L batches are created as a non- Sage ERP Accpac program i.e. imported batches & you want to restrict the users to modify this type of batches.

In Sage 300, you can restrict the users to modify the imported (batches created in a non-Sage ERP Accpac program, and then imported) by doing the G/L setup.

New Stuff: Auto Retention Amount Configuration in Sage ERP

Please fallow the setup to make the changes in G/L Setup:

Go to the General Ledger à G/L Setup à Options:

1

Now go to the Edit Imported Entries & select “No Edit” option from the drop down.

1

Hence this will restrict the users to modify the imported GL batches.

You can also select “Fiscal Period. Year. Trans Date” which allows users to only modify the Fiscal Period & Transaction dates of imported GL batches.

With this option in SAGE 300 you could assign appropriate rights to users & also with the help of this option you can maintain the security at GL batch which will be very helpful in maintaining the appropriate accounting with SAGE ERP Solutions.

Also Read:
1. Restricting Order Posting, Possible?
2. How to restrict Expired Lots in Sage 300 ERP
3. Restrict Posting to G/L Batches in Sage 300 ERP
4. How to restrict use of Expired Stock in SAGE 300 ERP
5. Restrict Posting on A/R batches

Incomplete Sales order detail report

$
0
0

The Sales Order is a confirmation document that is sent to the customers before the delivery of goods or services. After receiving the PO, the customers may request SO to know about the exact date of delivery for the goods or services ordered. Also the inventory/production department refer to the list of Sales Orders to see what needs to be shipped out and when.
In order to keep track of sales order i.e. how many sales order were completed and how many are still pending, Greytrix has developed a Reporting solution named “Incomplete Sales order detail report” which gives us a complete idea about the number of Incomplete Sales order and its details.

New Stuff: – Default accounting methods of PJC

12
Filter can be set for Incomplete Sales order detail report for:-
Sales order number and
Expected ship date
Also records can be sort based on two options:-
Order Number
Primary Salesperson
Report provides details in sales order like Sales order number, customer number, order date, expected ship date, item number, total quantity ordered, pending quantity to be shipped etc.
So Greytrix “Incomplete Sales Order Detail Report” ensures tracking of sales orders for any organization.

Also Read:-
1. Aged Sales Order Report in Sage 300 ERP
2. Create Jobs related Sales Orders in Sage 300 ERP
3. Creating Purchase order from an Existing Sales Orders in Sage 300 ERP
4. Using Analysis Codes in Sage 200 ERP for Sales Order Processing
5. Creating Single Shipment entry from Multiple Sales Orders in Sage 300 ERP

MANUFACTURING EXCISE REPORT- ANNEXURE IV FOR LABOUR JOB

$
0
0

The Excise module in ERP enables the organization to ensure Excise compliance and management of all transactions of Sales, Purchase, Production, Warehouse Transfer etc. Preparing the Reports in manufacturing industry is one of the crucial process. In our last blog post  we had discussed about the Excise Invoice report which is prepared by the manufacturer while issuing excisable goods from manufacturing location to customer or another excisable location and it is signed by the manufacturer, going further on that note, In this blog we will discuss about the Annexure IV report for Manufacturing Excise.

Annexure IV is one of the Manufacturing Excise Standard reports which gives detailed information about the stock register of goods sent for processing or Job working. This report shows the relation between the Labour job Issue and Labour Job receipt. The raw materials that goes out of the premises for partial processing are captured in this report. This report is generated when the user makes the IC shipment entry and Labour job Receipt entry through the Job work process. This report is to be maintained by Assesse who sends Raw Materials / Semi-Finished Goods.

New Stuff:  Incomplete Sales order detail report

To Print this report,

1. Perform Transactions required in Job Work Process Module
– I/C Shipment
– Labour Job Receipt
2. Go to M/E reports –> Manufacturing excise report –> “Annexure IV for Labour Job”

Please refer the below screenshot:

Manufacturing Excise report
3. Print the report by specifying appropriate parameter values.

Please refer below screenshot for Annexure IV Report:

Annexure IV

The printed report describes details about:
1. Description of Goods (Inputs)
2. Date of receipt of Processed Inputs. (Receipt date)
3. Quantity processed in /Units /Pieces (Quantity received after processing in Labour Job receipt)
4. Quantum of Waste Material Received Back (Displays the quantity in this column only if item is Scrap item)
5. Tariff classification number.
6. Quantity Removed. (Quantity of items shipped in I/C shipment)

Hence, this report provides detailed information about goods sent for Job work process.

Also Read,

1. Excise Invoice Report
2. Manufacturing and Sage 300 ERP
3. Transfer of Excise duties along with Inventory Transfer in Sage 300 ERP
4. Manufacturing and Subcontracting in Sage 300 ERP


Migrate Vendor Custom Fields from QuickBooks to Sage 300 ERP

$
0
0

GUMU™ for QuickBooks to Sage 300 ERP is a Sage certified Migration solution. Greytrix is a pioneer in providing Migration services at its Sage Migration Center and catering end-user business requirements.

We at Greytrix are focused to help the end –user in successfully implementing the new Sage 300 ERP system through our various successful migration and integration solutions.

New Stuff: Migrate Sales Person from Sage BusinessWorks to Sage 300 ERP

In this blog, we shall explore upon the migration of Vendor’s Custom fields from QuickBooks to Sage 300 ERP.

Let’s have a quick look at Vendor’s Custom field screen in QuickBooks.

Below is a screen shot of a Vendor screen in QuickBooks.

QB 1

Below is a screen shot of Vendor’s Custom Field in QuickBooks.

QB2 - Copy

To add a custom field in QuickBooks you can click on the Define Fields button seen in the above screenshot and add the custom field in the Setup custom Fields for Names screen shown below.

QB Custom Field Screen


After data migration to Sage 300 ERP, the converted Vendor and Vendor’s Custom Field will look as shown in the below screen shots.

Sage 300 1

Sage 300 2

After data migration from QuickBooks the field values of Vendor’s Custom field gets converted with the following mapping:

Mapping

In this way, Custom Fields from QuickBooks are migrated into target Sage 300 ERP company database. For more information on ERP data migration, drop us a mail at erpmig@greytrix.com

Also Read:

1) Migrate Item Masters from QuickBooks to Sage 300
2) Migrate Vendor from Sage BusinessWorks to Sage 300 ERP
3) Migrate Customer from Sage BusinessWorks to Sage 300
4)
Migration of purchase Payment from QuickBooks to Sage 300


Overridden TDS Amount Report in Tax deducted at source for Sage 300

$
0
0

Tax deducted at Source (TDS) is one of the ways to levy income tax under the various tax sections. As the name suggests, TDS is deducted from a person’s income at the source itself. The Greytrix TDS module for Sage 300 automatically calculates TDS amount on the document and deducts the TDS while the posting is done.  But if due to some reason, the user wants to calculate the different TDS amount on the particular document rather than automated calculated TDS amount, in such cases user should have provision to do so.

TDS module provides user to Override/change the TDS base amount so that he/she can calculate the TDS amount as per his/her requirement. We have provided Override TDS check box to do so. Once user checks the Override TDS, the TDS base amount control gets editable so that user can enter the value manually and can calculate the TDS amount refer the screen shot.

New Stuff:  Migrate Vendor Custom Fields from QuickBooks to Sage 300 ERP

overriden tds

So as per the above screen, the program will calculate TDS amount on 1200 rather than calculating on 1082.5.

Using this feature, a user can easily adjust the TDS amount for a particular vendor on the TDS payable documents, rather than creating the manual adjustment entries.

Also Read,
1. Maintain TDS accounts Location or Branch wise.
2. Manual TDS Posting in Greytrix TDS Module for Sage 300 ERP
3. TDS Screen popup blank for TDS Vendor
4. Financial Budgeting in Sage 300 ERP
5. Configure Reverse Charge Mechanism for Service Tax in Sage 300 ERP

Manufacturing Excise – Annexure V Report

$
0
0

Manufacturing Excise is an Add-on module for Sage 300 that helps users to manage the manufacturing process wherein the manufacturing company can easily process their transactions and maintain lots of reports. In our previous blog post, we had discussed about the Excise invoice report, which is a document of excise duty levied on the customer while issuing excisable goods. Going further in this blog we will discuss about the Annexure V report.

In manufacturing industry, processing of raw material and converted them it into the finished goods is regular process. So the manufacturer has to maintain the quantity of raw material received, quantity of finished goods manufactured, Waste / Scraped quantity, consumable Quantity and other relevant details. In our manufacturing excise module, we have developed Annexure V report which gives all the required data in single report. Please refer the below screen shot.

New Stuff: Overridden TDS Amount Report in Tax deducted at source for Sage 300

To print this report, navigate to,

Excise Module >> M/E Reports >> Manufacturing excise reports.

Please refer below screen shot for report output:

Annexure V

Hence, Annexure V is very useful report which provides details of the finished goods manufactured from raw material and has to maintain by manufacturer.

Also Read,
1. Manufacturing and Sage 300 ERP
2. Manufacturing Excise Process
3. Transfer of Excise duties along with Inventory Transfer in Sage 300 ERP
4. Why use Greytrix Trading Excise

Migrate Inventory On Hand Quantity from Sage BusinessWorks to Sage 300 ERP

$
0
0

GUMU™ for Sage BusinessWorks ERP to Sage 300 ERP is a Sage certified Migration solution. Greytrix provides Migration services at its Sage Migration Centre and fulfils the business requirements.

New Stuff: Migrating Item Notes from Sage PRO ERP to Sage 300 ERP

This blog is in continuation to our GUMU™ ERP Migration services. In our previous blog we discussed about Migrate your inventory to Sage 300 from Sage BusinessWorks. In this blog we will discuss about migration of Inventory On Hand Quantity from Sage BusinessWorks to Sage 300 ERP (Formerly known as Accpac) using GUMU.

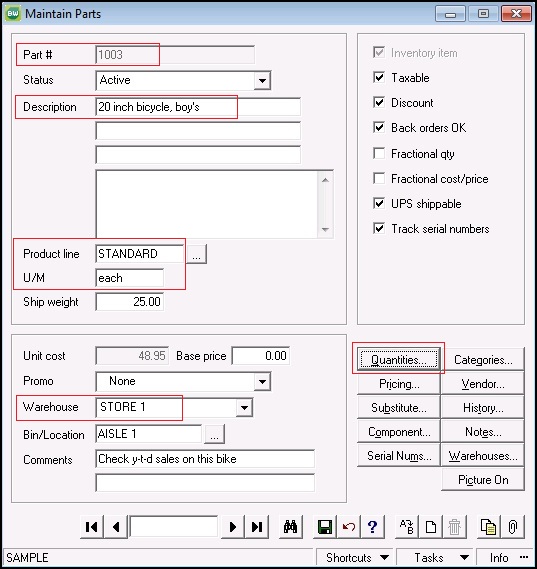
You can observe Items and their On Hand Quantity in Sage BusinessWorks from the following path –
Inventory –> Maintain Parts

BW_Item1

Click on Quantities button, to know On Hand Quantity of an item as per location as shown below.

BW_Onhand2

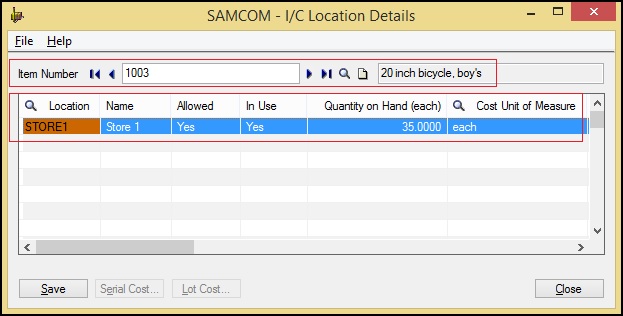
After migration from Sage BusinessWorks to Sage 300, you can check On Hand Quantity of Items in Sage 300 ERP as shown below.

And the path for Sage 300 ERP is:
Inventory Control –>I/C Item and Price Lists–>Location Details
Here you can observe Location wise On Hand Quantity of an Item as shown below.

Sage300_OHQ@Location

Terms for both Sage BusinessWorks and Sage 300 ERP:

Mapping

In this way, you can observe the Quantity On Hand of an Item of source ERP (i.e. Sage BusinessWorks ERP) and after conversion target ERP (Sage 300 ERP).

Also Read:
1) Migrate Vendor Notes from Sage PRO ERP to Sage 300 ERP
2) Migrate Ship to Address from Sage 50 CAD (Simply Accounting) to Sage 300 ERP
3) Migrate Open Sales Orders from Sage BusinessWorks to Sage 300 ERP
4) Migrate Vendor Notes from Sage BusinessWorks to Sage 300 ERP
5) Migrate Item Warehouses from Sage BusinessWorks ERP to Sage 300 ERP

2000 is just the beginning – Greytrix, with you always!

$
0
0

2000 followers is just the beginning. Thank you so much to our Greytrix LinkedIn Company Page followers who have believed in us and stayed with us since decades and have been sharing and liking our blog posts and solutions.

We may have grown in numbers but we are still your trusted and favourite one stop solution provider for all your needs be Sage ERPSage CRMSalesforceSAP Business One or any Custom requirements and have been upgrading to new technologies such as ecommerce, mobile and cloud so you are on pace with the latest technologies.

We are there at these places sharing the content you like.

Website

Greytrix is one stop solution provider for Sage ERP /Sage CRM and Salesforce needs. 

Sage and Salesforce Website Listings
* Sage Third Party Products – http://www.sagepss.com/Partner.aspx?AccountID=439
* Salesforce App Exchange – https://appexchange.salesforce.com/listingDetail?listingId=a0N30000000psM5EAI

Blog Subscription

Read our blog and Subscribe for information on Business and Industry trends. It also includes tips and tutorials which gear up and meet your daily challenges related to various system integration.

List of our Blogs with September Stats [No need to search for help anywhere else]

Sage X3 – http://www.greytrix.com/blogs/sagex3/ [562 posts]
Sage CRM – http://www.greytrix.com/blogs/sagecrm/ [1031 posts]
Sage 300 – http://www.greytrix.com/blogs/sageaccpacerp/ [937 posts]
Sage 100 – http://www.greytrix.com/blogs/sagemas/ [178 posts]
Salesforce.com – http://www.greytrix.com/blogs/salesforce/  [99 posts]

LinkedIn

We have 2000+ LinkedIn follower so far. Follow Greytrix to get news updates, Blog postings, announcements, and exclusive give-away in your LinkedIn news feed.

* LinkedIn Group – http://www.linkedin.com/groups/Greytrix-2222029
* LinkedIn Sage 100 – Sage CRM Showcase Page
https://www.linkedin.com/company/gumu-sage-100—sage-crm-integration
* LinkedIn Sage X3 – Sage CRM Showcase Page
https://www.linkedin.com/company/gumu-sage-erp-x3-integration-with-sage-crm
* LinkedIn Sage 500 – Sage CRM Showcase Page
https://www.linkedin.com/company/gumu-for-sage-crm—sage-500-erp-integration

Twitter

Follow Greytrix on Twitter and receive alerts related to Events, News, Announcements and published on the blog.

Facebook

Become Greytrix’s Facebook fan and get news, updates, announcements, and exclusive give-away in your Facebook News feed.

Google Plus

Add Greytrix to your Google+ Circle and Follow it to receive alerts related to Events, News, Announcements and published on the blog. You can also schedule hangouts with our consultants related to your queries.

YouTube Channel

Subscribe to Greytrix YouTube channel get the latest Marketing and Technical video and screen-casts on your YouTube homepage.

Let’s connect and Grow Together.

– Greytrix Family, with you always.

Setting default primary Ship to Location in Sage 300

$
0
0

Ship-to locations are the addresses to which customers wants you to send the goods that they have ordered. (Invoices and statements are sent to the address entered in the customer records). Accounts Receivable can keep an almost unlimited number of ship-to locations for your customers, and you can choose the address to use when you are entering the invoices or defining recurring-charge records. Each ship-to address can also specify the salespeople who share in transactions posted using the code for the ship-to address, and the percentage each salesperson receives.

You use the Ship-To Locations form to add shipping addresses for your customers. You assign a code to identify each address, then select the code during invoice entry to specify the address for the order and to display the shipping method, special instructions, and tax information assigned to the address.

Sage 300 ERP provides a Ship -To Locations form to add, edit and delete ship-to locations and to view the details of the existing ship-to locations, also to set Primary Ship-To Location that have been setup for a customer.

To view the screen, navigate to Accounts Receivable -> AR Customers -> Ship-To Locations. The screen looks like:

New Stuff: 2000 is just the beginning – Greytrix, with you always!

blog1

Select the Primary Ship-To Location as Yes then it will be used to designate a particular ship-to location as the primary ship-to location for a customer.

Accounts Receivable then uses the shipping information from this ship-to location record as the default entry when you set up a recurring charge record or create an invoice for the customer. Order Entry also uses these defaults when you process an order for the customer.

A new screen of AR ship to location will be opened up, tick the Primary Ship-To checkbox to set as Primary Ship-To. You can also see the primary Ship-to location in AR Customer Master Screen as shown below.

blog2

Also whenever the existing primary ship to location if exists ,and if we try to set multiple ship to location as primary Ship-To then it show the warning message  as show below as will override with the new ship-To location. In short only one ship to location can be set as primary ship location.

blog3

The Ship-To Location cannot be set as Inactive or deleted if it is used in any un-posted transaction. Once the Ship-To Location is set as Inactive, it cannot be used while adding an Invoice and we must also ensure that the Primary Ship-To checkbox should be un-ticked.

Also Read:
1.Update Bill-To-Address and Ship-To Address on OE Order Entry Screen
2.Shipping Labels in Sage 300 ERP
3.Enhanced features in Greytrix Drop Shipment for Sage 300 ERP Version 2014
4.Default settings for Receipts in Account Receivable in Sage 300 ERP
5.Customer Credit Limit in Sage 300 ERP


Augmenting Bills of Material

$
0
0

Manufacturing and Assembling industry relies on Bills of Material to track and maintain BOM items along with Raw material. Sage 300 provide efficient feature of Bills of Material in the Inventory control module. Using this feature user can setup their BOM which is used in Assembling /disassembling creation.

In the Assembling industry e.g. Computer Assembling, Here while assembling a Computer user selects various parts in the BOM such as RAM, CHIPSET, GRAPHICS CARD, MONITOR, KEYBOARD, MOUSE etc. at the time of setting the BOM in Sage 300 ERP there would be a requirement form where we need to specifying the specification of the parts used in the BOM such as Size of RAM, Chipset numbers, Graphic card size, Power consumption details for Monitor, Keyboard, Mouse etc. To store such additional details while creating the BOM in Sage 300 ERP we have a useful component called Custom fields in BOM.

Standard BOM does not have the feature to specify optional fields in header and in detail BOM section. So that you can specify the additional supporting information related to the Components used in the BOM. To overcome this we have augmented standard Bills of Material details where we have provided 10 additional reference fields of 255 characters each. Here user can specify additional details which are required to support the component present in the BOM.

We have added these additional fields using standard Sage 300 SDK in business layer which makes them easy to integrate with standard BOM. These fields being added at the business layers makes it feasible to load and dump using the standard Sage 300 feature. Also user can use these fields for printing on the report where in the BOM components are printed.

So by using this component you can supplement your Bills of material with additional feature to store informative fields.

About Us:

Greytrix is one stop solution provider for Sage ERP and Sage CRM needs. We provide complete end-to-end assistance for your technical consultations, product customizations, data migration, system integrations, third party add-on development and implementation expertise.

Greytrix have some unique solutions of Sage 300’s integration with Sage CRM, Salesforce.com and Magento eCommerce. It also offers best-in-class Sage 300 customization and development services to Sage business partners, end users, and Sage PSG worldwide.

For more details on the component, please contact us at accpac@greytrix.com . We will be glad to assist you.

Migrating Ship-Via Codes from Sage Business Vision to Sage 300 ERP

$
0
0

GUMUTM for Sage Business Vision ERP to Sage 300 ERP is a Sage certified Migration solution. Greytrix is a pioneer in providing Migration services at its Sage Migration Centre and catering end-users business requirements.

We at Greytrix help the end-user in implementing new Sage 300 ERP system through our various successful migration and integration solutions.

In this blog we will discuss about how GUMU TM migrates Ship-Via codes from Sage Business Vision ERP to Sage 300 ERP (Formerly known as Accpac).

New Stuff: Migrate Vendor Custom Fields from QuickBooks to Sage 300 ERP

We can create ship via codes for order entry and purchase orders from the following path in Sage Business Vision.
Sage Business Vision → Edit → Ship Via

Ship_Via_BVL

The above screen shot shows an existing ship via code in Sage Business Vision

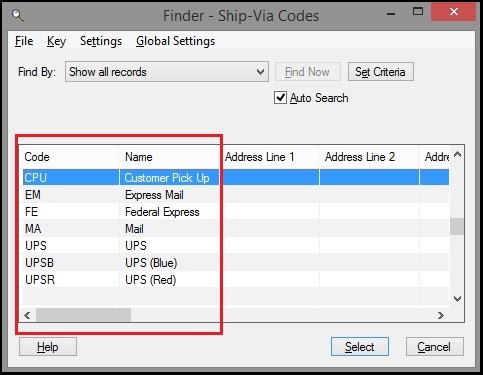
You can create Ship-Via codes maximum 6 characters long for order entry from the following path in Sage 300 ERP,
Sage 300 → Order Entry → O/E Setup → Ship-Via Codes

OE_Ship_Via_List

You can create Ship-Via codes maximum 6 characters long for Purchase Orders from the following path in Sage 300 ERP,
Sage 300 → Purchase Orders → P/O Setup → Ship-Via Codes

PO_Ship_Via_List

The above screenshots shows the converted Ship Via codes in Sage 300 ERP

Mapping

In this way, Sage Business Vision Ship-Via codes are migrated into target Sage 300 ERP company database. For more information on ERP data migration, drop us a mail at erpmig@greytrix.com

Also Read:
1) Migrating Items from Sage Business Vision to Sage 300 ERP.
2) Migrate Open Sales Order From Sage Business Vision to Sage 300 ERP.
3) Migrate Sales Department Code from Sage Business Vision to Sage 300 ERP.
4) Migrate Remit-To-Address from Sage Business Vision to Sage 300 ERP.
5) Migrate Sales Person from Sage Business Vision to Sage 300 ERP.


Migrating Ship-Via Codes from Sage BusinessWorks to Sage 300 ERP

$
0
0

GUMUfor Sage BusinessWorks to Sage 300 ERP is a Sage certified Migration solution. Greytrix is a pioneer in providing migration services at its Sage Migration Centre and catering end-user business requirements. We at Greytrix are focused to help the end user in successfully implementing the new Sage 300 ERP system through our various successful migration and integration solutions.

We provide data Migration Services from Sage BusinessWorks to Sage 300 ERP (formerly known as Sage Accpac) at our Sage Migration Centre. Our GUMU™ migration utility is compatible to convert all Master and Open transactions along with Sales, Purchase and GL historical data from Sage BusinessWorks to Sage 300 ERP.

New Stuff: Migrate Inventory On Hand Quantity from Sage BusinessWorks to Sage 300 ERP

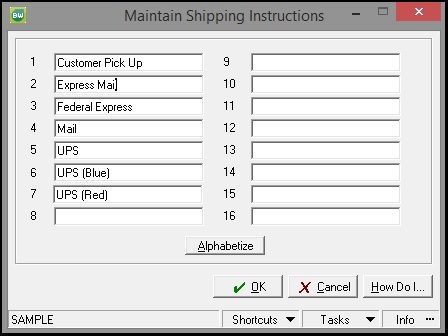
You can find Ship-Via code Shipping Instructions of the Sage BusinessWorks. Navigate through the below link to check the Ship-Via code presents in Sage BusinessWorks.

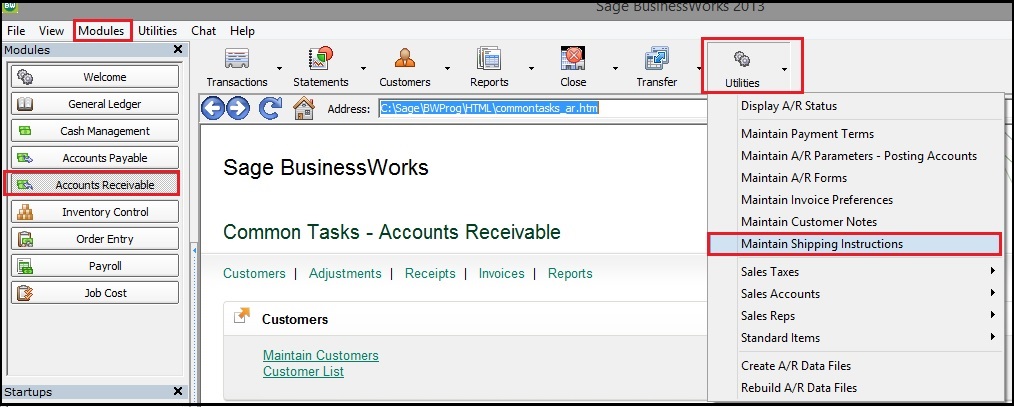
Modules – > Account Receivable -> Utilities – > Maintain Shipping Instructions (check below image)

BW 2
Below is the screenshot of the Ship-Via code in Sage BusinessWorks ERP.

BW1
After the conversion, the data is converted as below in Sage 300 ERP.

Navigate through the below link to check the Ship-Via code from Sage 300.

Order Entry -> OE Setup – > Ship-Via Codes

Below is the screenshot of the converted Ship-Via codes in Sage 300 ERP.

Sage 300 1After data migration from Sage BusinessWorks the field values of Sage BusinessWorks Ship-Via code get converted with the following mapping.

Sage 300 2
In this way, Sage BusinessWorks Ship-Via codes are migrated into target Sage 300 ERP Company’s database. For more information on ERP data migration, drop us mail at erpmig@greytrix.com

Also Read:
1) Migrate Open Sales Orders from Sage BusinessWorks to Sage 300 ERP.
2) Migrate Vendor Notes from Sage BusinessWorks to Sage 300 ERP.
3) Migrate Item Warehouses from Sage BusinessWorks ERP to Sage 300 ERP.
4) Migrate Remit-To-Address from Sage BusinessWorks to Sage 300 ERP

Migrate AR Payments from Sage BusinessWorks ERP to Sage 300 ERP

$
0
0

GUMU™ for Sage BusinessWorks ERP to Sage 300 ERP is a Sage certified Migration solution. Greytrix provides Migration services at its Sage Migration Centre and fulfils the business requirements.

We provide data Migration Services from Sage BusinessWorks to Sage 300 ERP (formerly known as Sage Accpac) at our Sage Migration Center. Our GUMU™ migration utility is compatible to convert all Master and Open transactions along with Open Sales, Open Purchase and GL historical data from Sage BusinessWorks to Sage 300 ERP.

New Stuff: Migrate Inventory On Hand Quantity from Sage BusinessWorks to Sage 300 ERP

Let’s see how Sales Payment Transactions are migrated from Sage BusinessWorks to Sage 300 ERP. We have created an invoice in Sage BusinessWorks with few Inventory Type Items and made payment for the same. As a result, AR payment gets created in Sage BusinessWorks with the Applied Invoice number and amount to it. In below screenshots, you can review Invoice details and Payment details. The path to view Invoice details and Payment details of a customer in Sage BusinessWorks –
Sage BusinessWorks -> Customer Inquiry ->Transactions button.

BW_cust_

Screenshot for Invoice details in Sage BusinessWorks:

BW_invoicedetails

Screenshot for the payment transaction details against above invoice number in Sage BusinessWorks:

BW_payment_details

After the data migration in Sage 300 ERP, follow the below given path to check the migrated Payment transaction entry of a customer in Sage 300 ERP-
Accounts Receivable -> AR Transaction -> Receipt Batch list and check for payment entry.

Sage300_BW1

After data migration from sage BusinessWorks, the field values of AR Payment gets migrated with the following mapping.

Mapping

In this way, Sage BusinessWorks payment is migrated into target Sage 300 ERP company database. For more information on ERP data migration, drop us a mail at erpmig@greytrix.com.

Also Read:
1) Migrate price list from Sage BusinessWorks to Sage 300 ERP
2) Migrate Ship to Address from Sage Business Vision to Sage 300 ERP
3) Migrate Banks from Sage Business Vision to Sage 300 ERP
4) Migrate A/P Payment Terms from Sage BusinessWorks to Sage 300 ERP
5) Migrating Item Pricing From Sage Pro ERP To Sage 300 ERP

Migrating Open Purchase Order from Sage BusinessWorks to Sage 300 ERP.

$
0
0

GUMU™ for Sage BusinessWorks ERP to Sage 300 ERP is a Sage certified Migration solution. Greytrix is a pioneer in providing Migration services at its Sage Migration Centre and catering end-users business requirements.

We at Greytrix help the end –user in implementing new Sage 300 ERP system through our various successful migration and integration solutions.

New Stuff: Migrating Ship-Via Codes from Sage BusinessWorks to Sage 300 ERP

In this blog, we will discuss about how Sage BusinessWorks Open Purchase Orders are migrated to Sage 300 ERP (Formerly known as Accpac) using GUMU™.

What is Open Purchase Order?

If any Purchase Order raised on Vendor and the goods / material is not supplied or partially supplied then this Purchase order considers as Open Purchase Order.

BW1
As you can view in the above screenshot, the open PO number 2115 has 3 line items with a total cost of 270.00.

Navigate through the below link to check the Purchase Orders present in Sage BusinessWorks.

Modules – > Inventory Control -> Maintain Purchase Order

Below is a screenshot of the converted Sage 300 data.Sage 300 1
The above screenshot shows, the converted PO in Sage 300 ERP with the same number of line items and total amount as in Sage BusinessWorks.

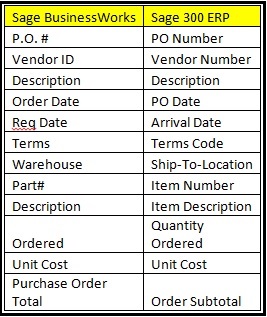
Note: The master’s codes (i.e. Ship-To-Location, Terms Code, Item Number) displayed in above screenshots are mapped during migration.

After data migration from Sage BusinessWorks the field values of Sage BusinessWorks Purchase Order get converted with the following mapping:

Mapping
In this way, Sage BusinessWorks Open Purchase Orders are migrated into target Sage 300 ERP company database. For more information on ERP data migration, drop us a mail at erpmig@greytrix.com

Also Read:
1) Migrate Open Sales Orders from Sage BusinessWorks to Sage 300 ERP.
2) Migrate Vendor Notes from Sage BusinessWorks to Sage 300 ERP.
3) Migrate Item Warehouses from Sage BusinessWorks ERP to Sage 300 ERP.
4) Migrate Remit-To-Address from Sage BusinessWorks to Sage 300 ERP

Overridden TDS Amount Report in Tax Deducted at Source for Sage 300.

$
0
0

In our last blog post we discussed how to override the TDS amount in Tax Deducted at Source wherein, the user could change the TDS amount as per the requirement. Now it is also important for the users to know, how many and which are the documents those he/she has changed, what was the actual calculated TDS amount by override TDS feature. So under the TDS report in TDS module we have provided Overridden TDS amount report which shows the required data.

In Exception report, we need to pass the parameter value in Ignore difference in TDS Amount up to and report will show the entries which have override TDS amount with document number.

Exception Report

New Stuff: Migrating Open Purchase Order from Sage BusinessWorks to Sage 300 ERP.

Please refer the below screen shot for the report output.

Snap Report

The report shows the list of all the TDS documents for which the TDS has been deducted and override/change the TDS amount by the user. The report output will have, party code and name along with the document number, voucher amount (calculated TDS amount) and TDS amount which is actual TDS amount deducted on the document.

Hence this report gives user to know the list of documents for which users have deducted the TDS amount more or less than the actual calculated amount.

Also Read:
1. Maintain TDS accounts Location or Branch wise
2. Manual TDS Posting in Greytrix TDS Module for Sage 300 ERP
3. TDS Screen popup blank for TDS Vendor
4. Financial Budgeting in Sage 300 ERP
5. Configure Reverse Charge Mechanism for Service Tax in Sage 300 ERP

Migrate Open Sales Orders from QuickBooks to Sage 300 ERP

$
0
0

GUMU TM for QuickBooks to Sage 300 ERP is a Sage certified Migration solution. Greytrix is a pioneer in providing Migration services at its Sage Migration Centre and catering end-users business requirements.

We at Greytrix help the end –user in implementing new Sage 300 ERP system through our various successful migration and integration solutions.

In this blog we will discuss about how QuickBooks Open Sales Orders are migrated to Sage 300 ERP (Formerly known as Accpac) using GUMUTM.

New Stuff: Migrate Vendor Custom Fields from QuickBooks to Sage 300 ERP

Below is a screenshot of an open sales order in QuickBooks

QuickBooks–> Order Entry –> Maintain Sales Orders

QB 1

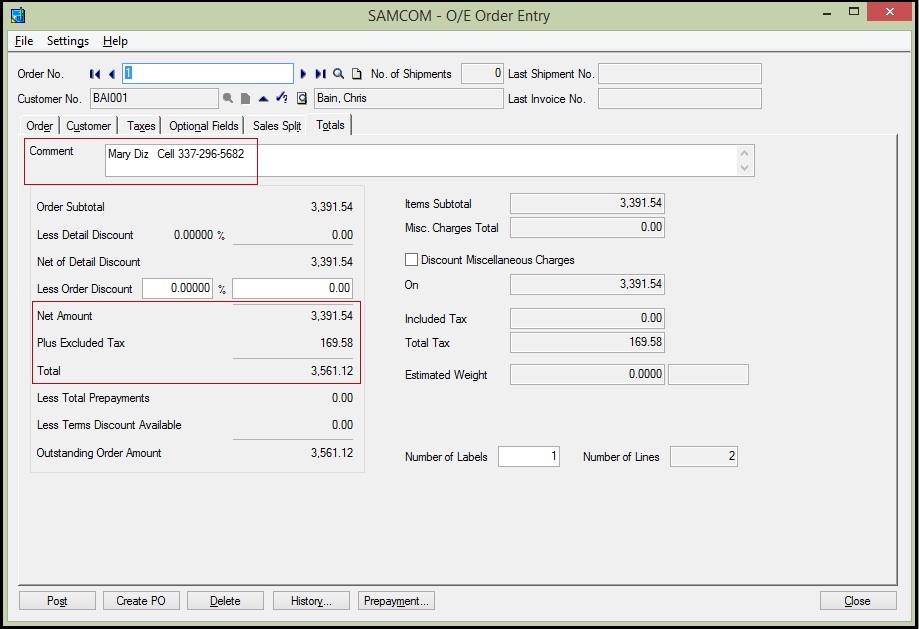
In the above order there are 2 items ordered and the total amount is 3561.12 including tax.

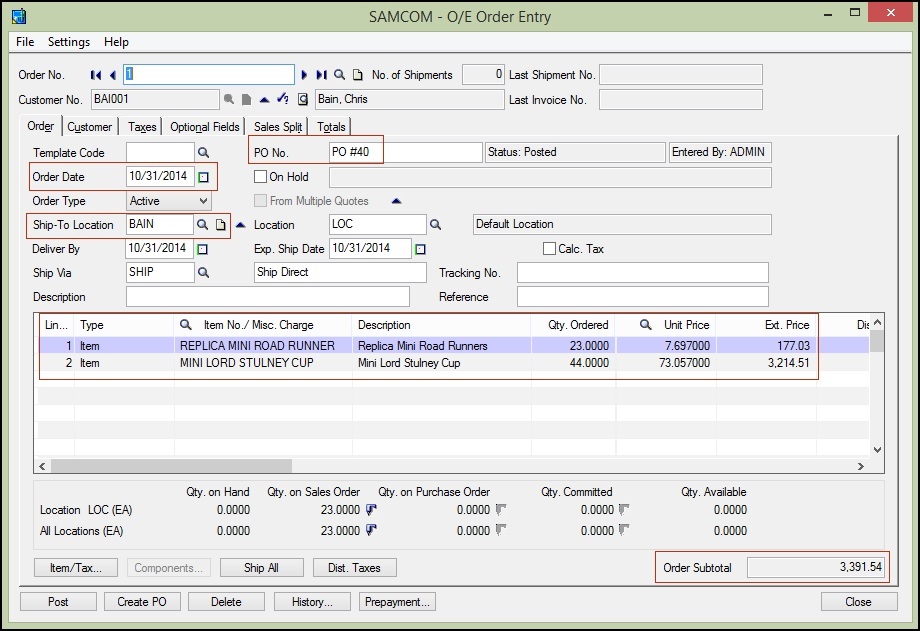
After migration of QuickBooks data, the data is converted as below in Sage 300 ERP.

Below is a screenshot of the converted open sales order in Sage 300 ERP

Sage 300 ERP –> Order Entry –> O/E Transactions –> Order Entry

Sage 300 1
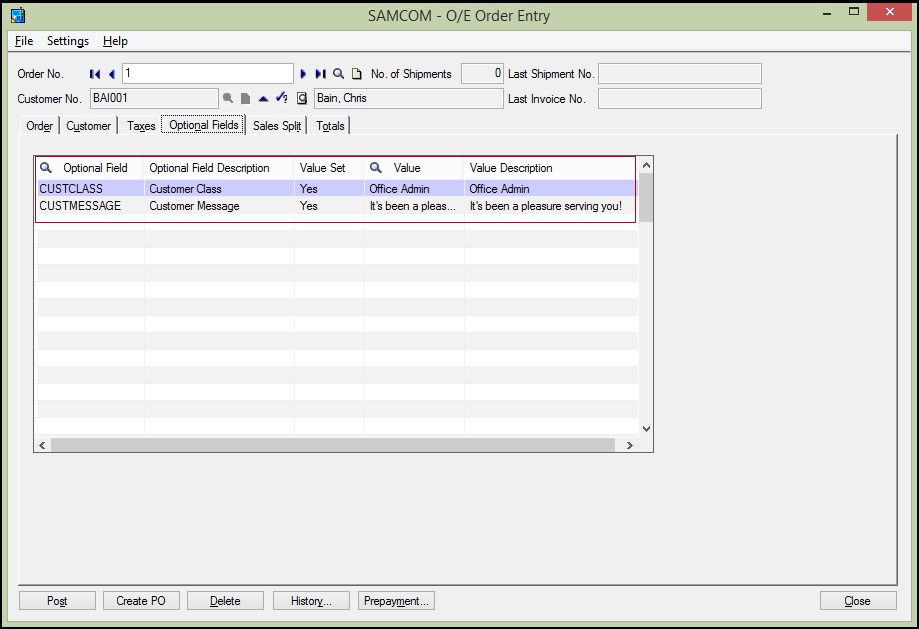
The Customer Class and Customer Message field in QuickBooks are converted as optional fields in Sage 300 ERP.

Sage 300 2

Sage 300 3

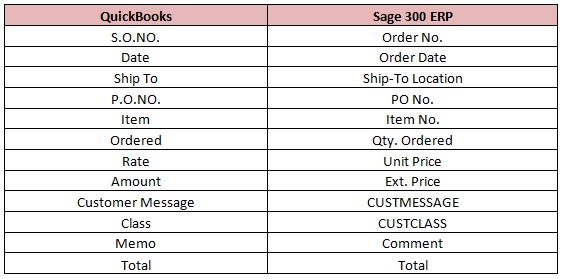
After data migration from QuickBooks the field values of QuickBooks Sales Order get converted with the following mapping:

Mapping

In this way, QuickBooks Open Sales Orders are migrated into target Sage 300 ERP company database. For more information on ERP data migration, drop us a mail at erpmig@greytrix.com

Also Read:
1) Migrate Open Sales Orders from Sage BusinessWorks to Sage 300 ERP
2) Migrate Vendor Custom Fields from QuickBooks to Sage 300 ERP
3) Migrate Vendor Masters from QuickBooks to Sage 300 ERP
4) Migrate Sales Invoices from QuickBooks to Sage 300 ERP
5) Migrate AR Payments from QuickBooks to Sage 300 ERP

Viewing all 1475 articles
Browse latest View live


<script src="https://jsc.adskeeper.com/r/s/rssing.com.1596347.js" async> </script>