Quantcast
Channel: Sage 300 ERP – Tips, Tricks and Components
Viewing all 1489 articles
Browse latest View live

How to send Emails from OE invoice to customer via Sage 300 ERP

$
0
0

Normally most of the company follow the practices of providing customer invoice via courier, hard copy & manually exporting the invoice and then send it to customers.

 But In today’s fast growing world we are still using this time taking task wherein we have the option to send emails to customers directly from sage 300 Erp.

New Stuff: Use of “Shortcut Folders” into SAGE 300 ERP

Following are the steps to configure the same:-

  1. Update email id of a customer in contact tab or Address tab of a customer.Regional setting2. Set up Delivery method of a customer. If you want to use the Contact’s Email id entered in Contact tab then you have to select the Delivery method as Contact’s Email whereas to use the id mentioned in   Address tab you have to select E-mail as shown below.

Regional setting3.    Even we can setup an Email Template to define the Subject Line and Body of an Email that you want to    send to your customer.

Regional setting

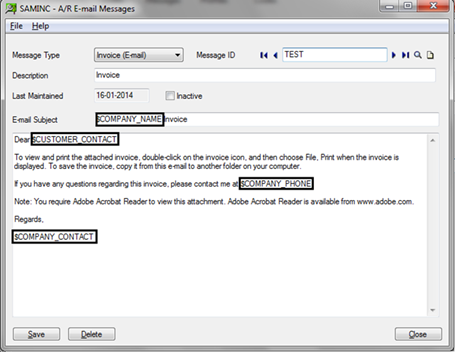
In addition to email variables that we have taken in the above example we can use more variables available in sage 300 ERP help file which we can get by pressing F1.

4.Create an OE invoice (customer invoice) click on post once posting is completed we will get a message to print the Invoice Yes/No & if we want to send an email to customer directly from this screen then after clicking on yes we will get a screen as shown below where we can select the delivery method as Customer.

Regional setting

And when we click on yes then the below screen will appear and will ask to click on send or do not send option

And once we click on send then with the help of customer master where we have updated the email id the system will send an email to customer id as shown below.

Regional setting

Also Read:
1. E-mailing Sage Intelligence reports
2. Send Email to Vendor via Sage 300 ERP
3. How to send Emails from Sage 300 ERP
4. Email Standard Order Entry Invoice Report in PDF or RTF Format
5. Order Entry Transaction flow in Sage 300 ERP


Migrate Customer Notes (Memos) and Comments from Sage Business Works to Sage 300 ERP

$
0
0

GUMUTM for Sage BusinessWorks to Sage 300 ERP is a Sage certified Migration solution. Greytrix is a pioneer in providing Migration services at its Sage Migration Centre and catering end-users business requirements. Our GUMU™ migration utility is compatible to convert all Masters and Open transactions from Sage BusinessWorks to Sage 300 ERP.

We at Greytrix help the end – user in implementing new Sage 300 ERP system through our various successful migration and integration solutions.

In this blog we will discuss about how GUMU TM migrates Customer Notes (Memos) and Comments from Sage BusinessWorks to Sage 300 ERP (Formerly known as Accpac).

New Stuff: Migrate Customer Memos (Notes) from Sage Pro ERP to Sage 300 ERP

Sage BusinessWorks provides a total of 26 user-definable information fields with generous field lengths and support for Notes (Memos) and Comments fields.

You can view Customer Notes and Comments in Sage BusinessWorks from the following path -
Sage BusinessWorks –> Accounts Receivable –> Customers –> Maintain Customers

BV1
See highlighted Notes (Memos) and Comments in the above screenshot from Sage BusinessWorks.

In Sage 300 ERP the Notes and Comments are converted by GUMU as follows:
Sage 300 ERP–> Accounts Receivable –> A/R Customers –> Customers

BW2

See highlighted in the above screenshot, the Notes (Memos) and Comments are converted in Customer master’s comment screen as Notes in Sage 300 ERP.

In this way, Sage BusinessWorks Customer Memos are migrated into target Sage 300 ERP company database. For more information on ERP data migration, drop us a mail at erpmig@greytrix.com

Also Read:
1) Migration of GL Accounts from Sage Business Works to Sasge 300 ERP
2) Migrate Banks from Sage BusinessWorks to Sage 300 ERP
3) Migrate Vendor from Sage BusinessWorks to Sage 300 ERP
4) Migrate Customer from Sage BusinessWorks to Sage 300 ERP
5) Migrate your inventory to Sage 300 from Sage BusinessWorks

Migrate Open Sales Orders from Sage PRO ERP to Sage 300 ERP

$
0
0

GUMU TM for Sage PRO ERP to Sage 300 ERP is a Sage certified Migration solution. Greytrix is a pioneer in providing Migration services at its Sage Migration Centre and catering end-users business requirements.

We at Greytrix help the end –user in implementing new Sage 300 ERP system through our various successful migration and integration solutions.

In this blog we will discuss about how Sage PRO Open Sales Orders are migrated to Sage 300 ERP (Formerly known as Accpac) using GUMU TM.

New Stuff: Migrate Customer Memos (Notes) from Sage Pro ERP to Sage 300 ERP

Below is a screenshot of an open sales order in Sage PRO ERP

Pro IMG1


Pro IMG3

After the conversion, the data is converted as below in Sage 300 ERP.

Below is a screenshot of the converted open sales order in Sage 300 ERP

AC 1
ac 6
AC2

AC 3

AC 4
ac 5
After data migration from Sage PRO the field values of Sage PRO Sales Order get converted with the following mapping:

Mapping

In this way, Sage PRO Open Sales Orders are migrated into target Sage 300 ERP company database. For more information on ERP data migration, drop us a mail at erpmig@greytrix.com.

Also Read:

1) Migrate Sales Order from Sage 50 (US) to Sage 300 ERP
2) Migrate Sales Person from Sage 50 (CAD) to Sage 300 ERP
3Migrate Items from Sage 50 (CAD) to Sage 300 ERP
4) Migrate GL Accounts Transactions from Sage 50 US to Sage 300 ERP
5) Migrate Purchase Orders from Sage 50 (US) to Sage 300 ERP

AR Invoice Report

$
0
0

Accounts receivable is short-term amounts due from customers to a seller who have ordered goods or services from him. Accounts receivable is listed as a current asset on the seller’s balance sheet.

In sage 300 ERP, the end user can view all the transactions like invoice, credit note or debit note in a single report (AR Customer Transaction Report). We have developed a similar report AR Invoice Report which gives you additional information about invoice-credit-debit and the receipts/adjustments applied against them.

Also Read: Confirmation message in IC Transactions

Our custom report is quite similar to the standard report but it gives additional information like taxes applied on transaction, currency code of document, document total in both functional and customer currency, batch and entry number, GL Posting sequence and GL Batch and Entry number and mainly it gives a list of all the receipts / adjustments that applies against the invoices and credit-debit note selected in the given filter criteria.

It also provides detailed information like receipts/adjustments number, amount, document date, and the GL Account that hits during receipts/ adjustments entry.

We have provided from and To Document Date as filtering option as shown in below image:

AR Invoice UI


After printing report, the format of report will be as follows:

AR Invoice Report

This report is useful to get the invoices-credit-debit against which yet receipt is not generated.

Also Read:

1. Delete Inactive Records in Account Receivable

2. Terms Code feature in Account receivable in Sage 300 ERP

3. Default settings for Receipts in Account Receivable in Sage 300 ERP

4. Clear Sales History from Account Receivable Module in Sage 300 ERP

5. Account Receivable Transaction Reports in Sage 300 ERP

Greytrix at TPAC 2015 Canada – Sage 300 ERP Growing Bigger

$
0
0

Its been quite an exciting journey for our team first at Sage South Africa Insights and recently at Sage CRM Bootcamp in Ireland. We now move on to TPAC Ontario, Canada from March 15-18, 2015 and what better place can it be, yes its near the beautiful Niagara Falls.

In its 13th Year TPAC has continued to be an important event (Top Reasons to Exhibit) for Sage Development Partners like us showcasing third party add-ons for Sage 300 ERP and Sage CRM to a focused audience. Whether you need a vertical solution, an add-on, a specialized service or customization you will see everything there is available all at one show. The session and networking on a one to one makes this a valuable conference everytime.

This is our third continuous year where we will be participating with a full profile of our 20+ Sage 300 ERP Add-ons, fixed cost migrations to Sage 300 ERP and Sage CRM Integrations. Visit us at Booth number 4 to learn more about our offerings.

Imp LinksEvent Website | Exhibitor Registration | Delegate Registration | Exhibitors
Do Drop by at our booth  # 4 – Lets grow bigger!Download our Consolidated Add-ons Brochure

TPAC Blog

With a wide variety of Sage 300 ERP Add-ons and Migrations and our well known Sage CRM Integrations, we at Greytrix will be making our presence felt at the event.

GreyMatrix Apparel solution for Sage 300 ERP, Greytrix Document Numbering for Sage 300 ERP,  Greytrix Doc Attach for Sage 300 ERP and Ecommerce Magento Integration with Sage 300 ERP are just a few of our 20+ Add-ons that we will be showcasing at the event. You can download our consolidated brochure of all our add-ons from here

During the event, we will also showcase our fixed cost Sage 300 ERP migrations which include,

We have always been at the forefront when it comes to Sage ERP Integrations with Sage CRM. Some of our well known Sage CRM – Sage ERP Integrations are as follows,

Apart from our Sage 300 Add-on and Migration solutions, we have also been working on all sorts of Sage 300 development work specializing in SDK Development, developing and modifying Crystal reports etc. for more than 12 years now. We also work with many Third Party vendors to upgrade and maintain their solutions. With a team of experienced professionals, we are well equipped to handle any customization requirements that you might have for Sage 300 ERP.

With focused events like TPAC showcasing a wide range of third party Add-ons for Sage 300 ERP and a large audience, the future of Sage 300 ERP surely looks bright.

Let’s connect and grow bigger!!

Why use Auto BR

$
0
0

Auto BR add-on is developed for users who get bank statement in .CSV file format. Auto BR is seamlessly integrated with sage 300 ERP.

Previously users had to manually verify the data to process reconcile of Accounts Payable/Accounts Receivable checks and bank statements, which was a tedious and a redundant task. Sage 300 ERP has an option of bank reconciliation for OFX statements, but still this option is not suitable for those users who receive bank statements in the CSV format. Working of Auto BR is simple and easy

New Stuff: AR Invoice Report

So we come up with the Auto bank reconciliation module for Sage 300 ERP, for the user who receives bank statement in CSV format. Auto BR module reads data from CSV statements and updates it in Sage 300 ERP, and then reconcile it from Bank module.

User can also set the review mapping structure so that it can work flexibly with the .csv file formats provided by bank.

Auto BR allows user to automatically reconcile bank statements with less efforts and saves lots of time. This also reduces the human error that can be made. Automatic reconciliation makes it simple, easy and process becomes fast. Allows viewing report which is provided by standard Sage 300 ERP.

Feature List:

Maintain Information:

• Greytrix Auto BR is a powerful, self-audit add-on that reconciles bank statements with actual checks and deposits.
• With this add-on, business owners or managers can cross-reference their business transactions with bank statements to make sure all records are clean and up-to-date.
• It also has the ability to process hundreds of transactions in a timely fashion, flag missing Checks.

Transact with Auto BR:

• The above screen allows the user to select the Bank and the statement file of the respective bank.
• Any mismatched data for Check Numbers and Transaction Numbers can be seen in withdrawals tab.
• Reconcile Status will get cleared for Matched check Number and Transaction Number.
• At the end, all transactions are listed along with the reconciliation status.

Print Auto BR Reports:

• After the reconciliation process, users can view the transactions which were previously not reconciled by the add-on and the cause of reconciliation failure.

Also Read:

1. Auto Bank Reconciliation in Sage 300 ERP
2. Working of Auto Bank Reconciliation in Sage 300 ERP
3. Clearing Deposit one by one in Bank Reconciliation
4. Create Bank Entry from Reconciliation Screen

Why use C Form

$
0
0

C Form is issued by VAT department to the registered dealer who makes interstate purchases of those goods which are mentioned in his RC (registration certificate). While doing transaction purchasing, the dealer furnishes this form to selling dealer in course of interstate purchase to get exemption/reduction in sales tax rate. It is defined under section 8(1) of CST act 1956.

New Stuff: Why use Auto BR

C Form

User can change the form type to C, F, and H and enter and change for number whenever needed making it flexible for user to work. This can be maintained for Account Receivable and Account Payable.

Feature List for C Form:

Maintain Information:

• Form applicable or not for the Customer/Vendor.
• Name of the Form received.
• Form Number for each Invoice.

Transact with Statutory Form for Customers and Vendors:

• Receive the Statutory forms, from Customers or Vendors for the particular Invoices in the date range given by the user.

Print Statutory Form Reports:

• The reporting provides flexible filtrations options of Customer/Supplier No, From and To Invoice dates before printing the information.

Also Read:

1. Statutory Form for Sage Accpac v6.0 ERP
2. New Feature in Statutory form
3. Statutory and Excise Module-Configuration-I
4. Statutory & Excise Module-Configuration-2

Mailing A/R Aged Trial Balance IN SAGE 300 ERP

$
0
0

While an option of emailing some forms and statements having small email messages directly to the customers / Vendors is provided in Sage 300 ERP, the emailing of A/R Aging reports directly to the customers is not provided in the Sage 300 ERP.

One of our clients’ recently had the same requirement i.e. the emailing of A/R Aging reports directly to the customers. To facilitate this, we have customized the UI of Aged trial balance to send the emails directly to the customers.

New Stuff: AR Invoice Report

The following screen shot provides the standard UI of Aged Trial Balance:

AR Aged Trial

Sage 300 ERP provides an accounts receivable aging report. An A/R Aging report is by default categorized into the sections as: “Current, 30 days, 60 days, 90 days, over 90 days”. The user defined parameters are also provided in the standard rpt.

While printing the AR Aging Report, it shows the data in various ranges as selected by users.
The important thing which is to be noted here is that how one can send the same mail to the various customers? So, for this only we have create a program & with the help of this, a separate mail to its corresponding customer will be sent.

In our customization, we have replaced the button Print with the button Print/Email as shown in the following screens shot.

AR Aged Print

When a user clicks on the button Print/Email. The following screen appears:

PrintEmail

When a user clicks on Print button the A/R Aging Report gets printed same as the standard report while the user clicks on Send Mail button, the program will send the mail to the selected customer separately. For sending Email the user has to define customer parameter which is mandatory.

If the customer is not defined by user, a validation message will appear which is shown as follows:

SelectCustomerMsgbox

Functionality:
1. During sending the mail, our program reads the user defined parameter from “From customer” to “To customer”. Then it picks one by on customer as from “From customer” to “To customer” and executes the AR Aging internally to send the email to selected customer.
2. The user has to make optional fields using Customer Code, and in that optional field the user has to define the email id of each person to which the mail needs to be sent. For example if the user wants to send the mail to “Bargain Mart – San Diego” with customer code “1100”, the user has to make an optional field “1100” in which they have to enter the email id as value as shown in the following screen shot.

OptionalField

3. The program will read the optional field value and send mail to those email id which are provided in the optional field “1100” and sent mail contains attached pdf file as A/R Aged trial balance report.

Thus, we have seen how our customization is helpful in sending A/R Aged trial balance report to its corresponding customers in the form of pdf file attached along with the mail.

Also Read:

1. How to send Emails from Sage 300 ERP

2. Barcode Scanner and Greytrix Products

3. Printing Non-invoiced and Partially invoiced Reports

4. Quarantine Release in Sage 300 ERP.

5. AR Option-Deposit Slips


Project Status in Sage 300 ERP

$
0
0

Your superior has asked you to take the lead of a project in your company. Maybe you are a leading the project, maybe you are the project manager or not. One thing is certain, very few people know how to report status on a project, even when they are expert project managers. The basic problem? Most people do not understand the perspective of a manager who is being pressed for information about a big project. There are some basic rules of reporting status that you can use to further your reputation as someone who knows how to keep management and the project team informed and drive a project to success.

New Stuff: Mailing A/R Aged Trial Balance IN SAGE 300 ERP

Project and Job costing module of sage 300 ERP provides you facilities to developing plans, providing estimations, allocate resource to project and task, billing and analysis of Projects. You can easily track out project wise status in PJC module.

Regional setting

Following are the details of Project status.

1. Estimation: This is the default status for new projects you add to a contract. Estimate status lets you assign categories and resources to the project, and enter revenue and cost estimates. Once you open a project for transactions.
2. Approved: This status indicates that the project has been approved, but it does not permit you to record transactions.
3. Open: Status permits you to record transactions for the selected project.
4. On Hold: This status prompts a warning, when you process a transaction that includes the project, where the project is on hold. You would use this status, for example, if some aspect of the project is in dispute.
5. Inactive: This status prevents you from posting cost transactions to or altering a project.
6. Completed: This status is used to indicate that all work on a project is finished, prior to closing the project.
7. Closed: This status means that all the work on the project is finished, and that you have recognized all revenues, and processed all billings, receipts, and closing accounting entries.

Also Read:
1. Project wise Costing Analysis in Sage 300 ERP
2. Project/Contract Maintenance in Sage 300 ERP
3. Default accounting methods of PJC
4. Project Invoicing Feature in Sage 300 ERP

Optional Fields in Sage 300 ERP

$
0
0

Many organizations wish to capture expenses location wise, department wise, or in a combination of fields

One of the best way is to incorporate these parameter in general Ledger charts of accounts by creating them as a segment in General Ledger. But, this will increase the size of charts of accounts.

If organization does not wish to increase the charts of accounts then another way is to create an optional field and capture the expenses at the time of expenses booking. Also link the optional field in all the COA in Trans. Optional fields tab for which you wish to capture the expenses as shown in the below screen shot.

New Stuff: Project Status in Sage 300 ERP

Regional setting

But it has been observed that when we apply an invoice to a particular credit note via AP Invoice credit note screen and if there is a difference in the exchange rate then as per accounting functionality the difference amount is debited to exchange loss account or credited to exchange gain account depending upon the exchange rate fluctuation.

Let us understand the scenario with an example:

Let us suppose a company needs to capture the expenses department wise so at the time of entering the AP invoice entry we will select the department at detail line level as shown in the below screen shot

Regional setting

Invoice is worth 1000 JPN and exchange rate is 60 JPN = 60,000 CAD.

Below is GL entry which is created on posting the above invoice entry which shows our expense is booked for the particular department.

Regional setting

Now, we have to raise a credit note against invoice but with a change in the exchange rate.

Regional setting

Let see the GL effect of the above entry

Regional setting

In above mentioned General Ledger entry optional field value flow from AP to GL entry, But the due change in exchange rate exchange account is also debited which is also an expense for us but the optional field is not flown to this account.

To make optional field flow to exchange loss account also, all we have to do the Apply document entry from AP payment option and then apply the particular invoice to a credit note selecting the respective optional field as shown in the below screen shot.

Regional setting

Now let us check whether the optional field has flown to GL too.

Regional setting

 Yes, it has and our purchase is solved. In this way we can capture expense revenue etc. by creating them as optional field.

Also Read:
1. Various Types of Optional Fields in Sage 300 ERP
2. Copy optional fields value on the Order Entry detail line
3. Transactions Details Optional Fields Report
4. How to filter finder based on optional fields
5. G/L Segment Code Vs. G/L Optional Fields

How to adjust the Serial-Lot quantity variance in Inventory Control in Sage 300 ERP

$
0
0

In our previous blog on Serial/Lot Stock report, we discussed finding out the variance between actual serial/Lot inventory and the quantity on hand present in the inventory.

New Stuff : Optional Fields in Sage 300 ERP

In the industries where they strictly use the serial and lot inventory management, if they find a difference between actual quantities on hand in the warehouse and serial and lot number present in the ERP system, then they will have to adjust the serial and lot variance without affecting the actual inventory quantity on hand. In this blog post, we will see how to do just that.

Before adjusting the variance, you first need to find out the variance in serial and lot quantity with Inventory Control–>IC Stock Control Report–>Serial and Lot Qty. on Hand

LOt1


lot2

In above report for the Serialized item number A1-103/R, actual quantity on hand is 6 and the total number of serial numbers in the system is 2. This means that 4 serial numbers must be added to the system to match the actual quantity on hand and serial number in the system.

In order to adjust the serial number you need to go to Inventory Control–> I/C Periodic Processing–>Serial Lot Reconciliation

lot3

In this screen, if there is a serial/Lot item with positive variance, then you need to select the Receipt as a transaction type so as to add the serial/Lot number in the system to match the Quantity on hand. Also if there is a serial/Lot with negative variance, then in order to remove the serial/Lot number from the system, you need to select the transaction type as Shipment.

In above example, as there is a positive variance for below serial item at Location 1, we need to add that number of serial numbers in the system.

Item Number Serial Number Quantity on hand Variance
A1-103/R 2 6 4
A1-105/R 3 8 5

Refer below screen shot

lot4

Now when you count actual inventory and the Serial number in the system, the numbers will match.

lot5

Also Read:
1. Adjustment Entry in Inventory Control
2. Inventory Reconciliation of Sage Accpac ERP
3. Generate Reports for Slow Moving Items in Sage 300 ERP
4. MRP Report in Sage 300 ERP
5. I/C Physical Inventory Reconciliation Process

How to restrict Expired Lots in Sage 300 ERP

$
0
0

Inventory is the total amount of goods or materials stored in Store/Warehouse/stockyard. Factory managers or store keepers should be aware of the total stock available for sale and out of stock or expired items to properly handle customer/ vendor orders.

New Stuff : How to adjust the Serial-Lot quantity variance in Inventory Control in Sage 300 ERP

Here we will see how lot numbers expiry date can be maintained in Sage 300 ERP. Restricting use of an expired Lot number can be achieved in Sage 300 ERP using Lot Inventory options. You can ensure that the expired Lot numbers are not available for Shipping/Invoicing.

1. Navigate to Inventory Control -> I/C Setup -> Options–>Lot Numbers Tab. Kindly refer below screenshot for the same.

1

2. Select the “Expired Lot Allocation Message” as error/warning in the Lots tab in the above screen.
3. Next go to Inventory Control -> I/C Items and Price lists -> Lot Numbers
In this screen, select the lot number for which the expiry date has to be mentioned. Specify the date in the Expiry date field as shown below:-

2

In order to see real time working, let’s make an Order as shown below:-
1. Create an order and select the “Order Date” prior to the “Expiry Date” assigned to that Lot and then select the same Item Number which has been assigned the Expired Lot Date.

3

2. Select the Lot that has the expired date assigned to it.

4

3. After the selection of the lot, an error message will be displayed regarding its expiry and will not allow that lot to be assigned to the details of the Order. Refer screenshot below.

5

This is how user can restrict Expired Lots in Sage 300 ERP.

Also Read:
1. How to allocate a Serial and Lot number at Order Entry screen in Sage 300 ERP
2. Serial/Lot Number Stock Report
3. Different Costing methods in Sage 300 ERP
4. Warranty Tracking in Sage 300 ERP
5. Confirmation message in IC Transactions

Update bills of material in Sage 300 ERP

$
0
0

There are scenarios in business world where the composition of Bill of Material may change or the Component Cost may vary according to market fluctuation. These variation needs to be updated in Sage 300 ERP BOM master. Sage 300 ERP has provided a smart feature to update BOM master i.e. “Update Bills of Material”.

New Stuff : How to restrict Expired Lots in Sage 300 ERP

By following the simple steps mentioned below, you can update the existing Bills of Material.
1. Open Inventory Control > I/C Items and Price Lists > Update Bills of Material as shown in the below screenshot.1

2. Select the ‘From’ and ‘To’ Master Item Number fields. Specify the range of master items to update.
3. In the From BOM Number and to fields, specify the range of BOM numbers to update.
4. In the Update field, specify whether to update components for a cost.
Your selection in this field determines the remaining fields that appear on the screen.
5. Fill in the remaining fields according to your selection in the Update field.

Updating Components:
1. In the Type field, specify whether to Add, Remove or Replace a component. Here we take an example of “Replace”. This option will replace the component Item Number with that of the ‘Replace by’ Item Number selected.2

Example: We have selected the From and To Master Item Number as “A2(IMAGE-1500)G”.
2. In the Component Item Number field, enter or select the item number for the component that you want to add, remove or replace. Here we have used the component Item number as “A1-655/0”.
NOTE:  If the component is itself a master item, in the BOM Number field, also specify the BOM number that is used to assemble the component item.
3. If you are replacing a component, enter or select the replacement item number. Here we have used the Replace by Item Number as “A1-656/0”.
NOTE:  If the replacement component is a master item, in the next BOM Number field, specify the BOM for assembling the replacement item.
4. If you are replacing or adding a component item:
1. In the Quantity field, enter the number of items to add to the build in the unit of measure displayed on the screen.
2. In the Unit Cost field, if the new item has a user-specified costing method, enter the cost for one unit.

Here, for the selected BOM Number and the Master Item Number, the component Item number will get replaced by the Replace Item Number. Earlier for the Master Item Number, the Component Item Number was “A1-655/0” as shown in the below screenshot.

4
5. Click on the Update Button. The Component Item Number “A1-655/0” is now replaced by the Replace By Item “A1-656/0” as shown in the below screenshot.3

Updating a Cost:
1. In the Type field, specify whether you are updating fixed costs or variable costs. Here we are taking an example of updating the “Variable Cost”. Refer below screenshot for the same. The Variable Cost for the select Master Item Number is “10″.5

2. In the Using field, specify whether to update costs by an amount or a percentage.
3. In the Base field, specify whether to increase or decrease the cost.
4. Specify the amount or percentage by which you are increasing or decreasing the cost.

6

Here in this example, we are increasing the Variable Cost by “10”.
6. Click on Update. After the Update process, the Variable Cost is updated to “20”. Refer below screenshot for the same.7

Note: This screen updates information on existing bills of material. If you want to create new bills of material, use the Bills of Material screen or the Copy Bills of Material screen.

Also Read:
1. Custom Fields for Bills of Material in Sage 300 ERP
2. Generate BOM and Kitting items on the fly from Order Entry screen in Sage 300 ERP
3. BOM Setup for Manufacturing Company in Sage 300 ERP
4. Using BOM and Assembly to Convert Items in Sage 300 ERP
5. Material Required to Assemble FG on order – Report

Allow Edited After Invoices Printed

$
0
0

From the control point of view, in respect to printing of the AR invoices in Sage 300 ERP, there is a configuration setting that can help one to restrict the printing of the invoices multiple times.

To achieve this, one needs to navigate to Accounts Receivable => A/R Setup => Options.

New Stuff:Update bills of material in Sage 300 ERP

Regional setting

By just checking this option in AR option, one would not be able to edit or do any modification in the AR Invoices once it has been printed by the system. By this feature, any modification even before the invoice is posted can be controlled and the same can be used as a maker checker feature in Sage 300 ERP.

Regional setting

When one tries to open the invoice batch that has been printed but not posted, then also the user gets an error message as shown in the above screenshot. One would only be able to view the entry done and not be able to do any further modification.

And after the verification of the entry by any senior person, the entry can be posted without making any modification to the entry

Also Read:
1. AR Option-Deposit Slips
2. Restrict Posting on A/P batches
3. Allow Adjustments in Receipt batches
4. How to send Emails from OE invoice to customer via Sage 300 ERP
5.  Avoid Applying Credit Note for previously credited invoice

Remit-To Locations in Sage 300 ERP

$
0
0

The Remit-To Locations are the addresses on which the payment cheques are send to the vendor. They are designed to maintain the names and addresses of the cheques recipients that are different from the vendor name and addresses. The form lets the user assign a primary remit-to location to be displayed on the Invoices from the vendor and printed on the cheques to be issued to the vendor. There can be multiple Remit-To Locations defined for a vendor.

New Stuff: Allow Edited After Invoices Printed

Regional setting

Sage 300 ERP provides a Remit-To Locations form to add, edit and delete remit-to locations and to view the details of the existing remit-to locations that have been setup for a vendor. To view the screen, navigate to Accounts Payable -> AP Vendors -> Remit-To Locations. The screen looks like:

Regional setting

If the Remit-To Location is set as the primary remit-to location then it will be used as the default one for each new Invoice.

Adding the Remit-To Location: On the Remit-To Location form select the vendor and click on the new button, type the code for the Remit-To Location fill in the required fields and click on Add

Edit Remit-To Locations: The details in the Remit-To Locations can be changed except for the location code. In the form, select the vendor code and the Remit-To location for which the details have to be changed and either double click or click on Open button make the changes and click on Save.

The Optional Fields tab of the Remit-To Location can be used to define the optional field for the particular remit-to locations. If the optional fields defined for the Invoices, vendors and the remit-to locations are same, when the remit-to location is specified in the Invoice entry, the system uses the optional field values from the remit-to location for the Invoice, Credit/ Debit notes.

The Remit-To Locations cannot be set as Inactive or deleted if it is used in any un-posted transaction. Once the Remit-To Location is set as Inactive, it cannot be used while adding an Invoice and we must also ensure that the Primary Remit-To checkbox should be un-ticked.

Also Read:
1. How to send Emails from OE invoice to customer via Sage 300 ERP
2. AR Invoice Report
3. Scoping Sage Intelligence Reports in Sage 300 ERP
4. USE DISTRIBUTION CODES TO SPEED UP DATA ENTRY in Sage 300 ERP
5. Restrict Posting to G/L Batches in Sage 300 ERP


Creating Purchase Work Flow Requisition using PO Requisition in SAGE 300 ERP

$
0
0

Purchasing Workflow provides a sophisticated workflow engine with configurable rules, routing and approval functions. An easy-to-use requisition interface creates documents that are controlled through the workflow process. Purchasing Workflow enables organizations to tightly control & manage their procurement system.

One of our client had procured Purchasing Workflow module. As per the requirement of this Module the end user should enter requisition entry from PW Module for approval process.

But as per this client scenario Requisition are generated in PO Module after third party add-on Module. We created a utility routine program to push newly created open Requisition from PO module To PW Module.

New Stuff: Remit-To Locations in Sage 300 ERP

The Utility Routine screen is as shown below, whenever the screen will open it will show a list of all the open Requisition from PO in the Grid.

Untitled


The data here will be shown detail wise. The data displayed will be  Requisition Number, Requisition Date, Item Number, Item Description, Quantity, Cost, and Location.

User can select the multiple requisition data from the grid for pushing the data from PO to PW. We have provided multiple selections option in the grid. After the Selection of the multiple data of multiple requisitions user needs to select the Cost Centre and Work flow from the drop down box which is mandatory for the creation of the Purchase Workflow Requisition.

On Click of the button the single Requisition will get created and the grid will be refreshed.

vvvvv


Advantage:

With the help of this utility you can easily integrate two modules in SAGE 300 ERP & create the single PO requisition in Purchase Work Flow Module from multiple PO Requisitions into PO Module.

Also Read:

1. Requisition Report in Sage 300 ERP
2. Allow Non Inventory Item Option in PO
3. Copy Cost To Purchase Order
4. Purchase Order Reports in Sage 300 ERP
5. How to Validate Purchase Receipt and Invoice in Sage 300 ERP


Item pricing with check type in Sage 300 ERP

$
0
0

In Sage 300 ERP, you can define price check type with check & cost base options in which the user can set the limit as less than or greater than percentage amount.

New Stuff: Mailing A/R Aged Trial Balance IN SAGE 300 ERP

In this price check type from item pricing screen, the user has an option named warning from dropdown list. User configure navigate to Inventory Control >> I/C Items and Price List >> Item pricing

IC item UI1

When Clicking on any currency code, the following screen appears, in this screen, select Price check tab, set price check type as warning.

IC item UI2

Let’s take an example, Select check as Unit price & Cost base as Markup Cost, add user with greater then percentage=10 & less than percentage=40 & click on save button.

The default price check range applies to all users who are not specifically added in user’s table.

In this form, we just need to map the currency code & price list code with the item and specify the user. This will help the users who makes the sales order to get the warning message at the time of sales order entry.

IC item UI3

Now go to the order entry, select item which is selected in the item pricing & add quantity below range. After that try to change unit price as 240 which is not in the range as per our requirement then while click on post button display the warning message while price exceed the boundaries which applies to user.

IC item UI4

This warning message gets populated because users have not added unit price within range from ‘Price check’ in ‘IC Item Pricing’.

This way you can configure item pricing in multiple price list code for various users.

Also Read:

1. Item Pricing based on Multiple Unit of Measurement

2. Item description in Order Entry Screen defaulting to blank in Sage 300 ERP

3. Configuration of Price List Code

4. Selling your items on contract pricing

5. Price by Cost plus a percentage or Amount


Why Data Backup solution is necessary for every ERP

$
0
0

All companies need to consider their strategy for data backup because data is the heart of the enterprise, it’s crucial for you to protect it. And to protect your organization’s data, you need to implement a data backup and recovery plan. Backing up files can protect against accidental loss of user data, database corruption, hardware failures, and even natural disasters. It’s your job as an administrator to make sure that backups are performed and that backup tapes are stored in a secure location.

New Stuff: Mailing A/R Aged Trial Balance IN SAGE 300 ERP

Regional setting

Backup of a company’s application data is critical in case of a massive system failure, or in case individual files need to be restored. There a various types of backup media which can be used including Tape, Cloud Backup, DVD, etc.

An adequate backup system must include the following elements:

  • Enough tapes for complete backups to occur on a predefined rotation
  • Regular testing of the system and media to ensure that restoration is possible
  • A person that is responsible to execute the backup plan on an on-going basis
  • The backup usually needs to occur when processing is not taking place (off hours)
  • A logical tape rotation schedule must be established and followed
  • Tapes need to be rotated to a secure location off site in case of disaster or theft
  • A calendar/log must be maintained to schedule tapes and record results

It is always necessary to take back up of your ERP Database. The Key advantage of database backup is that in case if you lose your critical business data or financial data due to Natural Disasters, Hardware & System Malfunctions or Computer viruses and malware. Then you can easily restore database backup from tap drives, cloud storage or from DB recovery server.

Also Read:
1. Backup your Company Database in Sage 300 ERP
2. Installation of Sage 300 ERP Workstation Setup
3. GL Account Code Change in Sage 300 ERP
4. Add logos to Sage 300 ERP Visual process flow

Sage 300 ERP makes your manufacturing processes simple

$
0
0

Regional setting

Every now and then companies are working hard or should I say smartly to expand businesses. From a trading company to a manufacturing unit, every company needs systematic functioning to receive the maximum positive output.

New Stuff: Why Data Backup solution is necessary for every ERP

Indeed every successful business runs on profit only. Who wants to run business at loss? A good systematic functioning is always suggested by experts to handle business processes with ease. If we take a manufacturing unit, there is a need to maintain the process eventually to make the profit from finished goods and efficiency of the workshop.

Now introducing ERP into a manufacturing business will help a lot in many ways. It helps by becoming an essential part to the success of your manufacturing and distribution company. A good ERP system has capability to streamline your manufacturing processes from raw material to finish goods with improved planning and forecasting.  When I say a good ERP, I would refer SAGE 300 ERP because of its benefit to many businesses. SAGE 300 ERP has given a humongous systematic functioning of many companies and into their growth.

Regional setting

As we know manufacturing business has many departments to handle each process. They are all linked together from purchase to sale to store. Sage 300 ERP gives you smooth functioning on accounting, Purchases, Sales, Human resources, warehousing, manufacturing planning, fixed asset etc. The best part of Sage is that it comes with standard practices where users can easily work and learn.

Some of the features age 300 ERP help you with

  • Providing the better inventory levels and a view to track your product information such as receiving, pick-ups, shipping etc. This could be a stress off from the shoulders of inventory/store personnel.
  • Keeps the record of each process from raw material receiving till finished goods dispatch.
  • A regular check on manufacturing work shop jobs. Tracking the product status on each operation like cutting, fabrication, and paint, assembling, storing etc.
  • An improved compliance is also necessary. Sage 300 ERP helps you keep with the functioning where business processes can be tracked and filed appropriately assuring the specific compliance regulations are followed.
  • User configuration and security has become a major role in a manufacturing process where processes have authorizations from junior to senior levels.  Human error gets minimized because Sage 300 ERP has provisions to set user control and authority.
  • Reporting system at its best in Sage 300 ERP. Import and export of reports into desired formats.

Also Read:
1. Sage 300 ERP in Sugar Industry
2. Sage 300 ERP for Ceramics Industry
3. Drill Down to Source Transaction from GL
4. How To Add A Macro To Accpac Desktop of Sage 300 ERP
5. Plan Execute Track Measure – For ERP Implementation

I/C Update Item Pricing for Sage 300 ERP

$
0
0

For each item in Sage 300 ERP, user can define different pricing for different currency and price list code. If user wants to update base price of a particular item, then user can directly go to the item pricing screen and update the base price value. But if user needs to update the base price of a range of items, then it will not be feasible to update each items pricing manually.

New stuff : Greytrix at TPAC 2015 Canada – Sage 300 ERP Growing Bigger

For this purpose, Sage 300 ERP provides the feature of ‘Update item pricing’ screen.
To update the pricing, user needs to go to Inventory Control–>I/C Items and Price Lists–>Update Item Pricing.

Price1

Here user can filter the data based on Currency and price list code for which pricing needs to be updated. These changes in the pricing will be reflected for the range of items selected from screen.

Screen includes following types of pricing that can be updated:
Base price, Sale price, markup cost, price check as well as price list updates.

Price2

User can update the pricing using Percentage, amount, markup, margin, exchange rate.

Price3For e.g. if user needs to increase the base price for an item by amount of 10, then user will have to enter the following details.

Price4

User can check the updated values in the report IC Price/ Sales Analysis Reports–>Price Lists

Price5

Similarly, user can update various other parameters in Item pricing using this feature.
Also Read:
1. Migrating Item Pricing From Sage Pro ERP to Sage 300 ERP
2. Choosing Vendor Contract Cost over IC Vendor Detail Cost in Sage 300 ERP
3. Location Grouping in GreyMatrix for Sage 300 ERP
4. Item Pricing based on Multiple Unit of Measurement
5. Selling your items on contract pricing

Viewing all 1489 articles
Browse latest View live


<script src="https://jsc.adskeeper.com/r/s/rssing.com.1596347.js" async> </script>