Quantcast
Channel: Sage 300 ERP – Tips, Tricks and Components
Viewing all 1475 articles
Browse latest View live

Sage 300 ERP for Automobile Dealer Industry

$
0
0

No matter what the economy is like, people will always need cars, trucks and other vehicles for transportation, and they mostly go to a car dealership to buy their vehicles.

A car dealership or vehicle local distribution is a business that sells new or used cars at the retail level, based on a dealership contract with an automaker or its sales subsidiary.

New Stuff: Sage 300 ERP makes your manufacturing processes simple

Every automobile dealer must have dealership management system (DMS) in place that clearly measures, reports and controls the functions within a dealership yielding quantifiable, reliable and timely information of significant importance to the dealer and dealership management. DMS most commonly refers to a software solution for your dealership that will meet the qualifications as defined.

In short, a dealership management system (DMS) or auto dealership management system is a bundled management information system created specifically for automotive industrycar dealerships adapted for cars, boats, bikes, RV, and power sports dealers.

Sage 300 ERP deals with all the requirements of Automobile Dealer Organization like Vehicle Sales, Workshop Activities, Spare Parts and Accessories Inventory and Financial Accounting. The tight integration of Sage 300 ERP modules automatically avoids the duplication of entries and generates maximum reports as an output from minimum basic input.

Regional setting

This dynamic, multicurrency, multi company solution delivers significant business benefits through the following key modules and add on:

Modules:

  • Order Entry
  • Purchase Order Entry
  • Inventory Control
  • Accounts Receivables
  • Accounts Payables
  • General Ledger
  • System Manager
  • Multi-Currency
  • Transactional Analysis and Optional Fields

The Automobile Sales and Services solutions on Sage 300 ERP covers Vehicle Purchase Management, Sales Management, Vehicle Service Management, Job Cards, DMS Integration, Vehicle Insurance Renewal and Payroll tightly integrated with your accounts.

Regional setting

All the data of purchase, sales and service of DMS (Dealer Management System) is seamlessly integrated with Sage 300 ERP. Accordingly Sage 300 ERP takes care of accounts and stock.

We will discuss in more detail about automobile activities in Sage 300 ERP in our next blog.

Also Read:
1.  Manufacturing and Subcontracting in Sage 300 ERP
2. Sage 300 ERP in Sugar Industry
3. Sage 300 ERP for Ceramics Industry
4. Sage 300 ERP makes your manufacturing processes simple
5. Manufacturing Costing and Sage 300 ERP


Warn for Non Inventory Item Option in PO in Sage 300 ERP

$
0
0

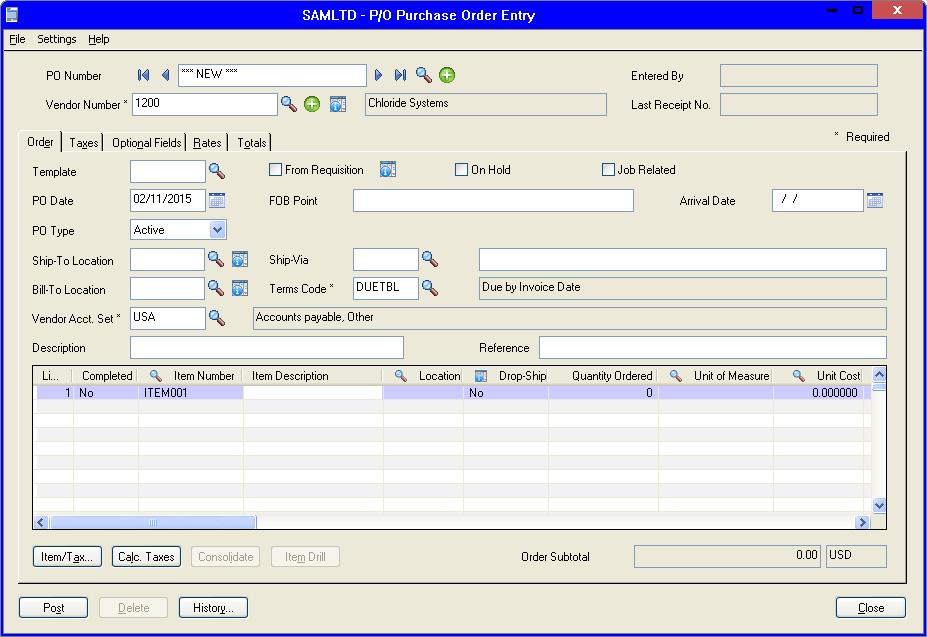
While creating a purchase order, whenever a user enters the item which is not present in the inventory, he normally faces the error: “Item does not exist.” [Please find screen shot below].

New Stuff : Sage 300 ERP for Automobile Dealer Industry

Item1

This error is thrown because the entered item is absent in the inventory. Sage 300 ERP will display this error every time user enters non inventory item.  Some users don’t want this error message to be thrown each time.

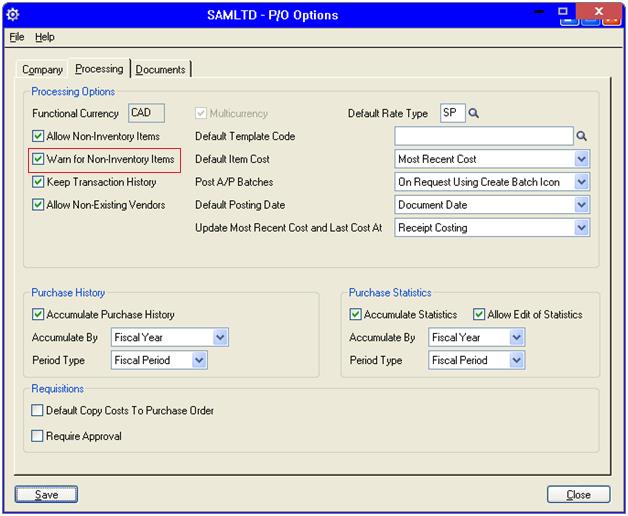
To hide this message, Sage 300 ERP has provided the setting In PO Option, i.e. check box ‘Warn for Non Inventory Items’ under the ‘Processing’ tab [please find screen shot below].

Purchase Orders–>P/O Setup–>Options

Item2

If this checkbox is unchecked, Sage 300 ERP will not throw any error when entering the non-inventory item.

Item3

This is a very useful feature provided by Sage 300 ERP and can be used if all items to be entered in the transaction are non-inventory items.

Also Read:
1. How to Use Different Item Description for Specific Items in Sage 300 ERP
2. Allow Non Inventory Item Option in PO
3. Use as Default option on IC Kitting Items screen in Sage 300 ERP 2014
4. IC Aged Inventory Report
5. Sage 300 ERP – Inventory Account Set

Error: “Sage 300 ERP UI Container has stopped working” message occurs when printing reports

$
0
0

Sometimes users face an error message “Sage 300 ERP UI Container has stopped working” when printing reports. This normally occurs on a Windows 2008 R2 or Windows 2012 server when printing reports to the preview screen. When we click to view the problem details, the following message displays:

“Assertion failed!

Program: C:\Apps\Accpac\RUNTIME\A4WCONTAINERXP.EXE
File: repcmd.c
Line: 227

Expression: NULL == record->pCrystalObjectHandle

For information on how your program can cause an assertion failure, see Visual C++ documentation on asserts”

New Stuff: Sage 300 ERP for Automobile Dealer Industry

Please refer the below screen shot

Runtime Library

1. To resolve such error please follow the below mentioned steps:
User must log in the server with as an administrator or account with admin rights

2. Run command prompt as administrator

3. From command line enter this command,

C:\Windows\Microsoft.NET\Framework\v4.0.30319\regasm/register[sage300runtimefolder]\a4wcrinterop.dll.

4. If the registration fails, ensure that the Crystal Runtime Engine is installed properly
for 32 bit computers Goto “C:\Program Files\SAP BusinessObjects\Crystal Reports for .NET Framework 4.0\Common\SAP BusinessObjects Enterprise XI 4.0\win32_x86″.

For 64 bit computers Goto “C:\Program Files(x86)\SAP BusinessObjects\Crystal Reports for .NET Framework 4.0\Common\SAP BusinessObjects Enterprise XI 4.0\win32_x86″.

If the engine is installed properly the directory should have more than 1200 individual files.

5. For Windows 2012/2012 R2 and Windows 8/8.1, ensure that .NET Framework 3.5 Features in enabled.

Windows Features

6. If the above steps do not resolve the problem, uninstall and reinstall the system manager as a local administrator and apply the latest product update for Sage 300 ERP 2012 or 2014.

7. The error can also occur if you have multiple versions of crystal runtime files. If you have another application that uses a different runtime engine, you will need to uninstall the application and install it on a separate machine. Any existence of these old Crystal components would create conflicts with the Crystal .NET runtime used by Sage 300 ERP.

Also Read:

1. Custom Report error in Sage 300 ERP
2. Get custom field information in Sage 300 ERP reports using sub reports
3. How to Solve GL Error Batch in Sage 300 ERP
4. Report not printing when printer option is set to printer in sage 300 ERP
5. Invalid Database Specification error Sage 300 ERP (formerly Sage Accpac)

Sage 300 ERP – Fast Food Retail Chain

$
0
0

Regional setting

New Stuff: Sage 300 ERP for Automobile Dealer Industry

Regional settingThus, it is really very important, that we ensure that a proper system is being selected to make sure that all the required processes are being implemented as per the requirements so that the desired results are achieved. Sage 300 ERP with its capability has helped clients to implement such process and helps grow their business.

Also Read:
1. Creating Purchase Work Flow Requisition using PO Requisition in SAGE 300 ERP
2. Remit-To Locations in Sage 300 ERP
3. How to restrict Expired Lots in Sage 300 ERP
4. How to adjust the Serial-Lot quantity variance in Inventory Control in Sage 300 ERP


Item wise tax calculation in Sage 300 (for Sales and purchase Transaction)

$
0
0

Sage 300 ERP provides a number of features for the transaction of sales and purchase. In our last blog we had discussed about how to define the Tax Rates in Sage 300 ERP  in the Tax module. In this blog we will discuss about how to calculate Item wise tax.

New Stuff: Sage 300 ERP – Fast Food Retail Chain

Sometimes there might be a situation where we need to calculate the different tax amount for same item but with different nature of business. So to calculate the Item wise tax, the user has to define multiple tax classes and tax rates for the defined tax authority.

Let’s see an example of OE Order transaction, to elaborate different tax calculation for every item with same tax authority.

⦁ Open OE order entry and click on new button.
⦁ Go to customer tab and select appropriate tax group.
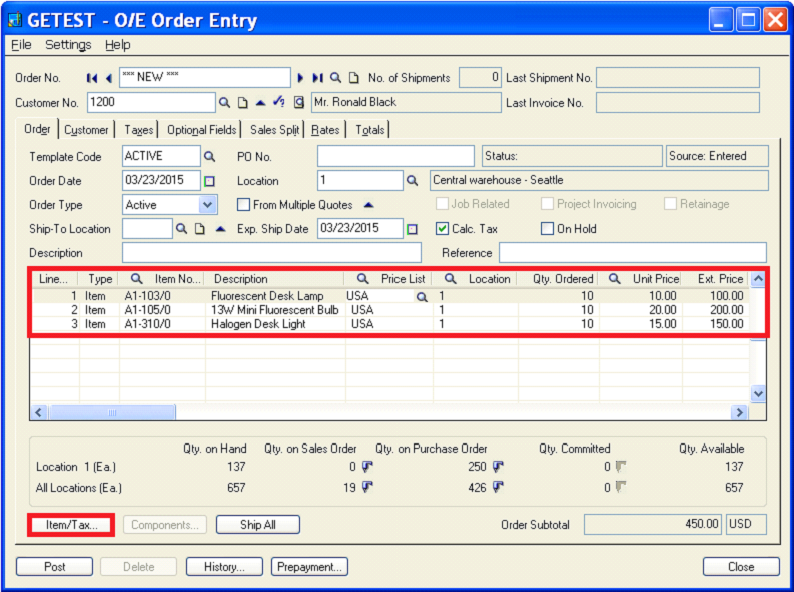
⦁ Enter three items with quantity ordered and other information related to item in detail grid.
⦁ Please refer below screen shot for transaction.

Item01

⦁ Now click on “Item/tax” button.
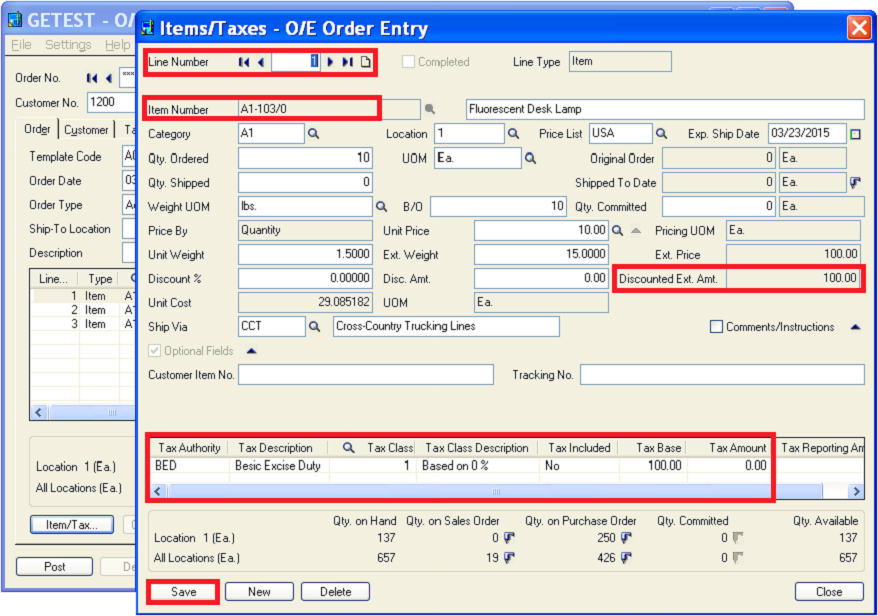
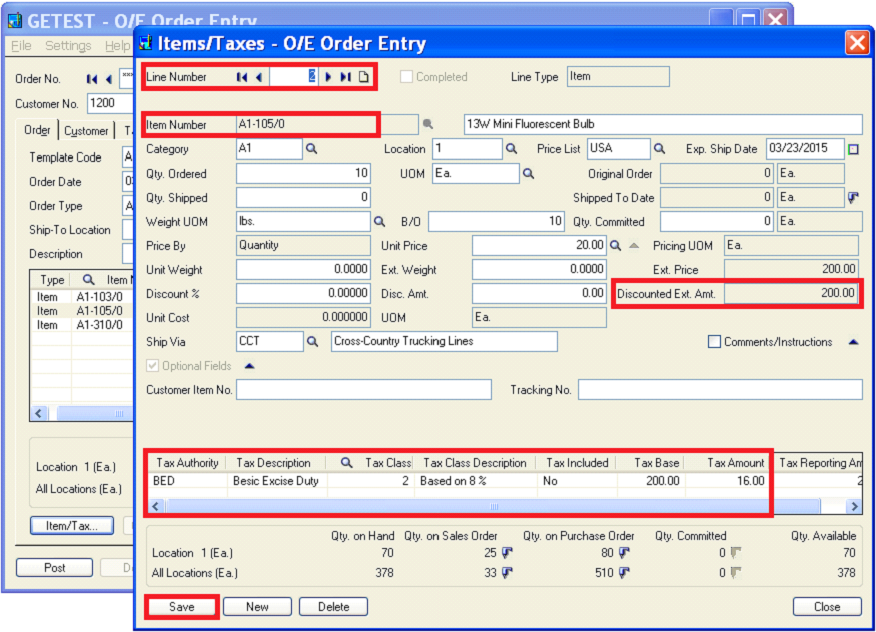
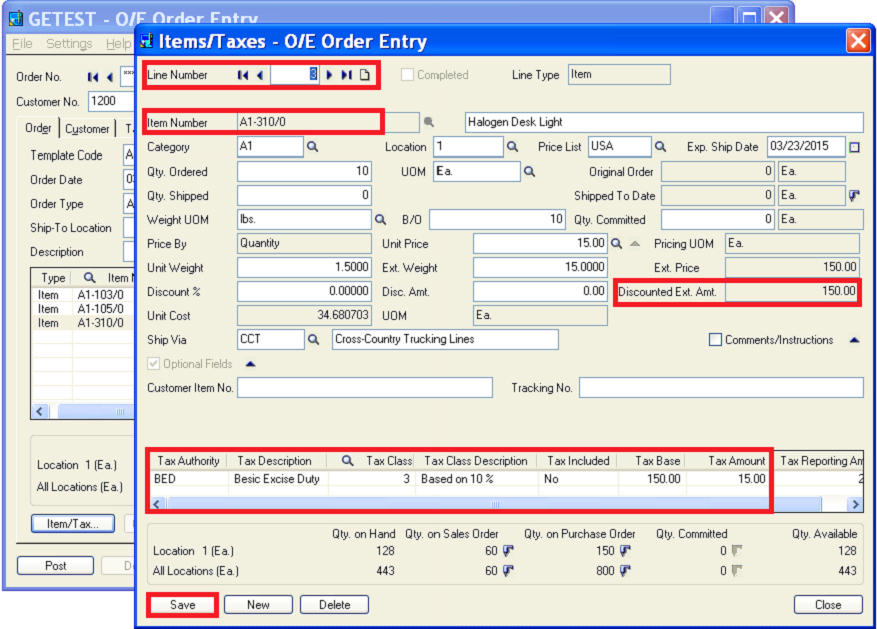
⦁ In order to calculate the tax as per tax rate of item you need to set the item’s tax class of the item.
⦁ Please refer below screen shots for every item’s tax information

item02

In above screen, tax calculate for the item “A1-103/0” based on 0% tax rate because tax class is 1.

item03

In above screen, tax calculate for the item “A1-105/0” based on 8% tax rate because tax class is 2.

item04

In above screen, tax calculate for the item “A1-310/0” based on 10% tax rate because tax class is 3.

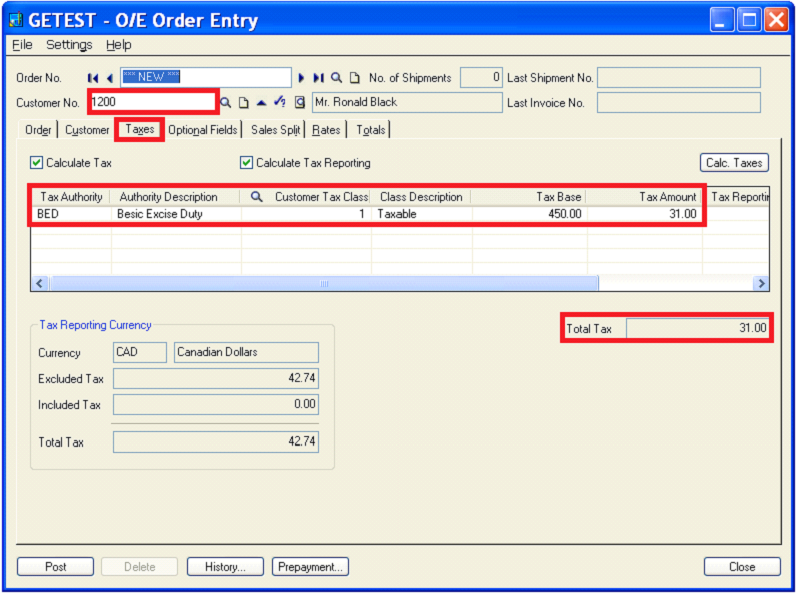
⦁Please refer the below screen for header tax base and tax amount.

item05

In this way, the user can calculate taxes on separate tax rate specified for each item.

Note. User cannot define more than 10 tax classes, so it will restricted to this level in transaction to calculate taxes separately for the item.

This feature of sage 300 ERP reduces your time as well as stress. Also you don’t need to do separate transaction for different tax rates.

Read Also:

1.Taxes in Sage 300 ERP
2.Tax Setting – Allow Tax In Price
3.Tax Calculation on the basis of Quantity in Sage 300 ERP
4.Setting up Price Inclusive of Taxes in Sage 300 ERP
5.Tax Classes in Sage 300 ERP


Tax Group in sage 300 ERP

$
0
0

Tax always has been a very important component when it comes to executing a business. In our previous blog we had discussed about the tax rates Tax Rates in Sage 300 ERP. Going further, after tax rates are defined, users need to set up tax groups for the tax authorities. In this blog we will discuss about the tax groups in detail.

Tax groups are used for calculating bunch of taxes at the time of purchase and sales transactions.

Go to Common Services –> Tax Services –> Tax Groups

New Stuff:  Item wise tax calculation in Sage 300 (for Sales and purchase Transaction)

Users can define tax group for

⦁ Sales
⦁ Purchase

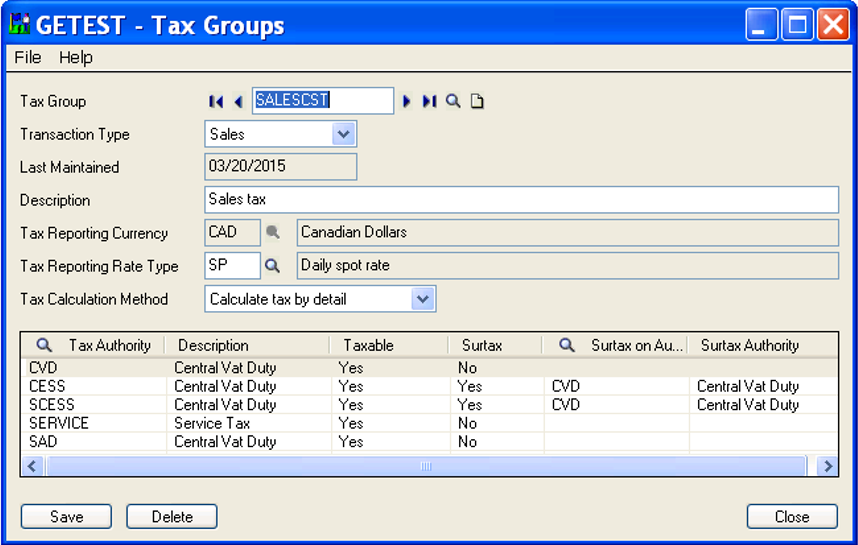
Please refer the below screen for Tax Groups:

Tax group 1

Important things about the Tax groups: 

⦁ User can define up to five tax authorities in one tax group.
⦁ Tax group currency must be the same for all tax authorities defined in the group.
⦁ If your organization uses multicurrency accounting, each authority in the group must use the same       source currency. Here, the user can define more than one group for each currency, if necessary.
⦁ The position of tax authorities in the tax group is important for taxes that are taxable. If a tax is           taxable, the tax amount is added to the base for calculating invoice tax for all authorities lower on         the  group list.
⦁ When you select a tax calculation method, we recommend not to select the summary method if any     authority in the group allows tax to be included in the price. The method you select applies to each       authority in the group. If you need to calculate tax for an authority by both detail and summary, you     must setup two tax groups for the same authority.

This feature of sage 300 ERP will reduce time and stress.

Also read:

1.Tax Rates in Sage 300 ERP
2.Taxes in Sage 300 ERP
3.Tax Setting – Allow Tax In Price
4.Tax Calculation on the basis of Quantity in Sage 300 ERP

Configuration tips for Greytrix Extended Report Pack in sage 300 ERP

$
0
0

As we have learnt in our last blogs about Greytrix Extended Report Pack which comprises of vital registers and vouchers, and are specifically designed and configured to meet Indian Business working style. Many times, due to some wrong or incomplete configuration, consultants ask for the solution on the errors or printing issue that they are facing on a particular module.

Following errors can occur if there is any wrong or incomplete configuration done for the extended report module.

⦁ Connection error Open connection.
⦁ Closing the UI due to failure to activate Sage 300 ERP data sources.
⦁ [Microsoft][ODBC Driver Manager] Data source name not found and no default drier                             specified–> connection error Open connection.
⦁ Connection details not provided.
⦁ <Field Name>/<View Name> does not found.

New Stuff:Tax Group in sage 300 ERP

Untitled

To overcome these errors, first, the user needs to create the ODBC connection and needs to define the server details in the configuration file.

Following are the detail steps

⦁ Create the system DSN from the control panel.
⦁ If the system is 64 bit then create the DSN from C:\Windows\SysWow64\odbc32.exe .
⦁ If the system is 32 bit then create the 32 bit ODBC from the control panel.
⦁ Add the server connection details in encrypted format in ServerDetails.ini file which is placed in          <SAGE installable path>. Please refer the below screen shot.

grey7
⦁ If the error is related to the fields or the SQL view, make sure you have run all the SQL views              provided with the installation.

In this way, the consultant or the user can solve these errors by doing the correct configurations easily.

Also Read:

1.GL Voucher in Greytrix Extended Report for Sage 300 ERP
2.AP Vendor Ledger Report for Sage 300 ERP
3.OE Sales Register Report for Sage 300 ERP
4.AR Customer ledger/ Transaction
5.Customer Transaction and Aged Trial Balance Report in Sage 300 ERP

AP Invoice Report

$
0
0

Accounts payable is short-term amounts due by a company to their vendors for the purchase of services or goods. Accounts payable is listed as a liability on the company’s balance sheet.

In sage 300 ERP, the end user can view all the transactions like invoice, credit note or debit note in a single report (AP Vendor Transaction Report). We have developed a similar report AP Invoice Report which gives you the additional information about invoice-credit-debit and the payments/adjustments applied against them.

New Stuff: Tax Group in sage 300 ERP

Our vendor report is quite similar to the standard report but it gives additional information like taxes applied on transaction, currency code of document, document total in both functional and vendor currency, batch and entry number, GL Posting sequence and GL Batch and Entry number and mainly it gives a list of all the payments / adjustments that applies against the invoices and credit-debit note selected in the given filter criteria.

It also provides detailed information like payments/adjustments number, amount, document date, and the GL Account that hits during payments / adjustments entry.

For generating this report we have provided from and To Document Date as filtering option as shown in below image:

01

After printing report, the format of report will be as follows:

02

This report is useful to get the invoices-credit-debit against payment not made.

Also Read:

1.AP Invoice Register
2.AP Invoice and Payment Voucher -Greytrix extended report pack
3.AP Payment Inquiry
4.AP-GL Integration
5.Account Set wise Filter in AP Aged Payable Report


Error while migrating data from lower version to higher version

$
0
0

Sage 300 ERP helps organizations to maintain their operational and financial data. As time progresses, the ERP gets better and better with new features added in it. So Sage releases new versions of Sage 300 ERP with the new features and new look. Currently Sage is providing “Sage 300 ERP 2014 version”.

So to make the database compatible with the versions, consultants or users have to upgrade their data to the next higher version. Many times the user or consultant get stuck in the error “Incorrect procedure. You must post or delete all open batches before activating Accounts Payable” while migrating the database from lower version to the higher one. Please refer the below screen shot.

New Stuff: AP Invoice Report

1

The above error occurs because there are some batches which are not posted from AP, AR, GL modules. Following are the detailed steps to overcome such errors.

⦁ Navigate to Accounts Payable AP Transactions.
⦁ Open AP Invoice Batch list and uncheck the “Show posted and deleted Batches” so Batch list will     show all the open batches from the AP invoice. Please refer the below screen shot.

2
⦁ User has to post all the open batches with an amount greater than zero and need to delete all the         batches with amount zero (highlighted in screen shot).
⦁ And also, the user will need to do the reconciliation of these entries from the Bank module.
⦁ Similarly if error came for Account receivable then user needs to follow the same process.

In this way consultant or user can overcome this error by following the above steps.

Also Read:

1.Warn for Non Inventory Item Option in PO in Sage 300 ERP
2.I/C Update Item Pricing for Sage 300 ERP
3.Creating Purchase Work Flow Requisition using PO Requisition in SAGE 300 ERP
4.Remit-To Locations in Sage 300 ERP
5.Allow Edited After Invoices Printed

Manufacturing Excise Process

$
0
0

Manufacturing Module for Sage 300 ERP also known as Sage ERP Accpac ERP is an industrial-strength. Manufacturing excise is a Greytrix Add-on that is designed for Sage 300 ERP.

In this Add-on, Manufacturing process maintains standard registration and statutory information like VAT, ECC, PAN Central Sales Tax, CE, Reg, RG32 details along with the Customer specific and Vendor specific Excise information and item details along with process, shipment & transfer with excisable locations.

Following are excise standard Reports:-

1) Manufacturing Excise Reports.
2) Abstract Goods Report.
3) PLA Register Report.
4) Excise Invoice Report .
5) Annexure-II Challan Report.
6) RG -1 register Report.
7) CENVAT Credit Register Report.
8) RG 23 Part II Reports for Inputs and Capital Goods.

New Stuff: AP Invoice Report

Manufacturing Process:-


MF01

In manufacturing process, Excise goods are received from manufacturing location & finally through IC transfer it will be shipped to depot location that means raw materials can be manufacture & transferred into finished goods & shipped to depot location.

- Raw materials are received into manufacturing location, is called as PO receipt.

- Shipped raw material from manufacturing location to job work location

- Received finished goods job work

- Transfer Finished Goods from manufacturing location to Deport location, this process is called as         Inventory Transfer, here we have to pay excise duty applicable for that inventory.

- After completion of the transfer of goods from manufacturing location to depot location, do shipment     order from transfer location with required inventory.

This is the way in which manufacturing excise works in Sage 300 ERP.

Also Read:

1. Manufacturing and Sage 300 ERP
2. Manufacturing Costing and Sage 300 ERP
3. Transfer of Excise duties along with Inventory Transfer in Sage 300 ERP
4. Manufacturing and Subcontracting in Sage 300 ERP
5. Order Process for Manufacturing Company in Sage 300 ERP


Use of Adjustment in receipts for write-off in Sage 300 ERP

$
0
0

In a growing industry many times the customer will pay the round off amount against the invoice amount, this is purely customer management related. In that case we have to write-off this amount in our system for knocking off the invoice, otherwise the invoice shows as an open into our system.

In our previous blog Write off entry In Sage 300 ERP we had shown how to create write-off batches for open invoices in SAGE 300 ERP. In this blog we will see the other way to do the write-off entries.

Let’s consider the example, invoice amount will be Rs. 859.24 & customer paid to you is Rs. 659.24. Now for this you need to knock-off the particular invoice. Just follow the below steps.

New Stuff: Manufacturing Excise Process

1. Go to A/R Setup –> Option

01
2. Check the “Allow adjustment in receipt Batches” option & save the changes.
3. Create the A/R Receipt entry for this invoice (Please refer the below screen shot).

02
4. Click on the Adjust button & create the adjustment entry as per the below screen shot.

03

5. Save the A/R Receipt Batch & post it.

In this way you can maintain the write-off amount into the particular account. So at the end of the year you can identify your bad debit total amount.

Also read:

1.Write off entry In Sage 300 ERP
2.Create Write-off Batches for Open Invoices in Sage 300 ERP
3.Payment Follow-up in Sage 300 ERP
4.Check/Payment Register Report
5.Migrate Banks from Sage BusinessWorks to Sage 300 ERP

Miscellaneous Payment Feature in SAGE 300 ERP
$
0
0

Sage 300 ERP provides you with a feature called Miscellaneous Payment which helps you to write / print the cheques either to a company or to a person for which the record does not exist in the vendor master. In short if you want to maintain the running vendor (person is not present into vendor master) transactions into your system then you can use Misc. Payment for them.

You can do such transactions in

Accounts Payable–>A/P Transactions–>Payment Batch List.

1. Click on New and select Transaction Type as Misc Payment.

New Stuff: Use of Adjustment in receipts for write-off in Sage 300 ERP

01

2. After selecting the transaction type you have to select the vendor number.
You do have an option not to select the vendor number if you don’t want to keep a track of this transaction against that vendor. If this is a one time operation you can enter the name in the Remit To, if you don’t want to add that as your vendor in AP Vendors.
Thus, if you keep the vendor number blank you must enter the name in the Remit To [Refer below screen shot] .

02

3. Enter the Vendor’s Invoice Number against which you to want to raise the payment.

4. In the grid enter the G/L account and cost of the goods sold in the Amount column [Refer below screen shot].

03

5. Click on Add button and click Print Check.

Now you will be able to view the check.

Thus use the Misc payment entry to issue the check to a particular vendor or company for which vendor record does not exists.

Also Read:

1.Misc. charges in Sage 300 ERP
2.Auto Application of Documents
3.AP Payment Inquiry
4.Error in AP Payment While Applying Document
5.AP Invoice Report


Greytrix HQ Relocating – Taking the Big Leap

$
0
0

Greytrix is growing bigger and better year on year. As a part of our overall expansion plan, our HQ is shifting to a new location to a bigger place with advanced infrastructure. With the aim to become you a single vendor channel for all your development needs, the headquarters of Greytrix is now equipped to accommodate all your present and future needs all under one roof.

IMPORTANT

Please bear with us on 27th, 30th and 31st of March as we may experience interim interruptions in phone services while the lines are being switched over to our new location.

Greytrix HQ

NOTE: All our contact information such as Phone numbers, Toll free numbers, E-mail addresses and Fax Numbers remain the same.

New HQ Address: B/ 301, Everest Nirvara Infotech Park, MIDC, Turbhe, Navi Mumbai – 400 705

We Thank You for your business and support and we look forward to serve you with a better rewarding partner experience with our new move.

Document numbering Based On Optional Field

$
0
0

In our previous blog “Why Use Document Numbering”, we had discussed about the use of document numbering for sage 300 ERP. We already know that the document numbering module generates the document numbers based on Location, Account set, combination of account set and also does generate based on the bank code. In this blog we will discuss about the new number generation method i.e. based on the optional field. This is the customization part which was done for one of our clients.

Optional field customization in document numbering of sage 300 ERP allows a user to generate the document number based on optional field condition.

New Stuff: Miscellaneous Payment Feature in SAGE 300 ERP

In this method, the user needs to define an optional field which will be considered for number generation process. Based on that optional field value, the document number will be generated.

Let’s take an example, to understand idea behind the number generation on optional field. First, the user needs do the configuration.

For example, we will create configuration for IC shipment screen,

⦁  Create one or more optional field GNDNUM for defining values of optional fields defined in               transaction for number generation.

Refer below screen for IC shipment optional field configuration.

11

⦁  Create one or more optional field GNDNUM for defining values of optional fields defined in       transaction for number generation.

Refer below screen to define optional field values.

12

⦁  Now, we need to define number series which would be generated for IC shipment.

Please refer the below screen to define numbering mapping.

13

⦁  Now, we will do the IC shipment entry with optional field “RGP”.

Please refer the below screen for IC shipment transaction with optional field.

04


05

⦁  After posting, the number will be generated as per configuration.

Please refer the below screen.

055

With the help of this customization, users can generate a number series on the basis of their requirements which are apart from Account set, Location, bank code and location | Account set.

Read Also:
1.Document Numbering for AR Misc. Receipt
2.Grouping feature in Document Numbering Series for Sage Accpac
3.Set Document Numbering based on Bank Code for Sage 300 ERP
4.Configuring Document Numbering for Sage 300 ERP
5.Set Document Numbering for Sage 300 ERP on the combination of Account Set and Location


Accounting Effect On Inventory Control

$
0
0

In this blog we will discuss in brief how accounting effect of IC transactions, like IC Receipts, IC Shipment, IC Internal uses IC Transfers and IC Assemblies.

During IC Receipt:
-Stock Account i.e. inventory control account gets debited.
-Payable Clearing Account – Credited (A Payable Credit account is an account which has credit effect at the time of IC or PO receipt and has Debit effect at the time of PO invoice.

Note: (Additional costs of IC receipt are added to the stock account and Payable Clearing Account as Debit and Credit respectively)

New Stuff: Document numbering Based On Optional Field

Use of IC receipt & IC Shipment: Sage 300 ERP provides only the modules as per the customer requirements. Suppose a Customer doesn’t have a PO module and OE Module but has the IC Module, the customer can maintain its inventory control through IC Shipment and IC Receipt.

During IC shipment :
-Payable Clearing Account-Debited
-Stock Account i.e. inventory Control-Credited

During Internal Uses:
-Internal Uses-Debited
-Stock Account i.e. inventory Control-Credited

During IC Transfer:
-Stock Account i.e. inventory Control-Credited (At location 1, if transfer is done from location 1 to Location 2)
-Transfer clearing account-Credited( The freight charges or labor charges consumed during this transfer)
-Stock Account i.e. inventory Control-Debited(At location 2, if transfer is done from location 1 to Location 2)

For example: if we transfer the goods which cost are Rs.200, if the freight and labor charges are Rs.150, the accounting effect will be shown as follows:
-Stock Account i.e. inventory Control-Credit –Rs 200 (At location 1,if transfer is done from location 1 to Location 2)
-Transfer clearing account-Credit- Rs 150 ( The freight charges or labour charges consumed during this transfer)
-Stock Account i.e. inventory Control-Debit-Rs 200+Rs 150= Rs 350(At location 2, if transfer is done from location 1 to Location 2)

IC Assembly:
-Stock Account i.e. inventory Control-Credit
-Assembly cost-Credit (Packaging, labor charges etc.)
-Stock Account i.e. inventory Control- Debit

For example: Suppose we assemble a computer which contains CPU Monitor and Key board. The accounting effect is shown as follows:
-Stock Account i.e. inventory Control-Credit –Rs. 5000 (monitor cost)
-Stock Account i.e. inventory Control-Credit –Rs. 1500 (CPU Cost)
-Stock Account i.e. inventory Control-Credit –Rs. 300 (Keyboard Cost)
-Assembly cost-Credit –Rs. 1000 (Packaging, labor charges etc.)
-Stock Account i.e. inventory Control- Debit- Rs. 5000+1500+300+1000= Rs 7800 (cost of assembled set)

Thus we have seen the accounting effect on inventory control during the IC Receipts, IC Shipment, IC Internal uses, IC Transfers and IC Assemblies.

Also Read:
1. Allow Non Inventory Item Option in PO
2. Confirmation message in IC Transactions
3. Quarantine Release in Sage 300 ERP
4. BOM Component Usage Enquiry in Sage 300 ERP
5. Adjustment types in I/C Adjustment


Migrate Item Price Lists from Sage 50 CAD (Simply Accounting) to Sage 300 ERP

$
0
0

GUMU™  for Sage 50 CAD (Simply Accounting) ERP to Sage 300 ERP is a Sage certified Migration solution. Greytrix provides Migration services at its Sage Migration centre and fulfills the business requirements.

In this blog you will get to know how GUMU™ migrates Item Pricing from Sage 50 CAD (Simply Accounting) ERP to Sage 300 ERP.

New Stuff: Restore your Sage 300 ERP Company Database backup in Sage 300 ERP

You can view Items and their pricing in Sage 50 from the following path -

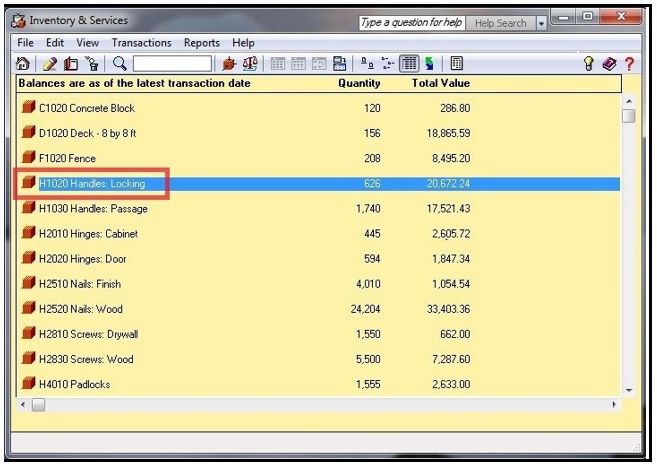
Sage 50–> Inventory & Services–> View Inventory & Services–> Items

SAY1

After double clicking on any Item, Price List Record window gets opened as shown below. In Units tab, you can see Stocking Unit of Measure of an item as shown below.


SAY2

In Pricing tab, you can see Price List and Price per unit as highlighted below.

SAY4

You can check migrated Price List data in Sage 300 ERP as shown below. Path for Sage 300 ERP is :
Sage 300 ERP –> Inventory Control –>I/C Item and Price Lists–>Item Pricing

SAY5

Also you can see Prices for the same as shown below.

SAY6

Terms for both Sage 50 and Sage 300 ERP:

SAY7
In this way, you can see the Price List data of source ERP (i.e. Sage 50 ERP) and target ERP (Sage 300 ERP).

Also Read:

1) What do you want to migrate to Sage ERP
2) Migrate GL Accounts from Sage 50 CAD to Sage 300 ERP
3) Migration of Purchase Payment from QuickBooks to Sage 300

4) Migrate customers from Sage 50 (US) to Sage 300


Deduction And Remittance Report For Sage 300 ERP

$
0
0

Tax Deducted at Source is an add-on for Sage 300 ERP and it is one of the ways to collect income tax. The TDS add-on provides various transactions, reports and forms. In this blog we will discuss about deduction and remittance report which is very useful during the auditing.

This report, gives the deduction and remittance details of the vendors with various options. This can be used to help users to search for the available deductions to make remittance. Also the user can clarify the remittance and deduction details as on date applying the various factors.

New Stuff: Migrate Item Price Lists from Sage 50 CAD (Simply Accounting) to Sage 300 ERP

To print this report Go to

Tax deducted at source–> D/T transaction report–>Deduction and remittance

Untitled

To make your selections in the following fields:-

Select Transaction Type: select the transaction type whether it is deduction or remittance.

Deduction Select Type: If the user selects the Deduction transaction for report, he must also select the deduction type. The following are the types which are available for deduction.

⦁ Remittance Created: The deduction details which are created for the remittance.
⦁ Remittance Not Created: The deduction details which are not yet created the remittance.
⦁ Both: The details combined with the above two options.

Remittance Select Type: The following are the types which are available for remittance.

⦁ Remitted: The remittance details that are really remitted to the bank (i.e. the records should have         the challan number and date).
⦁ Not Remitted: The remittance details that are created but not yet remitted to the bank (i.e. the            challan and date  details should be blank but remittance created).
⦁ Both: The details combined with the above two options.

Suppose I have selected the parameter as shown in the above screen and printed the report. Please refer below screen shot.

1245

In this way, the report gives all deduction and remittance information by vendor number, Service type and section of coverage, User can Easily find out document number, bank name, calculated and actual TDS amount, Total, grand Total.

TDS deduction and remittance report in sage 300 ERP very useful during the auditing and saves lot of time and stress of user.

Also Read:
1.Sage 300 ERP TDS and TCS Forms and their periodicity
2.TDS Section Summary Report
3.Reverse Remittance entry Option in the Greytrix TDS utility


Gate Pass System

$
0
0

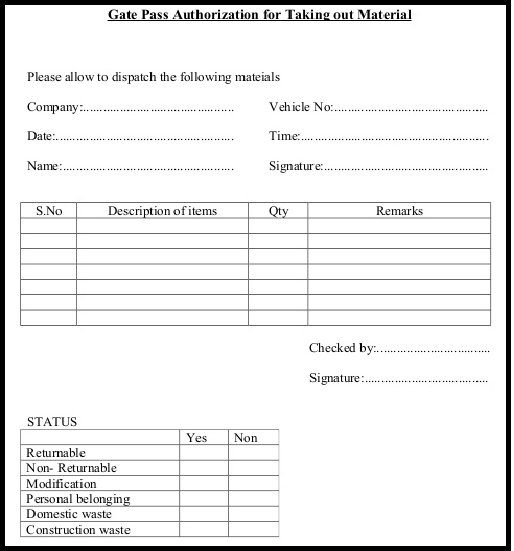
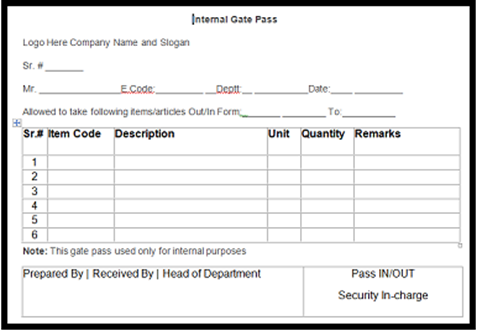
When your company has a regular movement of materials, goods deliveries from the store. It is advisable to enhance the tracking of all those outgoing deliveries, parts for repairing and fitting to identify what is issued and what is delivered and what is the accurate stock available in the warehouse.

In some countries it is also used as an evidence document for tax exemptions and computations too. Gate pass is the document prepared by the store users and attached with delivery challan to initiate the gatekeeper to process deliveries or transfer of materials. Based on the types of gate pass application it is decided if that it is returnable material or not. Generally when you sell material it is a non-returnable material.

New Stuff:  Deduction And Remittance Report For Sage 300 ERP

Below are the sample gate pass using which material can be issued out from the premises of the company.

Vendor

Vendor

Mainly there are two types of gate passes in ERP:

  • Gate pass for Returnable goods: When any material is required to send in the short term out of factory for any reason at that time gate pass for returnable goods shall be carried out. This gate pass is issued to the customer during delivery of goods from the store. Customer shall collect the gate pass from the stores.
  • Gate pass for No returnable goods: When any item is required to send permanently out from warehouse for any reason at that time gate pass for non – returnable goods shall be carried out.

Before issuing the gate pass to the respective person one needs to get the approval from Authorized person.

Hand over the copy of gate pass to security.

Using Sage 300 ERP application we can achieve Gate Pass System and generate the above mentioned gate passes from the Sage 300 ERP. Gate Pass System is supplementary feature present in the Sage 300 ERP, which will help various industries to track the material which is issued from the company premises along with the gate pass.

Usually three copy shall be made from Sage 300 ERP:

           First copy to Customer Copy
Second Copy to Security
Third Copy to Store copy

Based upon gate pass entry made in the Sage 300 ERP, you would get the gate pass register from the system.

Also Read:
1. Sage 300 ERP for Automobile Dealer Industry
2. Serial/Lot Number Stock Report
3. Kitting Item in Sage 300 ERP
4. Pending Shipments Inquiry in Sage 300 ERP
5. Inventory Movement Report in Sage 300 ERP

Use Item Comment as Default – AR Setup Options

$
0
0

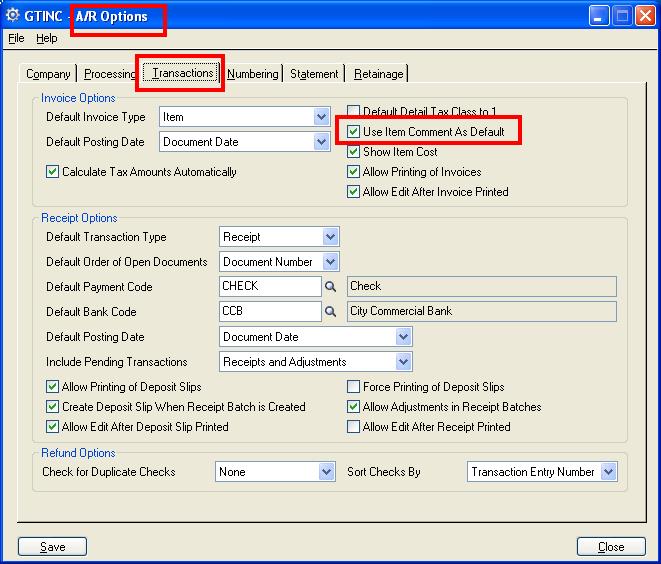
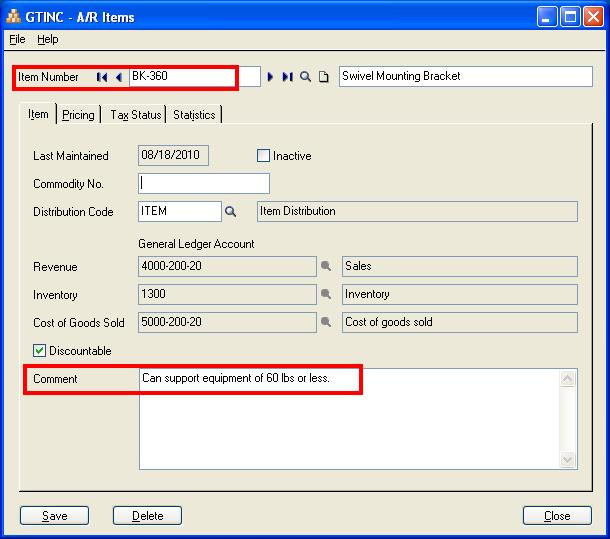
In Chemical or mobile manufacturing industries, users need to print comment i.e. a warning message while invoicing the customer. These comments remain same for particular item each time the Item is invoiced. With the help of Sage 300 ERP, user can default the AR Item comments such (Hazardous warning message, composition and package content etc.) Such comments can be entered on the AR Item setup screen and with the help of useful option AR Options screen, Sage 300 ERP pulls in the comments warning message from the AR Item master in the transaction screen.

New Stuff: Control your AR Receipt editing after being printed

How to use this feature:

  1. In order to access this feature please navigate to Accounts Receivables -> A/R Setup -> Options ->  “Transactions” tab. You can tick checkbox “Use Item Comment As default” as shown in the below screenshot.

Blog Post 1

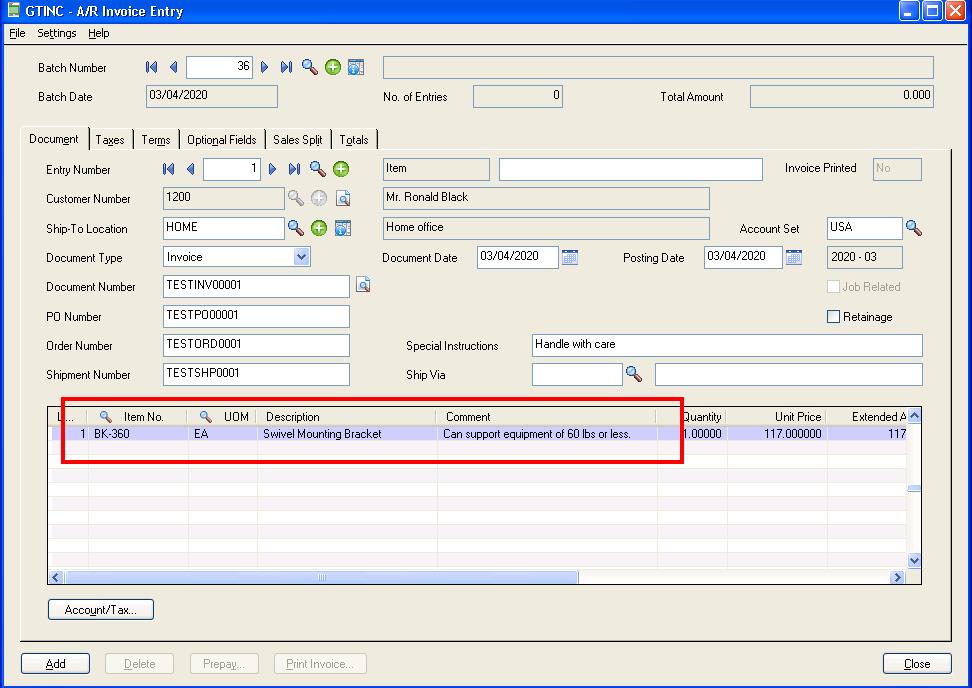
2. Next when you go to Accounts Receivables -> AR Item -> Comment and fill in the Comments that you need to show on the A/R Invoice line for that Item. Here as an example, we have considered the Item “BK-360” and its comments “Can support equipment of 60 lbs or less” Is shown in the below screenshot.

Blog Post 2

Now whenever user selects the Item for Invoicing the comment column populates the value from Item master as shown in the below screen shot.

Blog Post 3

NOTE:

User can further edit/update comments in invoice screen.

Also this setup option can be turned ON/OFF any time.

Also Read:

  1. Document Attach: Easy document referencing with Sage 300 ERP Add-on
  2. Control your AR Receipt editing after being Printed
  3. Greytrix HQ Relocating – Taking the Big Leap
  4. Miscellaneous Payment Feature in SAGE 300 ERP
  5. Use of Adjustment in receipts for write-off in Sage 300 ERP

Automatic Tax Calculations Option in Sage 300 ERP

$
0
0

In todays blog we will discuss about one more feature worth noticing of Sage 300 ERP i.e. to see how Automatic Tax Calculations can be achieved for A/R transactions.

New Stuff: Cleanup Accounts Using Apply Document Feature in Sage 300 ERP

To access this feature you can navigate to Account Receivable >> A/R Setup >> Options >>Transaction Tab

Kindly refer the below screenshot for the same.

1. If User unchecks the option “Calculate Tax Amounts Automatically” in AR Options screen, while creating any A/R Batch transactions taxes will not be calculated by default.

Blog Post 1

Calculate Tax Check box will be Unchecked in the transaction screen as well as Calculate Taxes and Distribute Taxes button will be displayed for the user to manually calculate the tax.  Kindly refer the below screen for the same.

Blog Post 2

2. If User Checks the option “Calculate Tax Amounts Automatically”; User while trying to create any A/R Batch transactions then taxes will be calculated automatically under Tax tab.

Here by default Calculate Tax checkbox will be checked in the transaction screen.  Kindly refer the below screen for the same.

Blog Post 3

This is how user can set option to calculate taxes automatically in A/R. This setting can be changed any time.

Also Read:

1. Control your AR Receipt editing after being printed

2. AR Option-Deposit Slips

3. Setting up Price Inclusive of Taxes in Sage 300 ERP

4. Tax Calculation on the basis of Quantity in Sage 300 ERP

5. Item wise tax calculation in Sage 300 (for Sales and purchase Transaction)

Viewing all 1475 articles
Browse latest View live


<script src="https://jsc.adskeeper.com/r/s/rssing.com.1596347.js" async> </script>