Quantcast
Channel: Sage 300 ERP – Tips, Tricks and Components
Viewing all 1475 articles
Browse latest View live

Defaulting Detail Tax class to 1 in Account Receivable in Sage 300 ERP

$
0
0

In this blog post, we would discuss yet another feature of Sage 300 ERP which defaults the Tax class to 1 in Account Receivable module.

In order to set this feature as active, you can access the screen; go to Account Receivable -> A/R Setup -> Options.

Blog Post 1

This option allows user to use 1 as the default tax class for details on new summary invoices.

There can be a scenario where by default all the customers should have detail tax class as 1 while creating any Transaction from AR side (that would be summary type).

Here when we take a look at the Customer master screen, we find that it has tax class as 2.

Blog Post 2

But when we add the information for the same customer on A/R Invoice Entry screen, we can see that the default tax class getting assigned is 1 as shown below:

Blog Post 3

Now when we uncheck the option “Default Detail Tax Class to 1” and create a new summary invoice, it sets the tax class as 2 which was setup of the A/R Customer master screen. This option can be set at any time.

Also Read:

1.   Add Comments in AR Aged Trial Balance Report

2.   Cleanup Accounts Using Apply Document Feature in sage 300 ERP

3.   Restricting Order Posting, Possible?

4.   Document Attach: Easy document referencing with Sage 300 ERP Add-on

5.   Control your AR Receipt editing after being Printed


Day End Processing in Sage 300 ERP

$
0
0

Day End Processing is I/C Periodic Processing which is needed to run after every business day. The main purpose of Day end is to move lot of manual data processing from the user. Generally when hundreds of user enter the POs, Orders, Invoices etc. they need to complete their work as quickly as possible. There are lots of things that get automatically posted or created once the Day end is done. This blog is looking to cover a few topics around Day End to hopefully make things a bit clearer.

New Stuff: Defaulting Detail Tax class to 1 in Account Receivable in Sage 300 ERP

To do the Day end processing go to Inventory control–>IC Periodic Processing –>Day End Processing

a1

Once user clicks on the Process button, Day end process starts with populating a pop up screen with progress on the day end process and once it is completed it gives a message saying “Day End Processing complete.”

a2

a3

Day End processing performs:

⦁ Update costing data for all the transactions (when the option is set to costing during day end               processing).
⦁ Produce general ledger journal entries from the transactions that were posted during the day (when       the item costing during posting or create G/L transactions using the Create G/L Batch icon).
⦁ Produce a posting journal for each type of transaction that was posted.
⦁ Update Inventory Control statistics and transaction history.

Day End processing also performs the processing task on Purchase Order and Order Entry module.

⦁ Processing transactions that were posted during the day in Order Entry and Purchase Orders.
⦁ Activating and posting future sales orders and purchase orders that have reached their order date,      and updating quantities on sales order and on purchase order.
⦁ Removing quotes and purchase requisitions with expiration dates up to and including the session        date for the day-end processing.
⦁ Updating sales commissions.
⦁ Creating batches of Accounts Receivable summary invoices and credit notes from posted Order           Entry transactions.
⦁ Deleting completed transaction details if you do not keep transaction history.
⦁ Updating statistics and history in Order Entry and Purchase Orders.

Cost Transactions

This is based on the Item Costing Method and is applicable when the costing buckets are updated for   the affected items in I/C. Basically depending on whether we are buying or selling:

⦁ Incoming Transactions: Increases Total Quantity/Cost in Location Details/Costing Buckets
⦁ Outgoing Transactions: Calculates/Removes Quantity/Cost from Location Details/Costing Buckets

Create Audit Information

Day End is responsible for populating all the various I/C, O/E and P/O audit history tables including:

⦁ Posting Journals (all transactions)
⦁ Item Valuation (all transactions)
⦁ IC Transaction History (all transactions)
⦁ IC Statistics (all transactions)
⦁ IC Serial Numbers Audit (IC and OE Shipments)
⦁ IC Sales Statistics (IC and OE Shipments)
⦁ OE Sales History (OE transactions)
⦁ OE Sales Statistics (OE transactions)
⦁ OE Commissions Audit (OE Invoices/Credit Notes/Debit Notes)
⦁ PO Purchase History (PO transactions)
⦁ PO Payables Clearing Audit (PO transactions)

Generate GL/AR/AP/PM/FA Entries

Create all the various batches in the sub-ledgers. These include:

⦁ GL Entries (all transactions)
⦁ AR Entries (OE Invoices, Credit Notes, and Debit Notes)
⦁ AP Entries (PO Invoices, Credit Notes, and Debit Notes)
⦁ PM Entries (IC Shipments, OE Shipments, PO Purchase Orders / Receipts / Invoices / Returns /        Credit Notes / Debit Notes)
⦁ FA Entries (IC Internal Usages, PO Receipts)

Miscellaneous Functions

Then there are a collection of miscellaneous functions that include:

⦁ Activates future orders (OE)
⦁ Deletes expired quotes that have not been activated (OE)
⦁ Deletes completed orders if “Keep History” is OFF (OE)
⦁ Activates future purchase orders (PO)
⦁ Clears completed transactions if “Keep History” is OFF (PO)

Also Read:
1.Inventory Control Settings – Allow Items at All Locations
2.Adjustment Entry in Inventory Control
3.Prompt to Delete During Posting
4.How to restrict user from using undefined UOM in inventory Control
5.BOM Component Usage Enquiry in Sage 300 ERP

Implementation of Bar code in Sage 300 ERP

$
0
0

Using of Bar code for business transactions is one of the powerful tools for saving time and cutting cost factor. In terms of saving time, using a barcode system minimizes employee training time. It takes only few minutes to read barcode with wire or wireless scanner and takes less time then enter data manually by hand. In terms of cutting costs, barcode scanner and printer cost little and are durable, regardless of their usages. It is a good practice to overcome the possibility of human errors by technology intervention

1

New Stuff: Gate Pass System

Sage 300 ERP provides you with the option to print label in purchase order Module, you can print label in Purchase order module at receiving point. Printed labels stick with your inventory stock or on your rack in case of spare parts. Sales Order entry and Shipment entry of order entry module helps you to deliver the material to your customer place.

You can configure Item and customer price list in Sage 300 ERP Inventory control Module. IC Module provides you with the facility to move your material or stock from one warehouse to other warehouse to manage your supply chain network. Physical inventory option provides you with the option to reconcile between your system stock and stock available at physical level.

Also Read :-

  1.  Barcode Scanner and Greytrix Products
  2.  POS Sage 300 ERP Integration
  3. Accounting Effect On Inventory Control
  4. BOM Component Usage Enquiry in Sage 300 ERP
  5. Warn for Non Inventory Item Option in PO in Sage 300 ERP

Much awaited Excel 2007 (.xlsx) support in Product Update 1 for Sage 300 ERP v2014

$
0
0

You must have already heard about release of Product Update 1 of Sage 300 ERP 2014. In this blog, let’s discuss one of its additional feature that has been introduced in Product Update 1 to enhance  Standard Import and Export routine support of Excel 2007 (.xlsx file format).

New Stuff:  Implementation of bar code in Sage 300 ERP

Below we have described new features and enhancements included in Product Update 1.

Here let us take an example for the Export option in the Order Entry screen. Refer the below screenshot for the same.

1

In the above screenshot you can find the “Export …” option in the File Menu. When you select the Export option then a new screen “Export” is popped up where the option to Export to Excel 2007 is available , which is not present in the release version of the Sage 300 ERP v2014. Refer the below screenshot for the same.

2


When “OK” button is clicked then all the details of the Order gets exported to the xlsx file format.

Similarly user can Import the Data from the .xlsx file into Sage 300 ERP v2014 have Product update 1 and above.

Note: If Excel 2007 is not available as a file type when importing or exporting, you must install Microsoft Access Database Engine 2007.

Also Read:

1. How to assign unique serial Number to Individual Items in Sage 300 ERP Versions 2014
2. How to Use as Default option on the Bills of Material screen in Sage 300 ERP 2014
3. Manage LANPAK in Sage 300 ERP 2014
4. New GUI Features in Sage 300 ERP 2014
5. New Inventory Control Features in Sage 300 ERP 2014

Migrate Customer Notes from Sage Business Vision to Sage 300 ERP

$
0
0

GUMUTM for Sage Business Vision to Sage 300 ERP is a Sage certified Migration solution. Greytrix is a pioneer in providing Migration services at its Sage Migration Centre and catering end-users business requirements. Our GUMU™ migration utility is compatible to convert all Masters and Open transactions from Sage Business Vision to Sage 300 ERP.

We at Greytrix help the end – user in implementing new Sage 300 ERP system through our various successful migration and integration solutions.

In this blog we will discuss about how GUMU TM migrates Customer Notes from Sage Business Vision to Sage 300 ERP (Formerly known as Accpac).

New Stuff: Migrate Customer Memos (Notes) from Sage Pro ERP to Sage 300 ERP

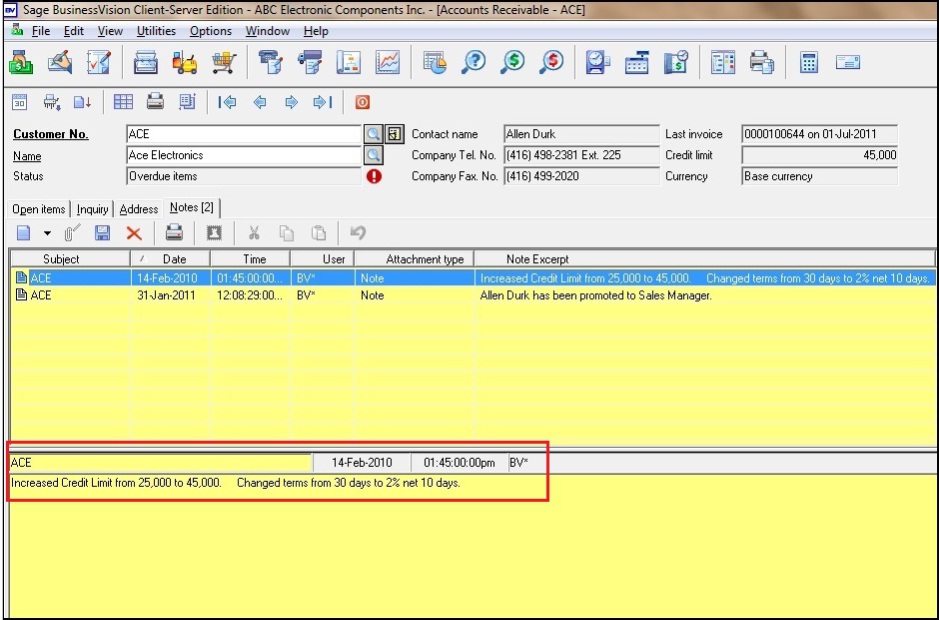
You can view Customer Notes in Sage Business Vision from the following path -
Sage Business Vision –> Edit –> Customer Details


BV Img1

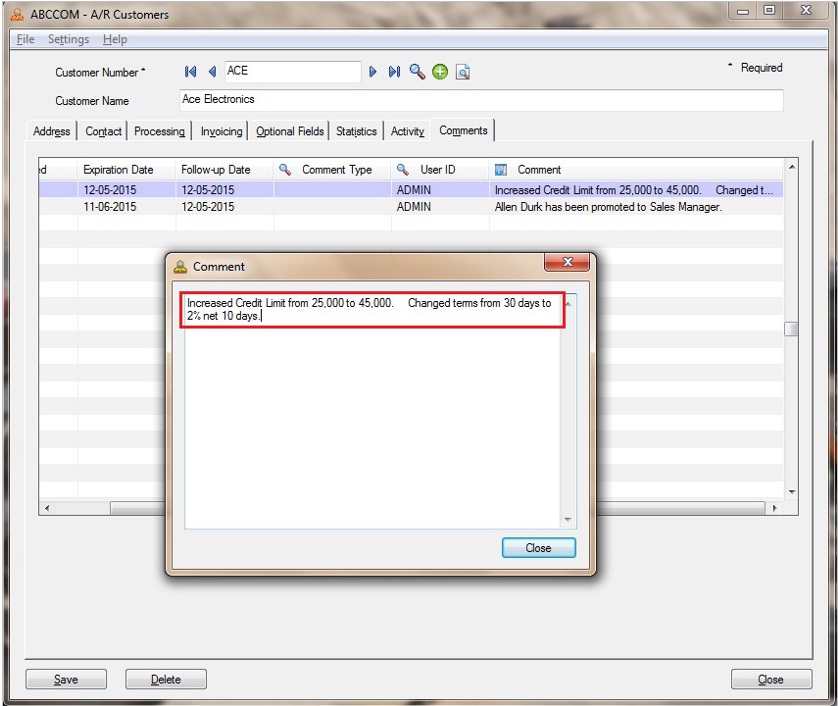
In Sage 300 ERP the Notes are converted by GUMU as follows:
Sage 300 ERP–> Accounts Receivable –> A/R Customers –> Customers

BV img2

See highlighted in the above screenshot, the Notes are converted in Customer master’s Comment screen in Sage 300 ERP.

In this way, Sage Business Vision Customer Notes are migrated into target Sage 300 ERP company database. For more information on ERP data migration, drop us a mail at erpmig@greytrix.com

Also Read:

1)Migrate GL Accounts from Sage Business Vision to Sage 300 ERP

2) Migrate Vendors from Business Vision to Sage 300 ERP

3)Migrate Banks from Sage Business Vision to Sage 300 ERP

4)Migrate Customer from Sage BusinessWorks to Sage 300 ERP

5)Migrate your inventory to Sage 300 from Sage BusinessWorks


Migrate Sales Person from Sage Business Vision to Sage 300 ERP

$
0
0

GUMU™  for Sage Business Vision to Sage 300 ERP is a Sage certified Migration solution. Greytrix is a pioneer in providing Migration services at its Sage Migration Centre and catering end-user business requirements.

We at Greytrix are focused to help the end –user in successfully implementing the new Sage 300 ERP system through our various successful migration and integration solutions.

New Stuff: Migrate Item Price Lists from Sage 50 CAD (Simply Accounting) to Sage 300 ERP

In this blog, we shall explore upon the migration of Salesperson from Sage Business Vision to Sage 300 ERP. Let’s have a quick look at the below screenshot of Business Vision Sales Person screen.

BV_SalesPerson1

After data migration from Business Vision the field values of Business Vision Sales Person gets converted with the following mapping:

BV SP 5

After the migration to Sage 300 ERP, the converted Sales Person screen will look as below:
Note: In Business Vision “Salesperson No.” field accepts 10 digit values where in Sage 300 ERP Sales person code field accepts only 8 digit code. So in below screenshot we have created Sales person code of 8 caharacters.

Sage300_SalesPerson1

For more information on the data migration, drop us a mail at erpmig@greytrix.com

Also Read:
1) What do you want to migrate to Sage ERP
2
Migrate GL Accounts from Sage Business Vision to Sage 300 ERP
3
Migrate Banks from Sage BusinessVision to Sage 300 ERP
4
Migrate Vendors from Business Vision to Sage 300 ERP


Migrate Customers from Sage Business Vision to Sage 300

$
0
0

GUMU™  for Sage Business Vision to Sage 300 ERP is a Sage certified Migration solution. Greytrix is a pioneer in providing Migration services at its Sage Migration Centre and catering end-user business requirements.

We at Greytrix are focused to help the end –user in successfully implementing the new Sage 300 ERP system through our various successful migration and integration solutions.

New Stuff: Migrate Item Price Lists from Sage 50 CAD (Simply Accounting) to Sage 300 ERP

In this blog, we shall explore upon the migration of Customers from Sage Business Vision to Sage 300 ERP. Let’s take an example of a Customer “ACTECH” in Sage Business Vision ERP system. This is how it looks:

BV_Customer1

BV_Customer2

BV_Customer3

BV_Customer4

BV_Customer5

BV_Customer6

After the migration to Sage 300 ERP, the converted Customer screen will look as below:

Sage300_Customer1

Sage300_Customer2

Sage300_Customer3

Sage300_Customer4

Sage300_Customer5

Below is the mapping of converted Sage 300 ERP Customer:

Customer_Mapping

Hope the above topic provides you sufficient information in comparing the Customer records between the two diverse ERP systems.

For more information on the data migration, drop us a mail at erpmig@greytrix.com

Also Read:
1) What do you want to migrate to Sage ERP
2) Migrate GL Accounts from Sage Business Vision to Sage 300 ERP
3) Migrate Banks from Sage BusinessVision to Sage 300 ERP
4) Migrate Vendors from Business Vision to Sage 300 ERP

Migrate Ship to Address from Sage Business Vision to Sage 300 ERP

$
0
0

GUMU™  for Sage Business Vision to Sage 300 ERP is a Sage certified Migration solution. Greytrix is a pioneer in providing Migration services at its Sage Migration Centre and catering end-user business requirements.

We at Greytrix are focused to help the end –user in successfully implementing the new Sage 300 
ERP system through our various successful migration and integration solutions.

New Stuff: Migrate Item Price Lists from Sage 50 CAD (Simply Accounting) to Sage 300 ERP.

In this blog, we shall explore upon the migration of Ship to Address from Sage Business Vision to Sage 300ERP. Let’s consider Ship to Address of Customer “DAVIS” in Sage Business Vision ERP system. This is how it looks:

BV1

After the migration to Sage 300 ERP, the converted Customer screen will look as below:

BV2

BV3

It also migrate Contact details from Sage Business Vision to Sage 300 as shown below.

BV4

Below is the mapping of the converted Ship to Address from Sage Business Vision to Sage 300.

BV6

Hope the above topic provides you sufficient information in comparing the Customer records between the two diverse ERP systems.

For more information on the data migration, drop us a mail at erpmig@greytrix.com

Also Read:
1) Migrate Item Price Lists from Sage 50 CAD (Simply Accounting) to Sage 300 ERP.
2What do you want to migrate to Sage ERP.
3Migration of Purchase Payment from QuickBooks to Sage 300
4Migrate GL Accounts from Sage 50 CAD to Sage 300 ERP
5Migrate customers from Sage 50 (US) to Sage 300


Migrate Item On Hand Quantity from Sage 50 CAD (Simply Accounting) to Sage 300 ERP

$
0
0

GUMU™ for Sage 50 CAD (Simply Accounting) ERP to Sage 300 ERP is a Sage certified Migration solution. Greytrix provides Migration services at its Sage Migration Centre and fulfils the business requirements.

New Stuff: Migrate Ship to Address from Sage Business Vision to Sage 300 ERP

In this blog you will get to know how GUMU™ migrates On Hand Quantity of Items from Sage 50 CAD (Simply Accounting) ERP to Sage 300 ERP.

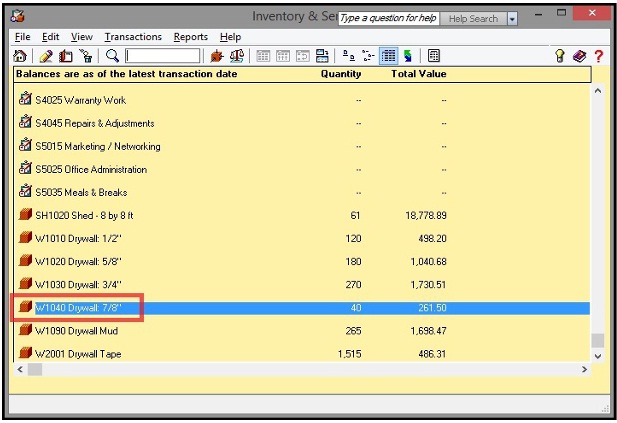
You can view Items and their On Hand Quantity in Sage 50 from the following path -
Sage 50–> Inventory & Services–> View Inventory & Services–> Items

SA1

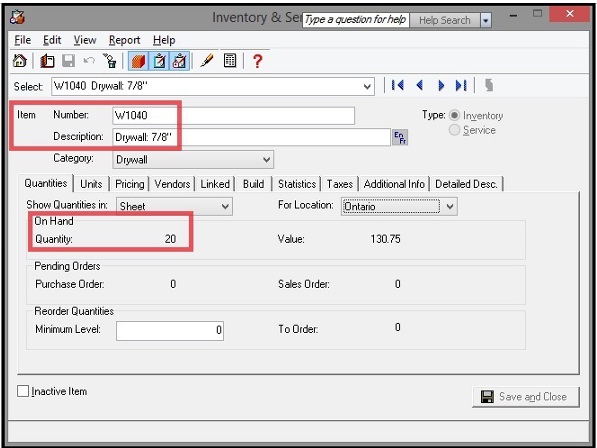
After double clicking on any Item, Inventory and Services Records window gets opened as shown below.
In Quantities tab, you can see On Hand Quantity of an item as shown below.


sa2

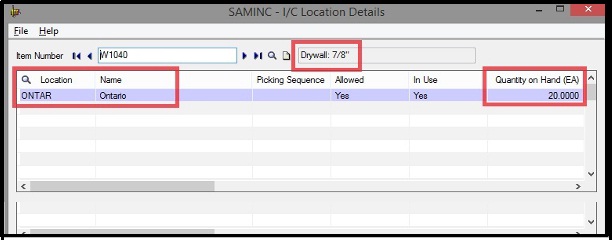
After migration from Simply to Sage 300, you can check On Hand Quantity of Items in Sage 300 ERP as shown below.

And the path for Sage 300 ERP is:
Sage 300 ERP–>Inventory Control –>I/C Item and Price Lists–>Location Details

Here you can see Location wise On Hand Quantity of an Item as shown below.

sa4

Terms for both Sage 50 and Sage 300 ERP:

SA5

In this way, you can see the Quantity On Hand of an Item of source ERP (i.e. Sage 50 ERP) and after conversion target ERP (Sage 300 ERP).

Also Read:
1.
I/C Update Item Pricing for Sage 300 ERP
2.
Item pricing based on Multiple Unit of Measurement
3.
How to Calculate Current Quantity on Hand on Custom Reports in Sage Accpac ERP
4. Location Wise I/C Item Details

5.
Migrating Item Pricing from Sage Pro ERP to Sage 300 ERP

Migrate Remit-To Location from Sage 50 (US) to Sage 300 ERP

$
0
0

We provide data Migration Services from Sage 50 US (formerly known as Sage Peachtree) to Sage 300 ERP (formerly known as Sage Accpac) at our Sage Migration Center.

This blog is in continuation to our series GUMU™ ERP Migration services. In our last blog, we had discussed about how to Migrate Vendors from Sage 50 US to Sage 300 ERPIn this blog, we are going to discuss about how vendor Remit-To Location gets migrated from Sage 50 US to Sage 300 ERP using GUMU™.

Our GUMU™ migration utility is compatible to convert all Master and Open transactions along with Sales, Purchase and GL historical data from Sage 50 Accounting- US edition (formerly Sage Peachtree) to Sage 300 ERP.

New Stuff: Migrate Item Price Lists from Sage 50 CAD (Simply Accounting) to Sage 300 ERP.

Let’s have a quick look at the below screenshot of Sage 50 vendor Remit to address screen.

Sage50

After data migration from Sage 50 (US), the field values of Sage 50 Remit-To Address gets converted with the following mapping:

Mapping

Here is the converted vendor Remit-To Locations field from Sage 50 US to sage 300.

Kindly refer the below screenshot from below path: Navigate to Account Payable >> A/P Vendors >> Remit-To Locations.

Sage 300

Sage300_1

For more information on ERP data migration, drop us a mail at erpmig@greytrix.com

Also Read:
1. Migrate Sales Payment from Sage 50 US to Sage 300 ERP
2. Migrate Purchase invoice from Sage 50 US to Sage 300 ERP
3. Migrate Banks from Sage 50 (US) to Sage 300 ERP
4. Migrate Banks from Sage 50 (Canada) to Sage 300 ERP
5. Migrate customers from Sage 50 (Canada) to Sage 300

Item Quantities Drilldown Feature for OE Shipment Entry Screen Part -II

$
0
0

In our last blog we discussed how to get Quantity on Hand and Quantity on Sales order in O/E Shipment screen and in this blog we see how to identify Qty. on purchase order, Qty. committed and Qty. available.

When we deal with shipping of any kind of goods, we do need to know about the quantity committed for that item, Qty. available and Qty. on purchase orders in particular location and all location so that the user can easily trace the QTY and can do the shipment entry.

New stuff: Migrate Remit-To Location from Sage 50 (US) to Sage 300 ERP

11

Qty. on Purchase Order:

At the screen level, the Qty. on purchase Order field directly drills down to the Qty. on the P/O. screen which shows the number of purchase orders placed by a user for the specific location and all locations.

22

Also from QTY. On P/O. screen, the user can directly navigate to the individual purchase orders by clicking on the drill down link given on the PO number and find the details of the Purchase order like PO items and their PO quantity (Please refer the below screen shot).

33

Qty. Committed:

When a customer places an order and puts some Quantity in the QTY committed column during the order then those quantities becomes dedicated to that particular order and won’t be available in future for another order. So using this field on the screen, the user can easily know the number of quantities which are actually committed. The user can easily drill down to the orders in which item quantities are actually committed for a particular location/All location.

44

If the user wants to see a particular order entry in list then he can directly navigate with the drill down feature. (Please refer the below screen shot).

Qty. Available:

When a user wants to create the shipment entry from a particular order and wants to ship some items, he must be aware of the quantity available on that particular location and all location so that the user can ship the items and easily know the quantities available to ship.

In this way the fields shows the shipment screen which gives the user 360 degree view of the committed, available quantity and can easily navigate to the orders by just clicking on the drill down button.

Also Read:
1.Quantity On Hand Drilldown feature for OE Order Entry Screen
2.IC Items Location Details Quantity Inquiry in Sage 300 ERP
3.Item Quantities Drilldown feature for PO Purchase Order Entry Screen
4.Item Quantities Drilldown Feature for OE Shipment Entry Screen

Migrate Remit-To-Address from Sage Business Vision to Sage 300 ERP

$
0
0

GUMU™  for Sage Business Vision to Sage 300 ERP is a Sage certified Migration solution.Greytrix is a pioneer in providing Migration services at its Sage Migration Centre and catering end-user business requirements.

We at Greytrix are focused to help the end –user in successfully implementing the new Sage 300 ERP system through our various successful migration and integration solutions.

New Stuff: 
Migrate Item Price Lists from Sage 50 CAD (Simply Accounting) to Sage 300 ERP

In this blog, we shall explore upon the migration of Remit-To-Address from Sage Business Vision to Sage 300 ERP. Let’s take an example of a Remit-To- Address in Sage Business Vision ERP system. This is how it looks:

BV11

Remit-To-Address is converted into Sage 300 ERP with the following mapping:

BV12
After the migration to Sage 300 ERP, the converted Remit-To-Location screen will look as below:

In below screen you could see the vendor whose Remit-To-Location is converted:

BV13
BV15
Hope the above topic provides you sufficient information in comparing the Remit-To-Location records between the two diverse ERP systems.

For more information on the data migration, drop us a mail at erpmig@greytrix.com

Also Read:
1) What do you want to migrate to Sage ERP
2
Migrate GL Accounts from Sage Business Vision to Sage 300 ERP
3
Migrate Banks from Sage BusinessVision to Sage 300 ERP
4
Migrate Vendors from Business Vision to Sage 300 ERP


Allow Remit To Information To be Changed

$
0
0

In this blog post, we will discuss about another feature of Sage 300 ERP ‘Allow Remit To Information To be Changed’. In A/P Option setting, there is a check box ‘Allow Remit To Information To be Changed’‘under the ‘Transactions’ tab [Refer screenshot below].

To achieve this, navigate to Accounts Payable –> A/P Setup –> Options

New Stuff: Migrate Remit-To Location from Sage 50 (US) to Sage 300 ERP

Ap Options 1

With this option checked, user will be allowed to do changes to remit-to location information on the Payment Entry form.

AP payment with checked option

While doing AP Payment, click on the zoom button along the “Remit To”, the above message will pop up in enabled mode. By default it will show you the data from master. But it will allow user to change address and remit to details. This option may be useful when user wants to change the remit to location information at the time of payment and the same changes will be saved only for that particular payment.
With this option unchecked, the Remit To and Address details in Remit to Location pop up will be in disabled mode. [Refer Below screen Shots].

AP payment with unchecked option

Here you can view the details, but will not be able to change anything. Thus in order to do changes at the time of payment, you need to check the option.

However, this option can be changed any time as per the convenience of the user.

Also Read:
1. Allow Non Inventory Item Option in PO
2. Allow Fractional Quantities in Purchase Order
3. Allow edit of System generated batches
4. Allow Adjustments in Payment batches
5. Allow editing of external batches


Summary Collection Report

$
0
0

In any ERP software, Account Receivable plays a very important role as it gives you the information about the money owed by customers to another entity in exchange for goods or services that have been delivered, but not yet paid for. Because of this, accounts receivable is listed as a current asset on the seller’s balance sheet.

In sage 300 ERP, we have developed a report which provides you with the list of the outstanding amount paid against the invoices. This will be more useful in identifying the amount due against a customer.

Suppose there are many invoices which are still open and you want to know the list of such invoices and also the amount pending against those invoices then this report will help you. If you want to know the pending balance against the customer, even then you can use this report to find it.

We have provided “from” and “to” filtering option as shown in below image:

New Stuff: Migrate Remit-To-Address from Sage Business Vision to Sage 300 ERP

3

The output will be as follows:

4

As shown above, you can get the customer name, Id, Document number, batch and entry number, invoice amount and the outstanding amount against the invoice.  At the end of each customer, the total outstanding balance is also displayed. This report will pick only those invoices which have outstanding amount.

This report is useful to get the customer wise outstanding balance.

Also Read:
1.Use Item Comment as Default – AR Setup Options
2.Account Receivable Transaction Reports in Sage 300 ERP
3.Default settings for Receipts in Account Receivable in Sage 300 ERP
4.Delete Inactive Records in Account Receivable
5.Clear Sales History from Account Receivable Module in Sage 300 ERP

Generate OE Shipment from Shipment Automation

$
0
0

OE shipment generation process can be a tedious task. But due to its high important nature, it needs to be prepared with utmost care. What if, there was a way to automate this particular task and help in increasing the productivity of the company? That is what we will be discussing in brief in the following blog, about the generation of OE shipment automatically from Order entry created for bringing about ease and efficiency in the OE shipment process.

Through this custom program, the user can generate multiple shipment at one click after selecting orders. While generating OE shipment from shipment automation screen you can also generate the Invoice simultaneously. Thus, not only reducing the time for processing but also improving the productivity

Let’s take an example here is an Order Entry with quantity of item=40 & committed quantity=15,Refer below screenshots:

New Stuff:Summary Collection Report

new

Shipment Automation screen will look like the following:

222

Here you can filter out orders using various filter criteria like:

• Customer Group
• Order Type
• Order Number
• Order Date

Once you are done with selecting various filter, click on Go button. Now the detail grid will show you the list of orders for which you want to generate shipment.

Click on Process to generate shipment. Also you can generate shipment from multiple orders at the same time.

Go to OE->OE transaction->OE shipment, you can notice that shipment entry get generated with shipped quantity as committed quantity from Order Entry. Refer below screenshot,

333

Along with the OE shipment, OE invoice entry also gets generated with shipped quantity.Committed quantity must be entered in order entry for automatic shipment creation. If you add transporter , LR no , LR date , vehicle no etc., all those data will be displayed in OE shipment optional field.

Also Read:
1.Item Quantities Drilldown Feature For OE Shipment Entry Screen
2.Editable PO Number field on O/E Shipment Entry for Sage 300 ERP 2012
3.Creating Single Shipment entry from Multiple Sales Orders in Sage 300 ERP
4.New Enhanced Quick Shipment for Sage 300 ERP
5.Ship Commit All in OE Shipment


Quick Receipt in Sage 300 ERP

$
0
0

Sage 300 ERP is a pervasive business management solution to keep track of business and saves time and cost of the owner. In this blog we will be discussing about a feature that we have come up with:  quick receipt feature of sage 300 ERP.

Quick receipt allows a user to print deposit slip by providing sufficient information for cash, check and other receipts. Sometimes, if there is any situation wherein the customers pays in cash or cheque and he needs to provide with an acknowledgement to the customer and take it to bank in timely manner, then quick receipt feature allows him to make a quick receipt with fewer details of payment and take deposit slip.

Let see, how to create quick receipt entry in Sage 300 ERP.

New stuff: Generate OE Shipment from Shipment Automation

To open the screen please navigate to,

Accounts Receivable–>A/R Transactions–>Quick Receipt Entry.

Please refer below screen shot for quick receipt entry.

1

To create quick receipt, the user needs to enter only fewer details like bank code, customer number, check number (if payment type is check), and amount.

Follow below steps to create quick receipt:

1.Click on new button to create new entry.
2.Select Bank code.
3.Click on the grid and fill the information like customer number, payment code, check/receipt no.,          account set, amount etc.
4.After filling the details, user needs to press insert or down arrow button or click anywhere to                  generate document number.
5.Once the number is generated, it means your details are saved.

After filling the information user can take deposit slip by clicking on deposit button.

Please refer the below screen shot for deposit slip.

2

Also, the user can use the applied receipt to the invoices, credit notes and debit notes. He needs to click on open button to open AR receipt entry screen.

Please refer the below screen for AR receipt entry.

3

This is the very useful feature of sage 300 ERP when there is a requirement of making an entry and proceed payment to bank in timely manner. This saves users time.

Read also:
1.    Allow Edited After Invoices Printed
2.    Migrate AR Payments from QuickBooks to Sage 300 ERP
3.    Use Item Comment as Default – AR Setup Options
4.    Control your AR Receipt editing after being printed
5.    AR Prepayment Creation through Order Entry

Quantity entered differs from the Serial number assigned in transaction for Sage 300 ERP v2014

$
0
0

In Sage 300 ERP it is mandatory that the transaction quantity and the serial number should match. Hence for each serialized inventory corresponding serial number is attached.

New Stuff:  Implementation of Bar code in Sage 300 ERP

But there arise scenario whereby, if we are shipping any FOC item or providing Sample item along with the actual Shipment, this item does not have a serial number.  So to achieve this functionality user can simply change the Inventory control setting to ON which will allow the transaction quantity different than the Serial number attached to the transaction.

Following simple steps you can help you attain this, User needs to navigate to Inventory Control –> I/C Items and Price Lists –> Items –> I/C Items

1

There is an option called “Allow Serial Quantity to be Different from the Quantity in the Entries” in the Serials tab. Once the User checks this option, SAGE 300 ERP v2014 allows entries to be saved even if the number of assigned serial numbers is less than the quantity of the serialized units that the User working with.

If the option “Allow Serial Quantity to be Different from the Quantity in the Entries”  in I/C Item is unchecked, the User will get the following message if Serial quantity is different from the quantity entered for that serialized item in the entry.

2


Default: Allow Serial Quantity to be Different from the Quantity in the Entries

If at all the item that get generated in your Inventory control module are with the same functionality then you can easily default the option from the I/C Option screen.

Set the default value of the option “Allow Serial Quantity to be Different from the Quantity in the Entries” using the I/C options in Inventory control module. For that, the User needs to navigate to Inventory Control –> I/C Setup –> Options –> I/C Options.

3

In the Serials tab of I/C options, the User can set the default value for the options “Allow Serial Quantity to be Different from the Quantity in the Entries” as shown in the screenshot. If the User checked this option, while creating new serialized item, the option “Allow Serial Quantity to be Different from the Quantity in the Entries” is checked by default.

Also Read:

1. How to assign unique serial Number to Individual Items in Sage 300 ERP Versions 2014
2. How to restrict use of Expired Stock in SAGE 300 ERP
3. Serial/Lot Number Stock Report
4. How to allocate a Serial and Lot number at Order Entry screen in Sage 300 ERP
5. How to adjust the Serial-Lot quantity variance in Inventory Control in Sage 300 ERP

Unit of Measure and Conversion Factor in Sage 300 ERP

$
0
0

Today we will be covering a very interesting and important point about Unit and measure and conversion factor in Sage 300 ERP.

In sage 300 ERP Unit of Measure is used to add the units of measure (UOMs) in which you buy, sell, price, and stock your inventory items. Inventory Control lets users define all units of measure in a single place so the users can add them more easily to item records. UOM is also used in sales order and purchase order.

Units of measure can comprise of many variables like number of items, dry measures, liquid measures, or weights. User can add all stocking units and multiples of stocking units to the Units of Measure screen, and then choose the group of units needed for each item master.

In the same, different kinds of variables can be further added like Kg, MTR, LTR, Pair and so on, for that refer below screen.

New Stuff:  Quantity entered differs from the Serial number assigned in transaction for Sage 300 ERP v2014

To create the Units of Measures go to Inventory Control–> IC Setup–>IC Unit of Measure.

11

In this screen, user can define the UOM with its conversion factor. A conversion factor is a number used to change one set of units to another, by multiplying or dividing. When a conversion is necessary, the appropriate conversion factor to an equal value must be used.

Suppose in above screen shot, to convert a unit of bundle to bag, the appropriate conversion value is 20 bundle equal 1 bag. Hence, whenever the desired number of bundle is added, the system multiplies to the conversion rate of the bag and displays the rate / conversion.

You can define unit of measure in inventory items, for that refer the below screen.

Go to Inventory Control–>IC items and price list–>IC Items

•Create a new item and add the necessary details.
•Enter the units of measure by which you purchase or sell the item.
•Identify the stocking unit of measure for the item. And mark it as Yes.

22
The default Unit of measures has a conversion factor of 1 and all other are defined in relation to the default UOM. It is necessary that each product must be stocked in a single unit of measure.  This is required since all transactions will be converted to this Stocking Unit for inventory valuation.

In this way user can define the UOM in the inventory module and later defined it to the inventory.

Read Also:-
1.Item Pricing based on Multiple Unit of Measurement
2.Create weight unit of measure
3.Item pricing with check type in Sage 300 ERP
4.How to restrict user from using undefined UOM in inventory Control

Database To Database Integration in SAGE 300 ERP

$
0
0

In our previous blogs which are related to integration, you can notice that all are related to import – export process. Previously for entering a data in the program, we needed to co-ordinate between the data files like excel, xml or text and then input the same in the program and create an entry into Sage 300 ERP. These types of integrations are totally dependent on the data file. Until and unless we will not get the file, our integration will not work. In short these types of integrations are dependent on other program.

To avoid those dependencies Sage 300 ERP come up with a new concept which is “Database to Database Integration”.

Database Integration simply means maintaining relation between two different databases, so that changes in one database will get reflected in the other. Recently we have done database to database integration for one of our client.

Here is a brief idea about our custom integration program:

What configurations need to do?

1.Add server of other system’s database into the Linked Server of SQL.
2.Create the virtual table (SQL view) for fetching the required data from both the database.
3.User will have config file in which the error log path & other required details will be added.

How database to database integration works?

1.Recently we have done this type of integration for PO Receipt Entry in Sage. To facilitate this, we have provided a User Interface for users to select the filter criteria, parameter required for Entry & verify the data which is fetching from linked database. Please find the below screen shot for more clarification.

New Stuff:Unit of Measure and Conversion Factor in Sage 300 ERP

11111
2.Once the user has completed the verification of data, he needs to click the Import button shown in above screen shot.
3.After clicking the import button, our program will check the data which is required for Sage 300 ERP entry & simultaneously PO receipt entry will get generated in the system.
4.Once the import process is over, user will get the message for checking the log file for more clarification. Please refer the below screen shot.

2222

In the same way, we can also integrate the other entries in Sage 300 ERP through database to database integration.

This integration will reduce the efforts of other system’s user who will export the data into the files.

Also Read:
1.AP-GL Integration
2.INTEGRATION OF OPERA PMS WITH SAGE 300 ERP
3.Integration of Infrasys POS with Sage 300 ERP
4.POS Sage 300 ERP Integration
5.Data Integration Utility for Sage 300 ERP


A/R Document Inquiry in Sage 300 ERP

$
0
0

Sage 300 ERP is a complete package of Accounting and Operational modules for high transaction industries. It is always important for an organization to maintain their customers’ information along with Sales information of each customer.  Sage 300 ERP Account Receivable module allows an organization to manage their customers and their day to day transactions. Sage 300 ERP provides A/R Document Enquiry screen, to manage receivables with a remarkable agility and intelligence and reinvest cash through your business faster with optimized collections.

New stuff: Database To Database Integration in SAGE 300 ERP

111

222

AR Document Inquiry screen helps users to

1. Provide information or directly drill down to the transactions like Invoices, Debit note, Credit Note,         Receipts, Adjustments, Refunds, Know the documents for every customers
2. Find specific AR documents such as an AR Invoice, based on the document number alone with           the  AR Document Inquiry. It’s not necessary to know the customer number on the document.It is a     very useful feature when you’re in a hurry. (Please refer the above screen shots)
3. If you are know the customer number and want to only get the documents for that particular                 customer, you can apply a customer filter so that only documents for the said customers are               visible when you use the navigation buttons and the Document No. Finder.
4. In a multicurrency system, it also displays amounts in customer currency as well as in                       functional currency.
5. Print a copy of the original invoice, debit note, credit note, receipt, or interest charge directly from         the  A/R Document Inquiry screen.
6. Drill down to view the batch header for the batch that contains the current document.
7. Drill down to view documents in the original transaction entry screens.
8. View transactions that have been applied to the current document.
9. Manage your receipts and get more choices to manage your disbursements.
10.If the user uses Order Entry, drill down from order numbers and shipment numbers to view the             original order or shipment in Order Entry.

In this way, AR Document Inquiry helps users to manage the Account Receivable transactions for all the customers.

Also Read:
1.    Stock Transactions Inquiry in Sage 300 ERP
2.    Open Orders Inquiry for Sage 300 ERP Order Entry Screen
3.    Pending Shipments Inquiry in Sage 300 ERP
4.    AR Customer Receipt Enquiry
5.    Sales History Inquiry in Sage 300 ERP

Viewing all 1475 articles
Browse latest View live


<script src="https://jsc.adskeeper.com/r/s/rssing.com.1596347.js" async> </script>