Quantcast
Channel: Sage 300 ERP – Tips, Tricks and Components
Viewing all 1475 articles
Browse latest View live

I/C Transaction Listing Report

$
0
0

In Sage 300 ERP, every module provides a number of standard reports which helps users to get the detailed transactions, setups etc. In this blog we will take a look on one the IC Transaction listing report.

I/C Transaction Listing Report shows a list of saved /or posted transactions that has not been cleared yet from Inventory Control, including details of the transactions. This report gets printed from a Standard user interface. You can refer the below screen shot.

New Stuff:A/R Document Inquiry in Sage 300 ERP

123

This report can be found under Inventory Control–>I/C Transactions–>Transaction Listing.

The UI has different filtering options available like the Include comment, serial /Lot number. Also it has the option to print the already printed transaction. User can select the Status depending on the Criteria.

You can print the following types of transaction listings based on the selection of the transaction type.

•Adjustments: – The adjustments transaction listing includes the details of adjustment entries created through IC adjustment. It also include Process Adjustments under Periodic Processing.

If you select Adjustments then all data related with Adjustments will be display in reports like the adjustment number and the type of adjustment for the bucket type (Offset Bucket, Specific Bucket, or Prorate). The changes are made in functional currency to your adjustment/write-off accounts when you adjust costs etc.

•Assemblies: – If you select assemblies then all data related with assemblies will get displayed in reports like Assembly number, assembly date, and transaction type (whether assembly or disassembly). Also Bill of Material (BOM) number and type of item, build quantity, fixed and variable costs, disassembly cost will get displayed in the report.

•Receipts:- If you select Receipts then all data related with Receipts will get displayed in the reports like Document number, additional cost if any, PO number. All information entered for each item detail, including Item categories, Inventory location, Quantity returned, Unit and extended costs, any adjustments to quantities and costs after the original receipt.

•Shipments: – If you select Shipments, then all data related with shipment will get displayed in reports like the all header material for the shipment, including Document number, Customer number price list, and all information entered for each item detail, including: Item categories, Inventory location, Unit and extended prices, Unit and extended weights.

•Internal usage: – If you select Internal usage then all data related with Internal usage will get displayed in reports like the all header material for the internal usage transaction, including: Date, year, and period of the transaction, Employee requester, location, quantity, UOM, Unit cost, Extended cost.

•Transfers: – If you select transfers  then all data related with transfers  will get displayed in report like the all header material for the transfer, including:  like the Document number, from transit number (if a transit receipt), Transaction type, transaction status, proration method. Information entered for each item detail, including: Requested and shipped quantities. Unit and extended weights, Unit and extended costs

The output of the report is as shown below:

456

Hence this report helps to give details related to a particular transaction.

Also Read:
1.Confirmation message in IC Transactions
2.GL Listing report – Summarized by Accounts
3.Date wise GL Transaction Listing Report
4.Item pricing with check type in Sage 300 ERP
5.Enhancement in General Ledger Transaction Listing report


Defaulting Detail Tax class to 1 in Account Payable in Sage 300 ERP

$
0
0

In this post, we will discuss about a feature of Sage 300 ERP  ‘Default Detail Tax Class to 1’ in Accounts Payable.

This feature sets all the tax class to 1 while creating the A/P invoices in spite of what is defined in vendor master. If the user wants the tax class always be set to 1 then selecting this option will be useful as he need not have to always manually change the tax class.

This option is found in A/P Option under the Transaction tab [Refer below screenshot].

To achieve this, navigate to Accounts Payable–>A/P Setup–>Options

New Stuff: I/C Transaction Listing Report

1

If this option is checked, the user will be allowed to use 1 as the default tax class for details on new AP invoices [Refer below screen shot].

2

But when we take a look at the vendor master screen, we find that it has tax class as 3 and 2 defined for the same vendor [Refer below screen shot].

3

As the option “Default Detail Tax Class to 1” is checked in the AP Option, whenever we create Invoices the tax class will be by default set to 1 in spite of swhat is defined in AP Vendor Master.

Now let’s have a look when option “Default Detail Tax Class to 1” is unchecked.

In this case it sets the tax class as 3 and 2 which were set in the A/P Vendor master screen. [Refer below screen shot].

4

However, this option can be changed any time as per the convenience of the user.

Thus, If you want to use 1 as the default tax class for new invoice details keep this option as checked and if you do not select this option, Accounts Payable uses the vendor tax class (from the Invoice Entry Taxes tab) as the default for new invoice details.

Also Read:
1.Allow Non Inventory Item Option in PO
2.Allow Fractional Quantities in Purchase Order
3.Allow edit of System generated batches
4.Allow Adjustments in Payment batches
5.Allow editing of external batches


Manage AR Item Statistics in Sage 300 ERP

$
0
0

Users in today’s blog, we will discuss an important feature of Sage 300 ERP, for the companies who does have Inventory control module but maintain their inventory using the AR Items and need to maintain the Item sales stats.

New Stuff:  Quantity entered different from the Serials number assigned in transaction of Sage 300 ERP 2014

In order to access this feature you need to navigate to Account Receivable A/R Setup Options Processing Tab. Kindly refer the screenshot for the same.

If User uncheck the option “Keep Statistics” in AR Options screen under processing Tab, then statistics for the transactions that are posted will not be included in the totals in the Item Sales History under A/R Transaction Reports as well as Items under A/R Setup.

1

 Before Transaction: 

Item sales History

2

Above screen shows the Item Sales History Report for Item “BK-360” before posting a transaction say Invoice with “Keep Statistics”unchecked in AR options.

Items

3

Above screen shows the statistics of Item “BK-360” before posting a transaction say Invoice with “Keep Statistics”unchecked in AR options.

Invoice transaction 

4

Above screen shows an Invoice is posted for Item No. “BK-360” for Quantiy : 5

After Transaction

Item sales History

5

Above screen shows the Item Sales History Report for Item “BK-360” after posting a transaction say Invoice with “Keep Statistics”unchecked in AR options.

Items

6

Above screen shows the statistics of Item “BK-360” after posting a transaction say Invoice with “Keep Statistics” unchecked in AR options.

On Comparing before Transaction and After Transaction Item sales History report for Item No. “BK-360”the number of Quantity sold displayed is 4.00 there is no change in the Item sales History report as well as the statistics displayed in the Items Screen. This is observed as the Keep statistics option is unchecked under AR options.
  1. If User checks the option “Keep Statistics” in AR Options screen under processing Tab, then statistics for the transactions that are posted will be included in the totals in the Item sales History under A/R Transaction Reports.7


For Example: Below screen shows the Sales History Report Before posting a transaction say Invoice with Keep statistics checked in AR options.
Before Transaction

Item Sales History Report
8

Items

9

Invoice Transaction: 

10Above screen shows an Invoice is posted for Item No. “BK-360” for Quantity: 1

11

After Transaction:

Item Sales History Report
12

 Items

13

On Comparing before Transaction and After Transaction Item sales History report for Item No. “BK-360”the number of Quantity sold has increased from “4”to “7” as the “Keep Statistics” option is checked under AR options.

This is how one can keep a track of the Item Statistics for a record.

Also Read:

1. How to Use Different Item Description for Specific Items in Sage 300 ERP
2. Populate Items on Order Entry Screen using Template Code
3. Generate BOM and Kitting items on the fly from Order Entry screen in Sage 300 ERP
4. Sellable and Non-sellable items in Sage 300 ERP
5. Track the cost of Items those are issued for Free

AR Options – Allow Edit of Statistics in Sage 300 ERP

$
0
0

To extend the discuss further from our previous blog on Manage AR Item Statistics in Sage 300 ERP, we will discuss about feature of Sage 300 ERP to see how to Edit the Item Statistics for Items under AR Options.

New Stuff:  Manage AR Item Statistics in Sage 300 ERP

In order to access this feature you need to navigate to Account Receivable–>A/R Setup –> Options–> Processing Tab.  Kindly refer the screenshot for the same.

1

1. If User Uncheck the option “Allow Edit of Statistics” in AR Options screen under Processing Tab, then user will not be able to Edit the statistics of the corresponding entries in the grid Under the statistics tab for A/R Items.

2

Above Screen shows Edit of Statistics for the corresponding entries in the grid are disabled.

2. If User Check’s the option “Allow Edit of Statistics” in AR Options screen under Processing Tab, then user will be able to Edit the statistics of the corresponding entries in the grid Under the statistics tab for A/R Items.

3

Before Edit

4

Above Screen shows Edit of Statistics for the corresponding entries in the grid are Enabled.

After Edit

5

Above Screen shows Edit of Statistics for the corresponding entries in the grid are Enabled.

Comparing Before Edit and After Edit shows respective change in the Entry for Amount Sold for the Current column has also updated the Year to date.

This is how one can Edit the statistics of the corresponding entries in the grid for a record.

Also Read:

1. Use Item Comment as Default – AR Setup Options
2. Populate Items on Order Entry Screen using Template Code
3. Generate BOM and Kitting items on the fly from Order Entry screen in Sage 300 ERP
4. Sellable and Non-sellable items in Sage 300 ERP
5. Track the cost of Items those are issued for Free

Automobile Industry| Go green with doc attach feature of Sage 300 ERP

$
0
0

salesgraph


In the recent years due to growth in economy, availability of better infrastructure and increase in the living standard of people there has been proportional growth in the Sales of Automobiles. This has opened plethora of opportunities for ERP usage in the Automobile sector in its back office to maintain their Book of Accounts.

In the recent years due to growth in economy, availability of better infrastructure and increase in the living standard of people there has been proportional growth in the Sales of Automobiles. This has opened plethora of opportunities for ERP usage in the Automobile sector in its back office to maintain their Book of Accounts.

In the recent years due to growth in economy, availability of better infrastructure and increase in the living standard of people there has been proportional growth in the Sales of Automobiles. This has opened plethora of opportunities for ERP usage in the Automobile sector in its back office to maintain their Book of Accounts.

Sage-300-ERP-Portal-3-Page

You can refer our extensive knowledge base for more information on implementing Sage 300 ERP in Automobile dealer industry. 

Purchase of the Automobile involves, loads of paper work that goes right from the Help desk department till the vehicle is handed over to the Customer at the time of delivery. Some of this paper work is repetitive and greatly involves usage photocopies of same documents across departments. Superfluous usage of paper adversely affects eco-system, so in an attempt to reduce paper work Greytrix has developed Document Attach Add-on which will help user to attach documents in form of soft copy directly in Sage 300 ERP, this will also help to manage the documents of each customer across department.
Each department while posting any transaction in the system, can now just attach the soft copy of the document for reference and this way user can manage all the documents related to the sales in system itself and will not be worried about filling each document related to the related sale in Sage 300 ERP.
So to conclude, for easy and hassle free document management in the Accounting system you can explore working on Document Attach Add-on for Sage 300 ERP.

Refer to our blog for more information on Document attachment.

Bank Reconciliation Status Report

$
0
0

The Bank Reconciliation Status of SAGE 300 ERP lists the status of all transactions for bank accounts, with the amount stated in the bank’s statement currency. The report includes:

For each bank:

  1. Lists of transactions and subtotals for all transactions that appear on the Reconcile Statements form.
  2. The bank total (the sum of all transactions that increase the bank balance, less the transactions that decrease it).

For each transaction:

1. The reconciliation status (for deposits, checks, or returned customer checks), or the transaction type description (for bank statement entries).

2. The document amount (that is, the item amount recorded in Sage 300 ERP), the cleared amount (entered when you reconciled the bank account), and the amount of the clearing difference. If the item has not been reconciled, the cleared amount is zero.

3. If you did not use the Print Deposit Details option, any deleted deposits appear as empty deposits on the report, showing “Deleted” in the status column and zeroes in the other columns. (If you used the Print Deposit Details option, deleted deposits do not appear on the report.)

4. A summary by bank for all selected banks appears at the end of the report.

New Stuff: I/C Transaction Listing Report

To print this report follow the steps mentioned below:

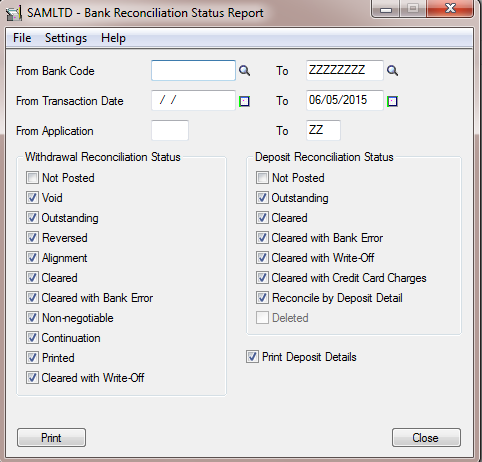
  1. Open Common Services > Bank Services > Bank Transactions Reports > Bank Reconciliation Status Report.Vendor
  1. Specify the bank or a range of banks to include on the report.
  1. Specify criteria for selecting transactions to include on the report, including:
  • The range of dates to which transactions were posted.
  • The source application (or a range of applications) that sent the transactions to Bank Services.
  • Reconciliation statuses for withdrawals.
    • Not Posted
    • Void
    • Outstanding
    • Reversed
    • Alignment
    • Cleared
    • Cleared with Bank Error
    • Non-negotiable
    • Continuation
    • Printed
    • Cleared with Write-Off
    • Cleared with Exchange Rate Difference
  • Reconciliation statuses for deposits:
    • Not Posted
    • Outstanding
    • Cleared
    • Cleared with Bank Error
    • Cleared with Write-Off
    • Cleared with Credit Card Charges
    • Cleared with Exchange Rate Difference
    • Reconcile by Deposit Detail
    • Deleted
  1. Select the Print Deposit Details option to print details of individual receipts in a deposit.
  1. Click Print.

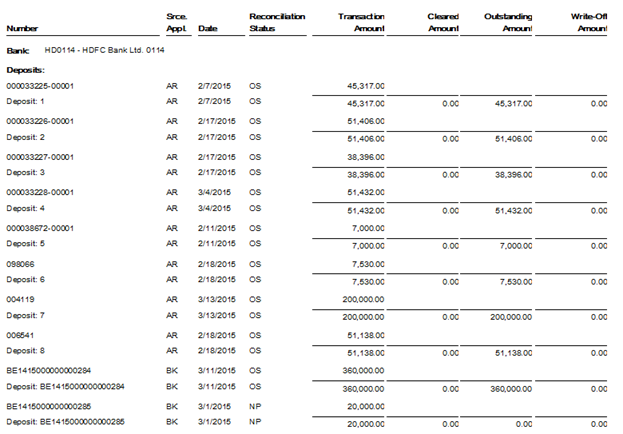
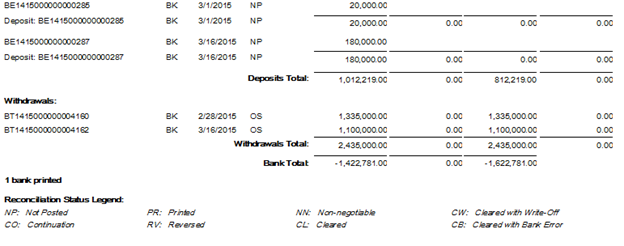
Below is the screen Shot of the report, it is printed as including the withdrawal & deposit reconciliation status as Not Posted & Outstanding.

Vendor

Vendor

This report will help you determine why the reconciliation does not balance & also help you to identify the cleared and outstanding amount in bank account.

Also Read:
1. Bank Transfer Entry In Sage 300 ERP
2. Accurate Bank Reconciliation
3. Create Bank Entry from Reconciliation Screen
4. Auto Bank Reconciliation in Sage 300 ERP
5. Set Document Numbering based on Bank Code for Sage 300 ERP

Integration with DMS and SAGE 300 ERP for Automobile dealer industry

$
0
0

Further to our blog on ERP for Automobile dealer Industry, let us broaden our knowledge about DMS and its integration necessity specifically for dealers of various automobiles.

Vendor

In today’s competitive business environment, companies need to interact with a wide base of clients, customers, suppliers and partners—both inside and outside of the organization. Hence, it becomes important for companies to integrate, automate, and streamline their core internal and external business processes across the extended enterprise.

Automotive Car dealer typically uses Dealership Management System (DMS) or Auto Dealership Management System which is a bundled software that caters to the needs of the finance, sales, and inventory components of running the dealership. It becomes important to preserve applications like DMS provided by dealer principal and also maintain internal application to meet the complex requirements of their business. The advantage for dealers using specialized system are plenty, however the primary outcome is more efficient dealership. Hence Integration of internal software with DMS becomes a pre-requisite for any automobile dealership company.

New Stuff: Bank Reconciliation Status Report

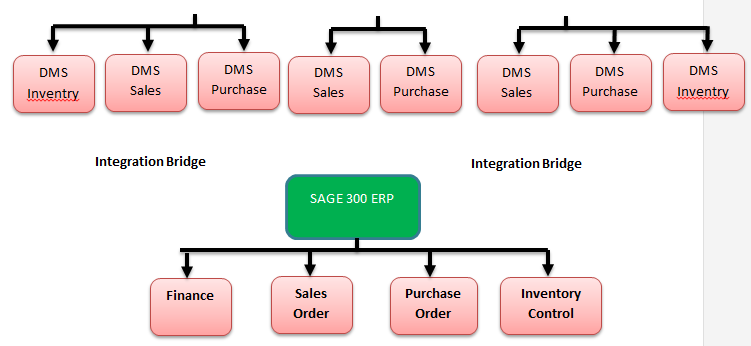
Any DMS system would have the following structure:-

Vendor

Vendor

Characteristically, the primary goal of DMS integration software would be efficient, reliable, and secure automotive dealer data extraction.

All dealers’ locations are connected to the Principal DMS through the DMS line. All transactional data like Purchase Orders, Sales Orders, and Repair Orders is primarily entered into this software by the dealers.

Later, this transactional data when required by dealers for internal analysis is pulled from the DMS data with the help of Integration Bridge into internal ERP software. Integration software can serve efficiently and effectively to extract and deliver data from Dealer Management Systems multiple times per day, during times that minimally affect dealer business systems.

The data can further be used by the dealer for internal evaluation. Integration product in SAGE 300 ERP can extract data from multiple DMS and provide data that powers SAGE ERP application. With the help of extracted data SAGE 300 ERP delivers different types of reports useful for Inventory tracking and controlling, different formats of Balance sheets, different formats of Profit and loss statements, various types of account statements, Inventory stock valuation reports etc. SAGE 300 ERP can also furnish all types of analytical reports like Purchase analysis, due date analysis for customer open balances, vendor payment history etc. after extraction of data from DMS through the Integration Bridge.

Also Read:
1. Sage 300 ERP for Automobile Dealer Industry
2. What is Supply Chain Management?
3. How to restrict use of Expired Stock in SAGE 300 ERP
4.  Warranty Tracking in Sage 300 ERP
5. Unit of Measure and Conversion Factor in Sage 300 ERP

Sage 300 ERP for media and entertainment Industry

$
0
0

Nowadays Media and Entertainment industry is growing very fast. They broadcast live coverage of sports, entertainment, news channels and provide services to customers for advertising, animation, B2B, digital marketing, sports, television, special effects, post- production such as film editing and radio.

This fast growing media and entertainment industry requires more innovative solution to deal with its growing number of audiences and customers. So that they can provide better services to their customers.

New Stuff: Integration with DMS and SAGE 300 ERP for Automobile dealer industry

 They require managing licenses, resources, media & entertainment related equipment’s and other assets. They are also required to keep track of inventory purchases, sales, customer’s invoices, customers receipt, vendor invoices & payments.

 Apart from this, in a company, there are mostly requirement of MIS reports, dashboard, sales Revenue, analysis and their financial data to help drive better business decisions

customer

Sage 300 ERP consist of different modules like sale, purchase, inventory, Asset, Account Payable Account receivable and General Ledger Module. Which will provide more helps to these fast growing Media & Entertainment industry.

Here is Some Key Aspects Included in Sage 300 ERP for Media & Entertainment Industry.

  • Keep track of assets and Inventory
  • Provides analysis, dashboards and other imports MIS reports.
  • Keep track of customer open invoices based on due dates.
  • Provide Financial data such as budgeting and Broadcasting
  • The system streamlines various business processes and workflows
  • Business Intelligence, through which users can build their own customize reports.
  • Revenue recognition and revenue forecasting
  • Deliver improved loyalty to reduce customer losses and drive recurring revenues

Also Read:
1. Sage 300 ERP in Sugar Industry
2. Sage 300 ERP for Automobile Dealer Industry
3.  Sage 300 ERP for Ready Mix Concrete Industry
4. Sage 300 ERP makes your manufacturing processes simple
5. Steel Tubes Industries and Sage 300 ERP


Migrate A/R Payment Terms from Business Vision to Sage 300 ERP

$
0
0

GUMUTM for Sage Business Vision ERP to Sage 300 ERP is a Sage certified Migration solution. Greytrix is a pioneer in providing Migration services at its Sage Migration Center and catering end-users business requirements.

We at Greytrix help the end – user in implementing new Sage 300 ERP system through our various successful migration and integration solutions.

In this blog we will discuss about how GUMU TM migrates A/R Payment Terms from Sage Business Vision ERP to Sage 300 ERP (Formerly known as Accpac).

New Stuff- Migrate Customers from Sage Business Vision to Sage 300

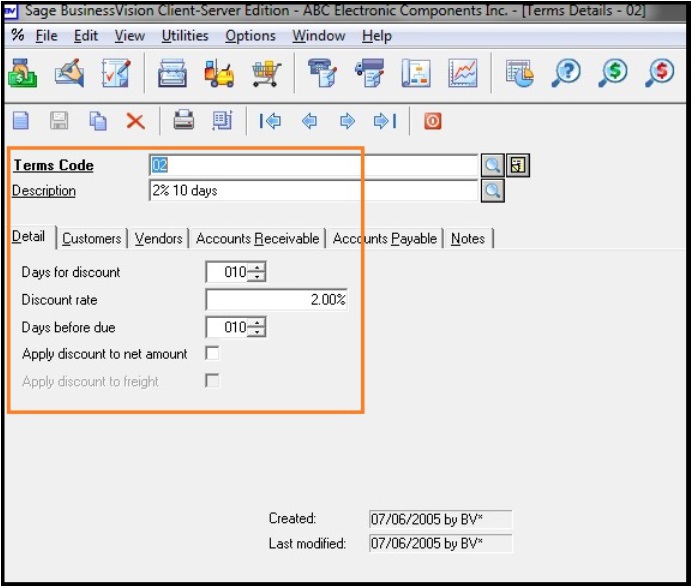
We can create payment terms for customers from the following path in Sage Business Vision.

Sage Business Vision → Edit → Terms

BV1
The above screen shot shows an existing payment term in Sage Business Vision


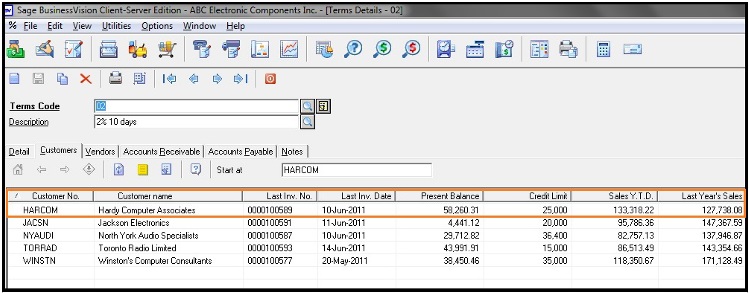
BV2

The above screen-shot shows the number of customers that are assigned this Payment Term in Business Vision.

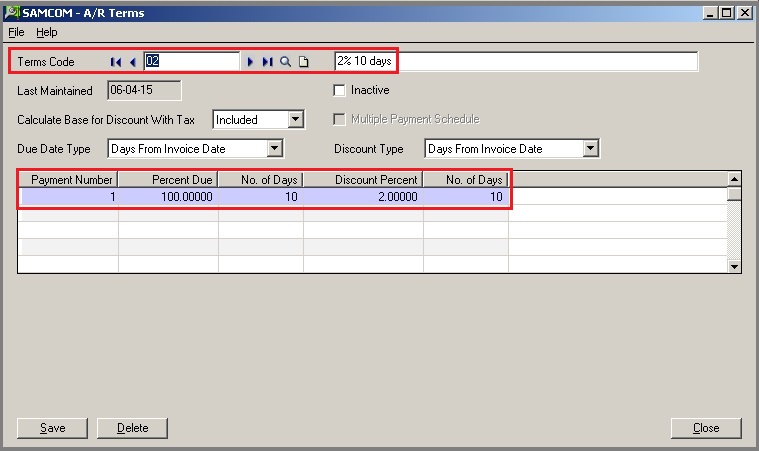
You can create payment terms for customers from the following path in Sage 300 ERP.

Sage 300 → Accounts Receivable → A/R Setup → Terms

Accpac1


The above screenshot shows the converted A/R Payment Term in Sage 300 ERP

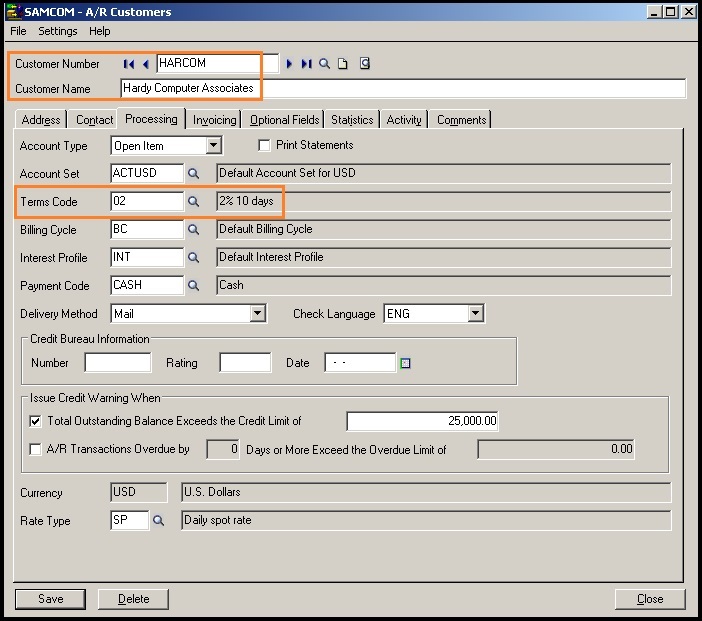
Accpac2

In the above screen shot the customer ‘HARCOM’ is assigned the ’02′ Payment Term as in Business Vision.

After data migration from Sage Business Vision ERP the field values of Sage Business Vision Payment Terms get converted with the following mapping:

MAPPING
In this way, Sage Business Vision
A/R Payment Terms are migrated into target Sage 300 ERP company database. For more information on ERP data migration, drop us a mail at erpmig@greytrix.com

Also Read:

1. Migrate Sales Person from Sage Business Vision to Sage 300 ERP
2. Migrate Banks from Sage BusinessVision to Sage 300 ERP
3. Migrate Vendors from Business Vision to Sage 300 ERP
4. Migrate GL Accounts from Sage Business Vision to Sage 300 ERP


Vehicle Finance Quotation

$
0
0

Now a days, customers become more demanding regarding finance quotation. so while making a Finance Quotation for Automobile Industries, it is very important to keep a good presentation which insists businesses go out of their way to make customers feel appreciated, understood and cared for which provides the end results which is more and more powerful.

So taking care of the customer’s satisfaction, we have developed a report for automobile industries in Sage 300 ERP known as “Vehicle Finance Quotation”, which provides the users a brief idea about the Loan tenure, Loan amount, EMI, Advance EMI, Bullet EMI, Balloon payment in correspondence to the total on road value.

This Report will display the quotation of a vehicle and its retail finance options too.

In Quotation part we have shown the ex-showroom price and total on road value which includes various charges like insurance charge, taxes like Vat etc.

In retail finance option we have taken three loan tenure (like 3 years,4 years and 5years) to show on the report and in correspondence to this Loan amount, Advance EMI, Bullet EMI, Balloon payment are also shown.

Finally a down payment of the vehicle is calculated and shown on the report.

This report can be printed using the same UI used for Quotation printing in Sage 300 ERP as shown in the following screen shot:

New Stuff:Migrate A/R Payment Terms from Business Vision to Sage 300 ERP

UI

The following screen shot show the overview of the report format:

new1


Thus the Finance Quotation, is the clear bifurcation of Quotation and retail finance option, which helps the customers in understanding the finance scenario clearly for their vehicle quotation.

Also Read:

1.Add Comments in AR Aged Trial Balance Report
2.Allow Printing of Invoices
3.Tax Audit Report
4.Summary Collection Report
5.Database To Database Integration in SAGE 300 ERP

Aged Purchase Order Report in Sage 300 ERP

$
0
0

In this post, we’ll learn about another report of Sage 300 ERP. In Purchase Order module if we want to view the transactions of purchase order as per the ageing period then the Aged purchase order report will be used. To print this report we can navigate to:

Purchase Order–>PO Analytical report–>Aged Purchase Order Report

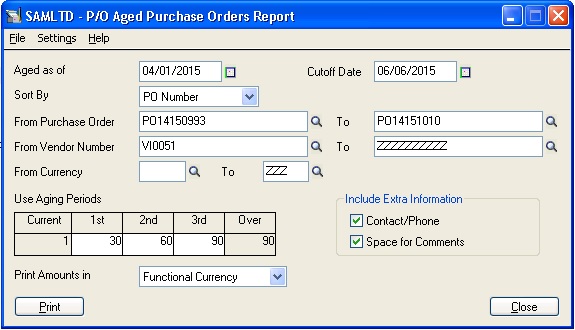
In this report user will get incomplete orders with relative ages as entered in UI. We have multiple selections in UI, refer below screenshot:

New Stuff:Vehicle Finance Quotation

Blog51

This report is used to print the ageing range of a particular purchase order, total of each aging period & grand total of all ageing period. In the above UI different filter are criteria available like purchase order range, vendor number & currency.

First criteria “Aged as of” is used to see the order aged, then second is “cut-off” date which will be the most recent date at which user want to print order (till current date).

Then sort by dropdown list is used to sort report information by PO number, vendor no or currency (if used multicurrency).

In this report if the user wants to print extra information like Contact/Phone & Space for Comments then user need to select checkbox  “Include Extra Information” as per the requirement in report UI.

Another dropdown list is provided to print amount either functional currency or vendor currency as per user’s requirement.

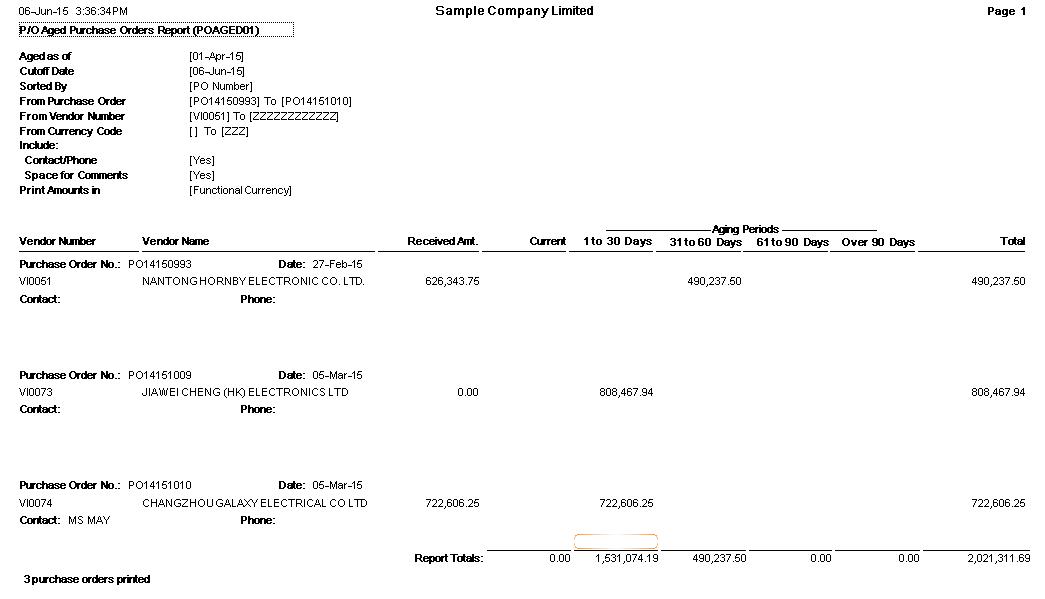
After applying the filter criteria, report will get printed:

Blog2

By using this report, the user can view the Aged Purchase Order & will be able to see the amount of the order as per its specific aging periods & other filter criteria.

In above screenshot we can see the purchase order number with its vendor code & vendor name, received amount. Ageing period between 1 to 30 days, 31 to 60 days, 61 to 90 days & over 90 days as per date of purchase order. This aging periods amounts will be based on aged as of & cut-off date from UI. Total of each purchase order & total of all aging columns will be displayed at the end of the report.

Also Read:

1.Aged Sales Order Report in Sage 300 ERP
2.Purchase Order Reports in Sage 300 ERP
3.Purchase Order Transaction Flow in Sage 300 ERP
4.Printing Non-invoiced and Partially invoiced Reports
5.Migrate Purchase Orders from Sage 50 (US) to Sage 300 ERP


Customized Stock Transfer

$
0
0

Some time in business it may happen that you have stored some inventory at one location and now you want to transfer them to another location. Sage 300 ERP has provided the users with screen named as IC Transfer which record stock transfers between physical inventory locations, if you store inventory items at more than one location.

IC Transfers changes the item quantities at location without changing the total number of items in inventory, or the total inventory valuation. Our customized stock transfers perform the same functionality. We, have just made IC Transfer task little bit convenient by adding few new fields.

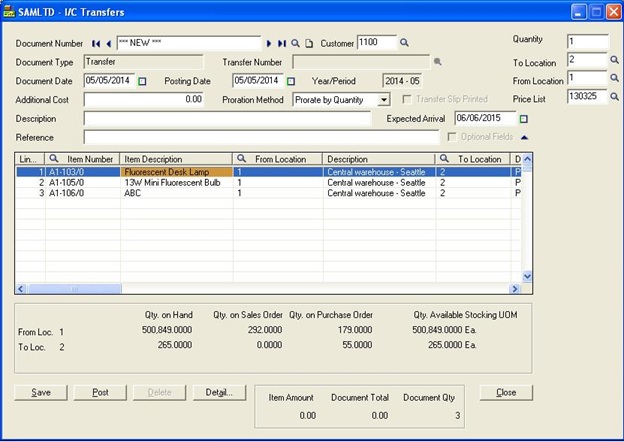
The customized UI will look as below. We have added Customer, Quantity, From -To Location and price list code on the UI.

New Stuff:Aged Purchase Order Report in Sage 300 ERP

new2

Suppose that you have to transfer 100 items from location 1 to location 2 with quantity 100 then think how much lengthy work it will be to fill each and every detail for 100 items.

To make this task easier, we have customized the IC Transfer Screen. In this screen you need to add only items, the rest mandatory details like From Location, To Location, Price List Code and Quantity will get added automatically. Later on if you want then you can change the details manually for particular item. This will work for both IC Transfer and IC Transit Transfer.

This customization will be helpful when you want to transfer more number of items from one location to other. This will help to save some time by avoiding manual work.

Also Read:

1.Accounting Effect On Inventory Control
2.Warn for Non Inventory Item Option in PO in Sage 300 ERP
3.How to adjust the Serial-Lot quantity variance in Inventory Control in Sage 300 ERP
4.Allow Non Inventory Item Option in PO
5.IC Aged Inventory Report


Optional to maintain Statistics for Customer, National Account and Group in Sage 300 ERP

$
0
0

In Sage 300 ERP within AR Options module have a feature to maintain statistics for Customers, Groups and National Accounts. Whenever any transactions such as Invoices, Receipts, Discounts, etc. are processed against the Customers its effect is visible in the A/R Customers, A/R Customer Groups and A/R National Accounts. Due to which you can maintain your Account balances customerwise.

New Stuff:  Defaulting Detail Tax Class to 1 in Account Payable in Sage 300 ERP

How to use this feature:

1. In order to use this feature navigate to Accounts Receivables–> A/R Setup –>Options –> “Processing” tab. There is a separate group box for “Customer, National Account and Group Statistics” as shown in the below screen shot.

1


2. You will find first option as Keep statistic
Enabling this option will allows user to track below information regarding Customers, Groups and National Accounts

  •  The amount and number of invoices, receipts, discounts, credit notes, debit notes, adjustments, write-offs, interest charges, returned checks, and paid invoice.
  • The total invoices paid, the total days to pay and an average days-to-pay figures for the Customer.
  • The year-to-date total days to pay and average days to pay.
  •  Rest 3 options are only allowed if “Keep Statistic” option is enabled.

NOTE:
User can change the choice for this option at any time. However, Turning off this option, will disable capturing of transaction’s statistics. User can again set this option to on but it will skip the transactions statistics from totals in accounts records for those which are posted while this option was set to off also it doesn’t shows the statistics tab on respective screens.

View the example below for detailed understanding:

Turn on the “Keep Statistic Option” on.
As per below screenshots from A/R Customer screen Consider Customer “BARMART” with Group Code “WHL” and National Account as “BARMART”.

2


First of all we will record statistic information for A/R Customers, Groups and National Accounts so that effects of transaction on statistical accounts figure can be observed after processing transaction.
As per below screen A/R Customer statistics tab for “BARMART” is showing 0.000 for Invoices amount.

3


Refer below screen, It’s Groups (WHL) statistics shows 1323.41 as invoices amount as it’s sum of all customer’s invoice amounts tagged with “WHL” as group.

4


As in screen below shot Customer’s National Account “BARMART” shows invoices amount 96.41.

5


Let’s process one A/R invoice entry against customer “BARMART” with amount 1170.000 as extended amount and Exchange rate 1.5075 for finding Amount in functional currency as in below screens.

6

7


After posting invoice batch No. 86, we can view statistics tab for A/R Customer, Group and National Account and see the effect on customer “BARMART” statistics as in below screens.

Now A/R Customer Statistics for “BARMART” displays invoices amount as 1763.770.0 + (1170.000* 1.5075 = 1763.77) =1763.77.

8


A/R Customer Group Code “WHL” Shows invoices amount as 3087.18

1323.41 + (1170.000* 1.5075 = 1763.77) = 3087.18

9


A/R National Group “BARMART” will display the invoices amount as 1860.18.
96.41 + (1170.000* 1.5075 = 1763.77) = 1860.18

10


This was an example for A/R Invoice, same effect can be observed with other type of transactions such as Receipts, Discount, Credit Notes , Debit Notes, Adjustments, Write-offs, Interest Changes, Returned Checks, Total Invoices Paid, Refunds etc. Kindly note, only when “Keep Statistic” option is on, transaction’s statistic will be recorded else there will be no change in statistic information will be observed.

User can also check the effect of enabling “Keep statistics” option with various statistics report provided under A/R Customer Reports.

Also Read:
1. Defaulting Detail Tax Class to 1 in Account Payable in Sage 300 ERP
2. I/C Transaction Listing Report
3. A/R Document Inquiry in Sage 300 ERP
4. Database To Database Integration in Sage 300 ERP
5. Unit of Measure and Conversion Factor in Sage 300 ERP

Major Reasons to upgrade your Legacy Accounting system

$
0
0

When businesses grow it encounters range of challenges such as keeping up with the market trends, managing the cash flows, employing skilled workforce, manage existing clients and at the same time explore new markets and potentials customers. One factor that closely binds all these challenges is the IT system employed by the organization. Hence it is of utmost importance that the ERP, Accounting, Payroll and CRM solutions employed by the organization is scalable or easy to upgrade. In absence of such an IT vision the organization are in continual threat of turning obsolete.

We at Greytrix recognize challenges faced by such growing organization and offer complete end-to-end assistance for its pre-sales technical consultation, product customization data migration and system integrations.

Migration

We highlight top 7 points which the small and medium business organizations and enterprise should consider when they decide upon upgrading their existing ERP legacy system.

1. Big Data Management:

As the business grows, keeping and maintaining large data in accounting system becomes tedious job for the organization. As the volume of data grows, cost and resources to maintain it increase and organizations opts to switch from small accounting system to midsize or big ERP system.

2. Enhanced Functionality and Technology:

At times the cost of developing a customized feature in an existing ERP is more than purchasing an entirely new ERP suite. Organization should circumspect the cost – benefit ratio when adapting newer functionalities or technology.

3. Scalable Architecture

When selecting a particular ERP solution apt forecasting of the organizations growth should be evaluated. Decision on the ERP should be made based on current requirement and also protect the investment into the future.

4. Seamless Integration of multiple applications with ERP

Lot of SME’s employ multiple software systems for various accounting and company’s operational purpose; which often leads to complexities in tracking the sales and functioning of the business organization. An ERP system employed should be such that it allows the organization to have an enhanced functionalities and offers to realign multiple software functionality into a single software. It should help to gain an integrated view of Customers, Employees and Vendors redefining accounting process which has been in place.

5. Return on Investments

Upgrade in ERP systems and legacy systems are initiated, when business and organization sense a huge return on investment on implementing new technology and foresee substantial impact on the business operations.

6. Evaluation of On-Premise or SAAS Cloud based Application

Conventionally most of the SME’s used application which were on-premise however due to technology upgrades and continual need to outperform customer expectations organizations explored tools such as Mobile and SAAS based software applications. This allowed strong customer relationship management in real-time and on the go. However, while making a choice of adopting SAAS, organizations should have their requirement, budget and security policies clearly defined.

Post consideration of the above points successful upgrade of an ERP system predominately depends on factors such as timely implementation, control of the budget allocated, training within the organization and stakeholders and ensuring the business and ERP systems matches up to the current business offerings and scenarios.

Greytrix helps in migrating to Sage 100,Sage 300 and Sage ERP X3 from Sage Pro, Sage 50 US, Sage 50 CA, Sage 50 UK,Sage Business Works, Sage Business Vision, QuickBooks and MS Dynamics Great Plains.

For more information on migration solutions, please contact us at erpmig@greytrix.com. We will be glad to assist you.

Sage Summit 2015 New Orleans – Countdown begins

$
0
0

Sage Summit (#SageSummit) – The most awaited Sage event of the year is scheduled to begin on July 27, 2015 at the beautiful city of New Orleans, LA. With thousands of guests attending each year, this is an event that needs no introduction in the Sage community. Small and Medium Enterprises from across the world, who have reaped the benefits of Sage Software, would be seen attending the event in large numbers along with the well-connected and powerful Sage community. It is a place for all of them to come together, network and share ideas. Sage Summit -2014 saw big wigs like Magic Johnson, Robert Gibbs, Karl Rove, Biz Stones and Jessica Alba share their Big ideas. This year’s event promises to be even bigger!!

Imp Links – Event Website | Register | Agenda | Product Agenda

Sage_Summit_2015

About Greytrix

While the last edition saw a wide range of topics covered by some of the best minds in the business – from tips for funding to handling complicated security – this year’s event promises to continue in the same vein and provide further insights for SMEs.

Top 5 reasons to attend Sage Summit 2015,

-  11,700 customers, partners, small business owners, medium- sized growth companies, accountants, bloggers and analyst rate      Sage Summit as “The Event” for SME businesses.

- Over 7500 guests including 2000 first time attendees, coming from 50 states, 11 provinces and territories and still counting.

- 500+ visitors to the Customer Solutions Center.

- 700+ visitors to the Innovation in Motion Lab.

You can follow Sage Summit related updates on twitter – hash tag #SageSummit

A little About Us – Greytrix is a decade old Sage Premier Gold Development Partner is a one stop provider for all your Sage ERP and Sage CRM needs. We provide complete end-to-end assistance for your pre-sales technical consulta­tions, product customizations, data migration, system integrations, third party add-on development and implementation expertise.

We are an integration specialist known for our award winning GUMUTM framework, following are our offerings

Sage ERP integrations with CRM both cloud as well as on-premise. Our cloud offerings include Salesforce.com integration Sage ERP X3 and Sage 100 ERP and are in process to release integrations for Sage 300 ERP and Sage 500 ERP. For on-premise, we integrate Sage CRM with Sage ERP X3, Sage 100 ERP, Sage 300 ERP, Sage 500 ERP and a host of other ERPs.  Magento eCommerce integration with Sage ERP X3 and Sage 300 ERP allows 360⁰ customer interaction and interfaces for seamless operations of front office, back office and portal activities.

With the kind of response and enthusiasm we see year on year for Sage Summit, we really feel proud to be a significant part of the Sage Community. Hope to see you at the Summit!

Think Greytrix, grow big!! 


Migrate Sales Department Code from Sage Business Vision to Sage 300 ERP

$
0
0

GUMU™ for Sage Business Vision to Sage 300 ERP is a Sage certified Migration solution.Greytrix is a pioneer in providing Migration services at its Sage Migration Centre and catering end-user business requirements.

We at Greytrix are focused to help the end –user in successfully implementing the new Sage 300 ERP system through our various successful migration and integration solutions.

New Stuff: Migrate Customers from Sage Business Vision to Sage 300

Today we will see how Sage Business Vision “Sales dept” code get migrated to Sage 300 ERP through GUMU. Let’s have a quick look at Sage Business Vision “Sales dept” screen.

BV1


BV4
After data migration from Sage Business Vision the Sales dept code of Sage Business Vision gets converted into the Sage 300 ERP as Category Code (Refer below screenshot).

”G/L Acct” of Sage Business Vision is assigned in IC category as: “Sales Account of Sage Business Vision is assigned as “Sales” and “Cost of Goods” is assigned as “Cost of Goods Sold” in Sage 300 ERP (Refer Below screenshot).

To see the category code in Sage 300 ERP follow the below mentioned path:
Inventory Control –> IC Setup –> Categories

BV5
In below screenshot you could see that the “Sales dept.” code of Sage Business Vision is assigned as “Category Code” in Items.

BV6

For more information on the data migration,drop us a mail at erpmig@greytrix.com

Also Read:
1) What do you want to migrate to Sage ERP
2) Migrate GL Accounts from Sage Business Vision to Sage 300 ERP
3) Migrate Banks from Sage BusinessVision to Sage 300 ERP
4) Migrate Vendors from Business Vision to Sage 300 ERP


Migrate Open Sales Order From Sage Business Vision to Sage 300 ERP

$
0
0

GUMU™ for Sage Business Vision to Sage 300 ERP is a Sage certified Migration solution. Greytrix provides Migration services at its Sage Migration Centre and fulfills the business requirements.

In this blog you will get to know how GUMU™ migrates Open Sales Orders from Sage Business Vision ERP to Sage 300 ERP.

New stuffMigrate Sales Department Code from Sage Business Vision to Sage 300 ERP

Refer following path for Open Sales Orders Sage Business Vision -
Sage Business Vision–> Edit–> Customer Details

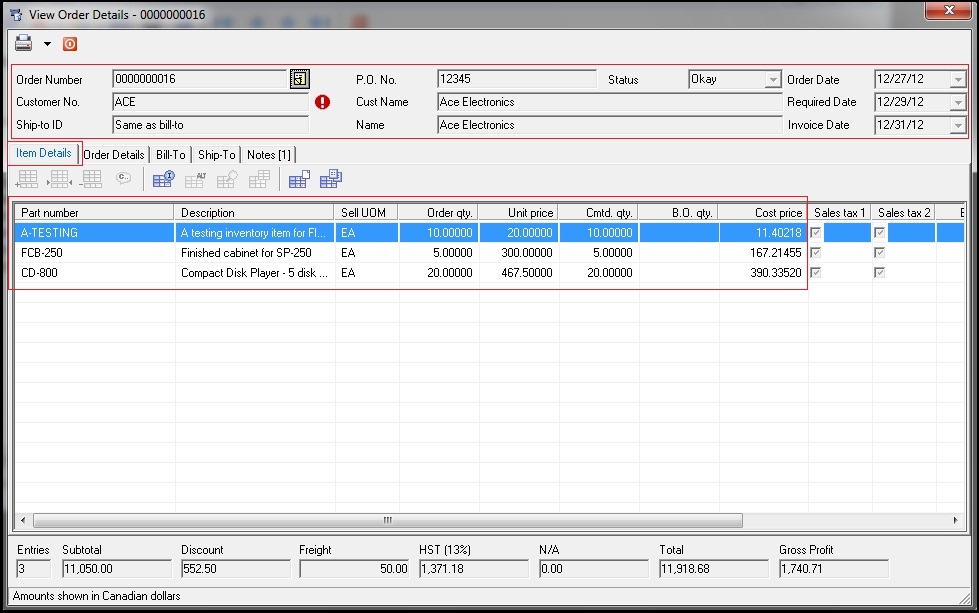
In this, go to “S.O.s” tab of Customer Details window and double click on required Order name. “View Order Details” window gets open.
Also In “Item Details” tab, you can observe ordered items details as shown in below screen -

BV

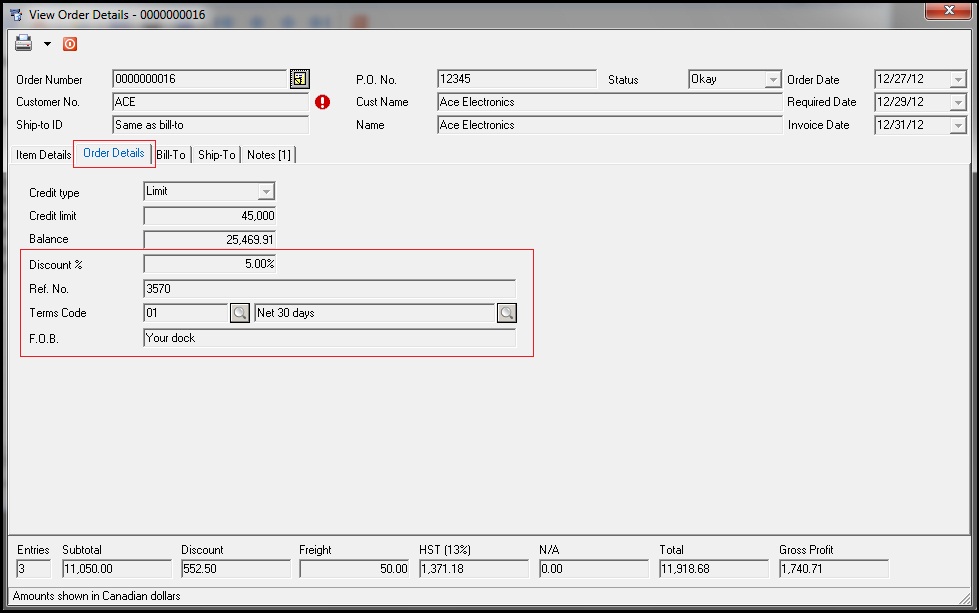
In “Order Details” tab, you can observe Discount detail, Ref no., etc. as shown below -

BV2

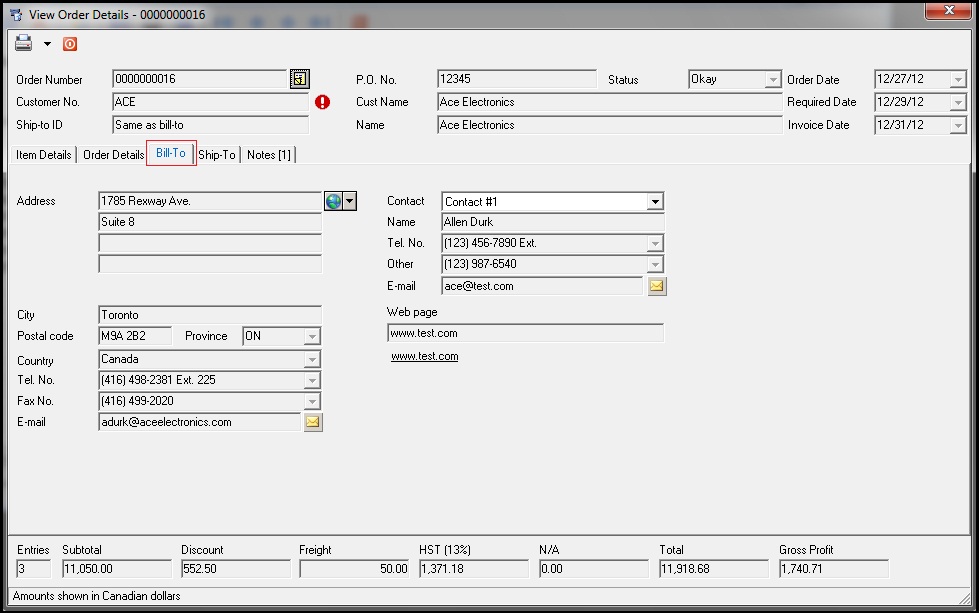
In “Bill-To” tab, you can observe Location details used for Billing purpose as below screen -

BV3

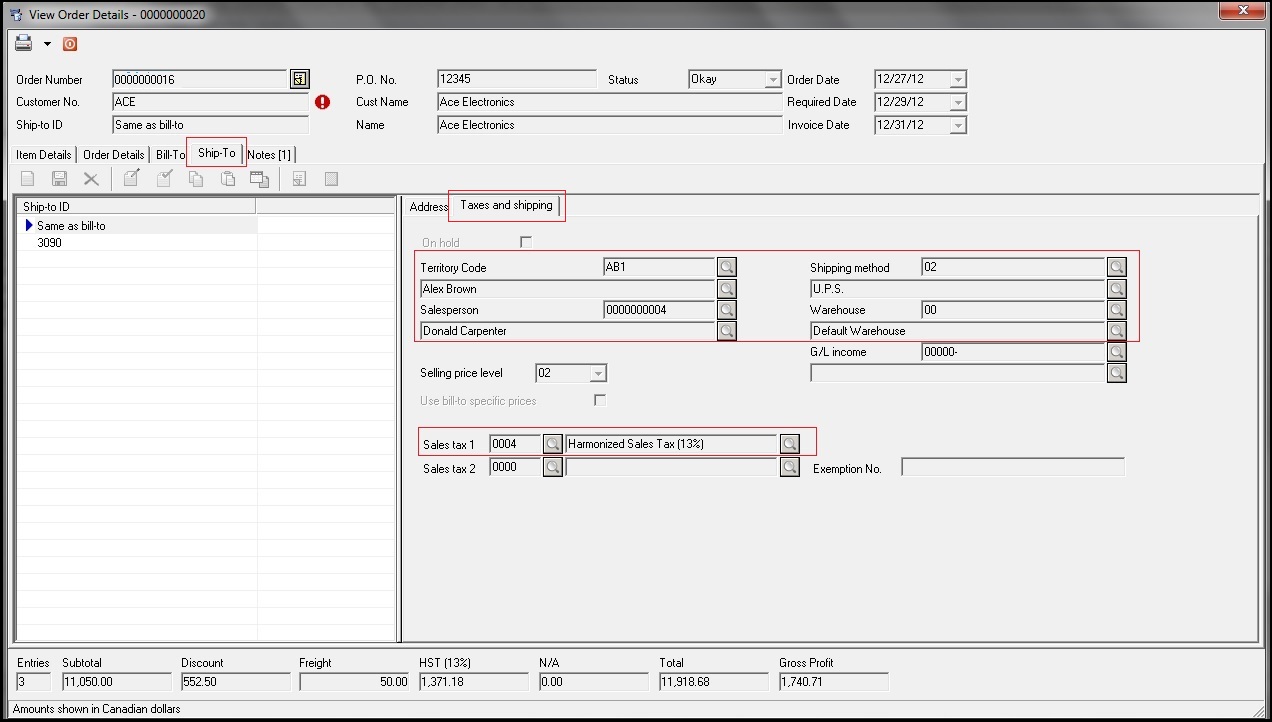
In “Ship-To” tab, you can observe Location details used for Shipping purpose in “Address” sub-tab as below screen -

BV_1

You can observe Notes in “Notes” tab as shown below -

BV6

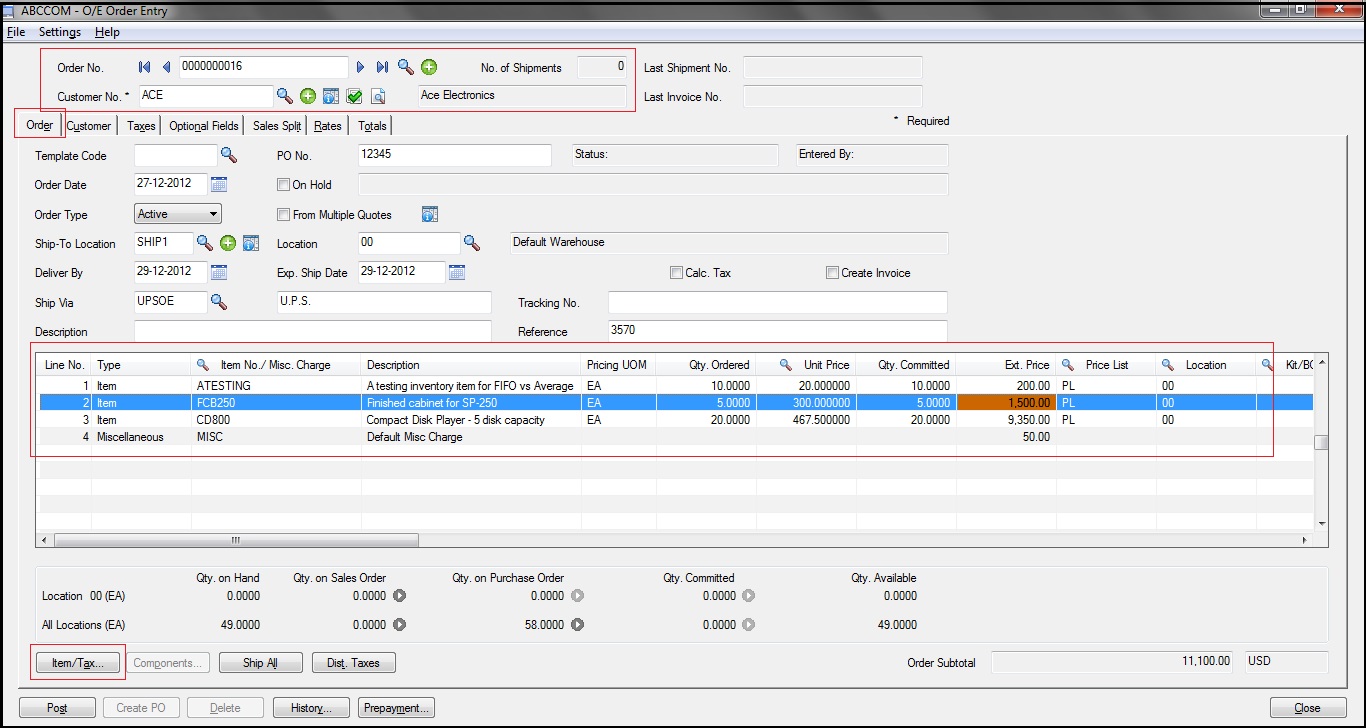
After migration from Sage Business Vision to Sage 300 ERP, you can check Open Sales Order in Sage 300 ERP by following path : Sage 300 ERP–> Order Entry –> OE Transactions –> Order Entry

In this, you can search required migrated Open Sales Order.

Here you can observe order details in “Order” tab. Freight charge of sales oredrs in Sage Business Vision migrates as Miscellaneous charge in Sage 300 ERP  as highlighted below -

Sage300_2

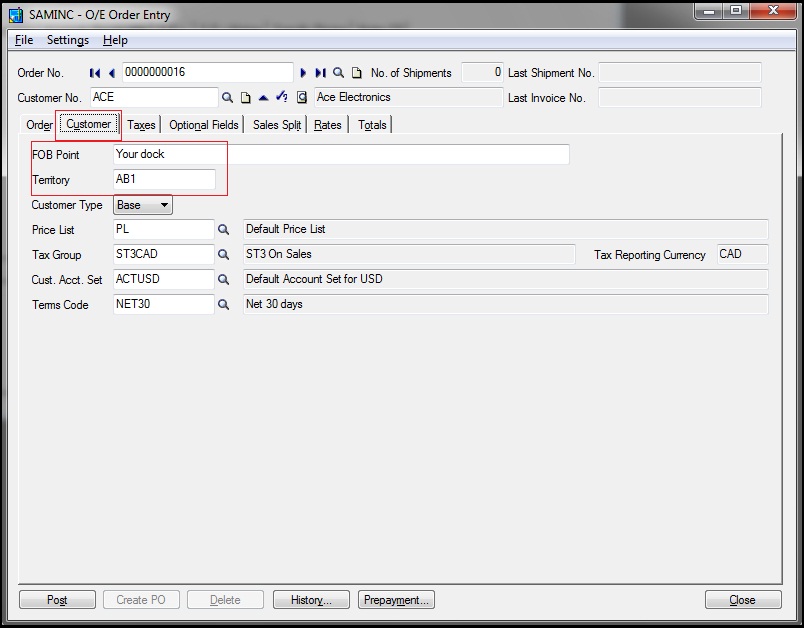
You can observe Customer details in “Customer” tab as below screen -

Sage 1

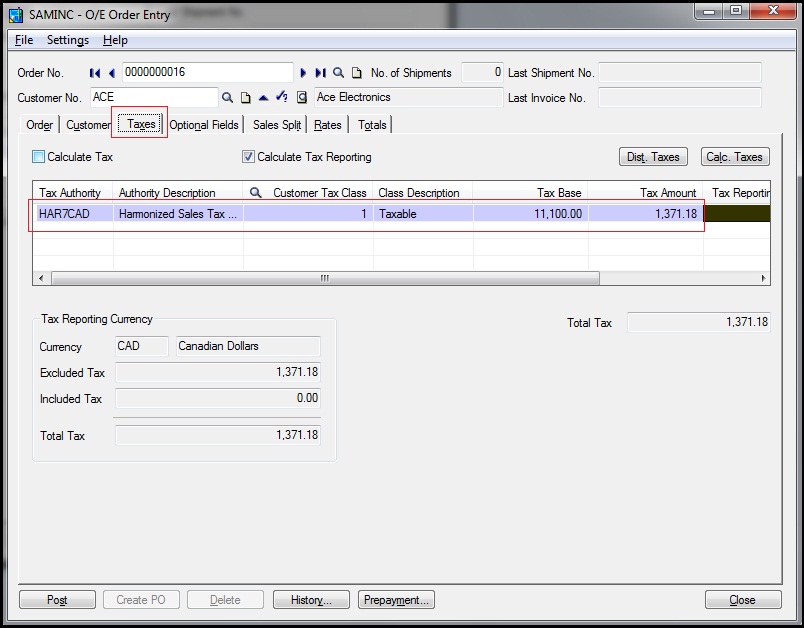
In “Taxes” tab, you can observe Tax details as shown below -

Sage 2

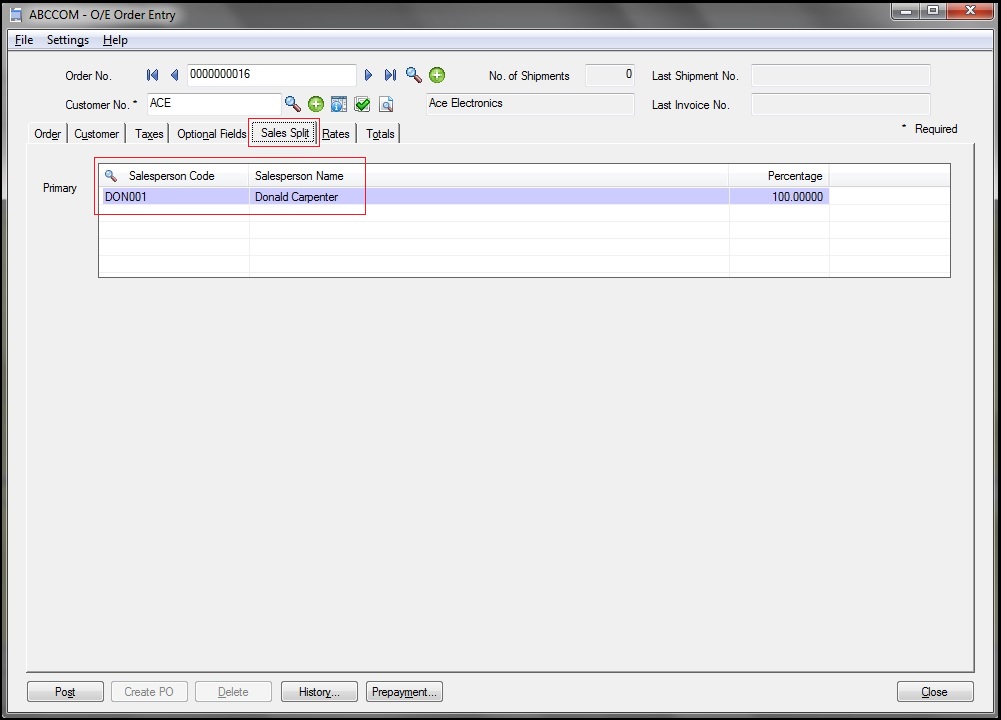
In “Sales Split” tab, you can observe migrated Sales person as highlighted below-

Sage300_1

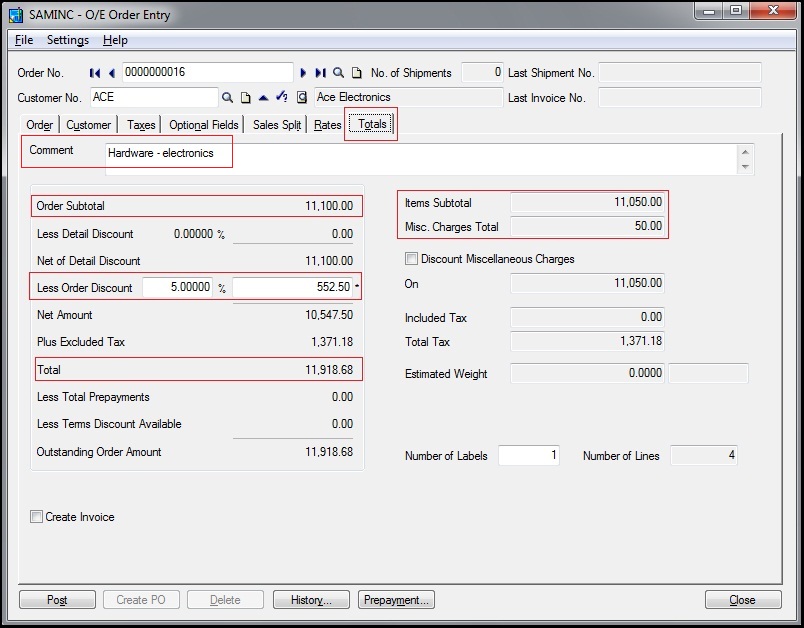
In “Total” tab, you can see Amount details and Comments as highlighted in below screen -

Sage 3

Terms for both Sage Business Vision and Sage 300 ERP:

Mapping

In this way, you can see the Open Sales Order of source ERP (i.e. Sage Business Vision) and after conversion target ERP (Sage 300 ERP).

Also Read:
1. Migrate Item On Hand Quantity from Sage 50 CAD (Simply Accounting) to Sage 300 ERP
2. Migrate Ship to Address from Sage Business Vision to Sage 300 ERP
3. Migrate GL Accounts from Sage 50 CAD to Sage 300 ERP
4. Migrate GL Accounts from Sage 50 US to Sage 300 ERP
5. Migrate Item Price Lists from Sage 50 CAD (Simply Accounting) to Sage 300 ERP


Retainage Accounting

$
0
0

In this blog post, we will discuss about another feature of Sage 300 ERP ‘Retainage Accounting”. In A/P Option, there is a check box ‘Retainage Accounting‘under the ‘Processing ‘tab [Refer screenshot below].

To achieve this, navigate to Accounts Payable –> A/P Setup –> Options -> Processing Tab -> Processing Options
New Stuff: Migrate Open Sales Order From Sage Business Vision to Sage 300 ERP

AP Options

With this option checked, the user will be allowed to use Retainage Accounting.
When you select the Retainage Accounting option, the Retainage tab appears on the options form, letting you specify retainage processing options.

AP Options-- Retainage Tab

In Retainage Tab you can define various fields like:
• Base Retainage Amount On:
Here you can select whether retainage will be calculated on the document total before tax or after tax.

• Default Retainage Exchange Rate:
If you use multicurrency, specify whether to use the current exchange rate or the exchange rate used for the original document as the default for retainage documents.

• Default Retainage Percentage:
Here you can enter the percentage of the document total to withhold on invoices, credit notes, and debit notes. This percentage will appear as the default when you add new vendors, but you can change the retainage (or holdback) percentage for particular vendors in the vendor record.

• Default Retention Period:
Enter the number of days from the original document date that you can withhold the retained amount from vendors. The program determines the default retainage due date by adding the retention period to the original document date.

The default retention period is used for new vendor records, but you can specify different ones for individual vendors. You can also change the retention period on invoices.

• Document Numbering :
Accounts Payable uses a separate numbering system to identify retainage documents that you generate using the Create Retainage Batch form.

The retainage document numbering grid lets you specify the next number, length, and prefix to assign to retainage invoices, credit notes, and debit notes, or you can accept the default that appears on the grid.

• Last Invoiced (display only):
It displays the date that you ran Create Retainage Batch from the Reminder List on.

• Number Of Days In Advance To Create Retainage Documents:
Enter the number of days before the retainage due date that you can generate retainage documents using the Create Retainage Batch form.

For example, if you enter 5, you can generate the retainage invoice five days before the retainage is due.

• Report Tax:
Generally, when you post invoices, Accounts Payable posts tax amounts to a tax account (either tax recoverable or tax expense) or to another general ledger account, and it updates the tax tracking reports.

For retainage, when the tax is reported can differ. Some tax authorities expect you to report tax when you post a retainage document; others let you report tax when you post an original document to which retainage applies.

The Report Tax option lets you specify when to report tax on retainage. You can make the following selections for this option:

1. At Time Of Original Document
2. As Per Tax Authority

• Schedule To Use For Automatic Creation Of Retainage Documents (optional):
Enter or use the Finder to select the code for the schedule you want to use to process retainage from the Reminder List.

If the schedule does not yet exist in Common Services, you can click the zoom button ( ) beside the field, then create the schedule using the Schedules form that opens. You can also click the zoom button after entering a schedule code to view information about the schedule.

When Retainage Accounting option is checked, you can create Retainage Invoice, Retainage Debit Note and Retainage Credit Note in AP Invoice Batch. (Refer below screen shot)

AP Invoice- Retainage

You can turn off the Retainage Accounting option, later, only if there are no unposted retainage batches and no outstanding retainage amounts.

Also Read:
1.  Allow Non Inventory Item Option in PO
2.  Allow Fractional Quantities in Purchase Order
3.  Allow edit of System generated batches
4.  Allow Adjustments in Payment batches
5.  Allow editing of external batches

Customized Stock Maintenance after Shipment & Invoice in Sage 300 ERP

$
0
0

Now a days we have good number of implementation in Sage 300 ERP in the Auto Mobile Industries. While implementing Sage 300 ERP many auto mobile customers have questions about the stock maintenance, because even after the shipment & invoice, the purchased vehicle is still present in the work shop or stock yard or show room for further processing like insurance, fixing of accessories etc.

In this case it is very difficult to identify the actual stock of items from the stock reports. For these kind of challenges in Sage 300 ERP we have developed a custom solution for it & that is “Customized Stock Maintenance”.

Once we will create the shipment & invoice, stock from the Sage 300 ERP will go out. But at the same time we will maintain the customized stock into the custom table with the help of triggers or schedulers. In that we will have the item code, location code (from which location the item is actually shipped), quantity. In short, if the item A is shipped from location L0001 with quantity 1 from Sage 300 ERP, at the same time item A of quantity 1 will available into the location L0001. Like that all the shipped items will be automatically maintained into the custom stock until & unless user will not create the gate pass entry for that item. Refer the below picture for more clarification.

New Stuff: Migrate Open Sales Order From Sage Business Vision to Sage 300 ERP

03

In the auto mobile industry once the invoice is done, only then will the item move from one location to another location for various processes, to track these kind of item we will provide you the customized user interface. Kindly refer the below screen shot of user interface.

02

If you see the above screen, user has transferred item Maruti 800 from location L0001 to L0005 for Coating Purpose. In this way user can transfer single item from one to another location multiple times & we can track the item with the help of customized stock maintenance.

With the help of this we can generate the various types of stock reports for identifying the stock at particular location.

The main purpose of this customized stock is to trace the item after the invoiced.

Also Read:

1.Customized Stock Transfer
2.How to restrict use of Expired Stock in SAGE 300 ERP
3.Stock Aging Report in Sage 300
4.Serial/Lot Number Stock Report
5.Stock Transactions Inquiry in Sage 300 ERP

Item Wise Detail Tax

$
0
0

A number of features regarding sales Taxes and purchase Taxes are provided in Sage 300 ERP. In our previous blogs we had discussed, “how to calculate Item wise tax” and discussed about how to define the Tax Rates in Sage 300 ERP in the Tax module. In this blog we are going to discuss how to apply Item wise taxes automatically on the detail lines in Order entry.

In retail sales industries, the taxes are based on the items. If a user places an order of 2 items (or more than that) and he needs to apply different taxes to these different items, Sage 300 ERP provides two ways to make these entries:

1. Select the tax class manually on the order entry
2. A configuration set up is required to be done to select the tax related to the relative item automatically.

New stuff: Retainage Accounting

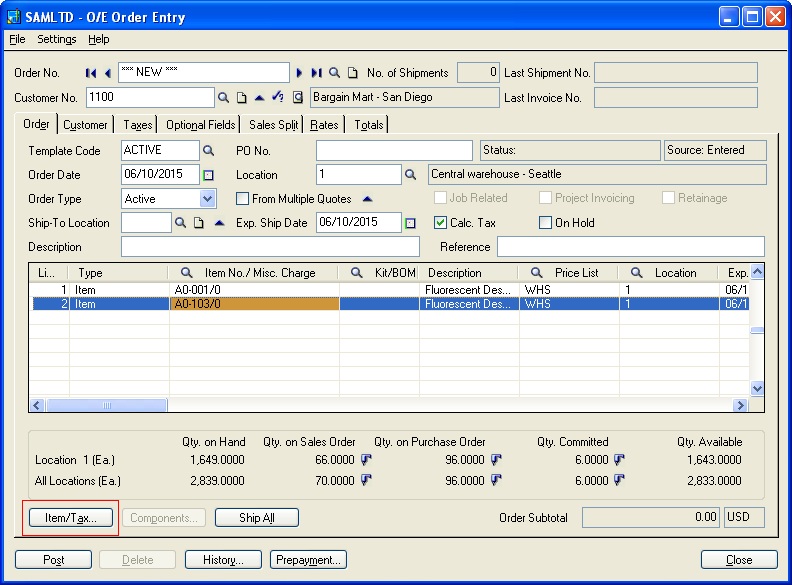
The following screen shot shows the manual selection of tax classes on the order entry screen:

Order Entry

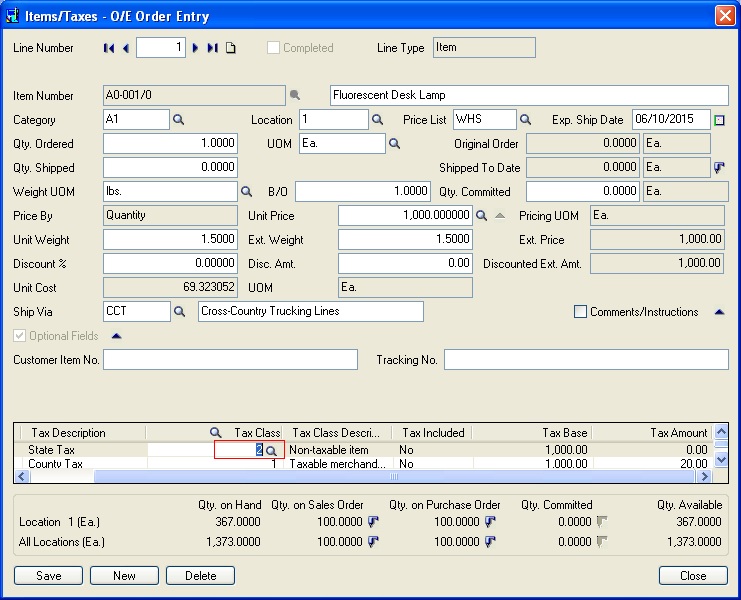
After clicking the highlighted button the following screen shot appears:

Item Taxes

The highlighted finder in the above screen shot is showing the manual selection of Tax classes.
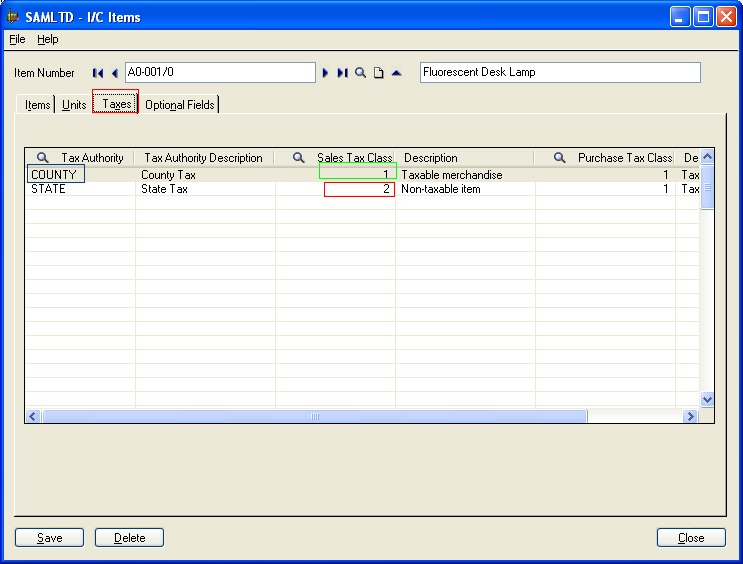
For selecting the Item wise taxes automatically the user needs to set up configuration on the item master screen as shown in the following screen shot:

IC Items

For selecting the Item wise taxes automatically following are the steps:
1. Go to IC ->Item Number -> Taxes Tab.
2. Select those taxes (i.e. tax authorities) which are needed for the corresponding item.
3. Set sales tax class as taxable or nontaxable.
4. Save

Now when a tax group containing these tax authorities, is selected on the Order Entry header and if the item has the corresponding tax authorities, the tax classes corresponding to those tax authorities which are selected in the item master will also get inserted on the item detail line automatically.

Thus we can configure the item wise tax selection.
Also read:
1.  Item wise tax calculation in Sage 300 (for Sales and purchase Transaction)
2.  Tax Rates in Sage 300 ERP
3.  Tax Classes in Sage 300 ERP
4.  Taxes in Sage 300 ERP
5.  Tax Audit Report

Viewing all 1475 articles
Browse latest View live


<script src="https://jsc.adskeeper.com/r/s/rssing.com.1596347.js" async> </script>