Quantcast
Channel: Sage 300 ERP – Tips, Tricks and Components
Viewing all 1475 articles
Browse latest View live

Auto- Application of Taxes at Item Level

$
0
0

We all know Tax component plays a very crucial role when it comes to considering any country or organization economy.

Hence, auto application of taxes to particular invoices drags our attention immediately. In most of the organizations, requisition is done by the user who is at many times not aware which tax authority is applicable and which is not on the item which he/ she has selected.

Hence, the finance user needs to verify it in order to apply accurate tax authority from the tax group which indeed consumes a lot of productive time of the finance users.

New Stuff: Item Wise Detail Tax

Sage 300 ERP allow us to predefine the tax authority at item master itself. Let us see how it can be done.

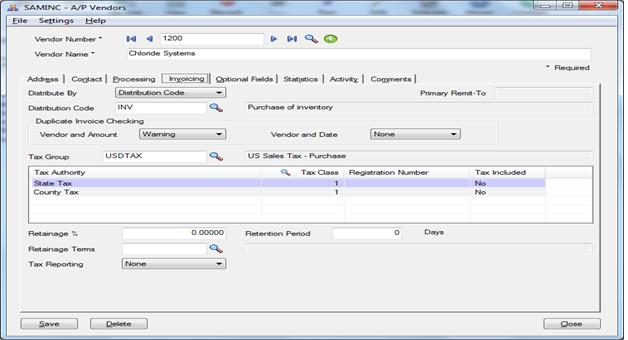
Below mentioned screen shot is of Vendor master screen in which you can see tax group assigned to the vendor.

Vendor

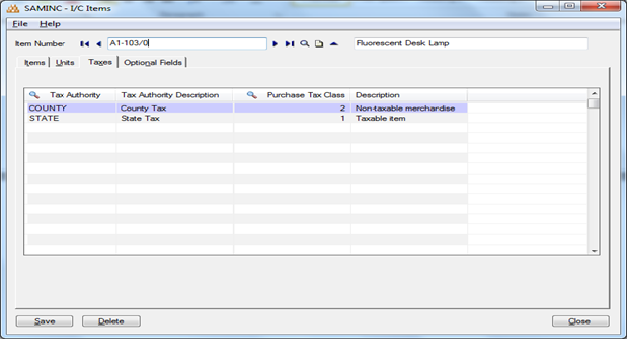
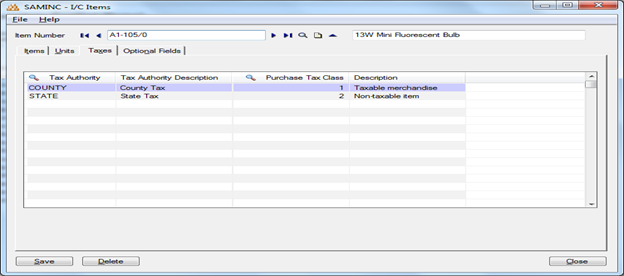
Suppose we purchase 2 different item from the mentioned vendor out of which for one item (A1-103/0) has State Tax is applicable while for other item (A1-105/0) County Tax is applicable.

Now, let us see how to configure these items in Sage ERP 300 in such a way that system applies corresponding tax authority to the item automatically provided tax group selected at Requisition is USDTAX or any other Tax group which has State Tax and county tax as it corresponding tax authorities.

Vendor

Vendor

As you can see in the screen shot we have just mapped the respective Tax authorities at item master level and set the Tax classed as required.

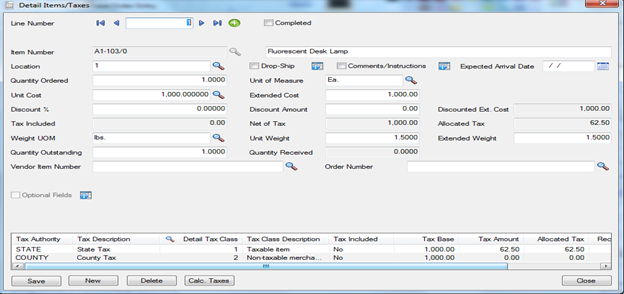
Now, at the time of entry when the user selects the mentioned item, tax would get auto applied as defined, which is visible in below screen shot:

Vendor

Hence, configuring the system in this way will save the finance user time of checking for the taxes.

Also read:
1. Item wise tax calculation in Sage 300 (for Sales and purchase Transaction)
2. Tax Rates in Sage 300 ERP
3. Tax Classes in Sage 300 ERP
4. Taxes in Sage 300 ERP
5. Tax Audit Report

Purchase History Report

$
0
0

It’s very important to keep track of all your purchases. To analyze the purchase history of your company, Sage 300 ERP has brought this crucial information together in form of a report, which is known as “P/O Purchase History Report”. This report gives the complete history of the purchase which you have made with your vendors.

To print this report navigate to P/O Analytical Reports->Purchase History.

Purchase History report provides us the below filtering criteria. You can refer the below screenshot:

-Select By–>Year/Period or Document date
-From and To Year Period
-From and To Vendor
-From and To Currency
-Print amounts In

New Stuff: Auto- Application of Taxes at Item Level

1

The multicurrency version of the report includes each vendor’s currency code. You can print the amounts in the functional currency or in the vendors’ currency.

Purchase History report allows a user to print summary or detailed purchase information by vendor or inventory item. Transactions here can be listed by vendor number or item number.

The summary report lists the year and period, total quantity received of each item (in stocking UOM), total cost, and quantity returned, credit note, and debit note totals. The summary report consolidates details with the same item number, year, period, and date into single details.

The detail report includes all item details posted for the vendor in the selected periods, and lists the year, period, transaction type, date, transaction number, location (if you use Inventory Control), quantity, cost, and unit of measure, and the number of days between the purchase order and receipt posting dates for each item detail. The detail report lists all purchases of an item from the vendor in the selected period.

It also include job details if you use Purchase Orders with Project and Job Costing.

The report output would look as below:

2

Usually users print this report after running Day End Processing, at the end of an accounting cycle, or any time they want to check the purchasing history. This report can be used as a purchases journal, to record purchases by vendor or item, and to indicate the strengths and weaknesses in company purchasing history.

Also Read:

1.Purchase History Inquiry in Sage 300 ERP
2.Purchase Order Reports in Sage 300 ERP
3.Purchase Order Transaction Flow in Sage 300 ERP
4.Creating Purchase Orders from Order Entry screen in Sage 300 ERP
5.Accumulate Purchase History Option


Shippable Backorders Report

$
0
0

Sage 300 ERP provides a report named as “Shippable Backorder Report” that lists the sales orders that you may be able to fill for the receipts you have posted in Purchase Orders.

If you use Sage Accpac Order Entry with Purchase Orders, you can select order numbers from Order Entry and include them on the report.

To view the report, navigate to Purchase Order–>P/O Analytical reports–>Shippable Backorder

[Refer below Screen Shot].

New Stuff: Purchase History Report

111

This report helps you to track the information of the sales order against each and every Purchase receipts. User can view the report either on the basis of Order number or Item number or both [Refer below screen shot].

222

Once you click on Print button following report get generated [Refer below screen shot].

333

In the above report user can view the sales order number against the receipt number on the basis of the Receipt date selected on UI against the Item Number along with the amount received and location details (Provided you use Inventory control module) e.g. Receipt Number RCP00000290 has the sales order no. 11111111111111111 and Receipt number RCP00000293 has the sales order no ORD000000000074.

Also you can enter the Order number in Receipt detail line only if you use Order Entry with Purchase Orders.

Thus, Shippable Backorder Report in Sage 300 ERP helps users to plan & schedule the shipments to customers effectively by capturing sales order number against PO receipts.

Also Read:

1. Allow Non Inventory Item Option in PO
2. Allow Fractional Quantities in Purchase Order
3. Allow edit of System generated batches
4. Allow Adjustments in Payment batches
5. Allow editing of external batches


Migrating Items from Sage Business Vision to Sage 300 ERP

$
0
0

We at Greytrix help the end–user in implementing new Sage 300 ERP system through our various successful migration and integration solutions.

Our GUMU utility is a Sage certified migration tool which helps in smooth data migration of various source ERPs to target ERP systems. Today, we are going to discuss a very important data migration option – Items.

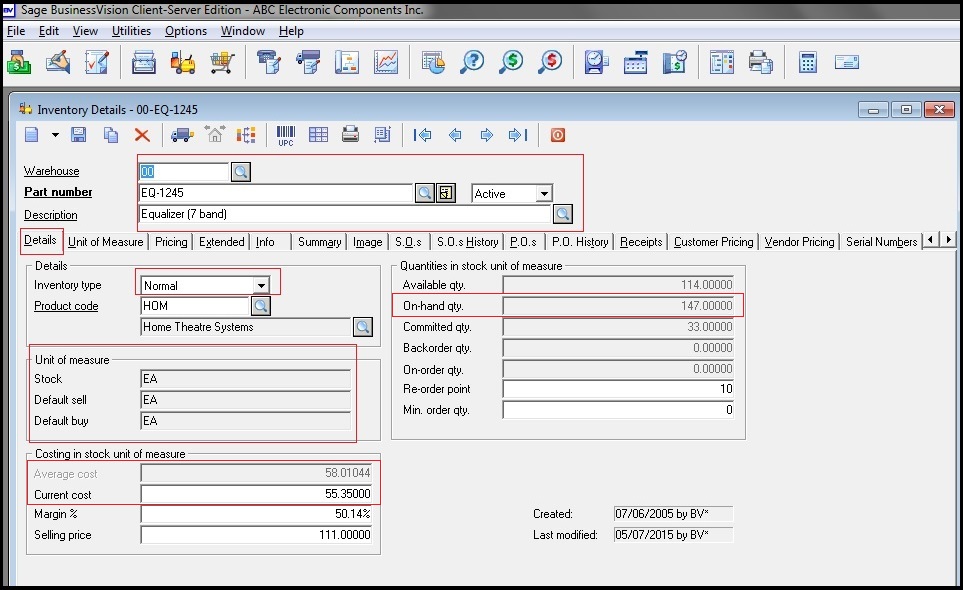
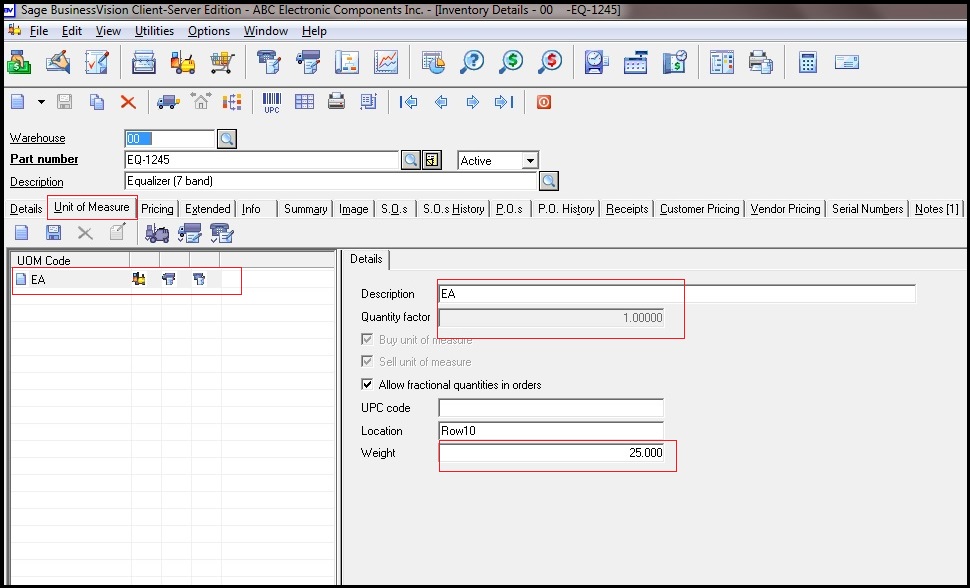
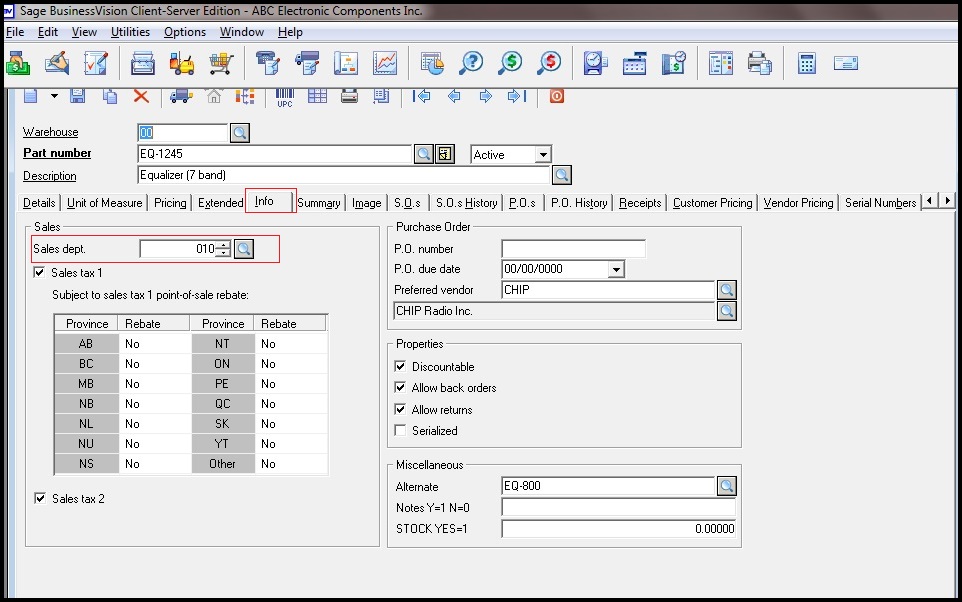
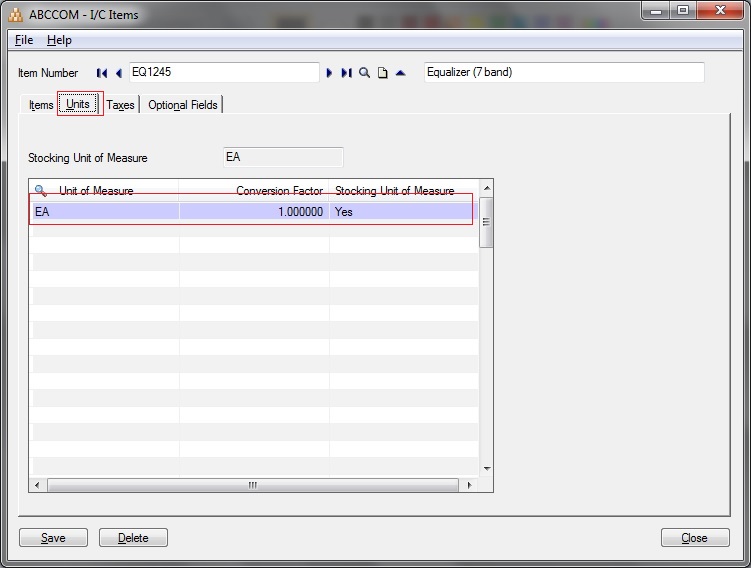
When converting Items data from Sage Business Vision to Sage 300 ERP, we ensure that all the details which are there in the Sage Business Vision are covered. Now, Let’s say Item “EQ-1245”; the Item Master screen in Sage Business Vision system looks like this:

New Stuff: Migrate Open Sales Order From Sage Business Vision to Sage 300 ERP

You can view Items in Sage Business Vision from the following path – Sage Business Vision -> Edit -> Inventory -> Details

BV
BV1

BV2

BV3
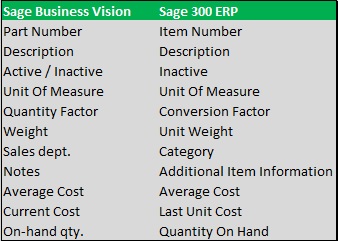
After data migration from Sage Business Vision the field values of Sage Business Vision Items get converted with the following mapping:

Mapping

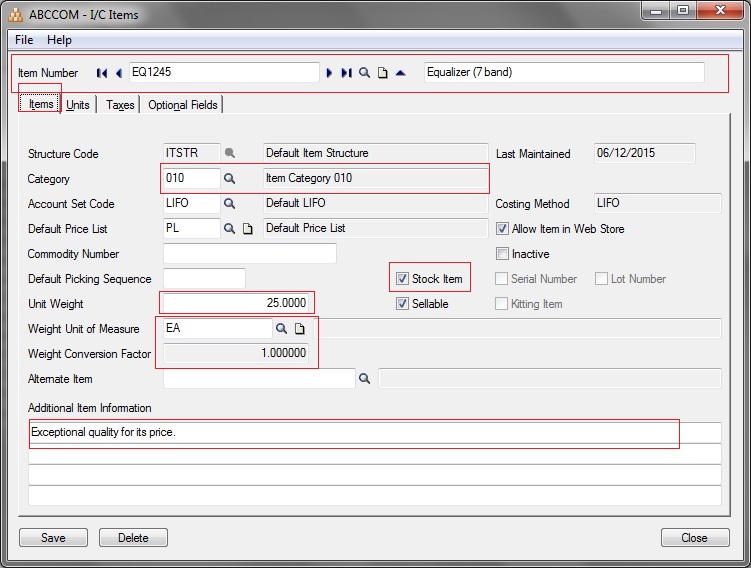
Here is the converted Items from Sage Business Vision to sage 300. Kindly refer the below screenshot where Items is converted as per the mapping mentioned in above table.

Sage
Sage1

The Cost and On hand information of the particular Sage Business Vision Item masters can be viewed in Sage 300 ERP IC Location Details of the selected Item master for the Location assigned. Below we have displayed Item On hand values, Average Cost, and Unit Cost from Sage 300 ERP system.

Sage2


In this way, Sage Business Vision Item gets migrated into Sage 300 ERP. In our next blog we will discuss about how to migrate Item Pricing information from Sage Business Vision to Sage 300 ERP.

For more information on ERP data migration, drop us a mail at erpmig@greytrix.com.

Also Read:
1) Migrate Vendors from Sage Business Vision to Sage 300 ERP
2) 
Migrate Customer Notes from Sage Business Vision to Sage 300 ERP
3) 
Migrate Sales Person from Sage Business Vision to Sage 300 ERP
4) 
Migrate Customers from Sage Business Vision to Sage 300
5) Migrate Ship to Address from Sage Business Vision to Sage 300 ERP

Migrate Item Unit Of Measure From Sage 50 US (Peachtree) to Sage 300 ERP

$
0
0

We provide data Migration Services from Sage 50 US (formerly known as Sage Peachtree) to Sage 300 ERP (formerly known as Sage Accpac) at our Sage Migration Center.

This blog is in continuation to our GUMU™ ERP Migration services. In our previous blog we discussed about
Migrate Item Pricing from Sage 50 US (Peachtree) to Sage 300 ERP. In this blog we will discuss about how Sage 50 Item UOM gets migrated to Sage 300 ERP (Formerly known as Accpac) using GUMU.

Our GUMU™ migration utility is compatible to convert all Master and Open transactions along with Sales, Purchase and GL historical data from Sage 50 Accounting- US edition (formerly known as Sage Peachtree) to Sage 300 ERP.

New Stuff: Migrate Item Price Lists from Sage 50 CAD (Simply Accounting) to Sage 300 ERP

Follow the below listed path to view the unit of measure in Sage 50 US (Peachtree):
Inventory Items –> Set Up Units/ Measures (Refer below screen shot).

This is the unit of measure that you use to stock, Buy and sell the item. For e.g. “Bag”, ”Bottle”, ”Each” etc. are example of unit of measure.

PT

After the migration to Sage 300 ERP, the converted Unit of Measure screen will look as below:
To see the converted UOM in sage 300 ERP follow the below path:
Inventory Control –> I/C Setup –> Unit of Measure.

PT3

For more information on the data migration, drop us a mail at erpmig@greytrix.com

Also Read:

1. What do you want to migrate to Sage ERP
2. Migrate GL Accounts from Sage Business Vision to Sage 300 ERP
3. Migrate Banks from Sage Business Vision to Sage 300 ERP
4. Migrate Vendors from Business Vision to Sage 300 ERP

How Deposit date in AR receipt entry plays important role in Bank Reconciliation

$
0
0

Many of the fresh users are not used to the application, in such cases there might be minor or major errors, because of this human error, the entire process gets disturbed. One of the field user must take care is the Deposit date at receipt entry screen.

The deposit number at the receipt entry screen is the number printed on deposit slips and The Deposit date is the date you deposit receipts for a particular deposit number at the bank. Accounts Receivable module assigns the batch date as the default date for this field, but you can change the date.

So special care should be taken at two instances:

1)      While Creating batch (Deposit date can be changed until and unless batch is unposted) &

2)      While posting the batch one must cross check the deposit date in this case, because once the batch is posted user may not be able to change, as the field gets freeze.

The reason why the selection is important because one can face problem while reconciling bank account. It goes as follows:

If the user selects the Deposit date of future/next month and the receipt entries are of present month

For E.g. JUNE is a future/next month and MAY is present month please refer the screenshot.

New Stuff: Shippable Backorders Report

Vendor

As you can see in the screen shot The BATCH date, RECEIPT date and POSTING date are same i.e. 29th MAY, 2020

Now when the user try to reconcile bank account for the month of May, it won’t match and will appear the As OUT OF BALANCE BY for the month of MAY.

Vendor

In the above screen shot the statement date and reconciliation date is 31st May 2020 and as we proceed further for calculation to match Bank statement and General ledger.

The following mentioned Receipt entry won’t get captured because the deposit date selected is of 2nd June 2020.

Vendor

Now if we select the reconciliation date for 2nd June 2020 in Reconcile statement the particular entry gets captured.

Vendor

Vendor

For reconciliation of bank, users have to enter reversal of those entries which are posted for the month of MAY but have deposit date of JUNE.

There itself, the reconciliation for the month of May will be Reconciled.

Also Read:
1. New Features in Accounts Receivable Module of Sage 300 ERP 2012
2. Defaulting Detail Tax class to 1 in Account Receivable in Sage 300 ERP
3. Default settings for Receipts in Account Receivable in Sage 300 ERP
4. Bank Reconciliation Status Report
5. Bank Transfer Entry In Sage 300 ERP

Overstocked Items Report in Sage 300 ERP

$
0
0

For every organization, analyzing their inventory is an important aspect to maintain the stock level at respective inventory location. In Sage 300 ERP there are many useful inventory reports that help to manage the inventory efficiently. In our today’s blog we will discuss about the Overstocked Items report in Sage 300 ERP.

Overstocked item report is important when we want to estimate the cost of excess stock, or when we want to determine whether to redistribute overstocked items to other locations. The Overstocked Items report lists each item at each location for which the quantity on hand exceeds the maximum or projected sales quantity assigned for the item and location.

This report also provides item quantities for locations that are over the maximum level or over the projected sales figures entered for the items in the Reorder Quantities form. Here, the user can also have an option to find out the costs of carrying the extra inventory items.

Before printing this report, the user has to make sure that he/she has run the Day End Processing, this will include the latest costing information in the report.

To print the Overstocked Items report Inventory Control–>I/C Stock Control Reports–>Overstocked Items

New Stuff: How Deposit date in AR receipt entry plays important role in Bank Reconciliation

123

Basically there are five basic reports:

Quantity Greater Than Maximum Level:-  Lists items for which the quantities on hand are more than a specified percentage higher than the maximum levels entered for the items in the Reorder Quantities form.

Quantity Greater Than Projected Sales:-  Lists items for which the quantities on hand are greater over the number of days you specify than the projected sales quantities entered for the period in the Reorder Quantities form.

Annualized Turn and Earn Ratio:- Lists items for which the ratio of the inventory turnover rate to the profit margin is less than the percentage that specify on UI.

Average Cost of Excess Quantity:-  Lists items with an actual cost that is greater than the amount you specify in the Greater Than field.

Most Recent Cost of Excess Quantity:-  Lists items whose most recent cost is greater than the amount you specify in the Greater Than field.

Refer the below sample report output:

456

Hence, using the Overstocked items Report, the Annualized Turn and Earn Ratio version of this report helps to find out company’s average inventory sale during the year to date and can also help to shows the profit margin, total sales, and total cost for each item in the year to date.

Also Read:

1.Stock summary Report
2.Date wise IC stock Transaction Report
3.IC Aged Inventory Report
4.Inventory Movement Report in Sage 300 ERP
5.Stock Aging Report in Sage 300 ERP


Unapplied Cash Entry

$
0
0

You may have often come across a scenario wherein you have received some payment from the customer after the due date or late and at that particular moment you are not aware for what the reason the payment is received.

You may get into confusion as to how to record such transaction into your accounting system.

Sage 300 ERP is the ultimate solution for handling such transactions. It allows you to record transactions under the ‘receipt form’ using transitions type as unapplied cash

You too may have received cash from your customer, with no indication about the transaction they are paying for. Sage 300 ERP allows you to record such transactions and resolve this problem efficiently.

In simple terms, unapplied cash is the receipt which does not have any specific customer transaction related to it

New Stuff: How Deposit date in AR receipt entry plays important role in Bank Reconciliation

The journal entry passed during such transaction is

Untitled

Processing Unapplied Cash Transactions When you receive payments from your customers with no indication of what they are paying, you enter the receipt as an Unapplied Cash transaction type in a receipt entry form. This step lets you record the receipt in your Accounts Receivable system and post it to the customer’s account so you can apply it to the appropriate document later.

Untitled

 Then we need to post the batch from the receipt batch list

Now let us invoice that customer

Untitled

Now in this case the customer had already made the payment of 1000 INR by means of unapplied cash

So now we will adjust that amount of the unapplied cash

The amount of unapplied cash is adjusted against the invoice which was raised.

You might feel that the unapplied cash transition works similarly as the pre-payment transaction, but I would like to bring to your notice the only difference between the two:

In case of pre-payment the account which gets credited in the accounts receivable is the ”Prepayment liability” and in case of the payment received in the form of unapplied cash the “Receivable control “ account get credited.

This is how we can solve the issue of posting the transactions which are related to the payments received from the customers without any reference provided by him.

Also Read:
1.Delete Inactive Records in Account Receivable
2.Terms Code feature in Account receivable in Sage 300 ERP
3.Aged Cash Requirements Report
4.Default settings for Receipts in Account Receivable in Sage 300 ERP
5.Optional to maintain Statistics for Customer, National Account and Group in Sage 300 ERP


Migrate Vendor Notes from Sage Business Vision to Sage 300.

$
0
0

GUMU™ for Sage Business Vision to Sage 300 ERP is a Sage certified Migration solution. Greytrix is a pioneer in providing Migration services at its Sage Migration Centre and catering end-users business requirements. Our GUMU™ migration utility is compatible to convert all Masters and Open transactions from Sage Business Vision to Sage 300 ERP.

We at Greytrix help the end – user in implementing new Sage 300 ERP system through our various successful migration and integration solutions.

In this blog we will discuss about how GUMU™ migrates Vendor Notes from Sage Business Vision to Sage 300 ERP.

New Stuff:Migrate Item Unit of Measure from Sage 50 US (Peachtree) to Sage 300 ERP

You can view Vendor Notes in Sage Business Vision from the following path -
Sage Business Vision –> Edit –> Vendor Details

BV
In Sage 300 ERP the Notes are converted by GUMU™ as follows:

You can navigate through the below mentioned path to check migrated comments into Sage 300
Sage 300 ERP–> Accounts Receivable –> A/R Vendors –> Vendors -> In ‘Comments’ tab

Sage
See highlighted in the above screenshot, the Notes are converted in Vendor master’s Comment screen in Sage 300 ERP.

In this way, Sage Business Vision Vendor Notes are migrated into target Sage 300 ERP company database. For more information on ERP data migration, drop us a mail at erpmig@greytrix.com

Also Read:
1) Migrate Customer Notes from Sage Business Vision to Sage 300 ERP.
2) Migrate Item Unit Of Measure From Sage 50 US (Peachtree) to Sage 300 ERP.
3) Migrating Items from Sage Business Vision to Sage 300 ERP.
4) Migrate Open Sales Order From Sage Business Vision to Sage 300 ERP.
5) Migrate Sales Department Code from Sage Business Vision to Sage 300 ERP.

AR Refund Inquiry for Sage 300 ERP

$
0
0

Sage 300 ERP has a feature to refund to the customers either in Cash, Check or Credit Cards for  reasons personal to the company. To know the list of the refunds done for a particular customer becomes very necessary when there are lots of paybacks to the customers in month or a quarter and the users need the information of the same. Sage 300 ERP provides a separate screen Refund Inquiry to know the refunds done from the Banks to the customers for a specific period. Here user is not limited to viewing the refunds for a single customer at a time, like Customer Inquiry form.

New Stuff: Migrating Items from Sage Business Vision to Sage 300 ERP

To do know the Refunds go to Accounts Receivable –> A/R Transactions –> Refund Inquiry.

From and To Bank,
From and To Customer,
From and To Date,
from and To Period,
From and To Check Number,
Status – All /Outstanding/Cleared/Reversed,
Payment Type –Cash/Credit/Check /All,

Please refer below screenshot.

4

Using the given filter criteria, user can look up all the refunds paid from a selected bank, or can display information for a refund for only the Refund number.

From the Refund grid, user can drill down by clicking on the document button and can view the original refund in the AR Refund screen. Please refer the below screen shot for the same.

5

By click on Open button on AR Refund inquiry, get detailed information for the selected transaction. The information includes (but is not limited to) the customer number, refund document number, and the documents to which the refund is applied.

For that refer below screen shot.

6

By clicking on Print button on AR Refund inquiry, get information all about Bank, check no. status, type, refund date, Posting date, year, batch entry ,customer no., remit to, refund amount in single report , For better understanding refer below screen shot.

7

Just to summarize, the Refund Inquiry screen provides a ready reference to all the information of refund amount from credit note, receipt, prepayment in Sage ERP 300 system.

Read Also:-
1.A/R Document Inquiry in Sage 300 ERP
2.AR Customers-OE Order Inquiry
3.Pending P/O Receipts Inquiry
4.Sales History Inquiry in Sage 300 ERP


Generate POs from requisitions in Sage 300 ERP

$
0
0

Sage 300 ERP always provides lots of features for users to reduce their manual work. This saves lots of invaluable time of the users. In this blog we will discuss another useful feature about how to generate multiple POs from requisitions without navigating to the PO screen.

Create POs from Requisition screen allows users to create multiple purchase orders automatically from current requisitions, from reorder quantities in Inventory Control, and from active sales orders in Order Entry. Users can create purchase orders only for active items, vendors, and locations.When Users creates purchase orders automatically, the program selects Active as the purchase order type, posts the purchase orders, and increases quantities on purchase order in Inventory Control module.

To review and edit the purchase orders created automatically, user has to use the Purchase Order Entry screen from PO module.

Let see, how to generate multiple POs from requisitions.

New Stuff: AR Refund Inquiry for Sage 300 ERP

To open screen please navigate to,

Purchase Orders > P/O Create Purchase Orders > Create POs from Requisitions

Please refer below screen shot for Create POs from Requisition.

1

The above screen allows a user to create purchase order in the range of

1.From and To Requisition Number
2.From and To Requisition Date
3.From and To Vendor Number

Also the screen provides options as below:

1.Consolidated Items:-This option allows users to consolidate details into single detail on the purchase order where vendor, item, unit of measure, location, and expected arrival date are same.

2.Include Bank Vendors:-This option allows users to convert requisition without vendor number to purchase order with the help of I/C vendor type.

3.Job Related:-This option allows users to create purchase order on the basis of Job Related.

Also, the user can include header level and detail level optional fields if required. Please refer below screen shots for optional fields.

2

With the help of this screen, the user can define header optional field which need to be include in purchase order.

3

With the help of this screen user can define the detail optional field which need to be include in purchase order.

Once, the user clicks on the process button, program automatically generates POs on the basis of configuration.

Hence with the help of this feature of sage 300 ERP user can save the time and reduce the stress. In our next blog we will discussed about how to create the PO from IC.

Read Also:
1.Purchase History Report
2.Aged Purchase Order Report in Sage 300 ERP
3.Purchase Order Transaction Flow in Sage 300 ERP
4.Creating Purchase Orders from Order Entry screen in Sage 300 ERP

How to deduct GTA (Goods Transport Agency) service tax in SAGE 300 ERP

$
0
0

GTA is a service tax, in relation to the transport services. Organizations are required to collect and deposit the tax with the government authority on behalf of the transporters. This is a mandatory compliance which all companies need to follow to avoid any legal issues with the authorities.

Vendor

New Stuff: Generate POs from requisitions in Sage 300 ERP

 Service Receiver will pay GTA service tax to the government authority in calculation with new service tax of 14%.

In this case the calculation that will take place, is shown below with example:

Suppose we get Invoice from a transporter of Rs. 20,000/- then tax calculation is

14% Service Tax on 30% of Invoice amount i.e. 6,000 is 30% amount of invoice 20,000

So, the tax will be calculated 14% of 6,000 = 840

Otherwise we can also calculate tax (Invoice amount*30%*14%) i.e. 4.20% of 20,000 = 840

In this scenario we need to pass the entry as shown in below:

Vendor

 Now in Sage 300 ERP, we need to pass the entry where our Tax Liability accounts get credited and our Tax expense (receivable) account gets Debited.

For that, first we need to create a two tax authority for GTA service tax one with the rates of 4.20 and another one with -4.20 so that Sage 300 ERP (Previously known as Accpac) will be credited with that amount in the specified account.

For the reference please check below Invoice screen shot.
Vendor

And below is the GL entry screen where exact entry is passed.

Vendor

Also Read:
1. Auto- Application of Taxes at Item Level
2. Tax Audit Report
3. Taxes in Sage 300 ERP
4. Automatic insertion of Item Wise Detail Tax
5. Automatic Tax Calculations Option in Sage 300 ERP

Knowing Pending Transaction In AR Customer Inquiry

$
0
0

The A/R Customer Inquiry screen provides detailed information about customers that exist in Sage 300 ERP. This helps users to know the customer information in a single click. In our previous blog Post, we had discussed about “AR Refund inquiry for Sage 300 ERP“, going further, in our today’s blog we will discuss about Pending Transactions in A/R Customer Inquiry screen which is related to pending transaction of the customer.

Pending tab from AR Customer inquiry screen provides the summary of transactions which provides the lists of all transactions that are entered or generated, but not posted, for an Accounts Receivable customer. It also lists the posted miscellaneous receipts for customers that have no customer record in Accounts Receivable.

New Stuff: How to deduct GTA (Goods Transport Agency) service tax in SAGE 300 ERP

To enquire about the Pending transaction of a customer

Go to Account Receivable– > A/R Customer — > Customer Inquiry.

Please refer the below screen shot.

1

The pending tab contains two grid list, the top grid lists transactions pending for a selected customer, displaying one line of summary information for each transaction. Summary information includes header information, document totals, taxes, and retainage amounts from transactions, and the batch status of the batches that contain the transactions. The second grid shows distribution detail for selected document which user selects on the top.

Please refer below screenshot.

4

Similarly, the user can easily view the original transaction just double click on the number that identifies transactions like shipment entry form, order entry form, refund entry form,receipt entry form and invoice ,credit note ,debit note in AR invoice entry form.

5

In this way, AR customer Inquiry helps users to know the pending transactions for the customers.

Read Also:
1.   Pending Shipments Inquiry in Sage 300 ERP
2.    Pending P/O Receipts Inquiry
3.    Sales History Inquiry in Sage 300 ERP
4.    IC Items Location Details Quantity Inquiry in Sage 300 ERP


AR Options — Include Tax in Statistics in Sage 300 ERP

$
0
0

In our previous blog we discussed about “Allow Edit in Statistics in Sage 300 ERP”. Extending the discussion further we will now see how to Include Tax in Statistics for Items under AR Options.

New Stuff: Knowing Pending Transaction In AR Customer Inquiry

In order to access this feature you need to navigate to Account Receivable –> A/R Setup –> Options –> Processing Tab.  Kindly refer the screenshot for the same.

1


1. If User Uncheck the option “Include Tax in Statistics” in AR Options screen under processing Tab, then Tax statistics for the transactions that are posted will not be included in the totals in the Item Sales History under A/R Transaction Reports as well as Items under  A/R Setup.

Before Transaction:

Item Sales History
Item Sales History
Above screen shows the Item Sales History Report for Item “BK-360” before posting a transaction say Invoice with “Include Tax in Statistics” unchecked in AR options.

3

Above screen shows the statistics of Item “BK-360” before posting a transaction say Invoice with “Include Tax in Statistics” unchecked in AR options.

Invoice transaction
4

Above screen shows an Invoice is posted for Item No. “BK-360” for
Document Amount: 117 and Taxes : 9.65 which makes Amount Due 126.65


After Transaction:

Item Sales History
5

Above screen shows the Item Sales History Report for Item “BK-360” after posting a transaction say Invoice for Document Amount of 117 as “Include Tax in Statistics” is unchecked in AR options.


Items
6

Above screen shows the statistics of Item “BK-360” after posting a transaction say Invoice for Document amount of 117 as “Include Tax in Statistics” is unchecked in AR options.

On comparing before Transaction with After Transaction Item Sales History report for Item No. “BK-360” the Amount sold displayed is 117 that is Document Amount of the Invoice is included in the Item Sales History report as well as the statistics displayed in the Items Screen. This is observed as the “Include Tax in Statistics” option is unchecked under AR options.

2. If User checks the option “Include Tax in Statistics” in AR Options screen under processing Tab, then Tax statistics for the transactions that are posted will be included in the totals in the Item Sales History under A/R Transaction Reports as well as Items under A/R Setup.

7

For Example: Below screen shows the Sales History Report Before posting a transaction say Invoice with “Include Tax in Statistics” checked in AR options.

Before Transaction:

Item Sales History8
Items9


Invoice transaction 
10

Above screen shows an Invoice is posted for Item No. “BK-360” for
Document Amount: 121.20 and Taxes 10.00 which makes Amount Due 131.20.

After Transaction:

Item Sales History11


Items12
On comparing Before Transaction with After Transaction Item Sales History report for Item No. “BK-360” the Amount Due of 131.20 which is Sum of Document total and Taxes; is added to amount sales number of 117 as we have kept “Include Tax in Statistics” option is checked under AR options.

This is how one can keep a track of the Include Tax in Statistics for a record.

Also Read:

1. Manage AR Item Statistics in Sage 300 ERP
2. AR Options – Allow Edit of Statistics in Sage 300 ERP
3. How to Use Different Item Description for Specific Items in Sage 300 ERP
4. Populate Items on Order Entry Screen using Template Code
5. Generate BOM and Kitting items on the fly from Order Entry screen in Sage 300 ERP


Migrate Item Price Lists from Sage Business Vision ERP to Sage 300 ERP

$
0
0

GUMU™ for Sage Business Vision ERP to Sage 300 ERP is a Sage certified Migration solution. Greytrix provides migration services at its Sage Migration centre and fulfils the business requirements. In this blog you will get to know how GUMU™ migrates Item Pricing from Sage Business Vision ERP to Sage 300 ERP.

New Stuff: Migrate Vendor Notes from Sage Business Vision to Sage 300

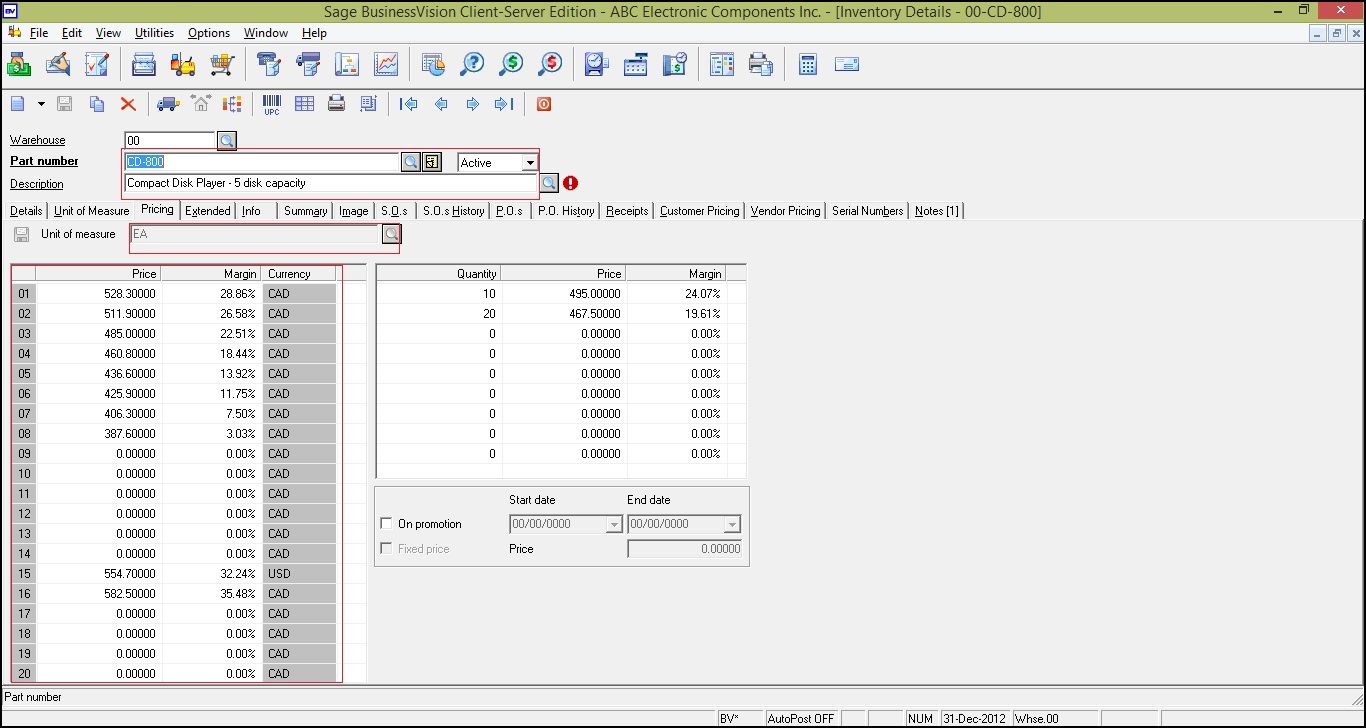
You can view Items and their pricing in Sage Business Vision from the following path,
Sage Business Vision –> Edit –> Inventory –> Details –> Pricing

In pricing tab, you can see Part Number,
Description, Price List, Price per unit, Unit of Measure and Currency as highlighted below:

BV2
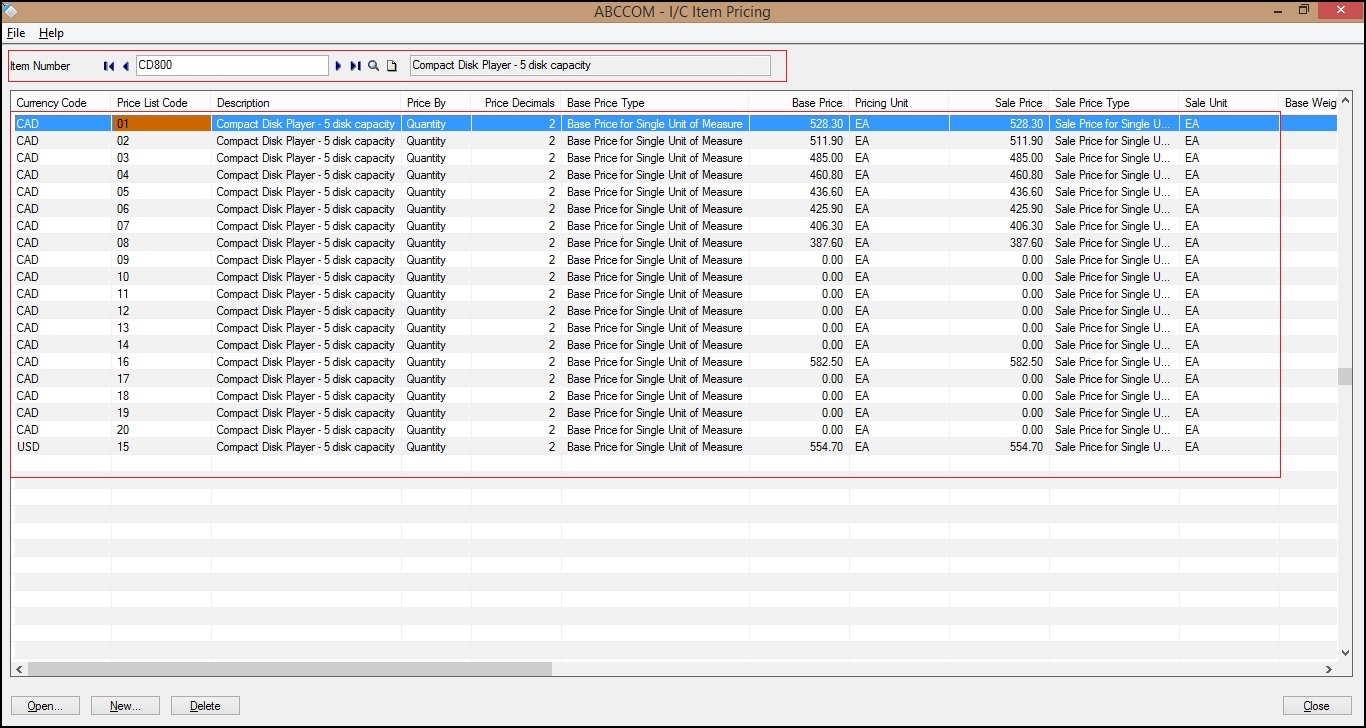
You can check migrated Price List data in Sage 300 ERP as shown below. Path for Sage 300 ERP is,
Sage 300 ERP –> Inventory Control –> I/C Item and Price Lists–> Item Pricing

Sage300_2
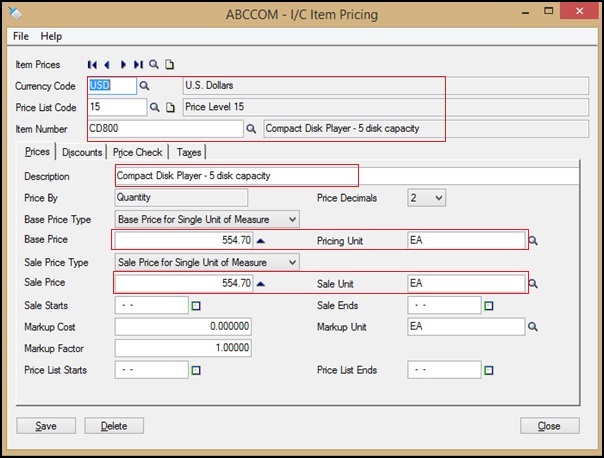
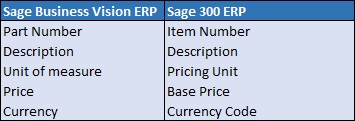
After double clicking on any Item Price List Record window gets opened as shown below. In Units tab, you can see Currency Code, Item Number, Price List Code, Description, Base Price, Sale Price, Pricing Unit, Sale Unit, Markup Unit and Markup factor of an item as shown below.

Sage3001_2
Terms for both Sage Business Vision and Sage 300 ERP:

Mapping
In this way, you can see the Price List data of source ERP (i.e. Sage Business Vision ERP) and target ERP (Sage 300 ERP).

Also Read:
1) Migrating Items from Sage Business Vision to Sage 300 ERP
2) Migrate Open Sales Order From Sage Business Vision to Sage 300 ERP
3) Migrate Ship to Address from Sage Business Vision to Sage 300 ERP
4) Migrate Customer Notes from Sage Business Vision to Sage 300 ERP
5) Migrate Banks from Sage Business Vision to Sage 300 ERP


Migrate A/P Payment Terms from Business Vision to Sage 300 ERP

$
0
0

GUMU™ for Sage Business Vision ERP to Sage 300 ERP is a Sage certified Migration solution. Greytrix is a pioneer in providing Migration services at its Sage Migration Center and catering end-users business requirements.
We at Greytrix help the end – user in implementing new Sage 300 ERP system through our various successful migration and integration solutions.
In our previous blog we discussed about Migrate A/R Payment Terms from Business Vision to Sage 300 ERP. In this blog we will discuss about how GUMU™ migrates A/P Payment Terms from Sage Business Vision ERP to Sage 300 ERP (Formerly known as Accpac).

New StuffMigrate Item Price Lists from Sage Business Vision ERP to Sage 300 ERP

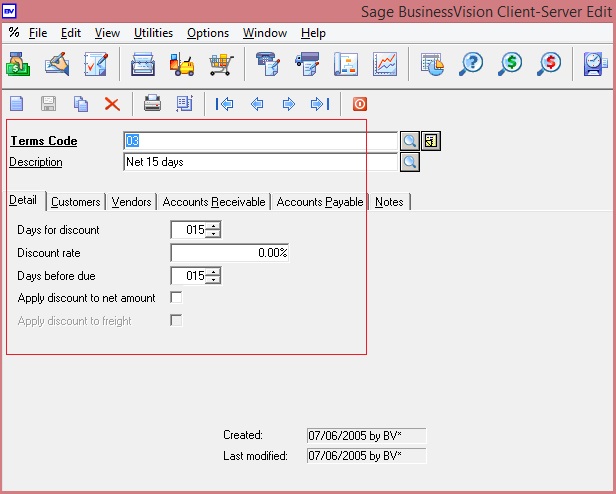
We can create payment terms for vendors from the following path in Sage Business Vision.
Sage Business Vision → Edit → Terms

BV

The above screen shot shows an existing payment term in Sage Business Vision

You can create payment terms for vendors from the following path in Sage 300 ERP,
Sage 300 → Accounts Receivable → A/P Setup → Terms

Sage

The above screenshot shows the converted A/P Payment Term in Sage 300 ERP.

Sage1

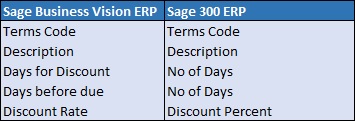
In the above screen shot the vendor ‘CNCP’ is assigned the “03” Payment Term as in Business Vision. After data migration from Sage Business Vision ERP the field values of Sage Business Vision Payment Terms get converted with the following mapping:

Mapping

In this way, Sage Business Vision A/P Payment Terms are migrated into target Sage 300 ERP company database. For more information on ERP data migration, drop us a mail at erpmig@greytrix.com

Also Read:
1) Migrating Items from Sage Business Vision to Sage 300 ERP
2) Migrate Open Sales Order From Sage Business Vision to Sage 300 ERP
3) Migrate Sales Department Code from Sage Business Vision to Sage 300 ERP
4) Migrate Remit-To-Address from Sage Business Vision to Sage 300 ERP
5) Migrate Sales Person from Sage Business Vision to Sage 300 ERP


Stock Ledger Report

$
0
0

Inventory Control as name suggests, supervises the supply, storage and accessibility of an item or inventory. This module plays a very important role in business as it keep a track of inventory that the company has.

In Sage 300 ERP, we have Stock Transaction Report which lists all the changes in inventory, their status on basic of Account Set, Location and Fiscal Period. The Stock Transactions report lists transactions that have resulted in changes to inventory levels for selected items.

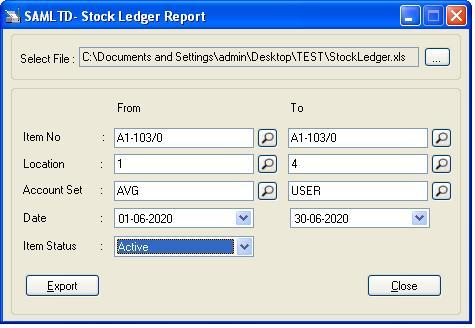
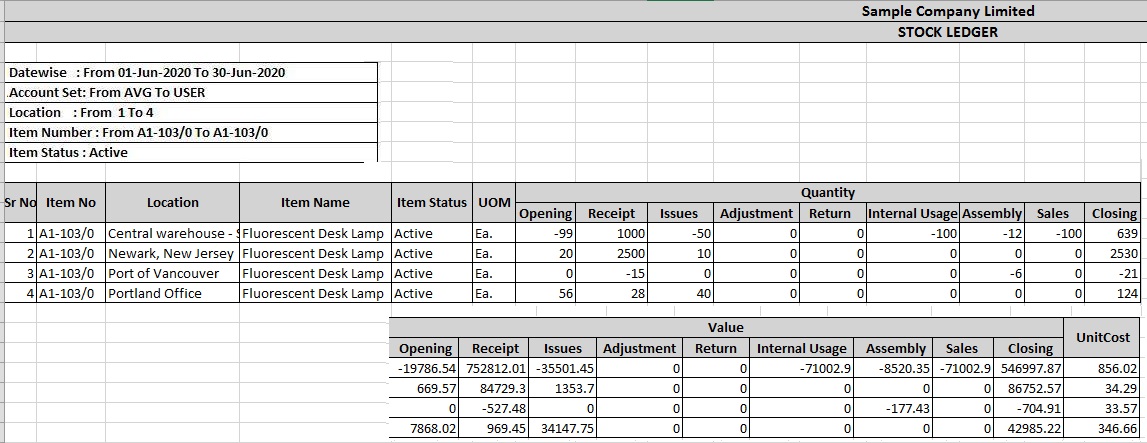
In business sometimes, user might need to print the report for particular date range instead of Fiscal Year-Period then our newly developed “Stock Ledger Report” is the solution for the same. Our report function same as standard “Stock Transaction Report ” but there is slight difference in their filter criteria as follows.
This report prints in excel for user’s convenience. Moreover we have provided ‘From’ and ‘To’ date filter so that user can list the change in inventory date wise.

New Stuff: Customized Stock Transfer

The report UI is as follows:

StockLedger-UI

After Printing Report, it will show output as follows:

StockLedger-Report

The report is particularly useful when you need the details of your Stock Transaction on a date range in excel format.

 Also Read:

1.  Date wise IC stock Transaction Report

2.  Stock summary Report

3.  Adjustment Entry in Inventory Control

4.  Alternate Amount in Inventory Control module of Sage 300 ERP

5.  Accounting Effect On Inventory Control

Purchase Order Action Report in Sage 300 ERP

$
0
0

In sage 300 ERP, a purchase order can either be partially received, fully received or never received.

Purchase Order Action report is one such report which will give you the PO Type i.e. partially received, fully received or never received.

Also this report is used to view summary & detailed list of your current purchase order. This report will print data in functional as well as in source currency.

To print this report navigate to:  Purchase Order–>PO Analytical report–>Purchase Order Action Report

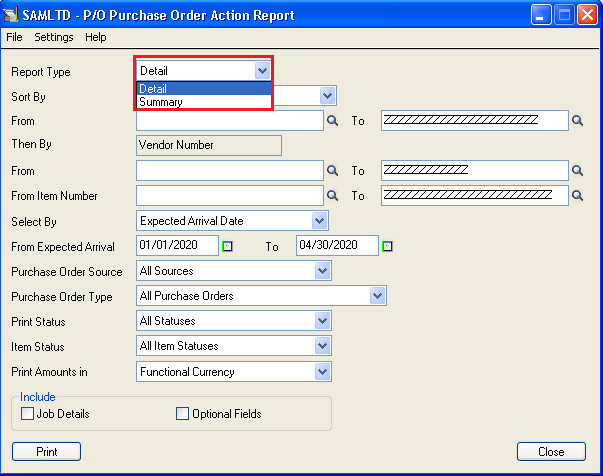
In this report user will get actions which is already done for any purchase order with status as entered in UI. We have multiple selections in UI, refer below screenshot:

New Stuff: Stock Ledger Report

PurchaseOrder02

This report is used to print all the purchase order, those that has yet to be received, partially received or are on hold. This report will get printed in Detail as well as in Summary format.

If the user selects the report type as Detail then he can sort report by purchase order number, vendor number or item number & if user select report type as Summary then user can only sorted by purchase order number & vendor number.

Report can be sorted as per Purchase Order number, vendor number or item number. You can also select whether to print by expected arrival date or purchase order date. User can view those purchase orders which are posted, printed or all orders.

If user selects the report type as Detail then only item status can be selected as per PO detail line items which are completed, incomplete, completed with no receipt or all items. Only detail report type should be selected as per functional or source currency.

In this report if the user wants to print extra information like Job details & optional fields then user need to select checkbox in “Include” as per the user’s requirement.

After applying the filter criteria, report will get printed [Refer below Screenshot]:

PurchaseOrder01

In above screenshot we can see report  gets generated with data like purchase order no & its vendor details, item no & item description, location, date, UOM, quantity ordered, quantity outstanding, received to date, ordered extended amount etc.

Thus Purchase Order Action Report will allow you to have a look on the all details of purchase orders for both summary as well as details.

Also Read:-
1.Aged Purchase Order Report in Sage 300 ERP
2.Purchase Order Reports in Sage 300 ERP
3.Invoice Action Report
4.Features of P/O transaction Report in Sage 300 ERP
5.Pending Order Aging Report in Sage 300 ERP


ERROR: Load Library

$
0
0

In Sage 300 ERP ,while printing customized report from standard User Interface like Invoices, Purchase order, Receipts you might have come across the error  “ERROR: Load Library”.

New Stuff: Purchase Order Action Report in Sage 300 ERP

111

Due to this error, the customized report does not get printed and throws a pop up message as shown above. The Solution to this error is you need to do some change in the .ini file present in the respective Sage folder e.g. if you are printing the report from OE Form–>Invoices you need to change the file present in Sage–>Sage Accpac–>OE56A–>oerpt.ini.

Below are the steps you need to follow to get rid of this problem.

Solution:

1.Open the XXrpt.ini file present in your respective module of Sage folder.

Suppose you get the above error while printing the Purchase Order report then, so open your XXrpt.ini file of that particular module.

Path: Sage–>Sage Accpac–>PO56A–>porpt.ini

2.Comment the type, datatype path and datatype query from that folder for the report name for which you are facing the error

For e.g:

Suppose you are printing a report named popor01.rpt then from porpt.ini file search for the report name popor01 and comment the lines marked in red below.

222

3.Rerun your report.

On the other hand, if you want to run the dll report then include these lines in your rpt.ini file.

Also Read:
1.Allow Non Inventory Item Option in PO
2.Allow Fractional Quantities in Purchase Order
3.Allow edit of System generated batches
4.Allow Adjustments in Payment batches
5.Allow editing of external batches


Migrate AR Payments from Sage Business Vision ERP to Sage 300 ERP

$
0
0

GUMU™ for Sage Business Vision to Sage 300 ERP is a Sage certified Migration solution. Greytrix is a pioneer in providing migration services at its Sage Migration Center and catering end-user business requirements. We at Greytrix are focused to help the end –user in successfully implementing the new Sage 300 ERP system through our various successful migration and integration solutions.

We provide data Migration Services from Sage Business Vision to Sage 300 ERP (formerly known as Sage Accpac) at our Sage Migration Center. Our GUMU™ migration utility is compatible to convert all Master and Open transactions along with Sales, Purchase and GL historical data from Sage Business Vision to Sage 300 ERP.

New Stuff: Migrate A/P Payment Terms from Business Vision to Sage 300 ERP

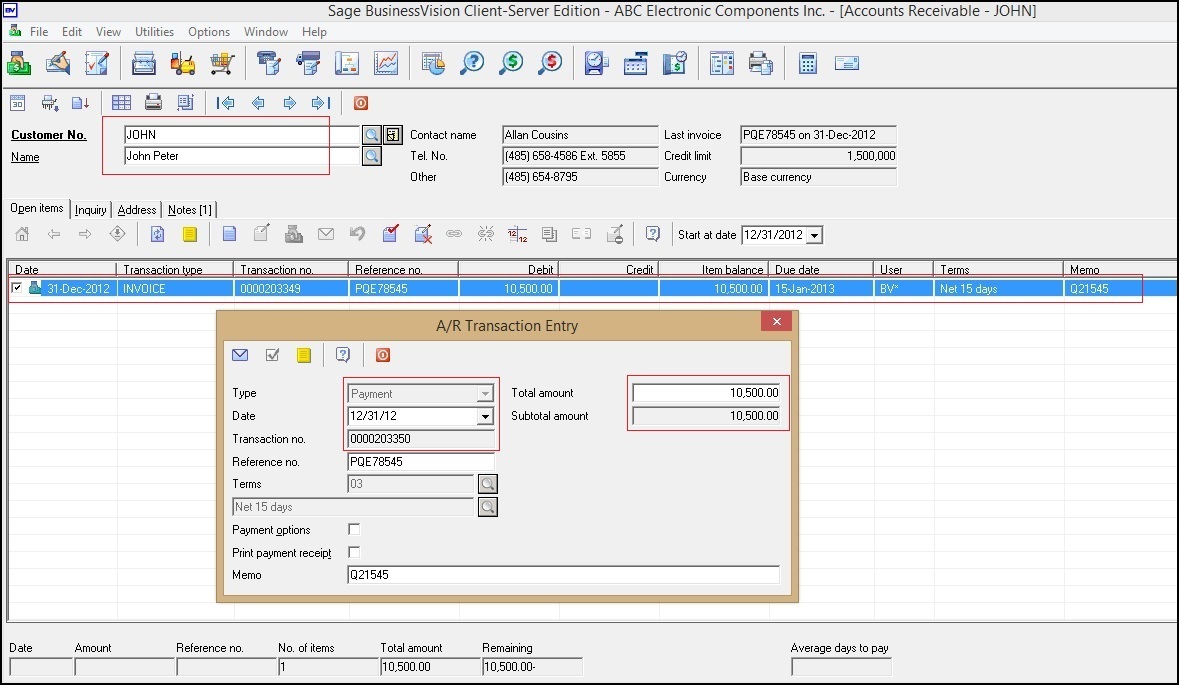
Let’s see how Sales Payment Transactions are migrated from Sage Business Vision to Sage 300 ERP. We had created an invoice in Sage Business Vision with few Inventory Type Items and made payment for the same. As a result, AR payment Invoice gets created in Sage Business Vision with the Applied Invoice number and amount to it as shown in below screenshot.

BV1

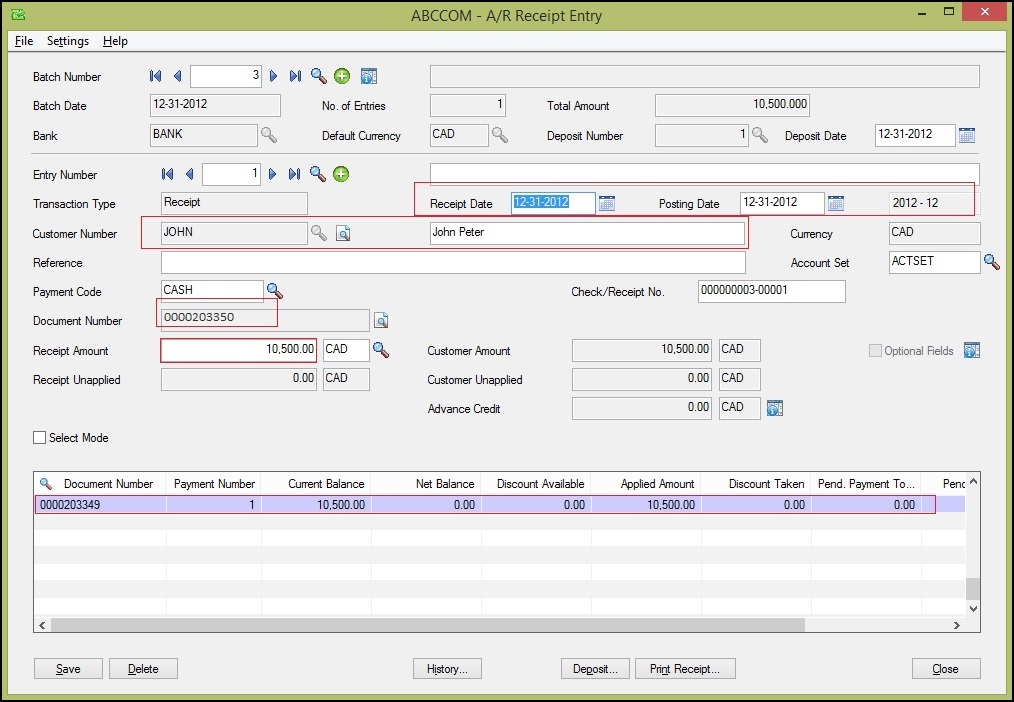
After the data migration in Sage 300 ERP, follow the below given path to check the migrated Payment transaction entry in Sage 300 ERP.
Go to Accounts Receivable -> AR Transaction -> Receipt Batch list and check for payment entry.

Sage

After data migration from sage Business Vision the field values of AR Payment gets migrated with the following mapping.

Mapping

In this way, Sage Business Vision payment is migrated into target Sage 300 ERP company database. For more information on ERP data migration, drop us a mail at erpmig@greytrix.com

Also Read:
1) Migrating Items from Sage Business Vision to Sage 300 ERP
2) Migrate Open Sales Order From Sage Business Vision to Sage 300 ERP
3) Migrate Ship to Address from Sage Business Vision to Sage 300 ERP
4) Migrate Customer Notes from Sage Business Vision to Sage 300 ERP
5) Migrate Banks from Sage Business Vision to Sage 300 ERP

Viewing all 1475 articles
Browse latest View live


<script src="https://jsc.adskeeper.com/r/s/rssing.com.1596347.js" async> </script>