Quantcast
Channel: Sage 300 ERP – Tips, Tricks and Components
Viewing all 1475 articles
Browse latest View live

PO Posting Journals Report in Sage 300 ERP

$
0
0

In our previous blog, we had discussed about Purchase Order action report. In this blog post we will discuss about PO Posting Journal report under Purchase Orders analytical reports.

PO Posting Journals report contain the detailed record of the general ledger transactions which arise from the receipts, invoices, returns, credit notes & debit notes posted in Purchase Order module.

To print this report, navigate to:

Purchase Order–>PO Analytical report–>Posting Journals Report

This report can print only one type of transaction at a time like receipt, return, invoice, credit & debit notes. You can also sort the transactions by day end number, transaction date, vendor number & receipt number.

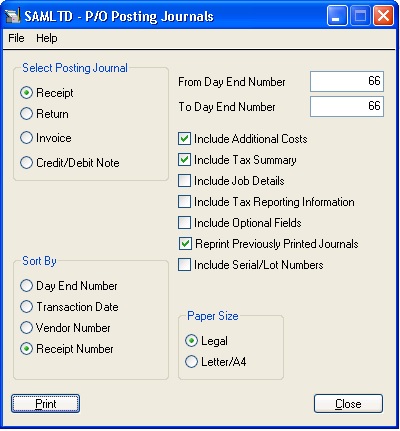
Once any PO entries is posted, you need to run Day End Processing before printing this report. We have multiple selections in UI, refer below screenshot:-

New Stuff: Migrate AR Payments from Sage Business Vision ERP to Sage 300 ERP

UI

You can also print the report with day end number range. In the above screen we have selected the posting journal as Receipt & select sort by as Receipt number then all receipts which have their impact on General Ledger will be displayed in the report.

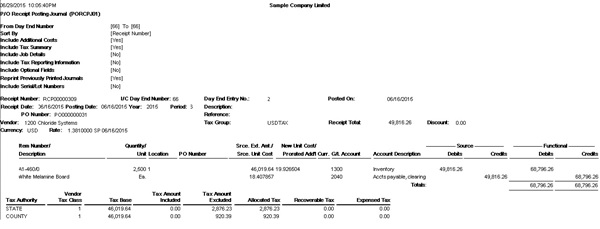
The report format will display GL account code with description, location, quantity, unit cost, receipt date, tax group etc. Once you will get the receipt then you can also find the GL effect with credit & debit amounts. Refer below screenshot:-

Report

In posting journal report you can also see the credit & debit amounts in source as well as in the functional currency. If you use multicurrency accounting then posting journal report displays some additional information like currency, exchange rate, transaction total in source & functional currency etc.

This report will be useful to get the GL transaction effects for all purchase order transactions.

Also read:
1.Posting Journals Report in Sage 300 ERP
2.Purchase Order Reports in Sage 300 ERP
3.Aged Purchase Order Report in Sage 300 ERP
4.Shippable Backorders Report
5.Purchase History Report


Best practices for upgrading your legacy data into New ERP System

$
0
0

We might call 2015 as the year of the ERP migration. According to the Gartner research conducted last year, 47 percent of organizations plan to move their core ERP system to the cloud over the next five years. Moving to the cloud requires an ERP upgrade even if a business sticks with the same ERP provider.

“Vendors and systems integrators have more sophisticated tools at their disposal to migrate data to cloud ERP, but the tools will only be as effective as the planning and execution surrounding their use,” warns Michael Guay, research director for ERP strategy and value realization at Gartner.

data mig

Below aspects of migration must be considered before any level of migration takes place.

Find out the flaws and inability of old ERP system.

Over the course of time, there emerges a sense of need to explore upon new functionalities which will carter services in a better way with proper use of the technology. Stakeholders and Business management keeps tap of the latest technology which are offered in the market; however they eventually realize that finding the right technology to support business can be a tedious stuff. So, we must list out the functionalities which our current system is unable to carry out and also the features we require when we think of changing our existing ERP system to new one.

Check the data keeping capacity of old system and find out up to what extent your data size will be in future.

The size of existing ERP legacy system expects an overall increase with the excessive usage of the system. Growth in the organization economy is not only directly proportional to better customer services; it is also proportional to increase in database storage and information.

Upgrading of ERP legacy system, helps the organization to store and preserve years of historical data without any apprehension of data storage limit in the system.

Understand the functionality of new ERP System

“Never Test the water by both feet”: this famous quote clearly comes into the picture when we started using the newly upgraded ERP system. Employees and management should be able to learn and understand the functionality of the newly upgraded ERP system. Special training with the concerned implementation executives will help out in getting through knowledge of the ERP system. Once an organization is successfully trained in the knowing the functionality of ERP system, it can be used in a most efficient way ; which in turn gives rise to better productivity , quality and sustainable growth to the business.

Define schedule and Resources

Define a proper Schedule for up gradation. Generally people prefer to move the data on weekends of their Fiscal year’s last month. For the migration process, put your best resources with having enough knowledge of both system functional as well as technical front.

Take an adequate backup

Before proceeding further with any kind of Activity, person has to be make sure that adequate backup has been taken for old system during backup process

Commit all current work data.

Users working on the existing legacy ERP system should ensure all the current accounting tasks has been completed and posted accordingly. This shall ensure the data entered in the old legacy ERP system is successfully converted in the new ERP system.

  1. All the existing users should be logged out from server and workstations.
  2. Take system and database backup file on old ERP Server.

Target ERP Company Setup:

Prepare a target shell company before initiating the migration process. In target Shell Company, the basic setup has to be done manually which can’t be handle in auto migration process. It will ensure that necessary setup done before migrating master information into target ERP.

Post Migration Process

1.In process, migrate all master data first followed by Transactions history.

2.Do the user setup and commit all data work.

3.Review with old and new data by continuing work on old system.

4.Once review completed, fix a day to enter all entries in new system which has been in downtime period in old ERP.

5.Start doing parallel entries in old system along with New ERP system.

6.Once we make sure the migrated data is fine and all reports are correct, we can stop using old system and continue Live work on new System only.

Greytrix helps in migrating to Sage 100, Sage 300 and Sage ERP X3 from Sage Pro, Sage 50 US, Sage 50 CA, Sage 50 UK, Sage Business Works, Sage Business Vision, QuickBooks and MS Dynamics Great Plains.

For more information on migration solutions, please contact us at erpmig@greytrix.com. We will be glad to assist you.
How to Print error at batch level for All Transaction Batches

$
0
0

Sage 300 ERP has many features in built for making transactions easier and faster. One of the simplest and the hidden functionality of Sage 300 ERP is printing errors at batch level and helps users to easily identify and correct those error before future posting of the final transaction.
As we all know, that human errors are most likely to occur at different stages of transaction entries.

We are now going to see how the error is captured and printed at the batch level itself.

New Stuff: Best practices for upgrading your legacy data into New ERP System

For e.g. suppose user makes an error at the invoice entry level refer the below screen shot.

Vendor

The error occurs when the batch is posted and the error is unknown as the message states that only error has occurred and error batch is created refer below screen shot.

Vendor

The error also states that check the posting Errors report for the information on that particular error but if you want to know the error of particular posted batch, one has to, just scroll to right where the user will see one column named “No of Errors” refer the below screen shot.

Vendor

By double clicking the column where the error is present, the posting error report UI will be opened where user will be able to identify and correct the error.

Vendor

By simply printing the error report user gets the perfect clarification why that error occurred as shown in below screen

Vendor

In a similar way we can print error reports from batch level for Receipt Batch, Adjustments and refund batches For AR and Payment Batch, Adjustments batches For AP.

Also Read:
1. ERROR: Load Library
2. Error while migrating data from lower version to higher version
3. Error: Sage 300 ERP UI Container has stopped working message occurs when printing reports
4. Error while posting GL Batch
5. IC Location Details Quantity Enquiry – Error

ATTENDING SAGE SUMMIT 2015? MEET GREYTRIX AT BOOTH #521

$
0
0

You’ve stumbled on this article in your quest for technical tips, updates or know how on Sage solutions frequently posted on our blog. Well this write-up is a bit different from our normal cadence and if you’re participating as an attendee, exhibitor or Sage employee, we hope to see you at Booth #521 and meet the Greytrix experts often behind the scenes helping you and your clients with their Sage investments.

Explore range of products and services offered by Greytrix at Sage Summit 2015 – Booth #521

Imp Links – Event Website | Agenda | Product Agenda

Greytrix Booth 521

About Greytrix

Need to discuss more strategic initiatives? Our Executive team, Kumar Siddhartha – CEO & Nitin Chandure – Sr. VP Operations are attending and can participate in 1:1 deep dive conversations.

Our Sage X3, Sage CRM and other Sage ERP focused Project managers and sales managers can work with you to provide any technical requests or customizations, GUMU and other extended solution requests on a tactical level. Need a demo or in depth understanding? This is the right place to interact with the team in person.

Greytrix team is also pleased to provide you with live demo and insights about outside the box solution for taking Customer Interactions to the next level using its GUMU™ integration with eCommerce Magento and Salesforce.com.

Contact us at sage@greytrix.com to secure a convenient 1:1 time with our experts or the management team at Summit.

Meet us at Booth #521 to know more about our Sage ERP and CRM Integration, Migration, Outsourced Development and Consulting Services. Greytrix works globally with +350 Business partners and has a dedicated team of +250 Sage Developers and Consultants.

For more information on our Sage ERPs related services, contact us at sage@greytrix.com

Think Greytrix, grow big!!

Quantity Commit Routine

$
0
0

Committing order quantity is one of the key features of Sage 300 ERP. This allows users to reserve quantity for a particular item in order.  In business, it might be possible that you want to reserve some item for a particular customer then in this case it is quite useful.

Suppose a user has created one order with quantity 100 and at the same time he commits it, then, it simply means that quantity is guaranteed to be available unless you allow negative inventory quantities. You can manually commit the quantity while creating the transaction, but it will be a quite lengthy task. To overcome this we have developed one utility which commits the ordered quantity automatically.

In Sage 300 ERP we have standard functionality to commit the quantity but our customized program is little bit different from the standard one. The standard functionality is useful to commit the quantity at the time of creating the order. But if you want to commit the quantity after creating the order in future then this routine will be very useful. By using “Quantity Commit Routine” you can commit the quantity in future as per your requirement. This routine will be used to bifurcate standard location and consolidate location.

Our user interface has only two button one to start the process and other to close the UI.

New Stuff: ATTENDING SAGE SUMMIT 2015? MEET GREYTRIX AT BOOTH #521

Blog1

When the user clicks on the process button the program will search the open and active orders, i.e. it will check the active orders against which shipment is not done or partial shipment is done.  Then for such active and open order it will check whether there is quantity available to ship. If yes then it will update the committed quantity value with the ordered / outstanding quantity. If there is no item available for that particular location then program will skip it and process will remain continue.

The updated Quantity Commit Order:

Blog2

The most important is that user need not to perform “Day End Processing” each time. The program is useful when you want to commit the quantity against some customer or order. If the order quantity is 10 and for that item – location if only 5 quantities are available then automatically it will update Quantity Commit column with remaining available quantity. The program will help you to save the time and automate the process of quantity commit.

Also Read:
1.Item description in Order Entry Screen defaulting to blank in Sage 300 ERP
2.Customer Wise Item filter on Order Entry screen in Sage 300 ERP
3.How to update large Instructions in Order entry screen
4.How to set default reserved quantity in Sage 300 ERP
5.Commit All in OE ORDER ENTRY

Default settings for Invoices in Account Receivable

$
0
0

Sage 300 ERP provides various options for default setting which makes the data entry process easier for the admin.

In this blog we will discuss about the default settings available in Account receivable for Invoice entry.

Once you set these options, they will appear by default while generating AR Invoice entry.
New Stuff:Quantity Commit Routine
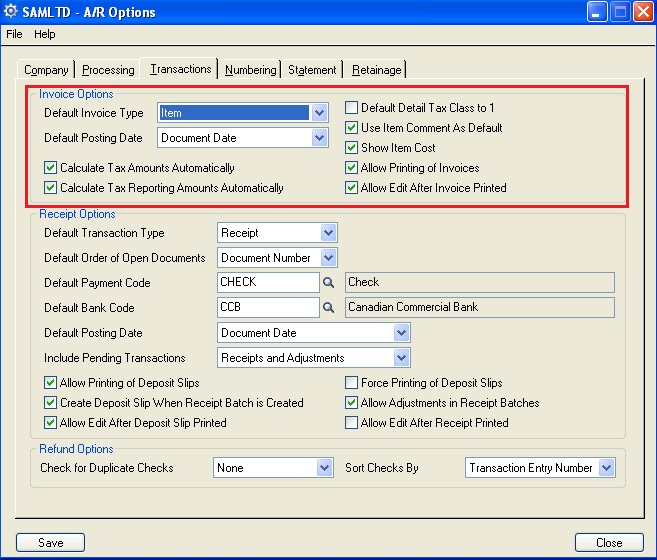
Navigate to Account Receivable –>A/R Setup Options –>Transaction Tab –> Invoice Options

AR Options

• Default Invoice type:
There are 2 options for default invoice type: Summary or Item.
You can set any one of them as default which you commonly use, so that it will appear as default in AR Invoice Entry.

• Default Posting Date:
The posting date is the date on which a document is posted to General Ledger, and it may be different from the document date. This distinction is particularly useful if you post a document to a year or period that is different from the document date.
There are 3 options available for default posting date:
Document date
Batch Date
Session Date

You can set any of these date as default posting date and Sage 300 ERP (formerly known as ACCPAC) will determine the date that appears as the default posting date on the A/R Invoice Entry screen.
However you can also change or edit the posting date at the time of creating AR Invoice.

• Calculate Tax Amount automatically (Check box):
Checking this option will result in automatic calculation of taxes as for invoices.You can also change the tax calculation method for individual invoices in Invoice Entry.

• Calculate Tax Reporting Amount automatically (Check box):
This will be useful when you have a multi currency database. If your taxes are in a currency that is different from functional currency, invoices must show the tax amount in the tax reporting currency, along with the exchange rate used for the conversion.
Select this option if you want to use automatic tax calculation as the default method for calculating tax reporting amounts on invoices.

• Default Detail Tax Class to 1(Check box):
For Summary Invoice:
– Select this option if you want to use 1 as the default detail tax class for summary Invoice.
– If this option is unchecked, Accounts Receivable uses the customer tax class (Invoice Entry  Taxes tab) as the default.
For Item Invoice:
This selection doesn’t have an impact on item invoices.For item invoices, Accounts Receivable uses the tax class set for the item.

• Use Item Comment as default (Check box):
For Item Invoice, you can check this option to display any comments you have entered in AR Item master records automatically when you are entering item details on an invoice entry.
If this option is unchecked, no default comments will get displayed during transaction entry, but you can type a comment of up to 250 characters for every item detail line.

• Show Item Cost (Check box):
If you use a price list for invoice entry, you can use this option to display the extended item cost when you are adding item details in the Invoice Entry screen.
Sage 300 ERP will not allow to change costs in the IC and you cannot print the costs on invoices.

• Allow printing of Invoices (Check box):
On checking this option, you can print invoice, Credit/Debit note in the Invoice Entry screen, or from Invoice Printing screen. This option does not force you to print the documents.
If you want to print the documents after posting the batches, then use Invoice Printing screen.
If you do not select the option, you cannot print invoices from Accounts Receivable.

• Allow edit after invoices printed (Check box):
When you select this option, you will be allowed to do changes in invoice entry after you have printed invoices, credit notes, and debit notes for them. You can also delete them.
Your choice for this option does not apply to batch header information. You can change the batch date or description at any time until you post the batch.

Note: However you can change your choices for these options at any point of time.

Also Read:
1. Default settings for Receipts in Account Receivable in Sage 300 ERP
2. How Deposit date in AR receipt entry plays important role in Bank Reconciliation
3. Default Settings for Accounts Payable Payments in Sage 300 ERP
4. AR Invoice Report
5. Optional to maintain Statistics for Customer, National Account and Group in Sage 300 ERP

Sales Order Action Report in Sage 300 ERP

$
0
0

In Sage 300 ERP, the actions that can be performed on a Sales Order can be Partially Shipped, Fully Shipped or Never Shipped.

Sage 300 ERP has Order Action Report which gives you the complete information of partially shipped orders, never shipped orders, either partially or never shipped and orders which are on hold depending upon certain filter criteria selected by the user.

To print this report navigate to, Order Entry –>O/E Report –> Order Action [Refer below screen shot]

New Stuff:ATTENDING SAGE SUMMIT 2015? MEET GREYTRIX AT BOOTH #521

Order Action UI

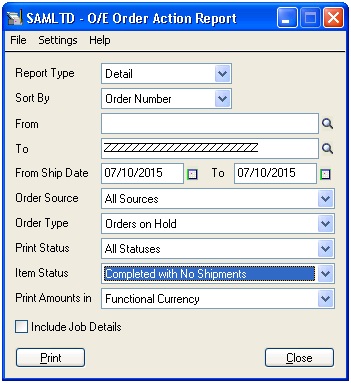
User can view the Order Action report detailed as well as in summary format.Order Action can be sorted on the basis of Order Number,Customer Number, and Primary Sales person. User can select From and To on the basis of option selected in Sort By i.e. if we want the report to be sorted on the basis of Order Number then From and To finder will display all the order numbers and report will print data accordingly.

User can view the data of the order which are never shipped,partially shipped and orderswhich are on hold. User can also view the report on basis of items which are out of stock, incomplete, availability for shipment, which are completed with no shipments and which are present in incomplete orders.

If you keep job details as checked then report will include contract, project, and category for Job related orders.

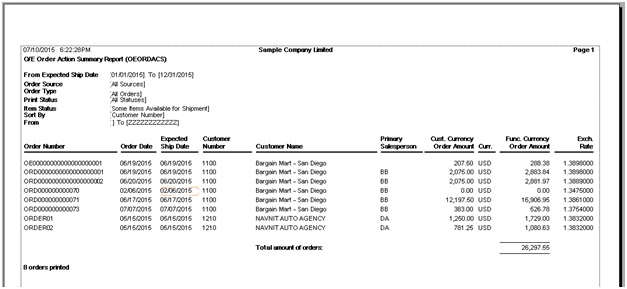
In case you select the Report type as Summary then the report will print the order number, Order Date, Expected Shipment date, Customer Number along with the Order amount in both Source and Functional Currency on the basis of the date range selected by user.Please refer below screen shot for more information.

Order Action SUmmary

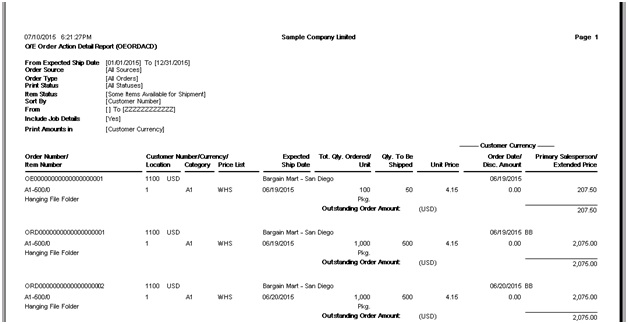
In case you select the Report type as Detail then the report will print the Item details such as Item Number, Order Quantity, Discounted Amount .Please Refer below screen shot for more information.

Order Action Detail

Thus Order Action Report will give you the complete details of the Orders along with the Items and Order Amount.

Also Read:
1. Shippable Backorders Report
2. Aged Purchase Order Report in Sage 300 ERP
3. Item description in Order Entry Screen defaulting to blank in Sage 300 ERP
4. Creating Single Shipment entry from Multiple Sales Orders in Sage 300 ERP
5. Creating Single Sales Order from Multiple Sales Quotes in Sage 300 ERP

How to fix when current entry is out of balance in GL

$
0
0

Sage 300 ERP provides various types of warning message to its users during transaction entries. In this blog we will discuss a warning message “the current entry is out of balance” in GL Journal entries.

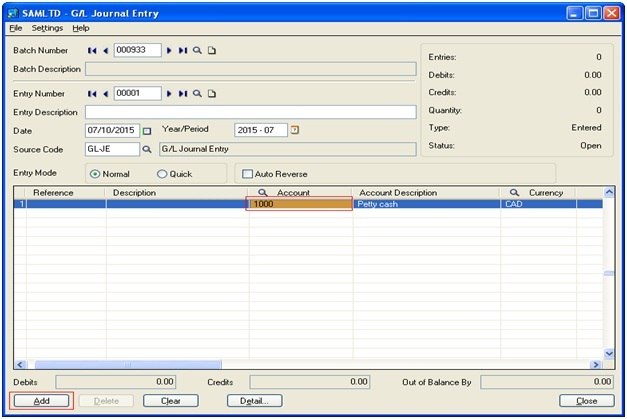
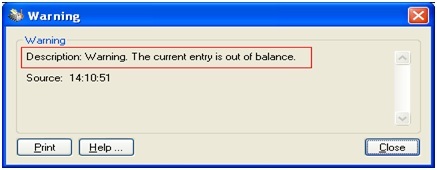
Sometimes when a user makes entries in GL Journal entry directly and clicks on the add button, a warning message will pop up that says: The current entry is out of balance. In this blog, our motto is to make aware of the issue and how to track those entries for which the current entry is out of balance in general ledger.

The following screen shot shows the GL journal entry screen:

New stuff: Sales Order Action Report in Sage 300 ERP

GL Entry
In the above screen shot we have taken a GL journal entry in which an Account set “1000” is inserted on GL detail line. Now when the “Add” button is clicked the following screen shot appears:

warning msg

The General Ledger gets out of balance in two ways:
1. Total Debits do not match with Total Credits.
2. Another type of out of balance occurs when the totals per period from the summary file (GL8-used in printing the Trial Balance report and Financial Statements) does not equal the totals per period from the transaction file (GL5-used in printing the detail on the General Ledger Detail report). When this occurs, an “Out of Balance” line appears.

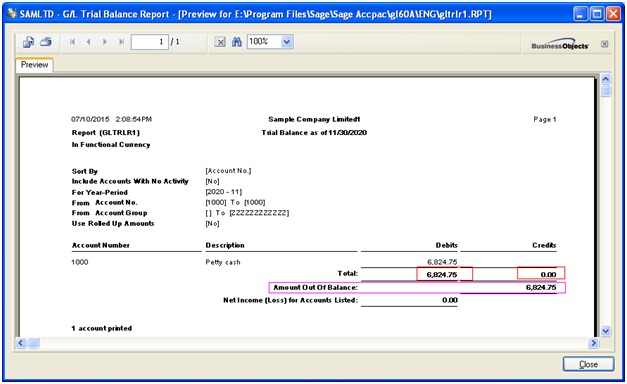
The first way is Total debits do not match with Total credit; one can see this on a trial balance report. For example for the account set 1000 when we run the trial balance report the following report has been obtained, as shown in the following screen shot:

Trial Balance rpt

How to track the above out of balance:
a) Run the Trial Balance Report for all accounts which are showing Beginning Balance, Activity and Ending balance.

b) If the Beginning Balance column does not equal zero in the Report Total, run the Trial balance report again and again for the different previous period. Continue this process until the Beginning Balance, Report total is zero.
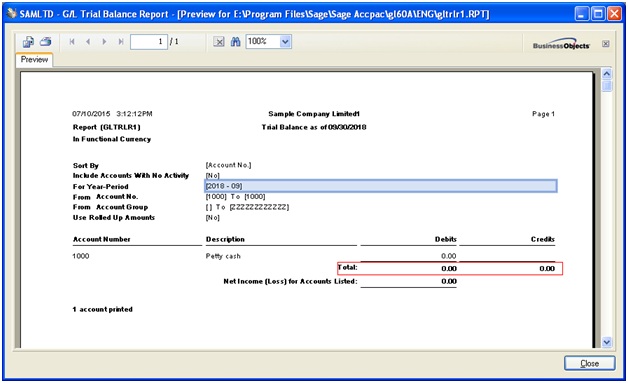
For example: for period 2018-09 we get total amount equal to credit and debit (that is report total) side as shown in the following screen shot.

Trial Balance1 rpt

c) Now one needs to find out those entries for which the total debits for the entry does not equal the total credits. Chose the General Ledger detail by Source Report from sage desktop  –> General ledger –> GL reports –> Source ledger)

d) Print it for all journals (like A/R clearing Journals, Bank reconciliation, Journal entry. etc), all batches (From 0 to 999999) and for the date range of the period (2018-10 in this case) that is out of balance.

e) Review the report to confirm each entry is a double sided entry and fix it.

So we see how to verify and fix the issue out of balance message box in General ledger.

Also read:
1. Stock Ledger Report
2. ERROR: Load Library
3. How to Pass GL Revaluation entry in Sage 300 ERP
4. GL Voucher in Greytrix Extended Report for Sage 300 ERP
5. Auto-Reverse General Ledger Entries in Sage 300 ERP


Different methods to Default different Unit of Measure on Purchase Order Entry in Sage 300 ERP

$
0
0

Many organizations purchase the Items in a same Unit of Measure for earning good profits.
Example: A huge vendor purchases Biscuits, in Boxes only because a single biscuit is of 5$ and the Box is of 30$. The boxes have the pack of 8 biscuits. Thus they want the same Unit of Measure should come up while doing the new Purchases.

But when the user creates new Purchase Orders, the system bring the default stocking unit of measures assigned to that Item.

New Stuff: How to fix when current entry is out of balance in GL

To assign the same UOM every time for the Items, users need to do the below settings in Sage 300 ERP.

1) We will have to first create the Unit of Measure that we need to use while purchasing. Here we will create the “CS” UOM from Inventory Control–>I/C Setup–>Unit of Measure.

1


2)  Now assign the CS Unit of Measure to the Item Master for which we want the default UOM as CS at Units tabs.

2


3) Assign the CS Unit of Measure for all the locations in the I/C Location details screen :

3


4) When you open the P/O Purchase Order Entry screen for creating the Purchase Order and insert the same Item i.e. A1-103/0 then the CS UOM will be added  automatically

4


Thus, with the above setting the user can set the same UOM that user want to setup for the Items.

Also Read:

1. Migrate Item Unit Of Measure From Sage 50 US (Peachtree) to Sage 300 ERP
2. Migrating Items from Sage Business Vision to Sage 300 ERP
3. Shippable Backorders Report
4. Purchase History Report
5. Auto- Application of Taxes at Item Level


Invalid Input. Cannot connect to the server. You may have specified as incorrect Server name or Server Port

$
0
0

The common error that the users face while setting up database setup for Portal is for the server name or Port number that the user specifies as shown in the below error.

New stuff: Different methods to Default different Unit of Measure on Purchase Order Entry in Sage 300 ERP

1

Most of the time, user inputs the server name correctly, but not the server port in the configure portal screen which is the cause of the above error.

To resolve the error, you need to check the SQL server port number in the SQL Configuration manager screen. The port number should match in the Configure Portal screen and in the SQL Configuration manager for the TCPIP properties as shown in the below screen shot.

2


4

This way using above simple and easy steps, one can save the configuration in the database setup Configuration PORTAL screen.

Also Read:
1. Sage 300 ERP Portals – One Stop Shop
2. “HTTP Error 500.0 Internal Server Error” while Configuring IIS for Sage 300 Portal
3. CALL .NET WEB SERVICE THROUGH OCX
4. Adding VB Application to Sage Accpac Portal
5. Greytrix Customer Portal for Sage 300 ERP

Error while setting up Database configuration for Sage 300 portal setup

$
0
0

One of the common error that the user encounters while setting up the PORTAL configuration is “Invalid input. The database ID you entered cannot be found”.

New stuff: Invalid Input. Cannot connect to the server. You may have specified as incorrect Server name or Server Port 

1
In today’s blog we will discuss about solution for the above error. You will need to check that whether that you have created a database in the SQL with the ID “PORTAL”. This database should be present in the SQL server which server name which we have provided in the Server Name attribute in the configuration screen.

2

Once you have created the database with name “PORTAL”, you will now specify the same in the Configure portal screen as shown in the below screen.

3
So this way using simple steps mentioned above you can successfully configure the PORTAL in Sage 300 ERP.

Also Read:
1. Sage 300 ERP Portals – One Stop Shop
2.“HTTP Error 500.0 Internal Server Error” while Configuring IIS for Sage 300 Portal
3. CALL .NET WEB SERVICE THROUGH OCX
4. Adding VB Application to Sage Accpac Portal
5. Greytrix Customer Portal for Sage 300 ERP

“This data has been updated to a new file format and is now incompatible with this version of Simply Accounting”

$
0
0

GUMU™  for Sage 50 CAD (Simply Accounting) to Sage 300 ERP is a Sage certified Migration solution. Greytrix is a pioneer in providing Migration services at its Sage Migration Center and catering end-user business requirements.We at Greytrix are focused to help the end –user in successfully implementing the new Sage 300 ERP system through our various successful migration and integration solutions.

New Stuff: 
Restore your Sage 300 ERP Company Database backup in Sage 300 ERP

Today in this blog we will see that how to resolve the error message encountered while restoring the backup into simply accounting.

When you tried to restore the backup of Sage 50 CAD (Simply accounting) say for e.g. You tried to restore the data of Sage 50 CAD 2011 into Sage 50 CAD 2014 that time it will pop up an error message stating that “This data has been updated to a new file format and is now incompatible with this version of Simply Accounting”. The reason why this is happening is because the Sage 50 CAD (Simply Accounting) has the latest product  updates installed.

To solve this error you need to get the latest Sage 50 CAD product updates. Follow the below steps to get the latest product updates:

Open Sage 50 CAD (Simply Accounting) –> Help –> “Check for Product Updates…” (Refer below screen shot)

PU11

To get the “Check for Product Updates…” option you need to turn on the Automatic updates option. Follow the below steps to turn on the Automatic updates option:

1. In the Home window, on the Setup menu, select User Preferences and then Options…
2. Select Automatically Download Product Updates and Prompt User to Install Them. This option is turned on by default. (Refer below screenshot).

SA2

3. Click on OK.

However we can upgrade the Sage 50 CAD backup and solve the error “This data has been updated to a new file format and is now incompatible with this version of Simply Accounting”.

For more information on the data migration, drop us a mail at erpmig@greytrix.com

Also Read:

1) What do you want to migrate to Sage ERP
2) Migrate GL Accounts from Sage Business Vision to Sage 300 ERP
3) Migrate Banks from Sage BusinessVision to Sage 300 ERP
4) Migrate Vendors from Business Vision to Sage 300 ERP


Migrate Item Warehouses from Sage Business Vision ERP to Sage 300 ERP

$
0
0

GUMU™ for Sage Business Vision ERP to Sage 300 ERP is a Sage certified Migration solution. Greytrix provides migration services at its Sage Migration center and fulfils the business requirements.

In this blog you will get to know how GUMU™ migrate Item Warehouses from Sage Business Vision ERP to Sage 300 ERP.

New Stuff: Migrate AR Payments from Sage Business Vision ERP to Sage 300 ERP

We can view warehouses in Sage Business Vision at the following path,
Sage Business Vision –> Edit –> Inventory –> Warehouses

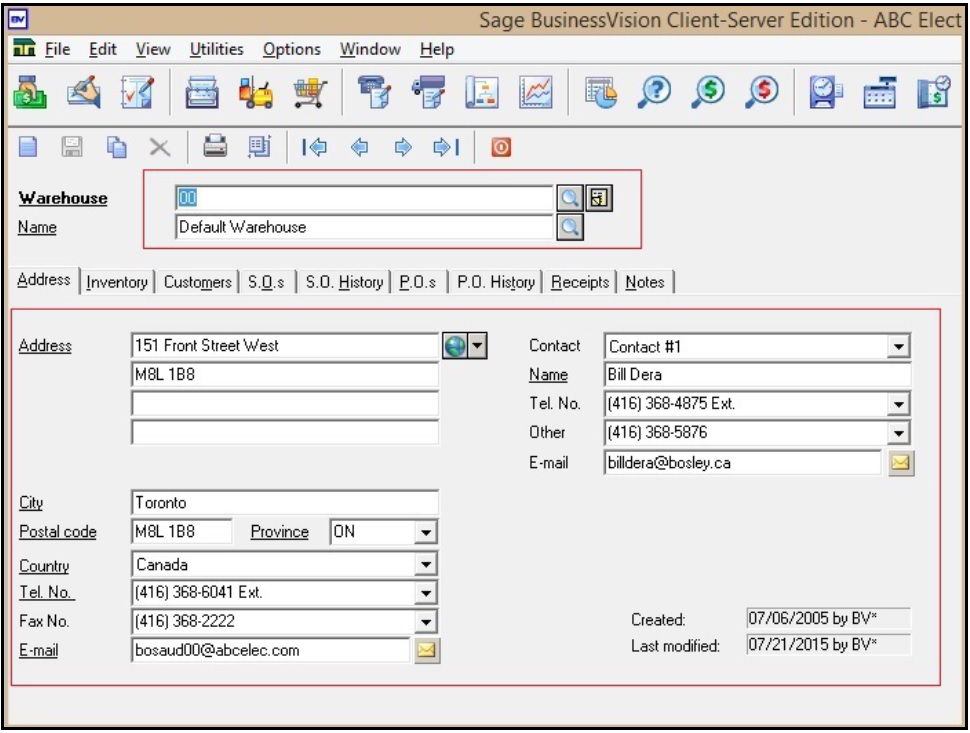
Now, let’s say Item warehouse “00”; the warehouse Master screen in Sage Business Vision system looks like this:

BV1

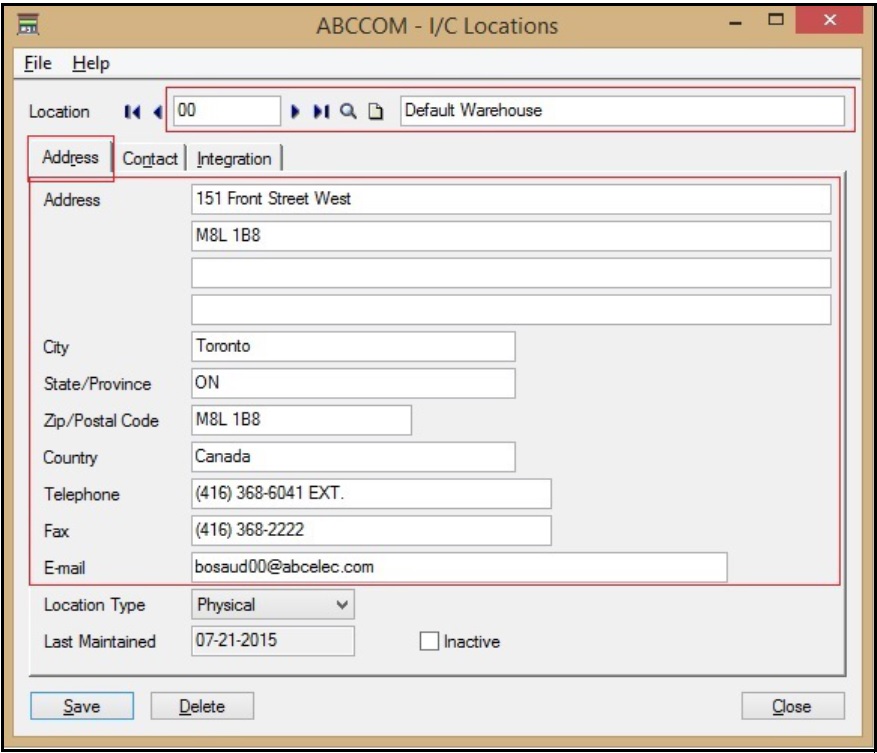
We can check migrated Item Warehouses data in Sage 300 ERP as shown below. Path for Sage 300 ERP is,
Sage 300 ERP –> Inventory Control –> I/C Setup –> Locations

BV2

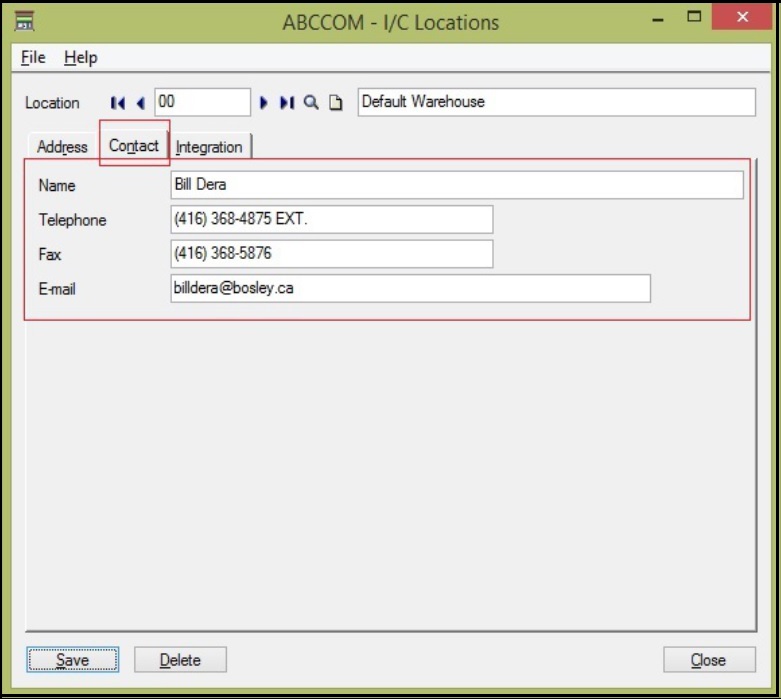
BV4

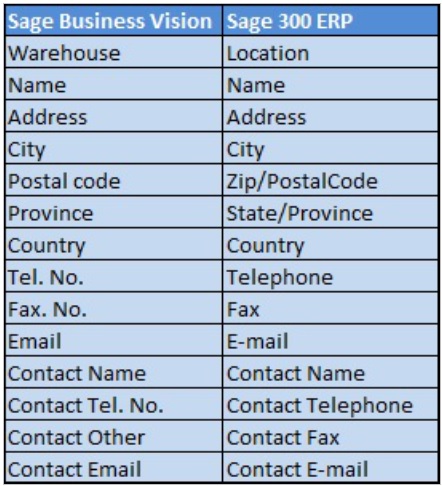
After data migration from sage Business Vision the field values of Warehouse gets migrated with the following mapping.

BV6

In this way, Sage Business Vision Item Warehouses gets migrated into Sage 300.

For more information on the data migration, drop us a mail at erpmig@greytrix.com

Also Read:
1) Migrating Items from Sage Business Vision to Sage 300 ERP
2) Migrate Open Sales Order From Sage Business Vision to Sage 300 ERP
3
Migrate Item Price Lists from Sage Business Vision ERP to Sage 300 ERP
4
Migrate Customer Notes from Sage Business Vision to Sage 300 ERP
5
Migrate Banks from Sage Business Vision to Sage 300 ERP

Migrate Sales Invoice from Sage Business Vision to Sage 300 ERP

$
0
0

GUMU™ for Sage Business Vision to Sage 300 ERP is a Sage certified Migration solution. Greytrix provides migration services at its Sage Migration Centre and fulfils the business requirements. In this blog you will get to know how GUMU™ migrates Sales Invoice from Business Vision ERP to Sage 300 ERP.

New Stuff: Migrate Item Warehouses from Sage Business Vision ERP to Sage 300 ERP

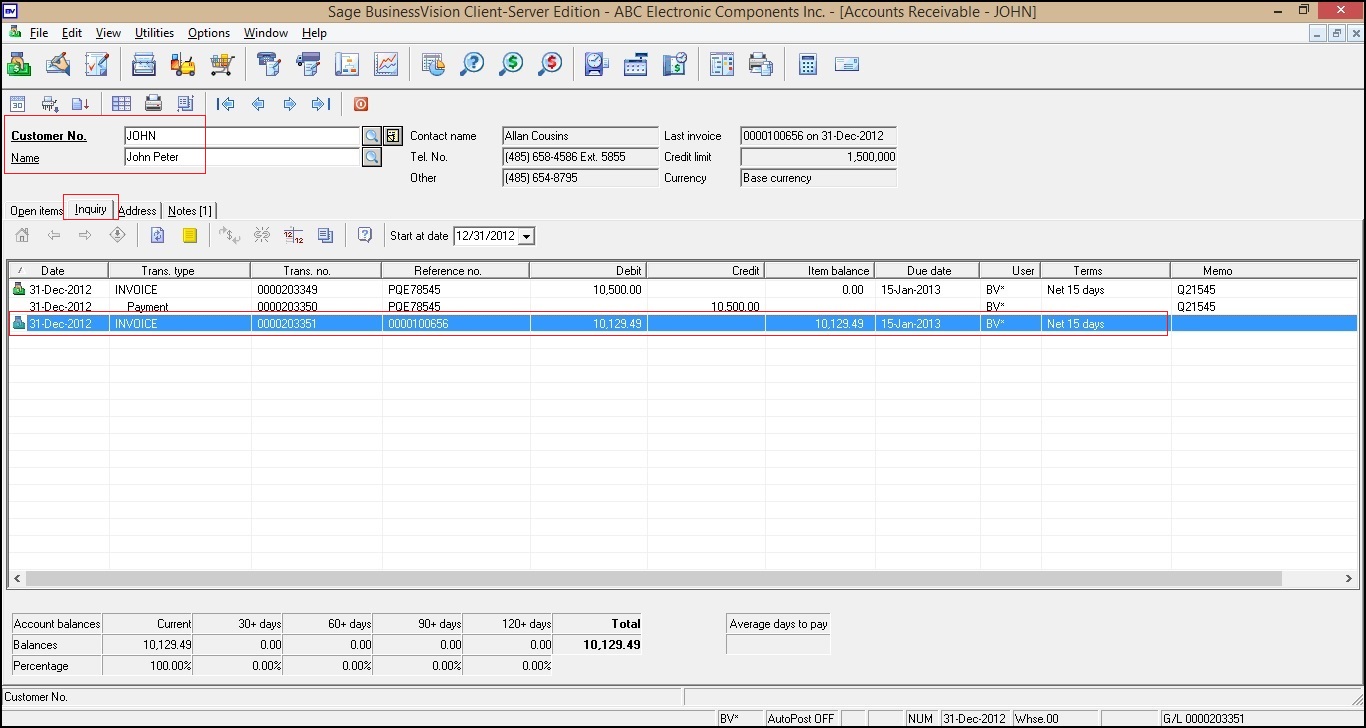
We had created an invoice in Sage Business Vision with few Inventory Type Items. To review invoices in Sage Business Vision, refer the mentioned path:
Business Vision –> Accounts Receivable –> Inquiry tab

BV

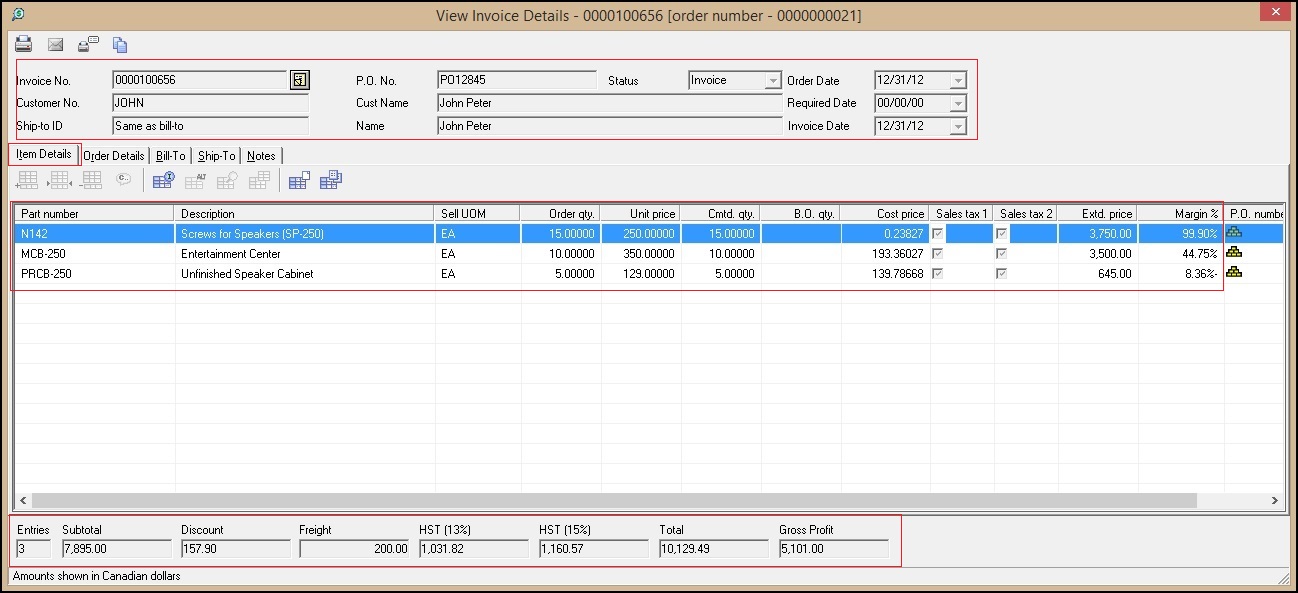
From Inquiry tab, double click on an invoice in Sage Business Vision ERP, below window gets opened.
In ‘Item Details’ tab, we can observe ordered items details.

BV1

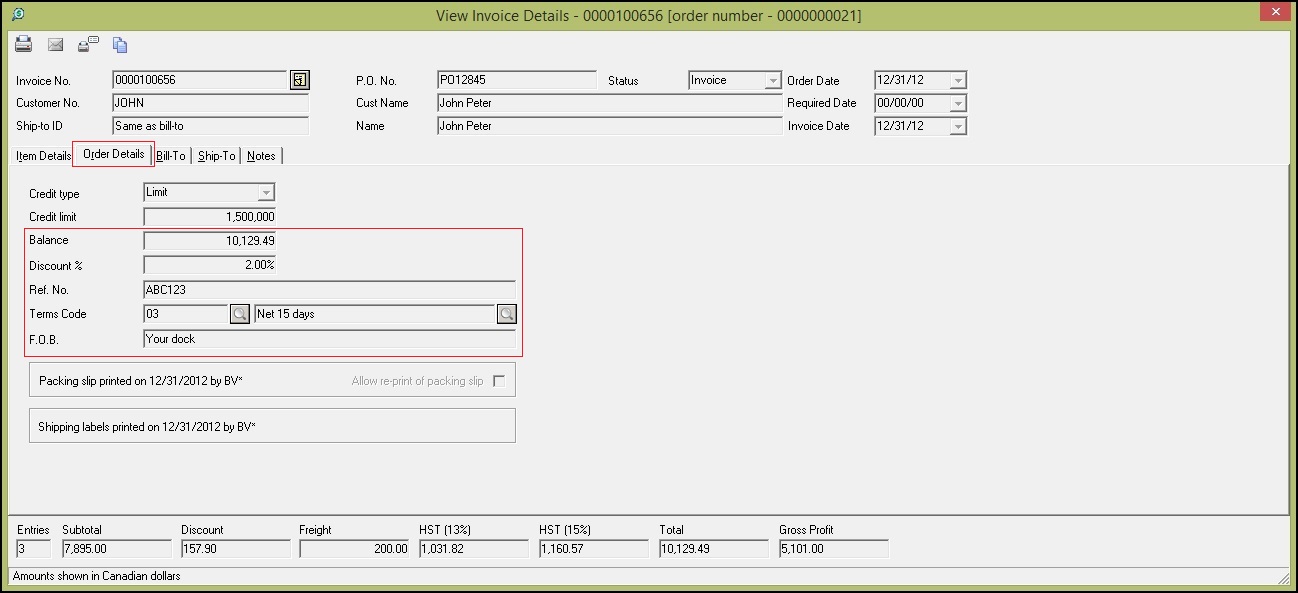
In Order Details tab, we can observe Discount detail, Terms Code, etc. as shown below –

BV2

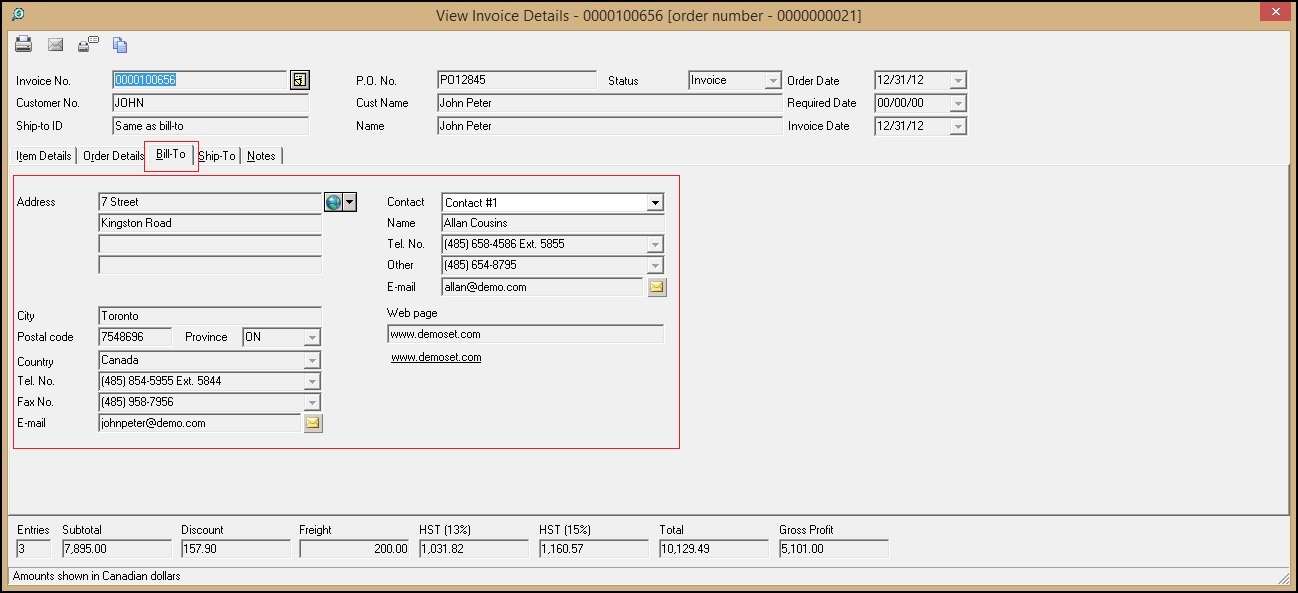
In Bill-To tab, we can observe Location details used for Billing purpose as below screen –

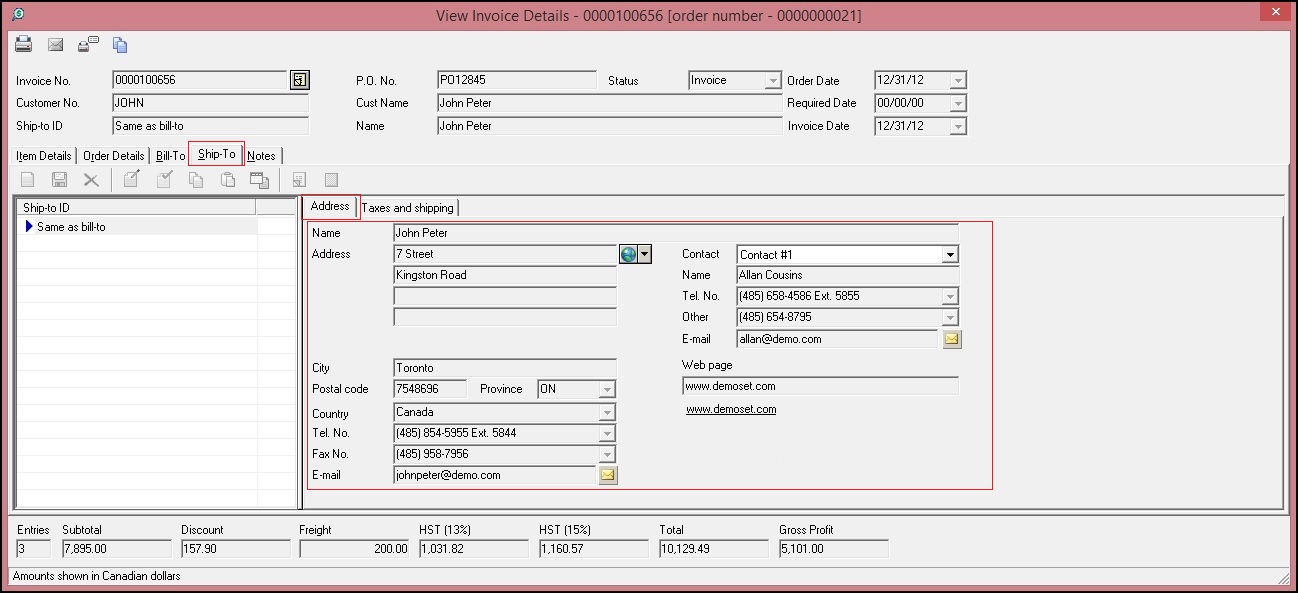
BV3

In Ship-To tab, we can observe Location details used for Shipping purpose in Address sub-tab as below screen –

BV4

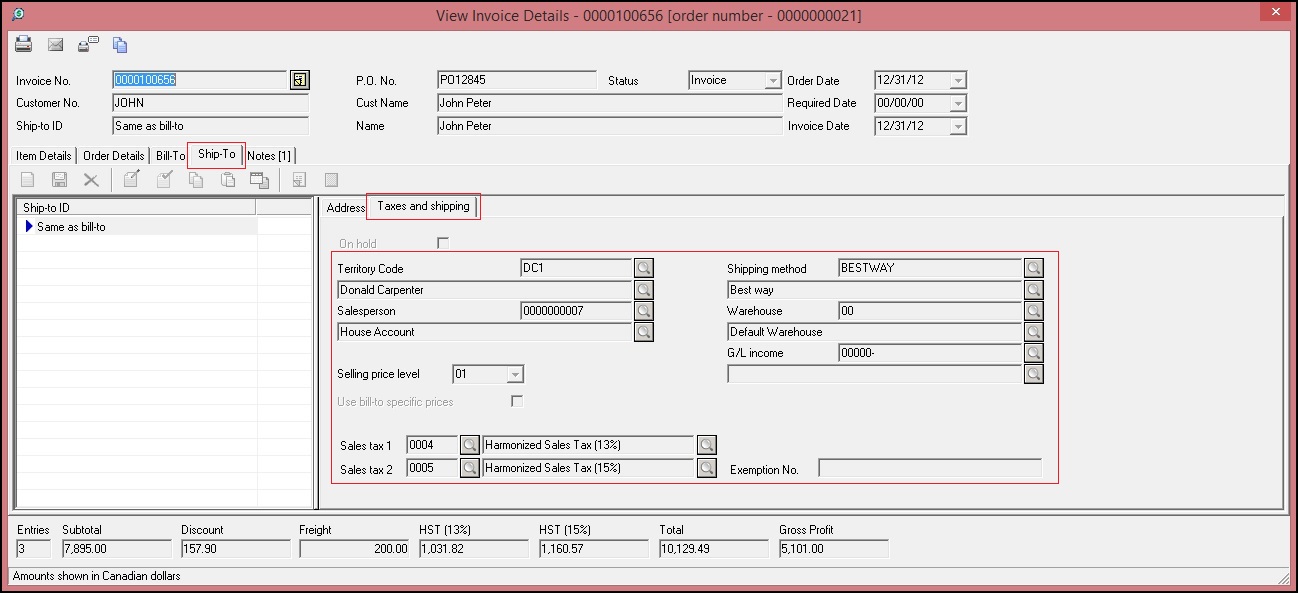
In Ship-To tab, we can observe Territory code, shipping method, etc. details used for Shipping purpose in Taxes and shipping sub-tab as below screen –

BV6

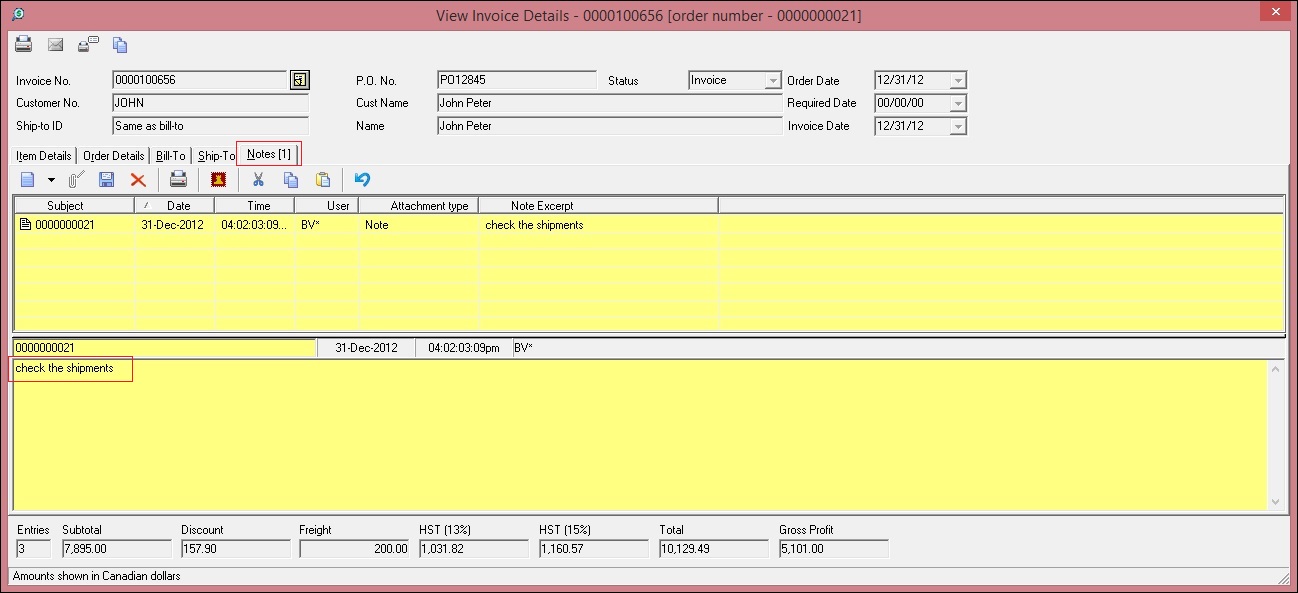
We can observe Notes or Comments in Notes tab as shown below –

BV5

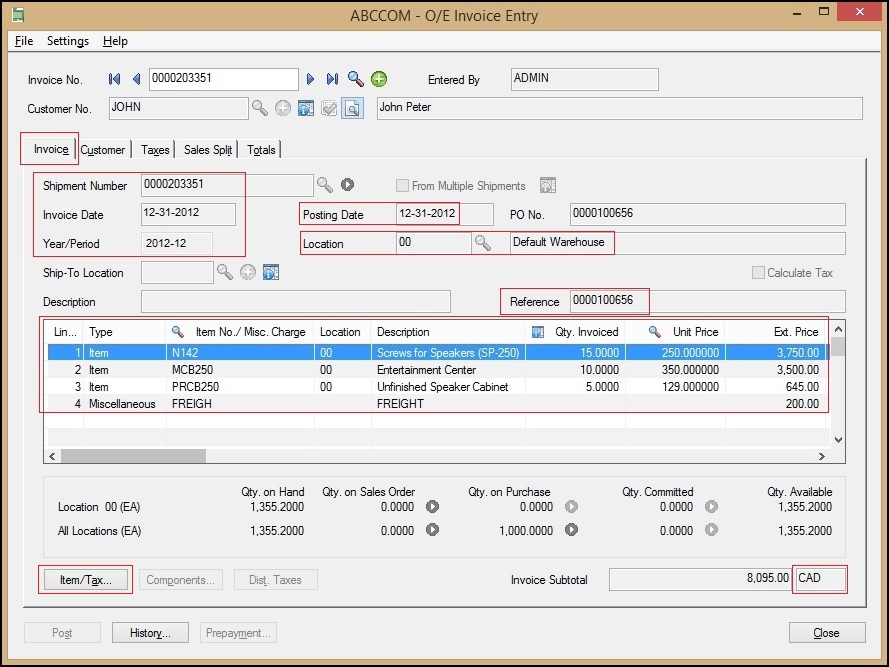
After migration from Business Vision to Sage 300 ERP, we can check Sales Invoice in Sage 300 ERP by following path:
Sage 300 ERP–> Order Entry –> OE Transactions –> Invoice Entry

Here we can observe invoice details, item list details, etc. in Invoice tab.

Also we can observe details in full screen by clicking on Item/Tax button as highlighted below –

Sage

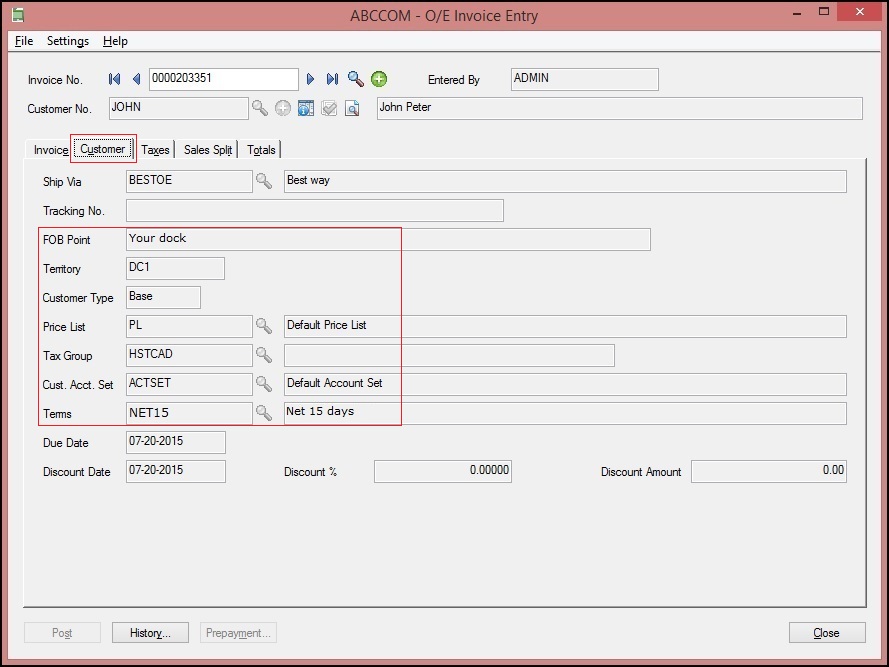
We can see Customer code details in Customer tab as below screen –

Sage1

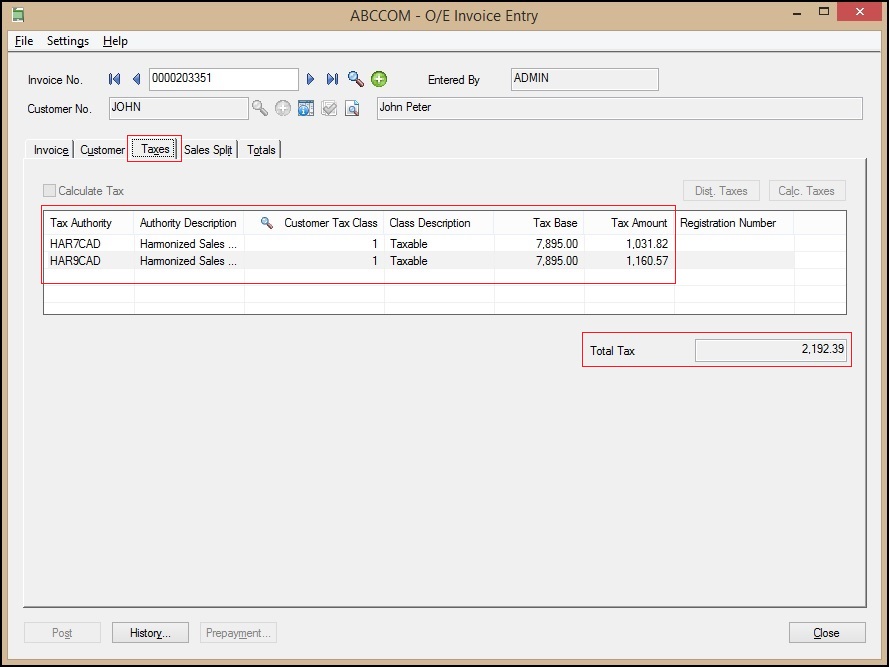
In Taxes tab, we can see Tax details as shown below –

Sage2

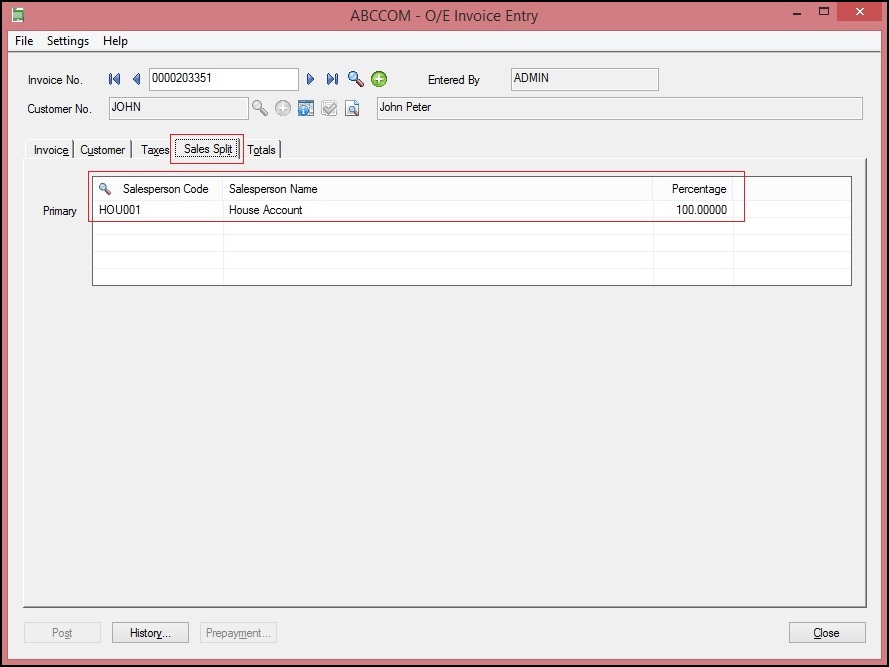
In Sales Split tab, we can observe Salesperson details as shown in below snapshot –

Sage3

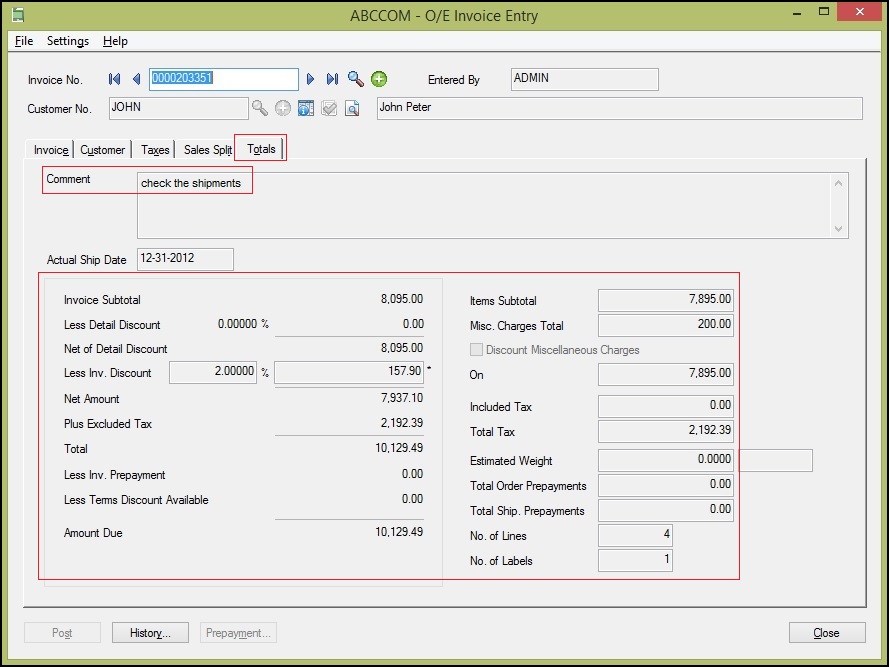
In Total tab, we can see Amount details and Notes/ Comments as highlighted in below screen –

Sage4

Terms for both Business Vision and Sage 300 ERP:

MAP

In this way, we can see a Sales invoice of source ERP (i.e. Sage Business Vision) and after conversion target ERP (Sage 300 ERP).
For more information on ERP data migration, drop us a mail at erpmig@greytrix.com

Also Read:
1) Migrate Open Sales Order From Sage Business Vision to Sage 300 ERP
2)
Migrate Ship to Address from Sage Business Vision to Sage 300 ERP
3
) Migrate Customer Notes from Sage Business Vision to Sage 300 ERP
4) Migrate Banks from Sage Business Vision to Sage 300 ERP

Subcontracting Process (57F4) in Sage 300 ERP

$
0
0

Today, we are going to discuss a new topic which is a part of Indian excise & the same is called as 57F4 & Subcontracting process. For example when we issue a material to any subcontractor we need to keep a track on what type of material is being issued, How much of quantity is being utilize, Pending balance of Quantity & when we are going to receive the material after the processing is completed by subcontractor & in order to keep close monitoring on this process, 57F4 process was implemented.

When we send a material to subcontractors for processing we are not required to pay any excise duty because while purchasing of this material we have already taken credit of it & when we send a material outside a factory premises for processing we need to send it with 57F4 Challan

New Stuff: Migrate Sales Invoice from Sage Business Vision to Sage 300 ERP

Now let’s see how the same can be configure in Sage 300 ERP

Example: – Here, we are subcontractor & we receive material From X Company for further processing with a tracking Challan number which we consider as 57F4 Challan.

To define this process lets navigate to Excise Module –> M/E Transaction –> 57F4 Process –> Excise Receipt.

Vendor

As shown in above screen, this is an inward transaction with Challan number against the materials that we have received from X company, wherein we have to update information in fields like description, Vendor, Challan number, item number, location, Qty.

Now we have already receive “100” Kg of material against Challan number “CH00001” & after processing that material we are going to send it back to X company & we have  to close the Challan as well against which we have shown the inward transaction so let’s navigate to Excise Module –> M/E Transaction –> 57F4 Process –> Excise Shipment

Vendor

As shown above after processing we are ready to send the material back to X Company so we will update the same from excise shipment screen & will enter some details like item number, Location, Quantity & as we can see out of 100 Kg we are sending back 90 Kg after processing. But here the most important is closing of Challan & the same is shown below.

Vendor

After updating details in the Excise shipment, the user will click on F6 button which will show all Challan against which we have received the material from X company & at the end we can see the Challan number “CH00001”with Quantity Available (Basic) which is 100 Kg & the allocated quantity is 90 kg.

After updating details in the Excise shipment, the user will click on F6 button which will show all Challan against which we have received the material from X company & at the end we can see the Challan number “CH00001”with Quantity Available (Basic) which is 100 Kg & the allocated quantity is 90 kg.

And for processing of material we can book an invoice from Accounts Payable –> AP Transaction–>Invoice Entry

Also Read:

1.  Excise Module- Tax Configuration
2. Statutory & Excise Module-Configuration-2
3. Statutory and Excise Module-Configuration-I
4. Transfer of Excise duties along with Inventory Transfer in Sage 300 ERP


Block your calendars for Greytrix Product session @ Sage Summit – 2015

$
0
0

Greytrix offers an invaluable opportunity to introduce partners and customers insights about outside the box solution for taking Customer Interactions to the next level using its GUMU™ integration with eCommerce Magento and Salesforce.com. Our offerings have been designed keeping various business and industry needs in mind.

Session Name: Salesforce.com and Magento eCommerce with Sage ERP: A “Best of Breed” approach to 360-degree customer interaction interfaces.

Date: Thursday, 30 July 2015

Time: 11:45 AM – 12:30 PM CDT

Location: Sponsor theatre B

Speaker: Kumar Siddhartha

In this session, we will showcase our Greytrix Integration products

Salesforce.com Integration: Our first in line Salesforce.com integration. Access your Sage ERP data from anywhere at any time through cloud based Salesforce.com integration.

eCommerce (Magento): Sage ERP and Magento eCommerce Solution integration is designed to assist businesses to manage and seamlessly integrate their eCommerce website and marketplace with back office ERP systems performing bi-directional data synchronization in a fully automatic manner.

Greytrix Booth 521


Along with this session, there will also be other sessions conducted by our Sage Partner Friends which we would be keen on attending. So with our hearts filled with anticipation and excitement, we would like to conclude for now until we meet again at Sage Summit – New Orleans!!

For more information on our Sage ERP and CRM technical consultations, product customization, data migration, system integrations, third party add-on development and implementation expertise services, contact us at sage@greytrix.com

Think Greytrix, grow big!!

Bin Maintenance in Sage 300 ERP

$
0
0

Bin Maintenance helps Sage 300 ERP users to track inventory items stored in various bins within a warehouse or Sage 300 ERP Inventory Control location. Bins could include shelves, slots, and containers and so on.

By creating bin in Sage 300 ERP picking and putting of stock are streamlined. Storekeeper also know where to store and from where to search any inventory item without wasting valuable time. In Sage 300 ERP, bin can be created using I/C location. Entire bin information is stored within your Sage 300 ERP database. With clear and separate bin locations, Inventory records will be more accurate. Items missing or misplacement would be a very rare scenario.

With the efficiency gains from the simple good idea of bin maintenance, your warehouse can enjoy faster turnaround time (TAT), more speedy dispatch to the customer. You win on both productivity and customer service.

Vendor

Benefits of Bin Management at Warehouse:

  • Well managed warehouse without more effort and difficulty.
  • Determine exactly where your inventory is at any point in time.
  • Customer delivery on time.
  • Process warehouse activity more efficiently,
  • Resulting in quicker turnaround times.
  • Better customer satisfaction.

Also Read:

1. Sage 300 ERP for Automobile Dealer Industry
2. Serial/Lot Number Stock Report
3. Kitting Item in Sage 300 ERP
4. Pending Shipments Inquiry in Sage 300 ERP
5. Inventory Movement Report in Sage 300 ERP

Create POs from OE in Sage 300 ERP

$
0
0

In our previous blog we had discussed about how to create POs from requisitions in Sage 300 ERP. Going forward, in this blog we will discuss about how to create multiple POs from Order Entry sales order.

This is one of the best feature provided by Sage 300 ERP. It allows the user to make purchase order for all active items or item with insufficient quantity in inventory or item which is in backorder quantity.

New Stuff: Bin Maintenance in Sage 300 ERP

To open screen please navigate to,

Purchase Orders–> P/O Create purchase orders–>Create POs from OE

Please refer below screen shot for Create POs from OE.

11
The above screen allows user to create purchase order in the range of
1.From and To Customer Number
2.From and To Order Number
3.From and To Order Date
4.From and To Expected ship Date

Also screen provides options are as below:
1. Create purchase order for each vendor: With this option, the user can create a single purchase order for same item, same location and same vendor.
2. Create purchase order for each Order: With this option, the user can create a separate purchase order for every sales order.
3. Include: This option allows the user to specify the purchase order quantity of an item.
4. Drop-Ship Items: This option allows the user to include drop ship address for item and customer.
5. Consolidate items: This option allows the user to consolidate details in single purchase order where item number location and unit of measurements are same.
Note: If optional fields are present then it will not allow to consolidate items.
6. Include Non-stock items: This will allow the user to include non-stock items in the purchase order  only if non-stock item option in inventory is allowed.

Also, the user can include header level and detail level optional fields in the Optional field & Detail Optional field tabs. Please refer the below screen shots.

Please refer below screen shots for Header optional fields. With the help of this screen, the user can define the header optional field which need to be include in purchase order.

2

Please refer below screen shots for Detail optional fields. With the help of this screen, the user can define the detail optional field which need to be include in purchase order.

3

The click on the process button will automatically generate POs on the basis of configuration.

Hence with the help of this feature of Sage 300 ERP user can save the time and reduce the stress.

Also Read :
1.Generate POs from requisitions in Sage 300 ERP
2.How to create PO from I/C
3.Purchase History Report
4.Purchase Order Transaction Flow in Sage 300 ERP
5.Creating Purchase Orders from Order Entry screen in Sage 300 ERP


Migrate Credit Note from Sage Business Vision to Sage 300 ERP

$
0
0

GUMU™ for Sage Business Vision to Sage 300 ERP is a Sage certified Migration solution. Greytrix provides migration services at its Sage Migration Centre and fulfils the business requirements.
In this blog you will get to know how GUMU™ migrates Sales Invoice from Business Vision ERP to Sage 300 ERP.

New Stuff: Migrate Sales Invoice from Business Vision to Sage 300 ERP

We can create credit note as mentioned below-

Credit meo

To review credit note in Sage Business Vision, refer the mentioned path:
Business Vision –> Accounts Receivable –> Inquiry tab

UntitledAR

After migration from Business Vision to Sage 300 ERP, we can check Sales Invoice in Sage 300 ERP by following path:
Sage 300 ERP–> Order Entry –> OE Transactions –> Credit /Debit Note Entry
Here we can observe invoice details, credit note date , etc. in Credit Note tab. Also we can observe details in full screen by clicking on Item/Tax button as highlighted below –

CR1

We can see Customer code details in Customer tab as shown in below screen –

CR2

In Taxes tab, we can see Tax details as shown below –

CR3

In Sales Split tab, we can observe Salesperson details as shown in below snapshot –

CR4

In Total tab, we can see Amount details and Notes/ Comments as highlighted in below screen –

CR5

Terms for both Business Vision and Sage 300 ERP:

Map

In this way, we can see a Credit note of source ERP (i.e. Sage Business Vision) and after conversion target ERP (Sage 300 ERP).
For more information on ERP data migration, drop us a mail at erpmig@greytrix.com

Also Read:
1) Migrate Customer Notes from Sage Business Vision to Sage 300 ERP
2
Migrate Vendors from Sage Business Vision to Sage 300 ERP
3) Migrate Sales Person from Sage Business Vision to Sage 300 ERP
4) Migrate Customers from Sage Business Vision to Sage 300
5) Migrate Ship to Address from Sage Business Vision to Sage 300 ERP

Template Provision in Sage 300 ERP (Purchase Orders Module)

$
0
0

In Sage ERP, you can create various templates for your data operations. With the help of templates, you can reduce or you can minimize your routine work and focus on more challenging operations related to productivity and growth. In this blog, we will explain the use and benefits of Purchase Order Entry Screen where you have set default values while creating the new Purchase order.

In Sage 300 ERP, users have the provision to make Templates to set accurate details by default in Purchase Order Transaction and also save his/her Data Entry Work to improve Productivity.

New Stuff: Migrate Credit Note from Sage Business Vision to Sage 300 ERP

By using this provision, users can make different types of Templates for each Purchase Order Type such as Active / Standing / Future / Blanket etc.

To access the Template screen for Purchase Order Module; Go to Purchase Order >> P/O Setup > >Templates.

  • Templates screen can be used to create new template or edit the existing ones. With the Template code, one can specify the default values for Vendors as well as fill in the purchase order description in the Purchase Order Entry screen.

Vendor

  • Order tab is used to set the following default information: (Refer the above screen shot.)\

1.PO type: PO type such as “Active”, “Standing”, “Future” and “Blanket”.

2.FOB point: Optional FOB (“Free On Board”) point

3. Ship To Location: This will be the Inventory location where the Item will be shipped.

4. Bill To Location: This will be the mainly Head Office location where the Item will be Billed.

5. User can set other optional information, such as “Description”, “Reference” and “Comment” for the   Purchase order.

6. On hold: Defines whether the Purchase order will be “On Hold” or not.

Vendor

  • Vendor Tab is used to specify the following information:

1. Ship-via: It will be used for specifying Shipping method.

2. Tax group: In Multicurrency accounting; if you define the Tax group in the Template code; then while creating the purchase order for a new Vendor who is not yet added to Account Payable, the Tax group will set the defined default currency and the reposting currency for the all purchase orders of the new Vendor

3. Terms code: Defines the Payment terms

Vendor

 • Along with this, for new Purchase Orders, Shipment and Credit note / Debit note, you can set default Template code in P/O Options itself.

Vendor

  • All the information set in the Template code will appear when you create a new Purchase order which the user can change further if needed for the individual Purchase order.

Note: Similar template feature are available in the Sale Order module also, the only difference in Sale Order it has Defaults set for Customers.

Also Read:
1. Different methods to Default different Unit of Measure on Purchase Order Entry in Sage 300 ERP
2. Purchase Order Action Report in Sage 300 ERP
3. Aged Purchase Order Report in Sage 300 ERP
4. Generate Purchase Order without IC module
5. Allow Fractional Quantities in Purchase Order

Viewing all 1475 articles
Browse latest View live


<script src="https://jsc.adskeeper.com/r/s/rssing.com.1596347.js" async> </script>