Quantcast
Channel: Sage 300 ERP – Tips, Tricks and Components
Viewing all 1475 articles
Browse latest View live

Default settings for Deposit slip,Receipts & Adjustments in Account Receivable

$
0
0

In our previous blog, we had discussed about Default setting for invoices in Account Receivable module. Going further, in this blog post we will discuss about Default settings for Receipts, Deposit slip & Adjustments in Account Receivable module.

Sage 300 provides various options which we can set up to get the process of all transactions easier. Once you set up this default option, it will appear by default at the time of AR receipt transactions.

For setting the default options for receipts, navigate to Account Receivable–>A/R Setup Options–>Transaction Tab–>Receipts Options, refer below screenshot:-

New Stuff: TDS on Recurring Payables in Sage 300

Blog new1
– Include Pending Transactions: – Pending transactions are set as receipt, all transactions, receipt & adjustment or any transactions. If you set any option on them, it will appear at the time of receipt entry.

– Create deposit slip when receipt batch is created (check box):- If you want to create deposit slip after receipt batch was created then you need to check this checkbox. This checkbox will enable only when check Allow printing of Deposit Slip.

– Allow edit after deposit slip printed (check box):- This checkbox is used to allow the editing of receipt batches after deposit slips have been printed for them. This checkbox will enable only when the user checks Allow printing of Deposit Slip.

– Allow Adjustments in receipt batches (check box):- If you want to create adjustment of receipt batches then you need to check this checkbox. If you do not want to create adjustment for receipt batches, keep this checkbox unchecked. Sage 300 will thence, not allow to create adjustment for receipt.

– Allow edit after Receipt printed (check box):- When you select this checkbox then you can make changes in receipt entry after you have printed receipt, prepayment, unapplied cash, apply document & misc. receipt. But if you check this option then you cannot change batch header information from AR Receipt screen.

You can change your choices for these AR Receipt transactions options at any point of time.

Also Read:
1.Default settings for Invoices in Account Receivable
2.A/R Options — Allow Blank Comment Type
3.AR Options – Allow Edit of Statistics in Sage 300 ERP
4.Account Receivable Option to set Default Summary/Item Invoices in Sage 300
5.Defaulting Detail Tax class to 1 in Account Receivable in Sage 300 ERP


IC Location Details Report

$
0
0

Inventory Control as name suggests, supervises the supply, storage and accessibility of an item or inventory. This module plays a very important role in business as it keeps a track of inventory that the company has.

In Sage 300, we have I/C Location Details Report which lists information for items at each location where you allow the items to be stocked.

To print this report navigates to:   Inventory Control–>I/C Setup Reports–>Location Details.

New Stuff: Default settings for Deposit slip,Receipts & Adjustments in Account Receivable

1

This report is printed from the standard UI Screen which has the following Filters:

Sort By: Specify the whether to sort location detail records by item number or location.

From and To Location: Specify a range locations to include in the report.

From and To Item Number: Specify a range Item to include in the report.

Print: Select the type of location details to print. This option allows the user to select one of the below options.

1)All Location Details
2)Location Details with Items Allowed
3)Location Details with Item not Allowed

The report prints the below information:

• Whether any transactions have been posted involving the item. “Yes” indicates that transactions have been posted for the item.
• Whether the item is allowed to be used in transactions at a location.
• Location and its Description
• Item And Its Description
• Picking Sequence
• Item’s costing Unit of Measure: This column shows the unit of measure the item has such as (Ea, LTR, and Kg) etc.
• If you added field names to the Alternate Amount 1 Name and Alternate Amount 2 Name fields on the Processing tab of the Options screen, columns using these names are added to the Location Details screen, where you can enter cost amounts. The report then shows this field and its value in the report.
• Most Recent Cost: This column defines the cost which is most recently being used to the item quantity on hand.
• Standard Cost: This column shows the Standard cost which we have used for this particular item.
• Last Unit Cost: This column shows the last unit cost which we have used for this particular item.

After applying the filter criteria, report will get printed [Refer below Screenshot]:

3

Also Read:
1.IC Location Details Quantity Enquiry – Error
2.Defining Specific Location for an Inventory Item in Sage 300 ERP
3.IC Items Location Details Quantity Inquiry in Sage 300 ERP
4.Location Wise I/C Item Details
5.Inventory location detail on Sage 300 ERP

Migrate Ship to Address from Sage BusinessWorks to Sage 300 ERP

$
0
0

GUMU™ for Sage BusinessWorks to Sage 300 ERP is a Sage certified Migration solution. Greytrix is a pioneer in providing Migration services at its Sage Migration Centre and catering end-user business requirements.

We at Greytrix are focused to help the end-user in successfully implementing the new Sage 300 ERP system through our various successful migration and integration solutions.

New Stuff: Migrate A/P Payment Terms from Sage BusinessWorks to Sage 300 ERP

In this blog, we shall explore upon the migration of Ship to Address from Sage BusinessWorks to Sage 300 ERP. Let’s consider Ship to Address of Customer “ETC” in Sage BusinessWorks ERP system. You can view customer ship to address in Sage BusinessWorks by referring below path:
Account Receivable (Module) –> Customers –> Maintain Customers

BW1

After the migration to Sage 300 ERP, the converted Customer screen will look as below:
You can navigate through the below mentioned path to check migrated customer ship to address into Sage 300 ERP –
Account Receivable -> A/R Customers -> Ship-To Locations

Sage

Sage1

It also migrate Contact details from Sage BusinessWorks to Sage 300 as shown below –

Sage2

Below is the mapping of the converted Ship to Address from Sage BusinessWorks to Sage 300.

Mapping

Hope the above topic provides you sufficient information in comparing the Customer records between the two diverse ERP systems. For more information on the data migration, drop us a mail at erpmig@greytrix.com

Also Read:
1) Migrate Sales Person from Sage BusinessWorks to Sage 300 ERP
2) Migrating AR Payment Terms from Sage BusinessWorks to Sage 300 ERP using GUMU™
3) Migration of GL accounts from Sage BusinessWorks to Sage 300 ERP
4) Migrate Customer from Sage BusinessWorks to Sage 300 ERP
5) Migrate your inventory to Sage 300 from Sage BusinessWorks

Options for maintaining Sales History in Sage 300

$
0
0

Many customers have questions about maintaining the sale & purchase inventory in one place. For fulfilling this requirement they purchase and implement an ERP system. Through this blog we will go through the options for maintain the sales history with different options in Sage 300.

For configure the setting of sales history go to

Order Entry–>O/E Setup–>Options

New Stuff: Migrate Ship to Address from Sage BusinessWorks to Sage 300 ERP

Blog1

Here you have options for “Keep Sales History”. If you select this option, you must also specify how sale history data is accumulated. For keeping sales history data you have two options. 1. Accumulated By and 2. Period Type

1.Accumulated By:
In this option you will get two choices whether to accumulate sales history by calendar year or fiscal year.

–  Calendar Year: This will set the sales history start date to January 1.
–  Fiscal Year: This will set the sales history start date to first day of your company’s fiscal year, as specifies in the fiscal calendar in Common Services.

2.Period Type:
In this option you will can select the length of period by which you will accumulate sales history.

Note: Weekly periods run from Sunday to Saturday. If you use weekly periods and your year does not start at the beginning of the week, the first and last periods in the year will be short ones.

In short, with the help of this you can easily maintain your sales history with various parameters. For knowing the sales history, we have sales history report. You will get the details about this on below link,

Sales History For all Costing Method

Also Read:
1.OE Sales Register Report for Sage 300 ERP
2.Sales History Report in Sage 300 ERP
3.Sales History Inquiry in Sage 300 ERP
4.Sales Order and Quote History Report in Sage 100
5.Find the A/R items sales history

Database Error 98 in Sage 300 ERP

$
0
0

While accessing any Sage 300 Company, at times user may encounter error such as –
”Cannot access database (error=98). See Help for More information.”

New Stuff: Options for maintaining Sales History in Sage 300

6

When the user reports error to System Administrator, the system admin team checks is the Database Setup of Sage 300 ERP, both Company and the System Company does not open.

6

To resolve the above error one needs to follow simple steps mentioned below:

1. Open Database setup and delete Database ID for the respective company.

6


2. Create the Database ID for the System Company.

6


3. Now recreate the Database ID for the respective company.

6


4. Now login to Sage, User will be able to log into the Database.

6
Also Read:

1. Restoring your Sage 300 ERP Company Database Backup
2. Error: Sage 300 ERP UI Container has stopped working message occurs when printing reports
3. Error 13 opening record file Occurred in Sage 300 ERP
4. Database Profiles table error on Sage 300 Workstation

I/C Transaction History Report

$
0
0

I/C Transaction History Report

I/C Transactions history report of SAGE 300 lists all the transactions posted from Order Entry, Purchase Orders or Inventory Control. The report shows the net changes to the inventory control account for the account set and period.

To print I/C Transaction History Report follow the steps mentioned below:

  1. Open Inventory Control –> I/C Statistics and Inquiries– > Transaction History Inquiry.
  2. Specify the report type Summary or Detail.
  3. Select a year and period.
  4. Specify a range of item numbers and account sets to include in the report.
  5. Click on Print button.

New Stuff: IIS Configuration Setting for. NET API

blog

Below is the screen short of I/C Transactions History summary report.

blog

This report provides the day wise details of particular item with the quantity, debit & credit amount which is affecting to the account set of an item.

Information printed for on I/C Transaction History Report are as follow;

  • The date, fiscal year, and fiscal period of each transaction.
  • The document number entered with the transaction.
  • Day-end numbers assigned sequentially each time Day End Processing is run, and entry numbers indicating the order in which each transaction was processed by Day End Processing.
  • If you use multi currency ledgers, the source currency and exchange rate for each transaction.
  • The amount of the transaction in source currency. Amounts that credit the general ledger inventory control account.
  • Debit or credit amounts for each transaction, to be posted to the account set are general ledger inventory control account. In multi currency ledgers, these amounts are in the functional currency.
  • The net change posted to the inventory control account from all transactions posted for the item.

The report can be used at the end of an accounting period to check the balance of your general ledger control account, since the total for the account sets on the report should match the total for the general ledger control account.

Also Read:
1) New Item Inventory Lookup in Sage CRM – Sage 300 ERP integrated system
2) Calculate CST, VAT and BED Taxes on Sage CRM’s Quote-Items screen
3) Main Menu Items Gadget On Interactive Dashboard
4) Bulk Sales Orders and Purchase Orders Processing from Sage CRM to Sage 300
5) Restricting Reports data to authorized users

Manage AP Vendor and Vendor group Statistics in Sage 300 ERP

$
0
0

This blog discusses important features of Sage 300 ERP for the organizations which maintain Vendor and group statistics.

New Stuff: Database Error 98 in Sage 300 ERP

In order to access this feature user needs to navigate to Accounts Payable –> A/P Setup –> Options –> Processing Tab. Kindly refer to the below screenshot.

ap


1. If User Uncheck the option “Keep Statistics” in AP Options screen under Processing Tab, then statistics for the transactions that are posted will not be included in the totals in the A/P Vendor group and A/P Vendors.

AP Vendor Groups

ap


AP Vendor

ap


Above screen shows Group code “INV” mapped to Vendor Number “1200”
Here in both the screens AP Vendor and AP Vendor Group; We can see that Statistics Tab is not displayed; this is because we have kept “Keep Statistics” unchecked in AP options.
In order to maintain statistics for Vendors navigate to Accounts Payable  –>  A/P Setup –> Options–> Processing Tab. Check the option of “Keep Statistics”.

ap


Before Transaction

AP Vendor Group

AP Vendor Group


Above screen shows the statistics of Invoices for amount “340.00” and count “2.00”

AP Vendor

AP Vendor
Above screen shows the statistics of Invoices for amount “340.00” and count “2.00”

 
Invoice Transaction

Invoice Transaction


Above screen shows an Invoice of Amount “160.00” for Vendor “2700”.

After Transaction

AP Vendor Group

AP Vendor Group


AP Vendor

ap

On Comparing Before Transaction with After Transaction statistics for Invoices, the amount has increased by “160.00” and the count has increased from “2” to “3” as the “Keep Statistics” option is checked under AP options.

This is how one can keep a track of the Vendor and Vendor group Statistics for a record.

Also Read:

1. Manage AR Item Statistics in Sage 300 ERP
2. Retainage Accounting
3. Default Settings for Accounts Payable Payments in Sage 300 ERP
4. Account Set wise Filter in AP Aged Payable Report
5. Terms Code feature in Account Payable in Sage 300 ERP

IC Item Valuation Report in Sage 300

$
0
0

In Sage 300, there are many useful inventory reports that help to manage the inventory efficiently. In our today’s blog we will discuss about the IC Item Valuation Report in Sage 300.

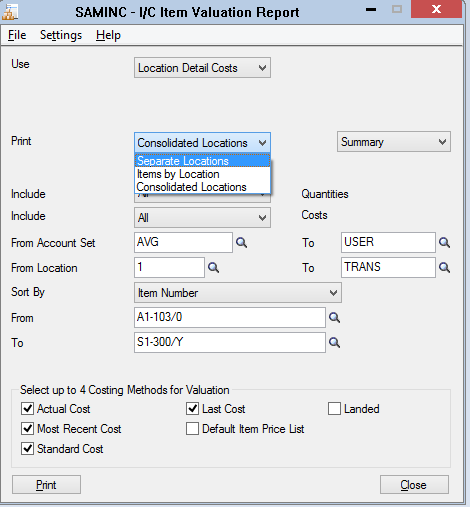
IC valuation report is a very important when users want to know quantities on hand, calculated for the items, locations, costs, or optional amounts. IC item valuation report also provides an option to print the report summary wise and detail wise for separate location, Item by location, Consolidate location. User can also find out the costing of the inventory in four different methods so this becomes very important as far as the user is concerned.

New Stuff : Manage AP Vendor and Vendor group Statistics in Sage 300 ERP

To print the Item Valuation report:

Open Inventory control–> IC stock Control Reports–> Item valuation

66666666666666666

In IC valuation report there are basically 2 reports one is “Location detail costs” to find the costing of the inventory on the basis of different locations and “Transaction Cost” which gives the cost of the inventory in four different costing methods. To print the report first have to select one type of valuation report.

Location Detail Costs:– To print the current value of your inventory using all data stored in costing buckets.

Transaction Costs:– To print all transactions and item costs for the period you specify (from receipts, shipments, transfers).

There are different filters available on the UI as follows:

• Select Transactions by Cutoff Date or Fiscal Year/Period.
• Print Transaction Details
• Include Quantities and Costs- ALL/Only positive/ only negative/only zero / non zero
• From and to Account Set
• From and to Location
• Sort by- select from drop down list
• Select up to 4 Costing Methods for Valuation

Before printing the report, the user has to select sub report type option from drop down list, depending on options selected, the report will show the summary or detail wise data. Following are the options in the drop down.

1. Print Separate Locations in Detail:– If the user selects this option, the report includes item number, description, and quantity on hand, stocking Unit and selected valuation for costing method.

2. Print Separate Locations in Summary:– If the user selects this option, the report include location code and location description and totals for all items at the location Unit and selected valuation for costing method.

3. Print Items by Location in Detail:- If the user selects this option, the report include costing method, average unit value, location, totals for all items and Unit and selected valuation for costing method.

4. Print Items by Location in Summary:– If the user selects this option, the report includes the totals for all items on the report.

5. Print Consolidated Locations in Detail:– If the user selects this option, the report includes the item number, description, and costing method for each item across all locations.

6. Print Consolidated Locations in Summary:– If the user selects this option, the report consists of a single line showing the total costs for all inventory items included in the range of items and locations you select.

7.Transaction Costs:– If the user selects this option, the report include item number and respective transaction, item  description, location code and discretion, stocking Unit and selected valuation for costing method.

Thus, IC Valuation report will give a detailed information regards to the inventory in term of cost and quantity in detail as well as in summary format.

Also Read:
1.Stock summary Report
2.Stock Status Report in Sage 300 ERP
3.Raw Material Purchase Report
4.Customized Stock Transfer


I/C Serial number Inquiry in Sage 300 ERP

$
0
0

In our last posts we had discussed most of the inquiry screen in Sage 300. Similarly I/C Serial number inquiry screen is used to know the status of the serial items for different locations regardless whether it is available in inventory or not.

To run the Serial number Inquiry, navigate to,

Inventory Control –> I/C Statistics and Inquiries –>serial Number inquiry.

New Stuff: IC Item Valuation Report in Sage 300

There are different filters available on the UI as follows
•From and To Serial Number
•From and To Item Number
•From and To Location
•From and To Date
•Status- Available/Not Available/Both

The below Screen will appear:

1

As shown in the above screen shot, the user can easily trace the information of serial items in detail grid. Also this screen lets the user get this information through the report. To get the report, users have to click on the print button. IC serial/Lot list report will be populated and using this, the user can fetch the report for serial items.

Using this screen, the user can drill down to the Serial number master screen by double clicking on the serial number column or he just has to select a row and view the following information about a serial number by clicking on the detail button. Please refer the below screen shot.

2

Also he can drill down to the transactions screen of the selected serial number on the screen. – he has to select serial no. row in detail grid click on “transactions “button this will open another pop up screen as serial number Transaction inquiry with list of all the transactions for selected serial number, To view transaction in details for that click on details button.

The below Screen will appear:

3

In this way, the IC serial number screen helps user to know the serial number for serial items with their details and transaction in Sage 300 in a single screen.

Also Read:
1.How to assign unique serial Number to Individual Items in Sage 300 ERP Versions 2014
2.Assign Unique Serial Number to Individual Items in Inventory Control Module of Sage 300 ERP
3.Serial/Lot Number Stock Report
4.How to allocate a Serial and Lot number at Order Entry screen in Sage 300 ERP


Single Invoice of Vendor with multiple payment schedule.

$
0
0

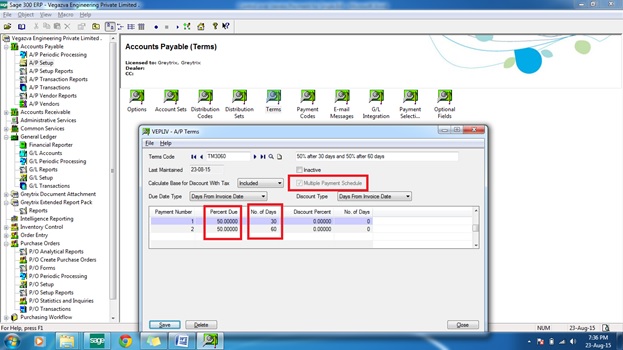
 In SAGE 300 a very useful feature is available, called the “Multiple Payment Schedule”, through which, any organization can have control over vendor bills due as per their defined schedule, bill wise.

For example, if any organization has term with vendor that 50% of bill will get due after 30 days and remaining balance 50% will get due after 60 days.

The above mentioned term condition can be very easily mapped in SAGE 300. Please refer below screen shots and details for better understanding.

New Stuff: I/C Serial number Inquiry in Sage 300 ERP

The user has to define the term, from the option Account Payable– >A/P Setup– > Tick the option multi payment schedule option and define the percentage as per the term. Please refer below screen

blog1

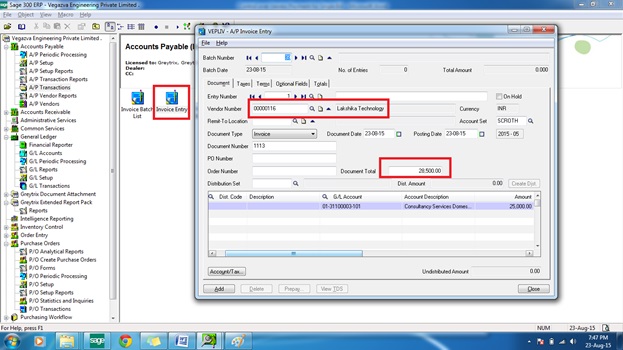
Tag the same term code to specific vendor in vendor master. When the user will book the invoice of that specific vendor, then the system will calculate and bifurcate the invoice due as per the defined percentage and days in the payment term. User can also view the due date and its distributed value at the time of invoice booking before posting invoice in the tab “Term”.

blog1

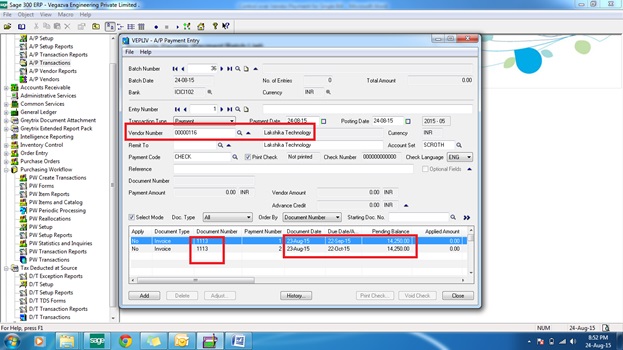
After invoice booking, when user will try to make payment of the vendor against that particular invoice, then system will show its due date and distributed amount. Please refer below screen.

blog1

Similarly, we can manage / control over single invoice of vendor with multiple payment schedule.

Also Read:

1) Auto Execution of EXE file using Windows Scheduler in Sage 300 ERP
2) Shippable Backorders Report
3) Customized Stock Maintenance after Shipment & Invoice in Sage 300 ERP
4) Terms Code feature in Account Payable in Sage 300 ERP
5) Manage AP Vendor and Vendor group Statistics in Sage 300 ERP

I/C Transfer Slips Report

$
0
0

I/C Transfer Slip Report of SAGE 300 helps the users to get the details of all the goods transferred from one location to another location.

Transfer slips include the following information:

  • Shipping and receiving plant information, including contact names and phone numbers.
  • Item number, item description, quantity transferred, and the unit of measure.
  • The quantity received, or a blank space where you can write the quantity received (this depends on the type of transfer slip you print). The following transfer slips are available:

New Stuff: Single Invoice of Vendor with multiple payment schedule.

    • ICTRNS01.RPT. If you print this type of transfer slip, the quantity received is always blank.
    • ICTRNS02.RPT. If you print this type of transfer slip, the quantity received varies depending on the type of transaction that you have just posted:
      • For a Transfer transaction, the quantity received is blank.
      • For a Transit Transfer, the quantity received shows the total quantities of all the transit receipts that originated from the transit transfer.
      • For a Transit Receipt, the quantity received shows the receipt quantity.

To print I/C Transfer Slips Report follow the steps mentioned below:

  1. Inventory Control à I/C Stock Control Reports à Transfer Slips
  2. In the Use Transfer Slip field, select the transfer slip form use. Inventory Control ships with two transfer slips: one prints the Quantity Received on the slip, and the other leaves this field blank.
  3. If you used the Transfer Slips icon to open the screen, select the range of inventory transfers for which to print transfer slips.
  4. Select Include Transfer Slips Already Printed if you are reprinting a transfer slip.
  5. Click Print.

blog1

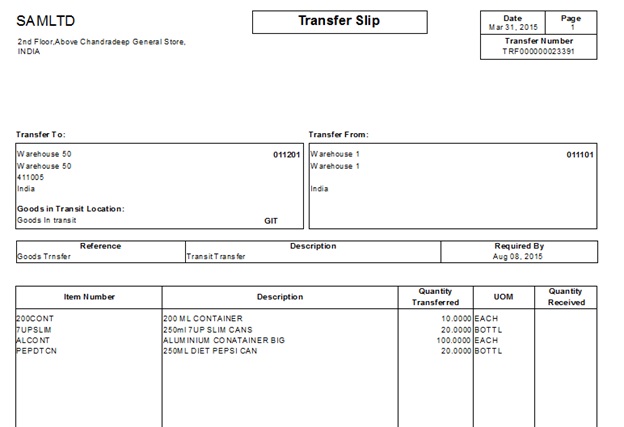
Below is the screen shot of the Transfer slip report:

blog1

Information printed for on transfer slips report are as follows:

  1. Transfer No generated by the system.
  2. Details of goods transfer FROM & TO locations including the address of both the locations.
  3. Details of goods required date, Item Number, Description Quantity Transferred, UOM & Quantity Received.

With the help of Transfer slip report of SAGE 300 users can check whether the goods received (Items & quantities) match with the goods shipped. User can also print the report at the time of moving the goods outside from his warehouse.

Also Read:
1) I/C Transaction History Report
2) I/C Transaction Listing Report
3) Inventory Locations in Sage 300
4) Stock Transactions Inquiry in Sage 300 ERP
5) I/C Serial number Inquiry in Sage 300 ERP

Schedule VI Reporting in Sage 300

$
0
0

As per companies act 1956, every registered company shall prepare Balance sheet and Profit and loss statement as prescribed in Schedule VI of companies act. As per the Schedule VI balance sheet format all Assets and Liabilities of company should be projected into current and non-current classification.

In traditional accounting system Accounts manager/CFO are required to collect the data from single/multiple general ledger source and spend unproductive hours to projection as per the format of schedule VI. In this exercise, it is a possibility of incongruity of financial figures and heading.

New Stuff: Bulk Sales Orders and Purchase Orders Processing from Sage CRM to Sage 300
blog

Sage 300 provides Financial Reporting Tool to generate your schedule VI format without investing unproductive hours of your finance manager/CFO. This dynamic reporting tools are available in General Ledger module of Sage 300.

Financial Reporting tool is nothing but a simple excel template in which you can pick and formulate the financial figures in form of functions.

With the help of defined functions as per the requirement of Schedule VI format you can project both the years’ data in an accurate manner without any error.

Sage 300 projected data on the real time basis only.

Concept of Financial Report.

  1. A Financial report is a spreadsheet containing Functions. Functions that read data directly from the general ledger.
  2. You can also use any other spreadsheet functions to further manipulate that data.
  3. You can print the Actual and provisionally posted amount.
  4. You can enter formulas that allow you to drilldown to associated transactions in the resulting report.

 Column of Financial Report.

  1. A, B, C and D column are reserve for Control Information.
  2. E onward for Data appearance.

 Commands of Financial Report.

  1. FR View: Generates financial statements from report specifications.
  2. FR Paste: Inserts Financial Reporter functions, account numbers, and selection criteria.
  3. FR Clear: Clears a previously generated financial statement.
  4. FR Options: Carry forward the opening budget
  5. FR Drilldown: drilldown to associated transactions after you generate a financial statement.

Also Read:
1) Include your Company Logo in Sage CRM Reports
2) Get impressive reports by adjusting Report Styles in Sage CRM
3) Generate Excel/PDF reports on standard Sage CRM entities externally
4) Set Schedule of Bulk Communication on Single Click

General Ledger Revaluation in Sage 300

$
0
0

In Sage 300 if you are passing multicurrency transaction in your books of accounts, due to fluctuation of exchange rates of source currency you would be required to re-evaluate your general ledger.

The difference between current fluctuations may be exchange gain or loss. Following are tips to configure your exchange gain/loss of your general ledger accounts.

New Stuff: Schedule VI Reporting in Sage 300

1)  Define Exchange gain or loss account.
General Ledger >> GL Setup >> Revaluation code.
blog1

Sage 300 provides you with the facility to configure unrealized exchange gain/loss account in which is Debit/credit in revaluation process.

2)  Configuration of Revaluation code to general leger.
General Ledger >> G/L Accounts >> Accounts
After clicking on multicurrency switch you will get one tab called Currency.
You would require to configure created Revaluation code to general ledger account which you want to reevaluate.

blog1

3)  Auto Generation of Revaluation Journal entry.
General Ledger >> G/L Periodic processing >> Create Revaluation Batch.

blog1

Following are the steps requires to follow for revaluation.

1. Enter Description of Revaluation batch.
2. Select currency which you wants to revaluate
3. Select Account range which you wants to reevaluate or specific account.
4. Select Revaluation code.
5. Select Fiscal year and period.
6. Enter Entry date on which you want to post the revaluation batch.
7. Enter exchange rate for revaluation.
8. Click on process Button.
After clicked on process button system will create Journal entry in General ledger module.

Also Read:

1. Enhancement in General Ledger Transaction Listing report
2. Link General Ledger Entry to the Original Transaction
3. Subsidiary Ledgers and General Ledger
4. General Ledger (GL) Accounts Distribution in Sage 300 ERP
5. General Ledger Period End Maintenance

G/L Integration in A/P module with options for creating G/L transaction by (Creating and Posting a New Batch)

$
0
0

General ledger is one of the primary component of accounting. Hence G/L Integration is a crucial activity as it enables the user to keep control over all the transactions of any enterprise. All the transactions flows from various modules to the General ledger. Sage 300 enables the administrator to configure the G/L transaction settings.

Creating and Posting a New Batch.  This option will enable the user to create as well as post the new General batches automatically, which gets created in the General Ledger. This helps in reducing the time and resource efforts which were earlier employed on posting batches in General Ledger.

New Stuff: General Ledger Revaluation in Sage 300

For “CREATING AND POSTING A NEW BATCH” we need to follow these below mentioned steps

1)  Click on accounts payable module.

2) Click on Setup.

3) Click on G/L Integration. And in the Integration tab you will find this option wherein you can set the “Create G/L Transition By” to “Creating and posting a New Batch”

blog1

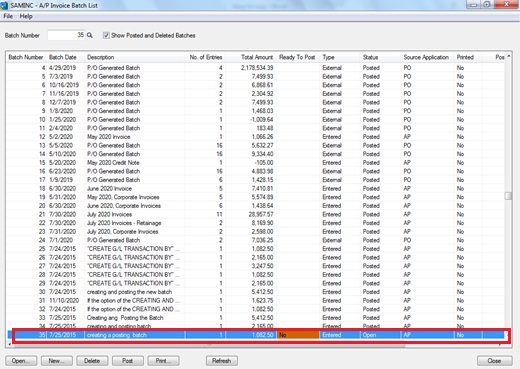
Now after entering an invoice entry in the Accounts payable module, we can see the invoice batch created in the A/P Invoice Batch List as shown below.

blog1

And now when we post this batch from A/P invoice batch list, it flows into G/L module and directly gets posted. It does not form any batch in G/L waiting to be posted.

As soon as we post the batch from AP invoice batch list we get to see the below screen which states that the posting sequence 35 completed which was the invoice batch created AP invoice list and this message box also indicates that the G/L transaction is completed.

blog1

Thus the work of posting the batches in G/L can be eliminated using this configuration in the G/L Integration in the Accounts payable module. This gives an ease and flexibility to the administrator of setting up check point in G/L batch list or to give freedom to post directly in G/L.

For organizations wherein the staff is handling the Accounts, payable is proficient and independent then directly G/L impact can be given using “Create and posting new batch”

Also Read:

1. G/L Integration for creating G/L transaction by (Creating a New Batch)
2. Creating G/L transaction by “Adding to an Existing Batch” in G/L
3. GL Consolidation feature in Sage 300
4. GET XML FORMAT DATA FROM WEB SERVICE RESPONSE WITHOUT EXPORTING FILE FOR SAGE 300 ERP
5. Deleting Inactive records in Sage 300 ERP

Change/Control Over Due Date and Payment Limit of Vendor Invoice

$
0
0

In SAGE 300 a very useful feature is available called as the “A/P Control Payment”. Through which any organization can control over due date and payment limit for specific Invoice of specific Vendor.

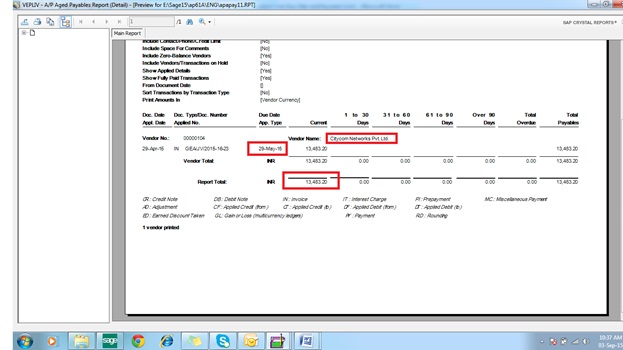
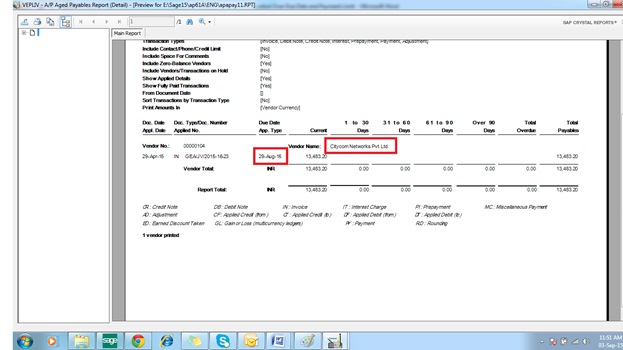
Suppose, we booked a purchase invoice of a vendor and its due date is 29-May-2015 and its Invoice value is Rs.13483.20 as shown in below report.

New Stuff: G/L Integration in A/P module with options for creating G/L transaction by (Creating and Posting a New Batch)

blog1

After booking invoice of vendor later it is decided by management or any responsible / concern person / department of an Organization that due date must have to change and also put payment limit over specific invoice of specific vendor. Then it can be done very easily in SAGE 300 through A/P Payment Control option. This option is available in Account PayableèA/P TransactionsèControl Payments. Select the Control Payments option, then select a specific vendor from finder, then select a specific document number and finally press GO button. System will populate all the information in the screen such as Doc. Type, Doc. Date, Doc. Total, Balance, Term Code and due date. In the same screen, the user can set payment limit and can change its due date, parallel user can also put discount percent, system will auto calculate its discount amount. Please refer below screen shot.

blog1

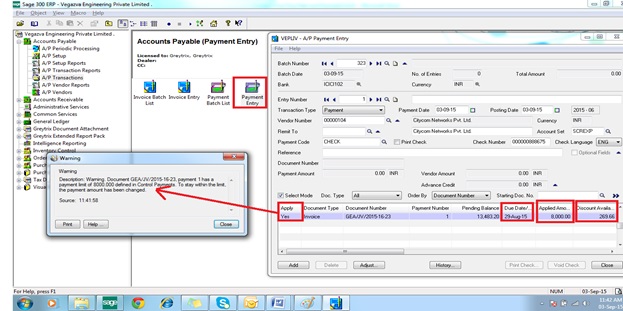
After completing this form, when the user will try to release the payment against this specific invoice then system will send a warning message to the user that the payment limit has been set for this invoice number and applied amount will auto populate by system as set in “control payment” form. Parallel due date will also get updated as changed in the payment control form and discount available will also get updated. Please refer below screen for the ready reference.

blog1

We can view the reports of that specific vendor, in the report we can see that due date has been updated as per the changes done in “control payment” form. Please refer below screen.

blog1

This way any organization can change and set due date and payment limit respectively for the specific invoice of specific vendor.

Also Read:

1. Single Invoice of Vendor with multiple payment schedule.
2. Advance Payment to a Vendor
3. Manage AP Vendor and Vendor group Statistics in Sage 300 ERP
4. Migrate A/P Payment Terms from Sage BusinessWorks to Sage 300 ERP
5. Migrate A/R Payment Terms from Business Vision to Sage 300 ERP


Creating Purchase Order By Using Sales Order details in Sage 300.

$
0
0

In Sage 300, there is a provision for Creating Purchase Order using Sales Order details from Sale Order Entry. This feature can be very useful and time saving for the users.

For using this functionality we have to take care some of the points are as follows:

The New Stuff : Change/Control Over Due Date and Payment Limit of Vendor Invoice

Define Vendor Details in Inventory Control Module.

Path: Inventory Control -> I/C Items and Price Lists -> Vendor Details.

a) Vendor Details: Vendor has to be link with Items to create purchase order.

b) If you want to make Purchase Order with its Vendor Cost, then you have to define Vendor cost in Vendor Details. System by default picked Vendor cost at Purchase Order entry.

00001

(Screen Shot 1: Vendor Details Form)

00001

(Screen Shot 2: P/O Create POs from O/E Form)

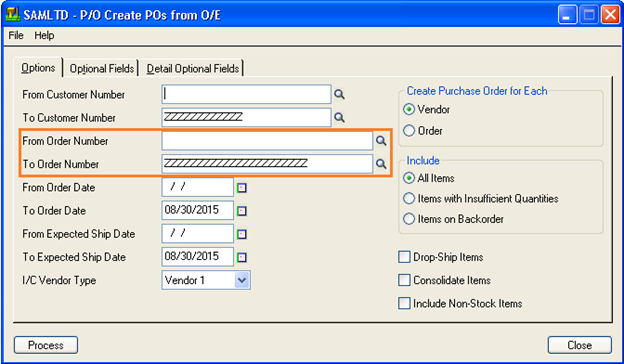
We can create Purchase Orders by using Sale Order details. To avail this feature, open P/O Create POs from O/E form.

Path : Purchase Orders -> P/O Create Purchase Orders -> Create POs from O/E

For creating Purchase Order from Create POs from O/E form, have to input proper values in available columns. (Refer Screen Shot 2)

1 – From Customer Number : Select the range of Customer from which you want to create Purchase Order

2 – To Customer Number : Select the range of Customer till which you want to create Purchase Order

3 – From Order Number :  Select the range of Sales Order from which Sale Order you want to create Purchase Order.

4 – To Order Number : Select the range of Sales Order up to which Sale Order we want to create Purchase Order.

5 – From Order Date : Provide the Date Range of Order Date.

6 – To Order Date : Provide the Date Range of Order Date.

7 – From Expected Ship Date : Provide the Date Range of Expected Ship Date.

8 – To Expected Ship Date : Provide the Date Range of Expected Ship Date.

9 – I/C Vendor Type : We have to select Vendor Type which we have linked in Vendor Details.(Prefer Screen Shot 1)

10 – Create Purchase Order For Each :

            i – Vendor : By selecting this option, System automatically generate Purchase Order by Vendor Number. If you have multiple Sale Orders which are having one item and that item linked to Vendor, then system by default generate Single Purchase Order with total Sale Order Quantity.

            ii- Order : By selecting this option, System automatically generate Purchase Order for each Sale Order.

11 – Include :

            i – All Items : System generate Purchase Order for each item which is used in Sales Order.

            ii – Item with Insufficient Quantities : System create Purchase Order only for insufficient quantities not for all quantities.

            iii – Item on Backorder : System create Purchase Order only for Backorder quantity available in Sale Order.

12 – Drop-Ship Items : Select this option to include the drop-ship addresses entered for items and customers on the Order Entry orders.

13 – Consolidate Items : Select this option to consolidate details that have the same item number, location, and unit of measure into single details on the purchase orders for selected vendors.

14 – Include Non-Stock Items : Select this option to include non-stock items from Order Entry orders. If you do not choose this option, non-stock items do not appear in the Finder, and they are treated as non-inventory items.

After filling the data , click on Process Button to generate Purchase Orders.

Also Read:

1. Creating Purchase Orders from Order Entry screen in Sage 300 ERP
2. Bulk Sales Orders and Purchase Orders Processing from Sage CRM to Sage 300
3. Template Provision in Sage 300 ERP (Purchase Orders Module)
4. Different methods to Default different Unit of Measure on Purchase Order Entry in Sage 300 ERP
5. Purchase Order Action Report in Sage 300 ERP

Default Settings for Invoices in Accounts Payable

$
0
0

In our previous blog, we had discussed about “Default settings for Deposit slip, Receipt & adjustments options in Account Receivable”. In this blog post we will discuss about Default settings for invoices in Accounts Payable module. Using this option we can set the default posting dates & tax related settings which we will maintain at the time of AP invoice transactions.

Sage 300 provides various options which we can set up to get the process of all transactions easier. Once you set up this default option, it will appear while generating AP invoice entry.

For setting the default options for receipts, navigate to Accounts Payable –>A/P Setup Options–>Transaction Tab–>Invoice Options, refer below screenshot:-

New Stuff: Creating Purchase Order By Using Sales Order details in Sage 300.

blog1

•  Default Posting Date:-

There are three options to set the default posting date are Document date, Batch date & Session date. Posting date is the date on which the batch is posted to General Ledger. Posting date can be different from the document date.

If you set the default posting date as document date then while creating invoice document posting date will be automatically get as per document date. If select default date as batch date them posting date will be automatically get as per batch date. If select default date set as session date then date will be automatically set as per accpac session date.

You can change the posting date any time of creating AP invoice entry.

•  Default Tax amount:-There are three options for default tax amount-
-Calculate
-Enter
-Distribute

If you select ‘calculate’, then the tax amount will be calculated automatically & you cannot change the tax amount. If you select the option as ‘distribute’ & you enter tax amount manually then you need to process from distribute button to calculate taxes as per distribution lines, If you select ‘Enter’ & enter all tax amount manually then you can change total tax amount manually.

•  Default Tax Base:-There are three options for default tax amount-
-Calculate
-Enter
-Distribute

If you select calculate then tax base will be calculated automatically & you cannot change the tax amount.  If you select as distribute & you enter tax base manually then you need to process from distribute button to calculate taxes as per distribution lines, If you select as Enter & enter all tax base manually then you can change total tax base manually.

If you select calculate, distribute or enter then the tax amount is calculated automatically based on the tax base.

•  Default Tax Reporting:- There are three options for default tax amount-
-Calculate
-Enter
-Distribute

If you select calculate option then Accounts Payable will convert all taxes to the tax reporting currency for created documents and their details. If you select as distribute then the total tax reporting amounts converts for each tax authority, then distribute the tax reporting amounts automatically to document details using the Distribute Taxes button. If you select enter then tax reporting amount convert manually for documents and their details.

This will be useful when you have a multi-currency database.

Also Read:
1.Default settings for Invoices in Account Receivable
2.Default Settings for Accounts Payable Payments in Sage 300 ERP
3.G/L Integration in A/P module with options for creating G/L transaction by (Creating and Posting a New Batch)
4.Defaulting Detail Tax class to 1 in Account Payable in Sage 300 ERP
5.Default settings for Receipts in Account Receivable in Sage 300 ERP


Payment Advice Report

$
0
0

In Sage 300 we have customized a report called Payment Advice report. In this blog post we will discuss about Payment Advice Report which contains the details about incoming payment.

Payment Advice is a Document which is sent to Vendor that contain the details of payment made to Vendors. This report will be printed from Custom UI .The UI has ‘From’ and ‘To’ Batch and Entry number filter Criteria. This report will print batch & entry wise which are generated from AP payment transactions. The UI is as show below.

New Stuff:Default Settings for Invoices in Accounts Payable

blog1

The report also provides the information of the payment done against the invoices. It gives the information about the vendor and its address details. The mode of the payment done along with payment date.

It shows the gross amount of the Invoice .It display the TDS amount information if applicable. The report also gives the information about the Balance amount as well as other deduction incase if any adjusted. The report consider only Payments and Prepayment entries only.

The output of the report is as follow:

blog2

Also Read:
1.Single Invoice of Vendor with multiple payment schedule
2.Single Invoice of Vendor with multiple payment schedule
3.Miscellaneous Payment Feature in SAGE 300 ERP
4.AP Vendor Ledger Report for Sage 300 ERP
5.Advance Payment to a Vendor

Account Range Selection Made Simpler in Business Intelligence

$
0
0

Sage 300 Business Intelligence empowers you to effortlessly create real-time, automate and pre-format report with accurate information. It harnesses the capability of Microsoft Excel to retrieve meaningful information from Sage 300 system for operations and strategic planning.

Using Business Intelligence, you can design your own custom reports. The Account Selection criteria is made simpler in the Business Intelligence tool. Suppose, if there are range of accounts say parent child accounts then you don’t require to specify the range of accounts in the spec as required in Financial Reporter. On stating the parent account no, the report fetches the sum of all the accounts under parent head.

New Stuff: Payment Advice Report

Let’s have a look on this smart feature of Business Intelligence by taking an e.g. the Sales accounts has multiple child as shown below:

1

If you require the total amount of all the accounts under the account head “Sales” then in BI report just specify the parent account no in the spec column then depending upon the formulae that you have added it will display the output.

1

The above BI report is designed to extract the net changes of the account which matches with the GL trial balance report as shown below:

1

Thus, by following simple steps you can define the account selection parameters and thereby getting the desired output in real-time.

Also Read:
1. Business Intelligence Security and License Managers in Sage 300
2. Scoping Sage Intelligence Reports in Sage 300 ERP
3. E-mailing Sage Intelligence reports
4. Add/Remove Additional Columns in Sage Intelligence reports
5. How to modify standard Reports in Sage Intelligence

Reverse Transactions for Bank Services in Sage 300

$
0
0

Sage 300 provides the reverse transactions for Accounts Payable, Accounts Receivable & bank Services. In this blog post we will discuss about the Reverse Transaction for Bank services.We can reverse the posted bank entries for selected bank.

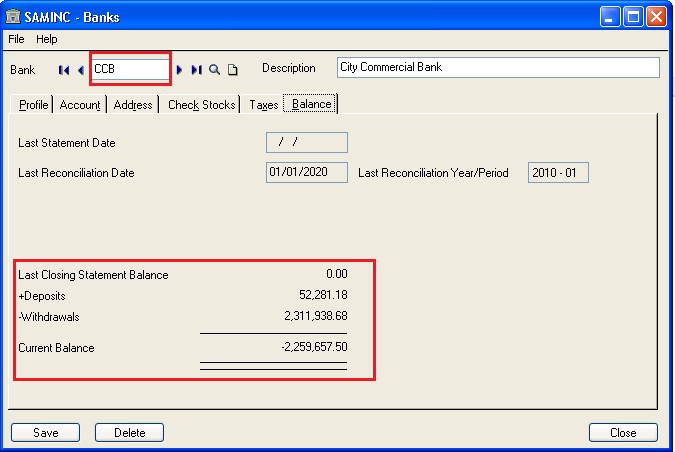
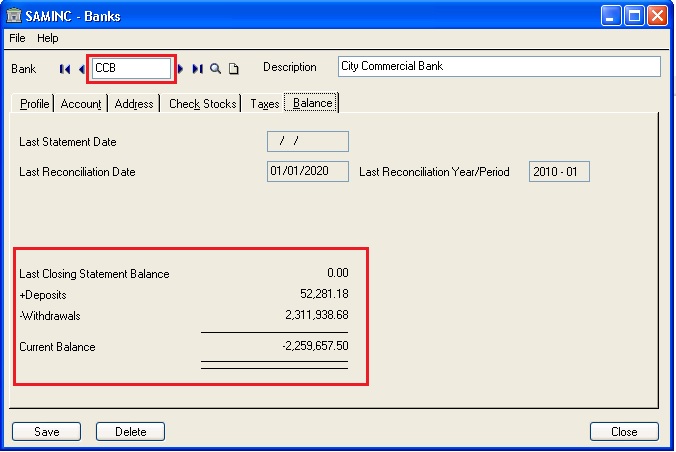
To view the updates after posting AP, AR & bank transactions bank services automatically updates into particular bank master screen, to analyse the last closing statement balance, deposits, withdrawals & current balance, navigate to Common Services–>Bank Services–>Banks, refer below screenshot:-

New Stuff:Account Range Selection Made Simpler in Business Intelligence

blog1

Let’s take an example, in above screen to view the Bank book balance with last closing statement balance, deposits, withdrawals & current balance.

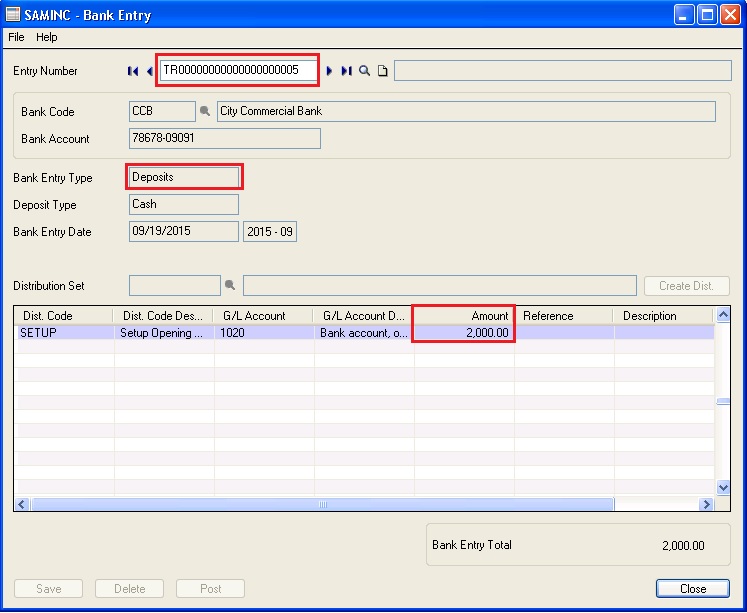
Now create new Bank entry transactions, to create new Bank entry navigate to Common Services–>Bank Services–>Bank Transactions–>Bank Entry. Create new Bank entry transactions, select bank code=CCB, select entry type as Deposits, add disc code with amount=2000, entry no will be generated after posting this bank entry= TR00000000000000000005, GL batch was generated automatically, and refer below screenshot:-

blog2

After posting bank entry, bank master screen for particular bank will be update automatically, deposit amount=2000 will be updated, the following amount will be calculated and displayed: 52281.18+2000=54281.18, refer below screenshot:-

Blog3

Deposits are increased by 2000 & Current balance is decreased by 2000 & now it is 2,257,657.50.

Reverse Transactions (Bank Reverse):

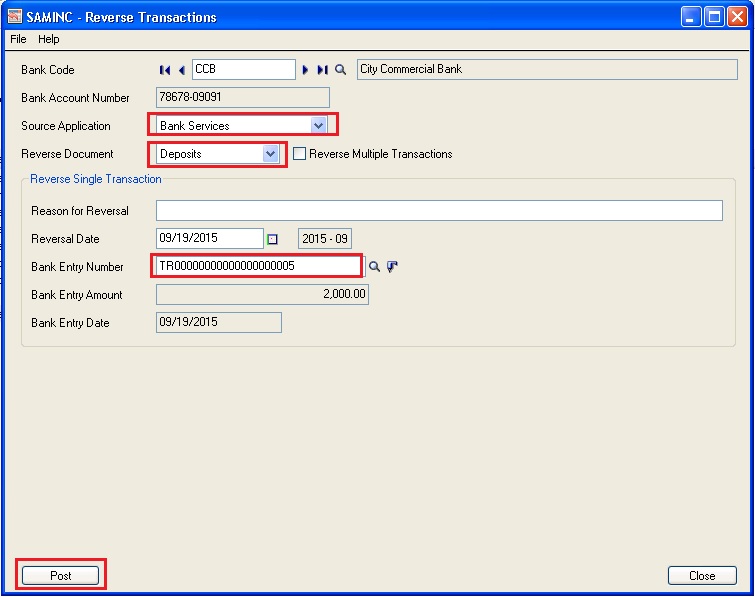
Now we can do the reverse transactions against bank services, select bank=CCB, select source application as Bank Services, reverse document=Deposits, select bank entry no= TR00000000000000000005, Click on post button, to navigate reverse transactions, go to Common Services–>Bank Services–>Bank Transactions–>Reverse Transactions, refer below screenshot:-

Blog4

After clicking on Post button, a screen pops-up with the message “Reverse transaction completed successfully”. It will also create a GL transaction in un-posted status under General Ledger module. Then go to General Ledger module and post the GL transaction of the Reverse Transaction.

Now we can verify the bank book balance after reverse transactions for deposited amount in bank entry.

Bank Balance Status after Bank services Reverse Transaction, refer below screenshot:-

Blog5

In the above screen, we can review the Deposits is decreased by 2000 and Current Balance is increased by 2000 after reverse transactions of bank entry.

Also Read:
1.Reverse Transactions – Payment Reversal Transaction in SAGE 300 ERP
2.Reverse Transactions – Receipt Reversal Transaction in SAGE 300 ERP
3.Multiple Reverse Transactions
4.Reverse Transaction feature in Sage 300 ERP
5.Reverse Receipt and Payment in Sage 300 ERP


Viewing all 1475 articles
Browse latest View live