Quantcast
Channel: Sage 300 ERP – Tips, Tricks and Components
Viewing all 1475 articles
Browse latest View live

How to take backup of company data in Sage BusinessWorks

$
0
0

Today, we shall discuss “How to take a backup of company data in Sage BusinessWorks” in this blog.

Below mentioned steps give you brief idea about the backup process of Sage BusinessWorks ERP:

Step 1: Open Sage BusinessWorks Company –> select ‘File’ option –> select ‘Backup’ option (Refer below screen-shot)

Sage BusinessWorks Backup

Sage BusinessWorks Backup

Step 2: After selecting the ‘Backup’ option, the user can see the following window (refer screen-shot below).

Sage BusinessWorks Backup

Sage BusinessWorks Backup

Step 3: After click on ‘Next’ the company list will display. Select the company of which you want to take the backup and click on ‘Next’ button (Refer below screen-shot).

Sage BusinessWorks Backup

Sage BusinessWorks Backup

Step 4: Select folder where you want to store backup file from left hand side panel. Enter ‘Backup File Name’ as shown in below screen-shot and Click on ‘Next’ button.

Sage BusinessWorks Backup

Sage BusinessWorks Backup

Step 5: Click on ‘Start’ button and system shall start the backup Process.

Sage BusinessWorks Backup

Sage BusinessWorks Backup

In this way, we can take Sage BusinessWorks company data backup.
Greytrix helps in migrating to Sage 100, Sage 300 and Sage ERP X3 from Sage Pro, Sage 50 US, Sage 50 CA, Sage 50 UK, Sage Business Works, Sage Business Vision, QuickBooks and MS Dynamics Great Plains. For more information on migration solutions, please contact us at erpmig@greytrix.com. We will be glad to assist you.

Also Read:
1) 
Migrate AR Payments from Sage BusinessWorks ERP to Sage 300 ERP
2) Migrate PO Invoice (Detail) from Sage BusinessWorks to Sage 300 ERP
3) Migrate Price Lists from Sage BusinessWorks to Sage 300 ERP
4) Migrate A/P Payment Terms from Sage BusinessWorks to Sage 300 ERP
5) Migration of GL accounts from Sage BusinessWorks to Sage 300 ERP


Migrate AR Debit Notes from Sage Business Vision to Sage 300 ERP

$
0
0

GUMU™ for Sage Business Vision ERP to Sage 300 ERP is a Sage certified migration solution. Greytrix is a pioneer in providing migration services at its Sage Migration Centre and catering end-users business requirements.

We provide data Migration Services from Sage Business Vision to Sage 300 ERP (formerly known as Sage Accpac) at our Sage Migration Center. Our GUMU™ migration utility is compatible to convert all Master and Open transactions along with Sales, Purchase and GL historical data from Sage Business Vision to Sage 300 ERP.

In this blog, we will discuss about how Sage Business Vision AR Debit Notes are migrated to Sage 300 ERP using GUMU™.

New Stuff: Migrate AR Credit Notes (summary) from Sage Business Vision to Sage 300 ERP

Navigate through the below link to check the AR Debit Notes in Sage Business Vision.
Sage Business Vision -> Accounts Receivable -> Open Items and select invoice, Ctrl+A to create Debit Note against selected invoice. You can check all transaction’s records related to entered customer id in Inquiry tab.

BV AR Debit Memo

BV AR Debit Memo

As you can view, here we have referred the transaction of Customer ‘JACSN’ and Transaction Number ‘0000203332’ (Debit Memo) is applied against invoice transaction no. ‘0000203328’. To check the details of this debit note refer below screenshot.

BV AR Debit Memo Details

BV AR Debit Memo Details

Below are the screenshots of the converted AR Debit Note into Sage 300 data.

Sage 300 AR Debit Memo

Sage 300 AR Debit Memo

Sage 300 AR Debit Memo Tax Details

Sage 300 AR Debit Memo Tax Details

Sage 300 AR Debit Memo Sales Person Details

Sage 300 AR Debit Memo Sales Person Details

Sage 300 AR Debit Memo Amount Details

Sage 300 AR Debit Memo Amount Details

Above screenshots shows, the converted AR Debit Note in the Sage 300 with the same details present in Sage Business Vision.

After data migration from Sage Business Vision the field values of Sage Business Vision AR Debit Notes get converted with the following mapping,

BV-Sage 300 Field Mapping

BV-Sage 300 Field Mapping

In this way, Sage Business Vision AR Debit Notes are migrated into target Sage 300 ERP company database.
Greytrix helps in migrating to Sage 100, Sage 300 and Sage ERP X3 from Sage Pro, Sage 50 US, Sage 50 CA, Sage 50 UK, Business Works, Sage Business Vision, QuickBooks and MS Dynamics Great Plains. For more information on migration solutions, please contact us at erpmig@greytrix.com. We will be glad to assist you.

Also Read:
1) 
Migrate Customers from Sage Business Vision to Sage 300
2) Migrate Remit-To-Address from Sage Business Vision to Sage 300 ERP
3) Migrate A/R Payment Terms from Business Vision to Sage 300 ERP
4) Migrate Sales Department Code from Sage Business Vision to Sage 300 ERP
5) Migrate Open Sales Order From Sage Business Vision to Sage 300 ERP

How to purge Data in Sage 50 CAD (Simply Accounting)

$
0
0

In this blog we will discuss about how to purge Sage 50 CAD (Simply Accounting) company data. In purging process we can delete unwanted data and it will reduce the size of files for a company and free the valuable disk space for current data.

New Stuff: Migrate Customers Custom Fields from Sage 50 CAD (Simply Accounting) to Sage 300 ERP

To purge the data follow the below mentioned path:

Open Sage 50 CAD data –> Maintenance –>Clear data –>Clear Paid transaction –> Clear paid vendor transaction/ clear paid customer transactions.

Sage 50 Purging screen

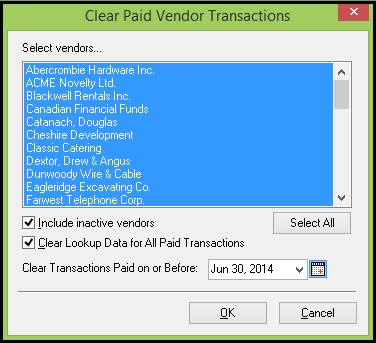
Once you select the “Clear paid vendor transaction” then the below screen will appear.

Clear paid vendor transaction

For clear paid customer transactions the below screen would appear.

Clear paid customer transaction

When the above mention screen will appear:
1. And if you want to purge the inactive Vendors and  Customer then only you need to check the checkbox “Include inactive vendors”/ “Include inactive customers” . It will remove the transactions information used in Vendor Aged and Customer Aged report.

2. You can clear details of processed invoices, deposit slips, remittances, and other payments from your data files to make space on your hard disk. The program clears individual detail lines from invoices or other payments, keeping only the totals. If you clear this data, you will not be able to look up, correct, or cancel invoices paid prior to the chosen date if cleared manually or prior fiscal year end date if cleared at year end.

3.In the “Clear transactions Paid on or Before:” you can select the date till you want to purge the data.

Once you complete the above mentioned process then click on “OK” to proceed with the purging process.

About Us:
Greytrix is one stop solution provider for Sage ERP and Sage CRM needs. We provide complete end-to-end assistance for your technical consultations, product customizations, data migration, system integrations, third party add-on development and implementation expertise.

Greytrix helps in migrating to Sage 100, Sage 300 and Sage ERP X3 from Sage Pro, Sage 50 US, Sage 50 CA, Sage 50 Usage Business Works, Sage Business Vision, QuickBooks and MS Dynamics Great Plains.

Also Read:
1) 
Migrate Sales Person from Sage 50 (CAD) to Sage 300 ERP
2) Migrate Items from Sage 50 (CAD) to Sage 300 ERP
3) Migrate Sales Invoice from Sage 50 CAD to Sage 300 ERP
4)Migrate Customer ShipVia Code from Sage 50 US (Peachtree) to Sage 100 ERP
5) Migrate Open Sales Order from Sage 50 (US) to Sage 100 ERP

Migrate Item Vendor from Quickbooks to Sage 300 ERP

$
0
0

GUMU™ for QuickBooks to Sage 300 ERP is a Sage certified Migration solution. Greytrix is a pioneer in providing Migration services at its Sage Migration Centre and catering end-users business requirement.

We at Greytrix help the end –user in implementing new Sage 300 ERP system through our various successful migration and integration solutions.

New Stuff : How to purge Data in Sage 50 CAD (Simply Accounting)

You can view Item Vendors in Sage Business Vision from the following path
QuickBooks -> Vendor-> Item list ->Select an item

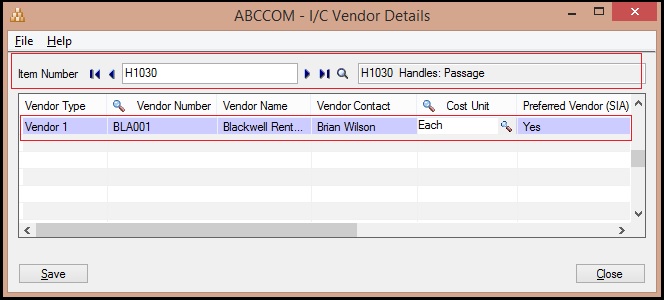
In below screen-shot you can view the vendor associated with the Inventory Item in QuickBooks.

You can check migrated Item


Vendor’s data in Sage 300 ERP as shown below. Path for Sage 300 ERP is:
Sage 300 ERP –> Inventory Control –> I/C Items and Price Lists –> Vendor Details

Item_vendor(Sage 300)
In this way, Item Vendors from Source QuickBooks gets migrated into target Sage 300 ERP company database.

Below is the mapping of the converted Item Vendor from Sage Business Vision to Sage 300 ERP,

Conversion sheet

About Us:
Greytrix helps in migrating to Sage 100, Sage 300 and Sage ERP X3 from Sage ProSage 50 USSage 50 CA, Sage 50 UK, Sage Business Works, Sage Business Vision,QuickBooks and MS Dynamics Great Plains.

Also Read:
1. Migrating Open Sales Order from Sage 50 CAD to Sage 300 ERP
2. How to purge Data in Sage 50 CAD (Simply Accounting)
3. Migrate Customer Optional Fieldsfrom QuickBooks to Sage 300 ERP
4. Migrate Purchase Credit Note from QuickBooks to Sage 300 ERP
5. Migrate AP Invoice from QuickBooks to Sage 300 ERP


Migrate Item Vendor from Sage 50 CAD (Simply Accounting) to Sage 300 ERP

$
0
0

GUMU™ for Sage 50 CAD ERP (formally known as Simply Accounting) to Sage 300 ERP is a Sage certified migration solution. Greytrix is a pioneer in providing Migration services at its Sage Migration Centre and catering end-users business requirements. In this blog you will get to know how GUMU™ migrates Item Vendor from Sage 50 CAD (Simply Accounting) ERP to Sage 300 ERP.

New Stuff: How to purge Data in Sage 50 CAD (Simply Accounting)

You can view Item Vendors in Sage 50 CAD from the following path,
Sage 50 CAD -> Inventory & Services -> View Inventory & Services -> Select any Item -> Go to Vendors Tab -> Click on Open Vendor List
In below screen-shot you can view the vendors associated with the Inventory Item in Sage 50 CAD,

Sage 50 CAD Item Vendor Details

Sage 50 CAD Item Vendor Details

You can check migrated Item Vendor’s data in Sage 300 ERP as shown below. Path for Sage 300 ERP is,
Sage 300 ERP –> Inventory Control –> I/C Items and Price Lists –> Vendor Details

Item Vendor Details

Item Vendor Details

In this way, Item Vendors from Source Sage 50 CAD are migrated into target Sage 300 ERP company database.
Below is the mapping of the converted Item Vendor from Sage 50 CAD to Sage 300 ERP,

Item Vendor Field Mapping

Item Vendor Field Mapping

Hope the above topic provides you sufficient information in comparing the Item Vendor’s records between the two diverse ERP systems.
Greytrix helps in migrating to Sage 100, Sage 300 and Sage ERP X3 from Sage ProSage 50 US, Sage 50 CA, Sage 50 UK, Sage Business Works, Sage Business Vision, QuickBooks and MS Dynamics Great Plains. For more information on migration solutions, please contact us at erpmig@greytrix.com. We will be glad to assist you.

Also Read:
1) Migrating Open Sales Order from Sage 50 CAD to Sage 300 ERP
2) Migrate Items from Sage 50 CAD (Simply Accounting) to Sage 300 ERP
3) Migrating A/P Terms from Sage 50 CAD (Simply Accounting) to Sage 300 ERP
4) How to Purge Sage 50 US (Peachtree) Data
5) Migrating A/R Terms from Sage 50 CAD (Simply Accounting) to Sage 300 ERP

Migrate vendor custom Fields from Sage 50 CAD (Simply Accounting) to sage 300

$
0
0

GUMU™ for Sage 50 CAD (formerly known as Simply Accounting) to Sage 300 ERP is a Sage certified Migration solution. Greytrix is a pioneer in providing Migration services at its Sage Migration Center and catering end-user business requirements

              New Stuff : Migrate Item Vendor from Sage QuickBooks to Sage 300 ERP

In this blog, we will discuss about how Sage 50 CAD (Simply Accounting) vendor’s custom fields are migrated to Sage 300 ERP (Formerly known as Accpac) using GUMU™.
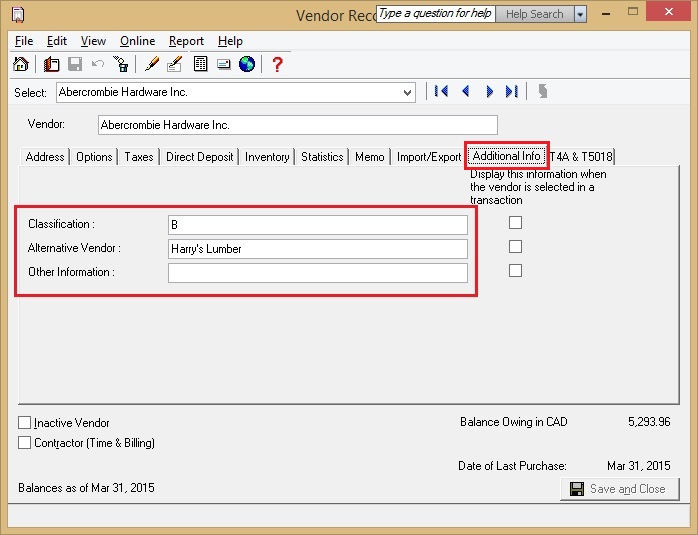
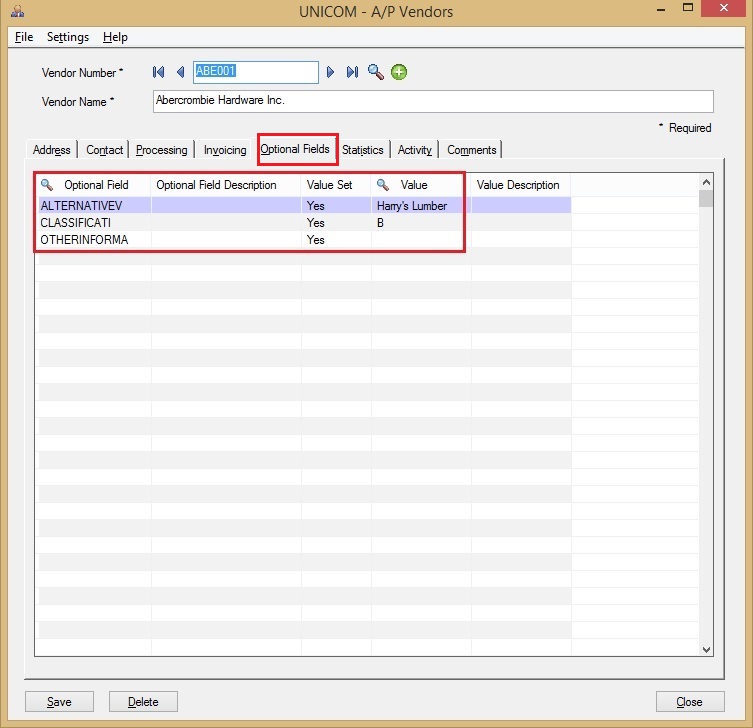
Below is the screenshot of Sage 50 CAD Vendor additional info which we convert it as optional Field in Sage 300custome(CAD)

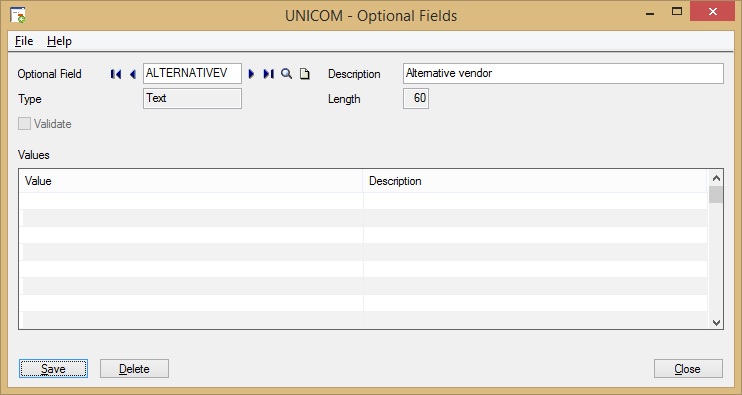
After the Migration, these additional info fields gets converted as option Fields in Sage 300.vendor_optional field(300)

Later, it gets assigned at Vendor masters as shown in below screenshotOptional field (Sage 300)
In this way, vendor’s additional info from Source Sage 50 CAD (simply accounting) gets migrated into target Sage 300 ERP as optional fields in company database.
Below is the mapping of the converted Custom fields from Sage 50 CAD to Sage 300 ERP.

About us  :-
Greytrix helps in migrating to Sage 100, Sage 300 and Sage ERP X3 from Sage ProSage 50 USSage 50 CA, Sage 50 UK, Sage Business Works, Sage Business Vision, QuickBooks and MS Dynamics Great Plains.

Also Read:
1.   Migrate Item Vendor from Sage QuickBooks to Sage 300 ERP
2.  How to purge Data in Sage 50 CAD (Simply Accounting)
3.  Migrating Open Sales Order from Sage 50 CAD to Sage 300 ERP
4.  Migrate Purchase Credit Note from QuickBooks to Sage 300 ERP
5.  Migrate AP Credit Note from QuickBooks to Sage 300 ERP


Magento Integration with Sage ERP (Sage X3 and Sage 300)

$
0
0

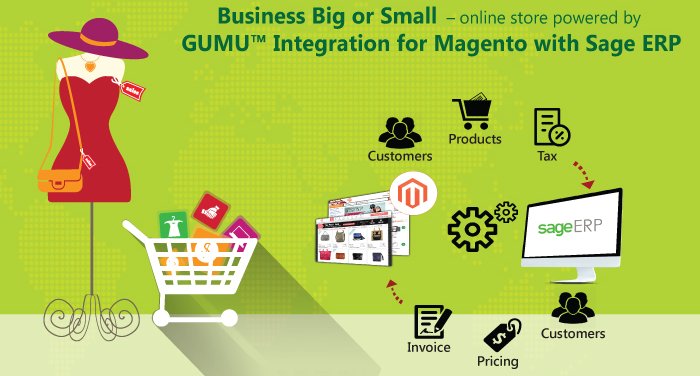
Businesses Big or Small – Online Store Powered by

Magento Integration with Sage ERP

eCommerce has exceptionally grown globally over the last few years. This is because enterprises have begun to intelligently integrate technology with their business processes. Enterprises have realized that web store or mobile apps for their brick and mortar business have helped them increase their outreach. Further, rapid advancement of technology in smartphones and the penetration of internet has also been complementary to this growth.

magento integration with sage x3

Magento – a feature-rich eCommerce platform is used to provide complete flexibility and functionality for online businesses. Magento with improved user experience, scalability and business agility with every upgrade (ver1.9 / 2.0) is the fastest growing and most widely used platform. Ahead of venturing into online business, these enterprises have a robust ERP in place such as Sage X3 / Sage 300. These businesses management systems specialize in maintaining the complexity of orders, invoices, customers, inventory, and product information.

Explore matchless features and benefits of using an integrated Magento webstore with your back end ERP system with our GUMU™ connector.

With two such critical business applications in place, it becomes essential to integrate and reap optimum benefits in order to accelerate growth and ROI for your online business. Greytrix after carefully analyzing the challenges of eCommerce developed GUMU™ Integration for Magento with Sage 300 / Sage X3. The solution offers bi-directional data integration of your web store with Sage 300 for entities like products/customers/orders and payment information. This results in data accuracy throughout entities thereby eliminating human intervention. Automatic updating of new orders in Sage 300 system on order placement in the online store in turn giving an exact level of inventories. Apart from these benefits, Greytrix also offers services in B2B Commerce, B2C Commerce, & Mobile Commerce. We also assist in building a responsive online webstore by web designing using Magento, expertise in secured payment through Payment Gateway integration and exploit the features of Magento for efficiently enhancing the website’s searchability utilizing SEO functionality.

Change Customer Number on Sales order after posting

$
0
0

The Sales Order is a confirmation document sent to the customers before delivering the goods or services. Sales Order can be created once the quote is accepted by your prospective customer.

New Stuff: – Migrate Customer Optional Fields from QuickBooks to Sage 300 ERP

Sales order is generated against a customer and in Sage 300 user cannot change customer number once sales order gets posted. But now it is possible to change customer number of sales order even after posting the order.

We have developed a custom application through which user can change/replace old customer number with new customer number for any particular sales order, since many of the customer’s orders will start under one customer but then it switch to another customer.  For example, a customer comes in to choose tiles and place the order, but then their building contractor comes in and completes the order and pays for it. To reduce this rigidness we have provided application to change customer number on order entry.

Let’s have walk-through of the functionality of our application:-

Go to Sales order form -> Create one quote or Order.

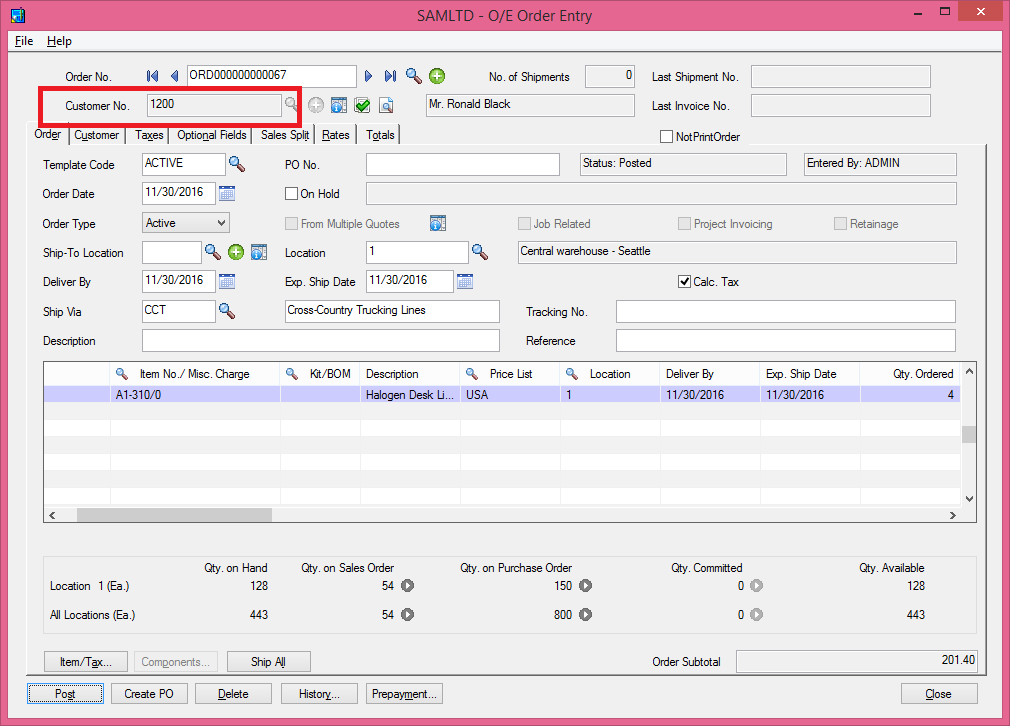
Order entry with customer number

You can see in above screen shot the customer no is 1200. User can change this customer number using our application.

Customer number change utility

Now here selected sales order value is ‘ORD000000000067’ and New Customer value is ‘1105’ after processing this customer of order ‘ORD000000000067’ will get change from ‘1200’ to ‘1105’.

Order Entry after customer number change

User can use this application for all Active orders and quotes to change/replace old customer number with new customer number.

Also Read:-


Business Registration Number in Sage 300

$
0
0

From Sage 300 v2014 onwards new features and various enhancements has been added on existing Sage 300 screens. In this blog we are going to discuss about the new field included on A/P Vendor screen and Company profile screen i.e. “Business Reg. No.”.

Business Registration Number is basically the business number which generally compromises of the information about the company’s business and the tax account to which it refers. The company can record its customers companies “Business Registration Number” using this additional text field provided.

New Stuff: New way of post AP, AR, GL, Bank batches in Sage 300 ERP 2016

In order to access the screen navigates to “Accounts Payable”  -> A/P Vendors ->Vendors ->Address tab.

Kindly refer the below screenshot for the same.

Vendor form

The “Business Reg. No.” filed value will be printed on the report for “Vendors” if it is printed with “Profile” option checked.

To Navigate to report kindly follow Accounts Payable -> A/P Vendors Reports -> Vendors.

Report screen

The value of the Business Registration Number will be printed as displayed in the below screenshot:

Vendor report

In order to access the Company profile screen navigates to “Common Services”  -> Company Profile  -> Address Tab.

Company Profile

This number is required for tax purposes in some of the countries such as Malaysia and Singapore. The business which includes the sales of the taxable services or the tangible properties is required to register for paying or filing various taxes (Corporate or others).

 Note:

  • In sage 300 this field can take alpha-numeric value up to 30 characters and can be specified / edited by the user any time.

Also read:

  1. Migrate AP Credit Note from QuickBooks to Sage 300 ERP
  2. Migrate Customer Ship to Address from QuickBooks to Sage 300 ERP
  3. Migrate Customers Terms Code from Sage 100 ERP to Sage 300 ERP
  4. Migrate AR Customer Optional Fields from Sage 50 US to Sage 300 ERP
  5. Clear History screen in Tax services of Sage 300 ERP 2016

Adding new note to I/C Module

$
0
0

In our earlier blog we had discussed about the new feature introduced in Sage 300 version 2017 i.e. Notes.

Going further, in this blog we will discuss about how we can add notes to Inventory Control Module.

New Stuff: Migrating Open Sales Order from Sage 50 CAD to Sage 300 ERP

1. On the Sage 300 desktop toolbar, click Notes.

Menu bar

2.  On the Notes screen, click Create New.

If a particular Inventory item is specified in the fields at the top of the Notes screen, the new note is assigned to that record by default.

Notes screen

3. On the Create Note screen, enter details for the note.

Enter note content in the text editor, and also enter information in the following fields:

  • Edit NoteNote for Item Number. Specify the Inventory item that the note is for.
  • A note can be assigned to only one record: here it is assigned to an inventory item.
  • Active on Specific Dates. Select this option to make the note active during a specific period of time. After you select this option, specify the dates when the note will be active in the Active From and Active To fields.
  • Cannot be Dismissed. This option is selected by default. Clear this option if you want users to be able to dismiss the note.
  • If a user dismisses a note, that user will not see the note again unless they open the Notes screen and restore the note by clicking Restore.

4. Click Save

So while navigating the particular Item its assigned note will gets displayed.

I/C Item

Also Read:

  1. Deleting Inactive records in Inventory Control
  2. Inventory Locations in Sage 300
  3. Accounting Effect On Inventory Control
  4. Warn for Non Inventory Item Option in PO in Sage 300 ERP
  5. Allow Non Inventory Item Option in PO

Migrate Tax from Sage 100 (MAS90) to Sage 300 ERP

$
0
0

GUMU™ for Sage 100 (MAS90) to Sage 300 ERP is a Sage certified Migration solution. Greytrix is a pioneer in providing Migration services at its Sage Migration Center and catering end-user business requirements. We at Greytrix are focused to help the end –user in successfully implementing the new Sage 300 ERP system through our various successful migration and integration solutions.

We provide data Migration Services from Sage 100 (formerly known as Sage MAS90) to Sage 300 ERP (formerly known as Sage Accpac) at our Sage Migration Center. Our GUMU™ migration utility is compatible to convert all Master and Open transactions for Sales, Purchase and GL historical data from Sage 100 (MAS90) to Sage 300 ERP.

New Stuff:
 Migrate data from Sage 100 to Sage 300 ERP with GUMU Solution

Now, we will discuss about migrating Tax masters from Sage 100 (MAS90) to Sage 300 ERP in our ERP Migration services. Let’s have a quick look on the Sage 100 Tax screen.

Sage 100 Sales Tax Code Maintenance

Sage 100 Sales Tax Schedule Maintenance

After data migration from Sage 100 (MAS90), the field values of Sage 100 Tax masters gets converted.

Here is the converted Tax field from Sage 100 (MAS90) to sage 300. Kindly refer the below screenshot from below path:  Navigate to common Services -> Tax Services.

Sage 300 Tax Authorities

Sage 300 Tax classes

Sage 300 Tax Rates

Sage 300 Tax Groups

In this way, Sage 100 (MAS90) taxes is migrated into target Sage 300 ERP company database.

About Us:
Greytrix is one stop solution provider for Sage ERP and Sage CRM needs. We provide complete end-to-end assistance for your technical consultations, product customization, data migration, system integrations, third party add-on development and implementation expertise.

Greytrix helps in migrating to Sage 100, Sage 300 and Sage ERP X3 from Sage Pro, Sage 50 USSage 50 CA, Sage 50 Usage Business Works, Sage Business Vision, QuickBooks and MS Dynamics Great Plains.

For more information on migration solutions, please contact us at erpmig@greytrix.com. We will be glad to assist you.

Also Read:

  1. Migrate GL Accounts from Sage 100 (MAS90) to Sage 300 ERP
  2. Migrate GL Accounts Transactions from Sage 100 (MAS90) to Sage 300 ERP
  3. Migrate Banks from Sage 100 to Sage 300 ERP
  4. Migrate Vendors from Sage 100 ERP to Sage 300 ERP


Migrating Customer Ship to Address from Sage Pro to Sage 300

$
0
0

GUMU™ for Sage Pro to Sage 300 ERP is a Sage certified Migration solution. Greytrix is a pioneer in providing migration services at its Sage Migration Centre and catering end-users business requirements.Data migration is always a challenging task to perform. We migrate data with the help of our Sage certified migration utility in accordance to our well defined migration process.

In this blog we will discuss about how GUMU™ migrates Customer Ship to Address from Sage Pro to Sage 300 ERP (Formerly known as Accpac).

New StuffMigrate Customer Memos (Notes) from Sage Pro ERP to Sage 300 ERP

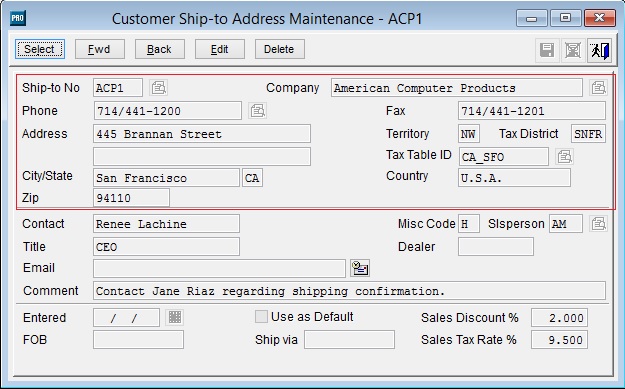
In the below screenshot you can see the Customer Ship to Address of Sage Pro. To view the Customer Ship to Address of Sage Pro follow the below mentioned path:

Open Sage Pro => Select Application ‘AR’ => Select any company => click Maintain => click on customers => select a customer

Customer Ship to address Sage pro

Change the drop down from ‘Customer’ to ‘Ship to’ and the below pop- up appears:

Sage Pro customer ship to address finder

Click on finder as highlighted, you will get the list of ship to address of the particular customer as given in below screenshot:

ship to address list  Sage Pro

Double click on an address:

Ship to address Sage Pro

After the conversion, the data is converted as below in Sage 300 ERP

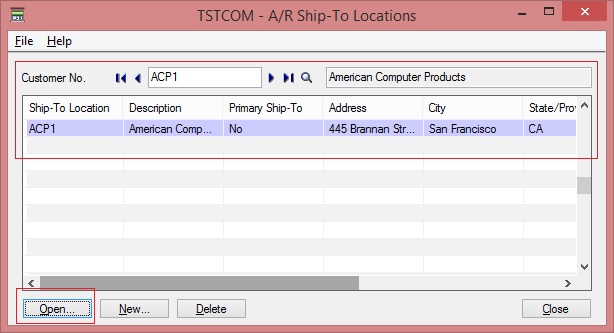
You can view Customer Ship to Address in Sage 300 from the following path

A/R Customers -> Ship-to-Locations ->Click on finder as shown in the below screenshot -> Select a customer-> Click open

ship to location sage 300


ship to location sage 300

In this way, Sage Pro Customer Ship to addresses are migrated into target Sage 300 ERP company database.

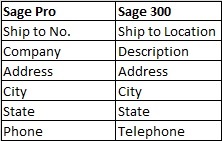
See below for field mapping:

Field Mapping

For more information on ERP data migration, drop us a mail at erpmig@greytrix.com 

About Us:

Greytrix is one stop solution provider for Sage ERP and Sage CRM needs. We provide complete end-to-end assistance for your technical consultations, product customizations, data migration, system integrations, third party add-on development and implementation expertise.

Greytrix helps in migrating to Sage 100, Sage 300 and Sage ERP X3 from Sage ProSage 50 USSage 50 CAD, Sage BusinessWorks, Sage Business Vision, QuickBooks and MS Dynamics Great Plains.


Also Read:

  1. Migrate Customers from Sage PRO to Sage 300
  2. Change Customer Number on Sales order after posting
  3. Migrate vendor custom Fields from Sage 50 CAD (Simply Accounting) to sage 300
  4. Migrate Item Vendor from Sage 50 CAD (Simply Accounting) to Sage 300 ERP
  5. Migrate Item Vendor from QuickBooks to Sage 300 ERP

From Customization to Competitiveness: Greytrix Sage 300 ERP Development Services assists in growth of mid-sized business

$
0
0

Mid-sized businesses have an appetite for growth, contributing upto 33% of GDP to the global economy. However, with the effects of advancing global competition, mid-sized companies are squeezed by growing inflexibility in managing its accounts, struggling with inventory management, inaccessibility of real-time view of customer data, thereby disrupting customer services. To free these enterprises from such operational bottlenecks – Greytrix leading Sage Gold Development partner, provides SDK for custom advancements in Sage 300.

sage 300 development sevices

Today, Greytrix has an expertise of working for 19 years in the industry, servicing small, mid-sized and large enterprises. Greytrix has team of experienced and certified techno-functional Consultants with knowledge of Sage 300 SDK, SDATA, Sage 300 C and Macros. Greytrix offers high quality, quick turnaround and cost effective development services, addressing your complex business challenges and create value through sustainable innovation.

Greytrix Sage 300 ERP Development services extends across are:

  • Development of Customized Reports:

The standard business management systems lack vital features for reporting, preventing proper maintenance of business intelligence and analytics. Greytrix with Sage 300 ERP Development Services, provides an ease in reporting for your organizations by generating detailed crystal reports from a wide range of data sources in Sage 300.

  • Interface Enhancements:

This includes additional functionality, develop new screens and develop existing UI with Sage 300 ERP SDK. 

  • Integration with Third party solutions:

Greytrix optimizes Sage 300 ERP by offering integration solution with Salesforce, Sage CRM and eCommerce Magento.

  • Comprehensive Customizations:

With an experienced team having a proficient functional knowledge of Sage 300 SDK, .Net, SDATA, Sage 300 C, respective SDK objects, Greytrix develops comprehensive customizations, creates new modules for your industry specific requirements and also work on screen modifications for Sage 300.

  • Customized Add-ons Development:

Greytrix has gained expertize in development of 15+ Add-ons for your industry specific requirements such as GreyMatrix Add-on for the apparel industry, Document Attachment Add-on for paperless documentation, Document Numbering Add-on for managing multiple documents and multiple transactions, Magento which is used as POS in retail industry and many more.

  • Techno-functional Support:

Greytrix offers techno-functional support and maintenance for both on-site and off-site offerings on a monthly/annual basis, and can also help you with the customizations as per industry specific requirements.

Our offerings will benefit mid-sized businesses with: 

  • Improved customer experience to win new customers that will help you tap better opportunities.

  • Delivery of specific services in the shortest turnaround time.

  • Providing better agility and productivity with enhanced customizations.

  • Extend our services into any department or industry eliminating risk and moving your business forward faster.

  • Better forecasting with accurate reports.

  • Improve every aspect of your business all in one single place.

Greytrix offers your business the flexibility to choose from our extensive set of engagement models with Fixed Time / Fixed Cost, based on time and material. We ensure the right framework for the engagement of business models based on your specific business needs and long term strategies.

Read our Sage 300 blogs  | Watch Sage 300 Product Videos

To know more about Greytrix Sage 300 ERP Development Services, write to us at accpac@greytrix.com

Sage 300 – Common Services – Option to Allow Non-Existent G/L Account.

$
0
0

It is might possible that while making transaction entry user may come to know that the ledger or G/L account to be hit as effect of transaction is not exist in Sage 300 G/L Account’s master.  In many organizations certain process will be followed to create a G/L account which involves proper authorization levels and approvals from the accounts heads. In such case if the system does not allow the non-existent G/L account to be referred in the transaction then it will cause the delays in further processing, reporting or invoicing and can create unnecessary delays in bank transactions documentations , document filings etc.

Sage 300 provides the option to set the action to be taken if any non-existing G/L account is referred on finance transactions as well bank services entries.

New Stuff: Pros and Cons of Single vs Multiple Databases in Sage 300

In order to access the screen, navigates to “Common Services” -> Company Profile -> Options Tab.Kindly refer the below screenshot for the same:

NonExistentGLAcct1

As per the above screenshot user can set one of the three below mentioned values provided for this option.  Please find the detailed description for each of them.

  1. None: If user specifies this option then Sage 300 will not display any message when user enters any Non-Existent G/L Account in transaction entry and allow user to save the record.
  2. Warning: If user specifies this option then Sage 300 will display the warning message when user enters any Non-Existent G/L Account in transaction entry and allow user to save the record.
  3. Error: If user specifies this option then Sage 300 will display the Error message when user enters any Non-Existent G/L Account in transaction entry and system will not allow user to save the record.

Below screenshot will illustrate the different behavior on selecting each of this value for “Non-Existent G/L Account”.

1. With None: If we input “TEMPACCTID” as Revenue Account and user tabbed over the field then it will not display any error and also allows saving the entry.

NonExistentAccount4

2. With Warning: If we input “TEMPACCTID” as Revenue Account and if user tabbed over the field then it will display Warning alert and allows saving the entry.

NonExistentGLAcct

3. With Error: If we input “NONEXISTENT” as Revenue Account and if user tabbed over the field then it will display error message and does not allows saving the entry as well invalid revenue account value in that field.

NonExistentGLAcct

Note: The value for this option can be changed any time. If value is change from “None” or “Warning” to “Error” then it will affect only new records which user will create after change in the value for this option. It will not display any error for the entries which are already exist.

Also read:

  1. Restrict Posting to Inactive G/L Account through Sub-Ledger
  2. Accounts Receivable Batch Status Report
  3. Dates and Entered By field’s on G/L Journal Entry in Sage 300 ERP 2016
  4. G/L Integration in A/P module with options for creating G/L transaction by (Creating and Posting a New Batch)
  5. Account Receivable – Creating Summary Invoice in Sage 300

Earned Discount Transaction Type and How to set it

$
0
0

An earned discount is a discount you give to a customer who pays on or before the discount date or within the discount grace period. For example, a customer may earn a 2% discount off the original invoice if payment is received within 10 days. The earned discount period is determined by the invoice date, apply date of the receipt, and any discount grace days.

New Stuff: – From Customization to Competitiveness: Greytrix Sage 300 ERP Development Services assists in growth of mid-sized business

In Sage 300 Earned discount transaction is a type of AR Receipt Batch. Earned discount is getting reflect in A/R Aged Trial Balance report. To set Earned discount follow below steps:-

Go to AR Invoice batch -> Create Invoice with type summary -> Add Amount for invoice.

Create AR Invoice

You can see in above screen shot new batch number 59 is created with invoice number IN00000000000000000034

After generating invoice user need to post this invoice entry from AR Invoice batch list to reflect in AR Receipt entry.

AR Invoice Batchlist

After posting batch the status of batch will get changes to posted from Open.

To add discount GO to AR receipt entry form -> Generate new batch ->Select transaction Type as a receipt -> Select customer number -> untick check box naming as Select Mode -> Select Invoice number in detail line document number -> Applied Discount taken value -> save this Receipt entry form.

AR Receipt Entry

You can see here we have added 250.00 as a Discount amount this discount amount will get reflect as an Earned discount in Aging report against that invoice.

Once user saved this receipt entry system will generate Document number and Check/Receipt No. see below screen shot.

AR Receipt Entry

Value of earned discount will get reflect in Aged trial balance report only after posting Receipt Entry.

Post this created Receipt entry through Receipt Batch List form.

AR Receipt Batchlist

To print Aged Trial balance report you need to follow below steps.

Go to AR Module -> AR Transaction Report -> Aged Trial Balance Report.

Open Aged Trial Balance report -> Select report type as “Aged Trial Balance By Document Date” or “Aged Trial balance By Due date” -> Select Age As Of date and Cut-off date -> Select all transaction type which are display in Select Transaction Type Section -> Select Applied Details and Fully Paid Transaction options -> Select from date -> Click on Print.

AR Aged Trial Balance Report

Aged trial balance report will get generated and discount which we applied in Receipt Entry against Invoice IN00000000000000000034 will be display as Earned discount with payment entry PY00000000000000000090.

AR Aging Report

This is how Earned discount is used in AR receipt entry against the AR Invoice.

Also Read:-


Sage 300 provision to set Business Registration Number for A/R Customer

$
0
0

The Sage 300 v2014 and above has provided new features and various enhancements to existing Sage 300 screens. In this blog we are going to discuss about the new field included on A/R Customer screen i.e. “Business Reg. No.”.

Business Registration Number is basically the business number which generally compromises of the information about the company’s business and the tax account to which it refers. The company can record its customers companies “Business Registration Number” using this additional text field provided.

New Stuff: New way of post AP, AR, GL, Bank batches in Sage 300 ERP 2016

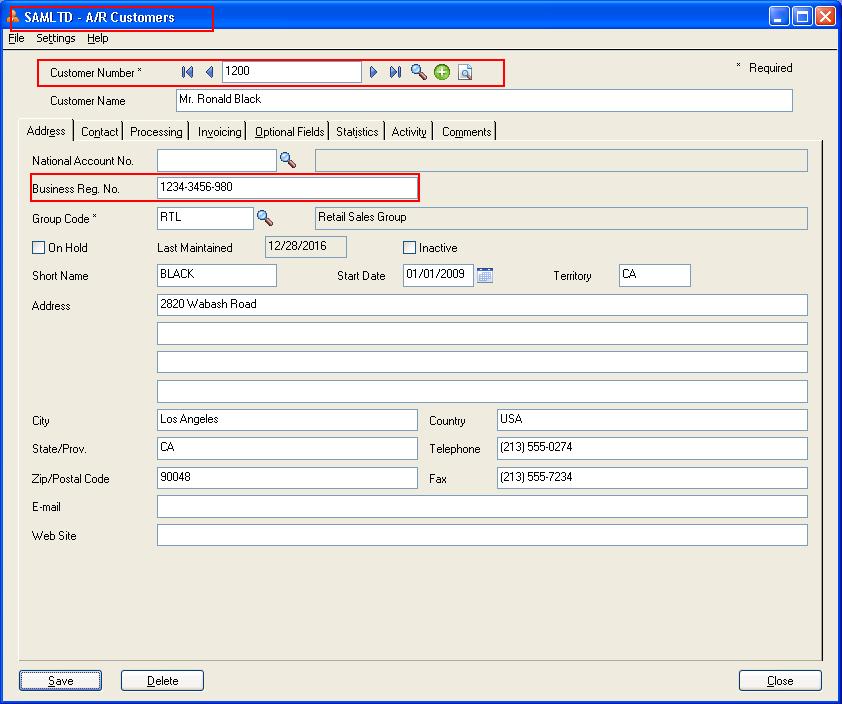
In order to access the screen navigates to “Accounts Receivable”  -> A/R Customers -> Customers -> Address tab.

Kindly refer the below screenshot for the same.

Business registration number

This number is required for tax purposes in some of the countries such as Malaysia and Singapore. The business which includes the sales of the taxable services or the tangible properties is required to register for paying or filing various taxes (Corporate or others).

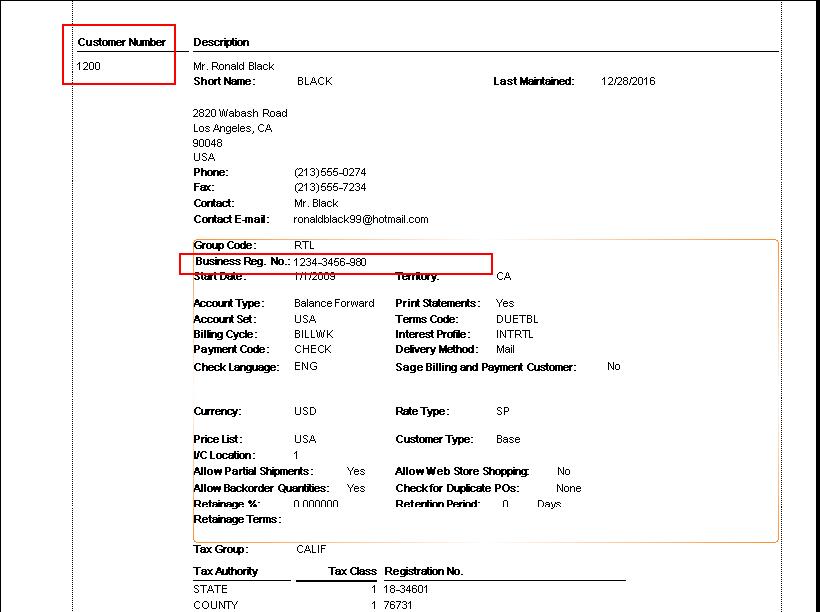
The “Business Reg. No.” filed value will be printed on the report for “customer” if it is printed with “Profile” option checked.

To Navigate to report kindly follow Accounts Receivable -> A/R Customer Reports -> Customers.

AR Customer Report

The value of the Business Registration Number will be printed as displayed in the below screenshot:

Report

Note:

  • In sage 300 this field can take alpha-numeric value up to 30 characters and can be specified / edited by the user any time.

Also read:

  1. A/R Customer List Screen
  2. Migrate Customer Optional Fields from QuickBooks to Sage 300 ERP
  3. Migrate Customer Ship to Address from QuickBooks to Sage 300 ERP
  4. Migrate Customers Terms Code from Sage 100 ERP to Sage 300 ERP
  5. Migrate AR Customer Optional Fields from Sage 50 US to Sage 300 ERP

XAPI Session from Web Service in Sage 300 ERP

$
0
0

XAPI Session is used to connect the Sage 300 ERP from third party application. The session is used to achieve the customizations in the standard Sage 300 ERP product for all the desktop versions. The customization in Sage 300 ERP can also be achieved by creating the web services.

New Stuff: Migrating Customer Ship to Address from Sage Pro to Sage 300

When user uses web service to access Sage 300 ERP and service is created using C# language, the user may come across the issue to open the session.

Error: Error HRESULT E_FAIL has been returned from a call to a COM component.

Hresult Error

There are certain cases when every details passes to open the session is passed correctly and still user comes across the above error. Uses needs to make sure that the Sage 300 ERP is installed on the system where the web service is deployed with Maximum XAPI users greater than zero.

Since, XAPI Session uses the IAP users from the local system where the web service is deployed, if the Sage 300 ERP is installed on the system but the Sage 300 instance with IAP users in not available then user will face the same issue.

XAPI License

So, the user must verify that the Sage 300 ERP is installed with IAP Users on the system where web service is deployed.

Also Read:

  1. GET XML FORMAT DATA FROM WEB SERVICE RESPONSE WITHOUT EXPORTING FILE FOR SAGE 300 ERP
  2. Notes in Sage 300 2017
  3. IAP User login failure using Windows Authentication Method
  4. LanPak License getting used to create a XAPI Session
  5. Manage LANPAK in Sage 300 ERP 2014

Create one report that has the ability to run for multiple companies without any additional setup

$
0
0

To create a report which works with any Sage 300 Company database, Crystal Reports needs a method to determine the path of the data needed in the report. Fortunately, Sage 300 automatically passes this information to the report if 3 parameters are added to the report. These parameters are CMPNAME, PATH and EXT. The parameters must be in uppercase and spelled exactly the same. To add parameters:

New Stuff: – XAPI Session from Web Service in Sage 300 ERP

1. Click the View pull down menu and select “field Explorer.”

Crystal report - Field explorer

2. Expand the section titled “Parameters.” Click on “New” Icon.

Parameter field add

3. Type in the parameter name “CMPNAME”. Make sure the type is a string, and a discrete value is checked. Click “OK”

Create new parameter

4. Repeat for the remaining parameters “PATH” and “EXT”.

Create new parameter with name path

Create parameter with FXT Name

5. Save the report.

6. Open Sage 300 and select a folder (either existing or new custom folder), right click and select “new report”.

New Report

7. Enter a name for the report and then browse the path of the report. Click “OK.”

report setup run

Set Path to save crystal report setup

8. Double click the newly created icon to open the report.

Generated report with some text

9. Print the same report from another company.

Report with text

Also Read:
1. Export Crystal Report in Multiple Formats
2. Date wise IC stock Transaction Report
3. How to run a Sage Intelligence report
4. How to modify standard Reports in Sage Intelligence
5. User Authorization Report in Sage 300 ERP

Additional Copy functionality on BOM

$
0
0

A BOM (bill of materials) is a list of raw items, sub-assemblies, intermediate assemblies, sub-components, components, parts and the quantities of each needed to manufacture a finished product. Sage 300 ERP offers multi-level BOM, increasing the complexity of the BOM. Sage 300 also offers the Copy BOM feature. But besides this there is a limitation to sage 300 copy BOM which is as follows.

  • Limitation of the Sage 300 COPY BOM Feature.
  • To use the Items/Components you have to first create the items in the Item master.

So lots of time is spending on creating new item from Item master and using this newly created item to create BOM from copy BOM screen. So in order to speed up the process of Copying BOM, Greytrix introduces “Additional Copy functionality on BOM”.

New Stuff: – Create one report that has the ability to run for multiple companies without any additional setup

Below is the process of Additional Copy functionality on BOM (BOM) utility for creating New Bill of Material (BOM) items.

1. Additional Copy functionality on BOM (BOM) utility is basically the customized screen of Sage 300 Copy BOM screen.

2. User needs to just do the entry for new Item code along with its description, base price, markup and Margin% in customized copy BOM screen which is shown in below screenshot.

BOM Copy

3. New item will get created in the Item master screen if the item entered in the “Copy to Item” is not present in Sage 300 ERP. Once the item gets created the components of the existing BOM from the screen will be copied to this newly created Item which will be the new BOM item.

4. Price list will be set automatically with new base price and unit cost.

Using this customized screen user can create new BOM in Sage 300 ERP with same BOM Components, by skipping the pre-requisite steps of creating the new item from item master and saves a lots of user’s time.

This is the ready to deliver module which is compatible till sage 300 version 2016 (6.3) and we also take up enhancements for the same as we know the fact that no two organizations use same business logic even if working in same area of interest.

For more information on this component you can drop us an email at accpac@greytrix.com

Also Read:-

Migrate Item Product Line from Sage Pro to Sage 300 ERP

$
0
0

GUMU™ for Sage PRO ERP to Sage 300 ERP is a Sage certified Migration solution. Greytrix is a pioneer in providing Migration services at its Sage Migration Centre and catering end-users business requirements.

We at Greytrix help the end – user in implementing new Sage 300 ERP system through our various successful migration and integration solutions.

New Stuff: Migrate Items from Sage PRO ERP to Sage 300 ERP

You can see the list of Product line by following the below mentioned path:

Open Sage Pro data ->  IC -> Maintain -> Product Lines.

Sage Pro Product Line Screen

In the below screenshot you can see the product line is assigned to Item masters.

Product Line assigned to Item Master

In the migration process we convert Product Line of Sage Pro data as a category Code in Sage 300 ERP (refer below screenshot).

Sage 300 Category Code Screen

In the below screenshot you can see that the category code is assigned to item master in Sage 300 ERP.

Category code assigned to Item master

In the above mentioned ways the item category code gets converted into Sage 300 ERP.

About Us:
Greytrix is one stop solution provider for Sage ERP and Sage CRM needs. We provide complete end-to-end assistance for your technical consultations, product customizations, data migration, system integrations, third party add-on development and implementation expertise.

Greytrix helps in migrating to Sage 100, Sage 300 and Sage ERP X3 from Sage Pro, Sage 50 US, Sage 50 CA, Sage 50 Usage Business Works, Sage Business Vision, QuickBooks and MS Dynamics Great Plains.

Also Read:
1) Migrating Sage PRO Company Database to Sage 300 ERP using GUMU Migration services
2) Migrating Item Pricing From Sage PRO to Sage 300 ERP
3) Migrate Items from Sage PRO ERP to Sage 300 ERP
4) Migrate Item Masters from QuickBooks to Sage 300 ERP

Viewing all 1475 articles
Browse latest View live


<script src="https://jsc.adskeeper.com/r/s/rssing.com.1596347.js" async> </script>