When you create an automatic payment batch with Accounts Payable, you have to specify a payment selection code for the batch, which contains criteria for selecting vendors and outstanding invoices and generating transactions to pay them.
Use the A/P Payment Selection Codes screen to add payment selection codes. You must create at least one payment selection code if you want Accounts Payable to generate payments for invoices automatically.
You can create as many payment selection codes as you want using the A/P Payment Selection Codes screen. For example, you might have separate selection codes for processing US, Canadian, and Mexican payments.
New Stuff: Inventory Control Reports in Sage 300 ERP
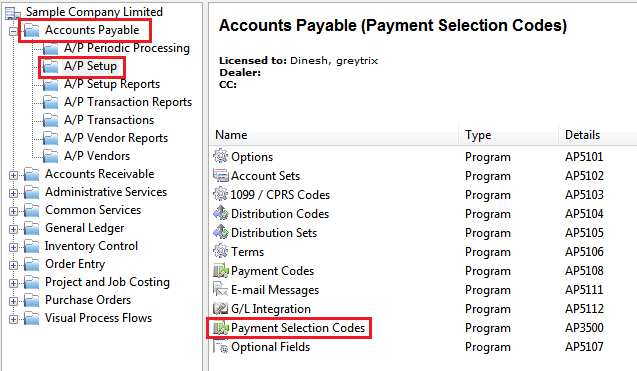
In order to access the screen navigates to Accounts Payable –> A/P Setup –> Payment Selection Codes.
Kindly refer the below screenshot for the same.
![Account payable module list]()
![AP Payment selection code]()
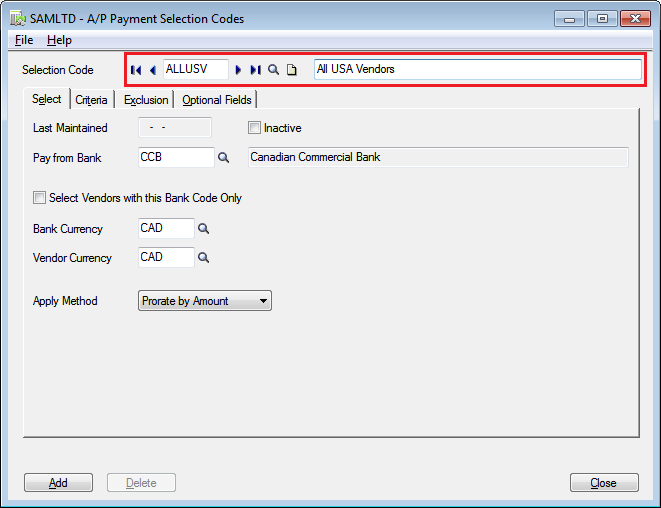
In Selection Code field you can type a six characters code to identify the payment selection criteria.
Press the Tab key, and then type a description for the code in the description field. You can use this code in the Create Payment Batch screen to use the criteria that you are defining.
![Selected AP payment code]()
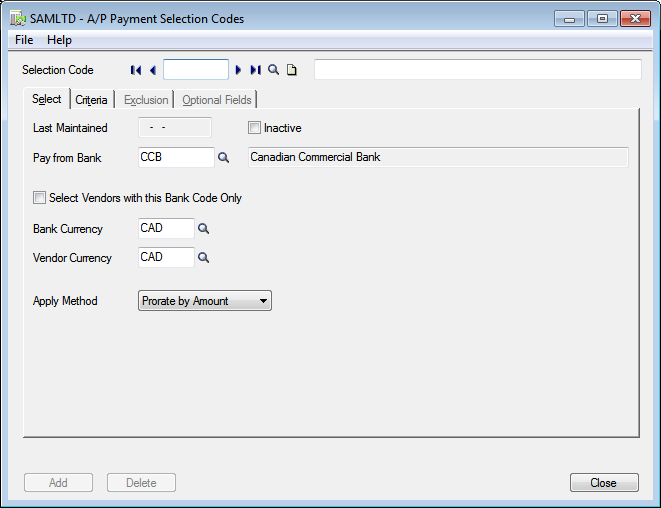
Select Tab: –
Kindly refer the below screenshot for the Select Tab.
Last Maintained: – This field defines the date when you last edited and saved the payment selection code.
Inactive Check Box: – You can set a payment selection code Inactive if we do not want it used by selecting this.
Pay from Bank: – You can select a Bank from this which the checks will be drawn. If you have a multicurrency ledger, make sure the bank supports the currency that you want to use. Use the screens in Bank Services to change bank information.
Select Vendors with this Bank code only: Each vendor is assigned a bank code (on the Processing tab of the Vendors screen), which allows you to pay vendors from particular banks.
If you select this option, Accounts Payable creates payments only for vendors that use the bank code you specify on the Create Payment Batch screen.
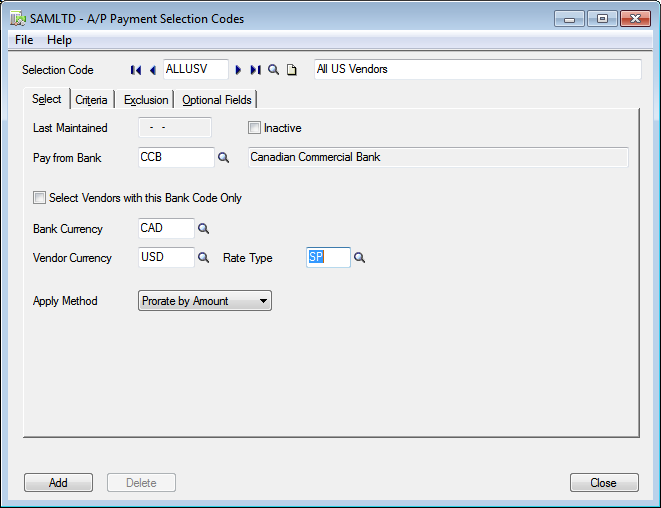
Bank Currency: – By using a finder you can select one bank currency or you must type a valid bank currency code. The bank currency is the payment currency. You can change the currency only to another currency that the bank uses. If you need to add a currency for a bank, you must use the Banks screen in Bank Services to do so. This field appears only if you have a multicurrency ledger.
Vendor Currency: – By using a finder you can select vendor currency or you must type a valid vendor currency code. Accounts Payable restricts payment batches to a single currency. For example, you can pay vendors whose source currency is US dollars, or you can pay vendors whose currency is Canadian dollars, but you cannot pay both sets of vendors in the same system-generated batch. If you are paying vendors manually using the Payment Entry screen, you can mix vendor currencies, although all the payments will be in a single currency. This field appears only if you have a multi currency ledger.
Rate Type: – By using a finder you can select Rate Type or you must type a valid rate type code.Specify the code for the kind of rate you want to use when converting non-functional amounts to functional currency. Examples of rate types might be “spot rate,” “average rate,” and “contract rate.” Rate types are defined using the Currency Rate Types screen in Common Services.
Apply Method: – This filed is used to select a Top Down or Prorate by Amount.
- Top Down: Select this option to apply payments automatically to invoice details, beginning with the first detail on an invoice until the payment is fully applied.
- Prorate By Amount: Select this option to apply payments proportionately to all invoice details.
![Selection Code]()
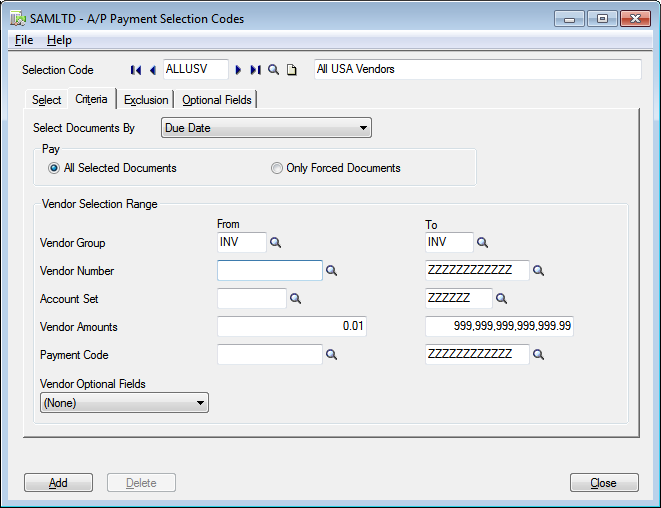
Criteria Tab: – These criteria fields appear automatically when you use the payment selection code on the Create Payment Batch screen. Kindly refer the below screenshot for the Criteria Tab.
Select Document: – Choose whether to pay only transactions that are due on or before a specified date, pay only transactions that have available discounts for early payment, or pay transactions that are due and provide a discount.
Pay:-
- All selected Documents: – Select this option if you want to pay all documents that meet the selection criteria.
- Only forced documents: – Select this option if you want to pay only documents that are marked Forced in the Control.
Vendor Group: – You can specify the range of vendor groups to include in the check run. Put a blank in the from field and the ZZZZZZs in the to field to include all vendor groups. If you have only one vendor group, enter the vendor group code in both fields.
Vendor Number: – You can specify the range of vendor Numbers to include in the check run. Put a blank in the from field and the ZZZZZZs in the to field to include all vendor numbers. If you have to specify only one vendor number, enter the same vendor number in both fields.
Account Set: – You can specify the range of account set to include in the check run. Put a blank in the from field and the ZZZZZZs in the to field to include all account sets. If you have to specify only one account set, enter the same account set code in both fields.
Vendor Amounts: – You can specify the range of amounts you want to pay, or set a range from 0.01 to 999,999,999.99 to pay any amount, regardless of its size.
Payment Code: – You can specify the range of payment codes for which to create checks. Put a blank in the from field and the ZZZZZZs in the to field to include all payment codes. If you have to specify only one payment code, enter the same payment code in both fields.
Vendor Optional Fields:-If you specify an optional field, additional fields appear, letting you specify a range of values for the field. You can also accept the blank from field and the ZZZZZZs in the To field to include all the values for the optional field. If you do not want to use an optional field as criteria, accept none, the default setting for this field.
![AP Selection code criteria]()
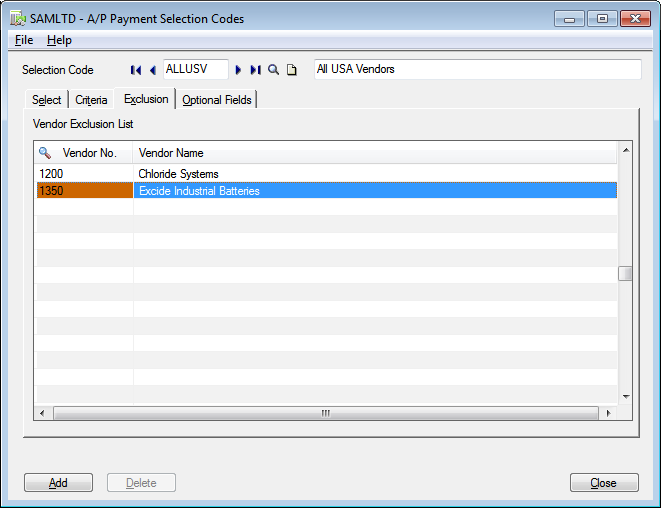
Exclusion Tab: – By using this tab you can exclude additional vendors from the payment batch. These exclusion criteria appear automatically when you use the payment selection code on the Create Payment Batch screen.
Vendor Number and Name: – On the table, type the number of each vendor you want to exclude from the payment batch, or use the Finder to select the number.
![AP payment selection code field tab]()
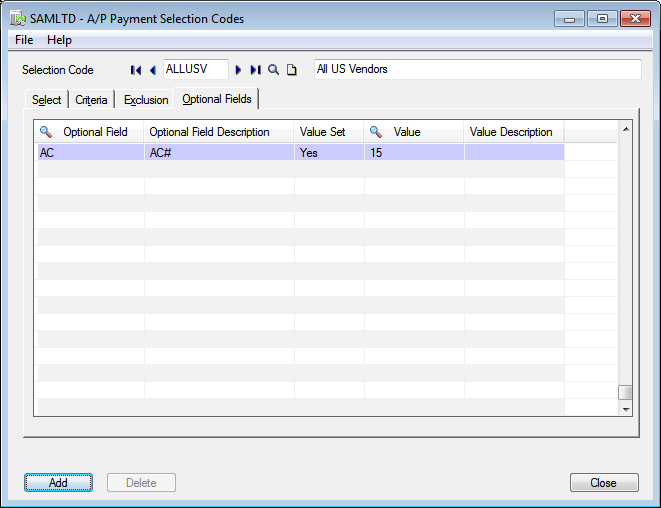
Optional Fields Tab: – The optional fields and values you specify on this tab are used as defaults when you use the payment selection code on the Create Payment Batch screen.
![AP payment selection optional field tab]()
Also read:
- Customized “A/P Payment Batch Creation” screen to generate A/P Payment Batch using Invoice Account set instead of Vendor Account set
- Concept of AP Create Payment Batch
- Creating payment batches in Sage 300 ERP
- Enhanced feature in Account Payable – Post A/P Payment batch from A/P Payment screen itself in Sage 300 2016
- Allow Adjustments in Payment batches


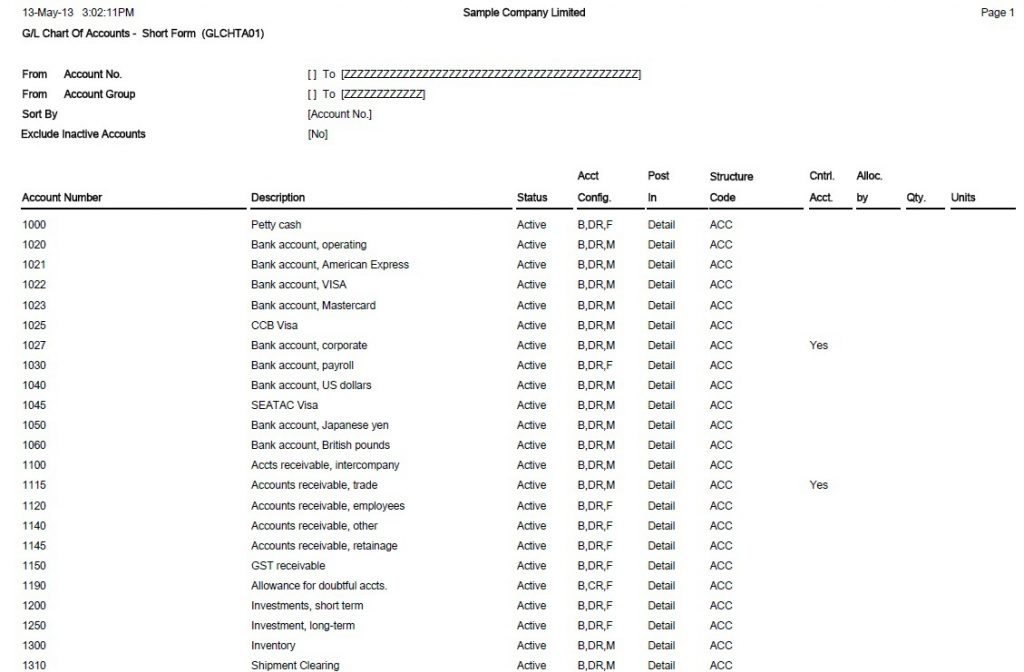
 2. Chart of Account Report: This Report lists all or a range of General Ledger accounts according to the selection criteria and the sort and format criteria. At printing time, we can select accounts by account number, segment, account group, account sorted group, or optional field. Thus to print report navigate to General Ledger->G/L Reports->Chart of Accounts.
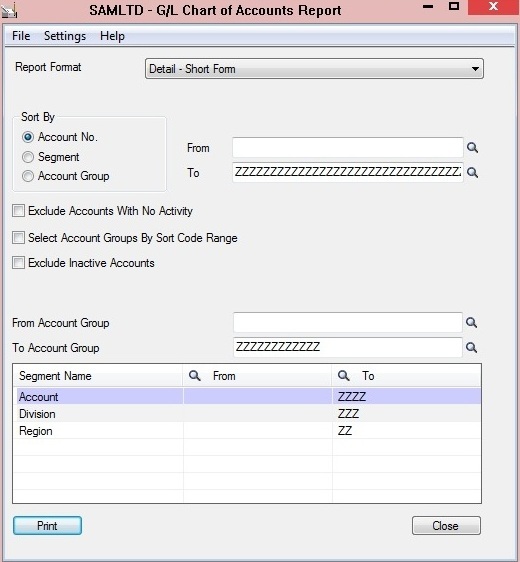
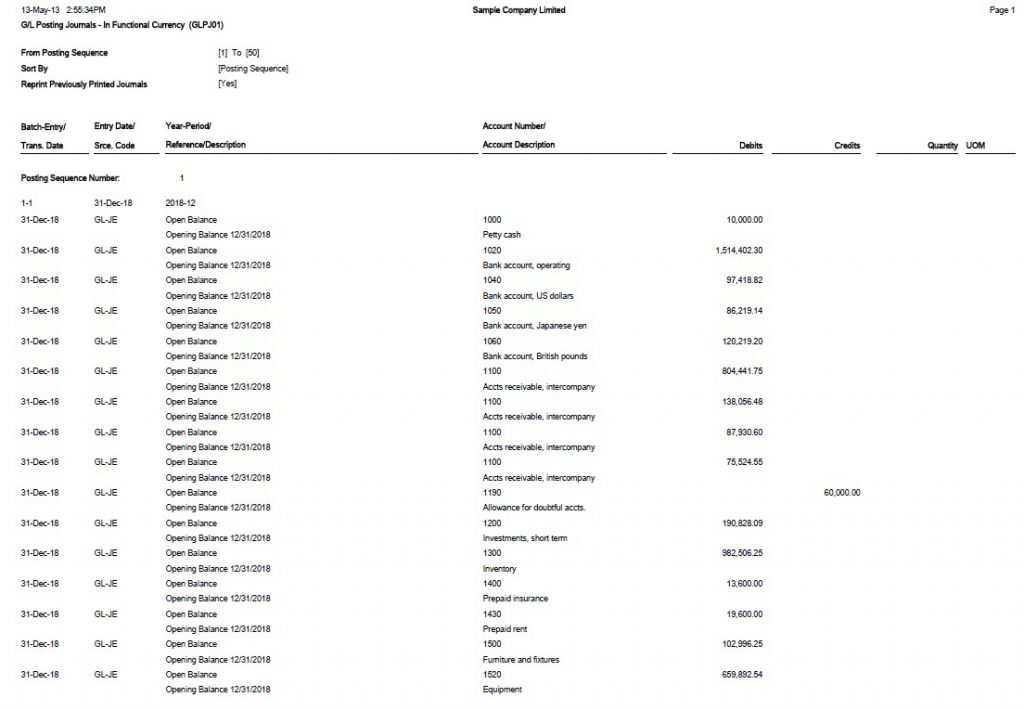
 3. Transaction listing report: This report is used to show net changes, balances and transaction details for accounts in a range of fiscal periods we specify. Thus to print report navigate to General Ledger->G/L Reports->Transactions Listing.
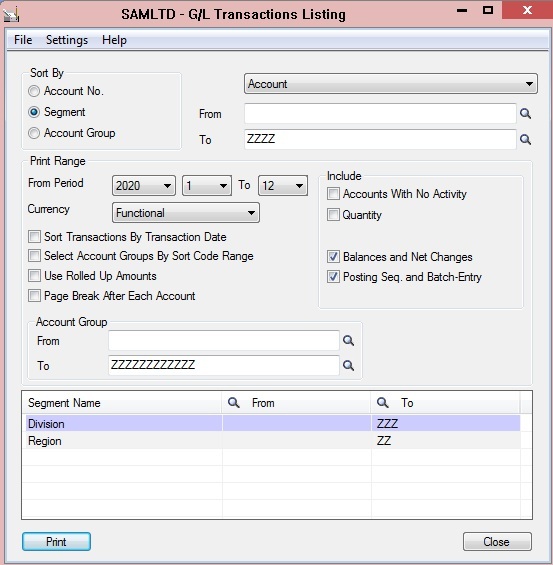


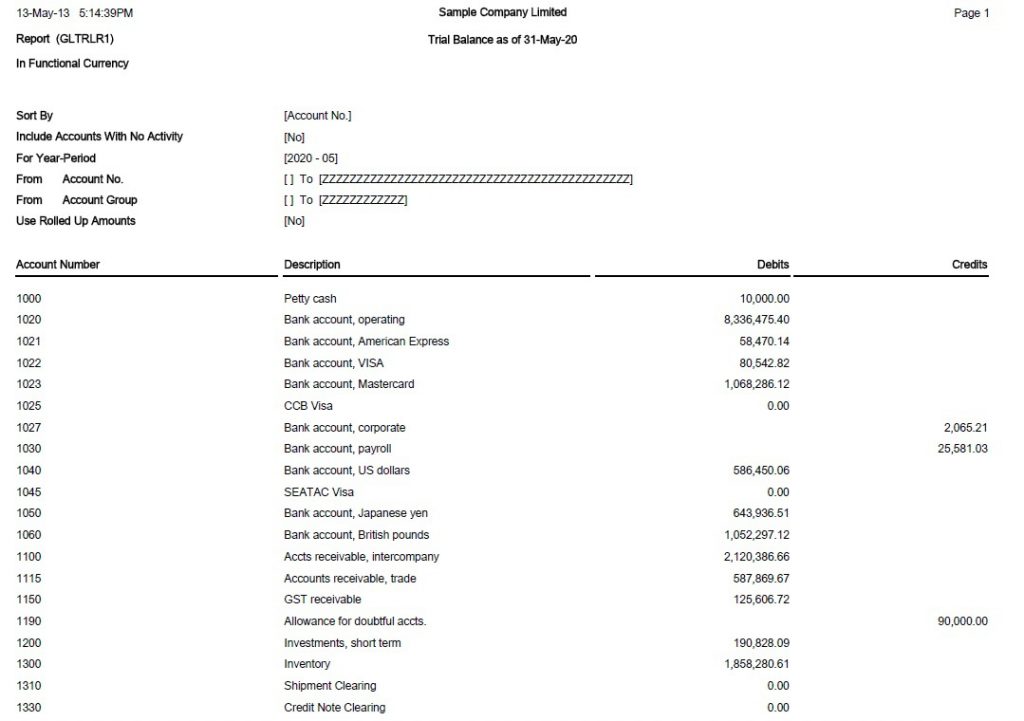
 5. Trial balance Report: This report prints a trial balance report or worksheet that lists selected account balances for a specified fiscal period. This is Printed the end of accounting periods, when we need to calculate adjusting entries.Thus to print report navigate to General Ledger>G/L Reports>Trial Balance.


 2. Inventory Movement Report: It is used to show the quantities and extended costs of inventory items that were received into stock and shipped out of stock during the period that user specify. Users print this report to see the stock activity for certain period. Thus to print report navigate to Inventory Control -> I/C Stock Control Reports -> Inventory Movement.
 3. Stock Transactions Report: Stock Transactions Report lets user to print the inventory changes or status for one or more items from one or more account sets and locations. Users print this report to list transactions that resulted in changes to inventory levels for selected items. Thus to print report navigate to Inventory Control -> I/C Stock Control Reports -> Stock Transactions.
 4. Transfer slips: This report print transfer slips when user post transfers to accompany goods to the receiving location. Users print this report when they are posting stock transfers and want to attach transfer slips to the transfer shipment. Thus to print report navigate to Inventory Control -> I/C Stock Control Reports -> Transfer Slips.


 4. Click on the Protection Tab on the Project properties dialogue box.


