Quantcast
Channel: Sage 300 ERP – Tips, Tricks and Components
Viewing all 1488 articles
Browse latest View live

Improve your Company’s Performance with Sage 300c

$
0
0

Sage 300c is nothing but the cloud version of Sage 300 ERP. If you see that, our all the previous versions of Sage 300 ERP is only the windows base ERP which can access through the desktop by local network. In this newer version first time Sage 300 comes up its web interface which user can easily access through the internet.

Sage 300c is simply the web base business management solution particularly designed for the small & midsized enterprises to manage their financial needs both domestically & internationally. In this version, Sage has provided the enhancement for their customers who can experience all the benefits of modern design & technology.

Sage 300c also provide the integration to automate the workflow of the business regardless of how many business & currency are involved. It provides you the simpler dashboard on your main screen once you logged into the Sage 300c. This dashboard can only holds the six data widgets. You can easily add & eliminate it from the checked off menu. With the help of these dashboards, you can visualize the data from more than one module & you can easily identify the business flow from that single screen only.

Sage 300

With this cloud based software, mobile access is important & should be simple & trouble free. This will provides you the extra level of complexity, but you can easily access the Sage 300c through the browser on your mobile & easily navigate all the screens regardless of time & space.

You can easily keep tracking of all your payment activities in single location. These dashboards shows real time transaction values & with the help of this you can determine how well your operation is performing.

Below are the few benefits of Sage 300c:

  1. Easily optimized management of multi company operation.
  2. Easily track your stock accuracy in real-time.
  3. Efficiently manage your warehouse inventory.
  4. Easily customized the screen as per the end user requirement.
  5. Powerful customer relationship management.
  6. Access reporting of critical data anytime anywhere.


About Us

Greytrix is one stop solution provider for Sage ERP and Sage CRM needs. We provide complete end-to-end assistance for your technical consultations, product customizations, data migration, system integrations, third party add-on development and implementation expertise.

Greytrix have some unique solutions of Sage 300’s integration with Sage CRMSalesforce.com and Magento eCommerce. It also offers best-in-class Sage 300 customization and development services to Sage business partners, end users, and Sage PSG worldwide.

For more details on the component, please contact us at accpac@greytrix.com . We will be glad to assist you.


Migrate QuickBooks Tax Masters to Sage 300 ERP

$
0
0

GUMU™ for QuickBooks to Sage 100 ERP is a Sage certified Migration solution. Greytrix is a pioneer in providing Migration services at its Sage Migration Center and catering end-user business requirements. We at Greytrix are focused to help the end –user in successfully implementing the new Sage 300 ERP system through our various successful migration and integration solutions.

We provide data Migration Services from QuickBooks to Sage 100 ERP at our Sage Migration Center. Our GUMU™ migration utility is compatible to convert all Master and Open transactions along with Sales, Purchase and GL historical data from QuickBooks to Sage 100 ERP.

New Stuff: Migrate GL Accounts from Sage 50 US to Sage 100 ERP

Now, we will discuss about migrating Tax masters from QuickBooks to Sage 100 ERP in our ERP Migration services. Let’s have a quick look on the QB Tax screen.

After data migration from QuickBooks, the field values of QB Tax masters gets converted. Here is the converted Tax field from QB to sage 100. Kindly refer the below screenshot from below path:  Navigate to Library Master -> Setup -> Sales Tax Code Maintenance.


In this way, QB taxes is migrated into target Sage 100 ERP company database. For more information on ERP data migration.

About Us:
Greytrix is one stop solution provider for Sage ERP and Sage CRM needs. We provide complete end-to-end assistance for your technical consultations, product customizations, data migration, system integrations, third party add-on development and implementation expertise.
Greytrix helps in migrating to Sage 100, Sage 300 and Sage ERP X3 from Sage ProSage 50 USSage 50 CA, Sage 50 US sage Business Works, Sage Business Vision, QuickBooks and MS Dynamics Great Plains.

For more information on migration solutions, please contact us at us.sales@greytrix.com. We will be glad to assist you.

Also Read:

Migrating your Sage 50 US (Peachtree) Company Database to Sage 300 ERP using GUMU Migration services
Migrating your Sage 50 US (Peachtree) Company Database to Sage 100 ERP using GUMU Migration services
What do you want to migrate to Sage ERP

Migrate AP Invoice from Sage Pro to Sage 300 ERP

$
0
0

GUMU™ for Sage PRO ERP to Sage 300 ERP is a Sage certified Migration solution. Greytrix is a pioneer in providing Migration services at its Sage Migration Centre and catering end-users business requirements.

We at Greytrix help the end – user in implementing new Sage 300 ERP system through our various successful migration and integration solutions.

In this blog we will discuss about how GUMU TM migrates AP Invoice from Sage PRO ERP to Sage 300 ERP (Formerly known as Accpac).

New Stuff:  Migrate Item Product Line from Sage Pro to Sage 300 ERP

Let’s have a look into Sage Pro Account Payables Invoice screen. We have open the existing invoice ‘4292’ from Sage pro data.

Sage Pro Invoice

In the below screenshot you could see the converted AP invoice entry screen.

Sage 300 AP Invoice Screen

In the below screenshot you could see the details such as Terms Code, Due date, Disc. Date, Disc. Percent and Disc. Amount.

Sage 300 AP Invoice Terms

In the below screenshot you could see the document total.

Sage 300 AP Invoice Total screen

In the above mentioned ways the AP Invoice gets converted into Sage 300 ERP.

About Us:
Greytrix is one stop solution provider for Sage ERP and Sage CRM needs. We provide complete end-to-end assistance for your technical consultations, product customizations, data migration, system integrations, third party add-on development and implementation expertise.

Greytrix helps in migrating to Sage 100, Sage 300 and Sage ERP X3 from Sage Pro, Sage 50 US, Sage 50 CA, Sage 50 Usage Business Works, Sage Business Vision, QuickBooks and MS Dynamics Great Plains.

Also Read:
1) Migrating Sage PRO Company Database to Sage 300 ERP using GUMU Migration services
2) Migrating Item Pricing From Sage PRO to Sage 300 ERP
3) Migrate Items from Sage PRO ERP to Sage 300 ERP
4) Migrate Item Masters from QuickBooks to Sage 300 ERP

Migrate Sage Pro GL Accounts to Sage 300 ERP

$
0
0

GUMU™ for Sage Pro to Sage 300 ERP is a Sage certified Migration solution. Greytrix is a pioneer in providing migration services at its Sage Migration Centre and catering end-users business requirements.

Data migration is always a challenging task to perform. We migrate data with the help of our Sage certified migration utility in accordance to our well defined migration process.

In this blog, we will discuss about how GUMU™ migrates G/L Accounts from Sage Pro to Sage 300 ERP (Formerly known as Accpac).

New StuffMigrate Currencies from Sage Business Vision to Sage 300 ERP

Open Sage Pro –> General Ledger -> Maintain -> Account Maintenance -> you can view an account in the below screenshot.

To view a GL Account in Sage 300(Formerly known as ACCPAC) follow the path given below:
Open Sage 300 -> General Ledger-> GL Accounts -> you can view an account in the below screenshot.

In this way, Sage Pro GL Accounts are migrated into target Sage 300 ERP company database. For more information on ERP data migration, drop us a mail at erpmig@greytrix.com

 About Us:
Greytrix is one stop solution provider for Sage ERP and Sage CRM needs. We provide complete end-to-end assistance for your technical consultations, product customizations, data migration, system integrations, third party add-on development and implementation expertise.

Greytrix helps in migrating to Sage 100, Sage 300 and Sage ERP X3 from Sage ProSage 50 USSage 50 CA, Sage 50 Usage Business Works, Sage Business Vision, QuickBooks and MS Dynamics Great Plains.

Also Read:

  1. Migrate Tax Authorities from Sage Business Vision to Sage 300 ERP
  2. Using the FOB Point in Sage 300 ERP
  3. Migrating Tax Authorities from QuickBooks to Sage 300
  4. Set background color in Sage 500 2016
  5. Migrate Item Vendor from Sage Business Vision to Sage 300 ERP

Migrate Vendors Remit To Locations from Sage 100 to Sage 300 ERP

$
0
0

GUMU™ for Sage 100 to Sage 300 ERP is a Sage certified Migration solution. Greytrix is a pioneer in providing migration services at its Sage Migration Centre and catering end-users business requirements.

Data migration is always a challenging task to perform. We migrate data with the help of our Sage certified migration utility in accordance to our well defined migration process.

In this blog, we will discuss about how GUMU™ migrates vendors remit to locations from Sage 100 to Sage 300 ERP (Formerly known as Accpac).

New StuffMigrate Currencies from Sage Business Vision to Sage 300 ERP

Open Sage 100 –> Accounts Payable -> Vendor Maintenance -> More -> Remit to Address. Please refer below screenshot.

To view a vendor remit to locations in Sage 300(Formerly known as ACCPAC) follow the path given below:

Open Sage 300 -> Accounts Payable -> A/P vendors -> Remit to Locations. Please refer below screenshot.

In this way, Sage 100 vendor remit to locations are migrated into target Sage 300 ERP company database. For more information on ERP data migration, drop us a mail at erpmig@greytrix.com

About Us:
Greytrix is one stop solution provider for Sage ERP and Sage CRM needs. We provide complete end-to-end assistance for your technical consultations, product customizations, data migration, system integrations, third party add-on development and implementation expertise.

Greytrix helps in migrating to Sage 100, Sage 300 and Sage ERP X3 from Sage ProSage 50 USSage 50 CA, Sage 50 Usage Business Works, Sage Business Vision, QuickBooks and MS Dynamics Great Plains.

 Also Read:

  1. Migrate Tax Authorities from Sage Business Vision to Sage 300 ERP
  2. Using the FOB Point in Sage 300 ERP
  3. Migrating Tax Authorities from QuickBooks to Sage 300
  4. Set background color in Sage 500 2016
  5. Migrate Item Vendor from Sage Business Vision to Sage 300 ERP


Migrate Vendor Expense Account from Sage 50 US (Peachtree) to Sage 300 ERP

$
0
0

GUMU™ for Sage 50 US (formally known as Peachtree) to Sage 300 ERP is a Sage certified migration solution. Greytrix is a pioneer in providing Migration services at its Sage Migration Centre and catering end-users business requirements. In this blog you will get to know how GUMU™ migrates Vendor Expense Account from Sage 50 US (Peachtree) ERP to Sage 300 ERP.

New Stuff: Migrate Vendors Remit To Locations from Sage 100 to Sage 300 ERP

You can view Vendor’s Expense Account in Sage 50 US (Peachtree) from the following path,
Sage 50 US (Peachtree) -> Vendors & Purchases -> Vendors -> View or Edit Vendors -> Select any Vendor
In below screen-shot you can view the Expense Account associated with the Vendor in Sage 50 US ERP,

Sage 50 US Vendor Details

Sage 50 US Vendor Details

You can check migrated Vendor’s Expense Account data in Sage 300 ERP as shown below. Path for Sage 300 ERP is,
Sage 300 ERP –> Accounts Payable –> A/P Vendors –> Vendors

Sage 300 Vendor Details

Sage 300 Vendor Details

In this way, Vendor Expense Account from Source Sage 50 US (Peachtree) are migrated into target Sage 300 ERP company database.
Below is the mapping of the converted Vendor’s Expense Account from Sage 50 US to Sage 300 ERP,

Vendor Expense Account Field Mapping

Vendor Expense Account Field Mapping

Hope the above topic provides you sufficient information in comparing the Vendor’s Expense Account records between the two diverse ERP systems.

About Us
Greytrix is one stop solution provider for Sage ERP and Sage CRM needs. We provide complete end-to-end assistance for your technical consultations, product customizations, data migration, system integrations, third party add-on development and implementation expertise.
Greytrix helps in migrating to Sage 100, Sage 300 and Sage ERP X3 from Sage Pro, Sage 50 US, Sage 50 CA, Sage Business Works, Sage Business Vision, QuickBooks and MS Dynamics Great Plains.
For more information on migration solutions, please contact us at erpmig@greytrix.com. We will be glad to assist you.

Also Read:
1) Migrate AP Vendor Optional Fields from Sage 50 US to Sage 300 ERP
2) Migrate Sales Credit Note from Sage 50 US to Sage 300 ERP
3) How to Purge Sage 50 US (Peachtree) Data
4) Migrate Item Location Details from Sage 50 US to Sage 300 ERP
5) How to run the Year-End Wizard in Sage 50 US

Document Number Based On Sales Person For Order Entry

$
0
0

In our previous blog, we have seen the multiple transnational screens where we have used the document numbering function in which we have usually generates the numbering using following numbering method account Set, Location, Account set | Location, Bank Code now in this blog let’s see how to generate the document numbers based on the Sales Parson.

New stuff: Export Sales by Salesperson

Based on sales person option we can generate Document numbering for Order entry screen, and for that we have newly added the sales person option on numbering method field at Document numbering module.

Once we set the numbering method as “Sales Person” as shown in below screen shot, user needs to map the sales persons on this screen to generate number as per Sale person.

Document Mapping

At detail grid, we can select the available salesperson code from its finder which has been created at Order master .

no. mapping with sales no finder

• On Single sales person we can assign structure code and as per that structure code number will get generated as shown in below image
• we can set the multiple sales person code with multiple prefix, structure code for number mapping.

Mapping Screen from multiple sales person

• Once the mapping gets done, we can do the transactions of Order entry of Any type (Active/ standing/Quote/Future).
• On order entry screen, where we will make the order entry transaction and then as per mapping, Document number will get generated as per below image and it will create number based on first sales person code available at sales split tab of order entry screen .

Sales Person Detail At order entry

• As shown below if we want to generate document on sales per code “DS” then we have to set it manually at first position at sale split tab, and have to shift the BB to next to that. Accordingly the number will gets generated for “DS” ( first sale person code) based on Document Mapping mapping.

no. generation based on first sales person code

Also Read:

1. O/E Salesperson Inquiry
2. Setting up Salesperson Commission in Sage 300 ERP
3. Salesperson Alert
4. Troubleshoot: Error while configuring the Sage 300 Web Screens

GL Clearing Module – Import Functionality

$
0
0

In the previous blog about GL clearing – GL Clearing Module for Sage 300 ERP we have learnt that our GL Clearing Module helps users to carry out internal reconciliation of GL Accounts by mapping the Debit and Credit side of the transactions. Reconciling the GL accounts is made easier and saves time by auto process.
We have seen the process how transactions flow into the module and how one can easily map the credit and debit side. There is one more functionality into this module, which helps users to auto map or mass clear the transactions at once instead of manually mapping the detail lines. The import functionality.

New Stuff: Document Number Based On Sales Person For Order Entry

Import functionality allows the users to import an excel file with a specific format consisting required data that is required to map the transactions. An example of the file format is as below:

Here in this excel,
– Batchnbr column contains the combination of GL Batch and Entry Number.
– Transnbr column refers to the detail line number of an entry.
– Dtransamt column refers to the debit amounts
– Ctransamt column refers to credit amount.
You may find all the required columns into an excel file consisting imported data from a GL batch detail entry.
To import this file, user may simply select the Excel file by browsing into the directory. Once the user clicks OK command, the transactions will get mass mapping done automatically based on the data in the excel file. This will auto reflect in the debit and the credit columns available on the screen and will set Map Transaction to “Yes”.

The Import functionality will ease the job of mapping the transactions manually one by one and will thus reduce more time required to reconcile the statements.
Also Read:
1. GL Clearing Module for Sage 300 ERP
2. GL Clearing Report in Sage 300 ERP
3. Create GL Batch Option in Sage 300 ERP
4. GL Batch Creation in two databases simultaneously
5. General Ledger (GL) Accounts Distribution in Sage 300 ERP


Easily Search item Option in manufacturing Order detail

$
0
0

Manufacturing Order is used to request a new item or product to be assembled or processed in the production area including its component and operation. The Manufacturing Order transaction window allows the system user to create, edit and closeout manufacturing orders.

In manufacturing screen, the user will be able to insert number of assemble component and operation for Single manufacturing order.

New Stuff :- GL Clearing Module – Import Functionality

Sometimes customer require number of component from single Manufacturing Order once he inserts number of component then How can user Search Specific item from Multiple Component?

Sage 300 provides a solution for making search of specific item form Component easy.

Create Manufacture Order in Sage 300 ERP navigate to Sage 300 >> Manufacture Order >>MF Transaction >> Manufacturing Order Entries and select item Number, Qty, BOM number, Production Area , Component

We will customize the Manufacturing window and we add finder for Search item on the screen, once the user puts the item number, then click on go button and enter item number to be searched.

E.g. suppose User inserts multiple item from Component tab and Require to search 64.08.9017 from component list now user put same item and click on go button our Customization will work and highlighted Particular Item please Refer Below Image:-

Working:-

If there is same item presents multiple times in the Material tab then to search next item user has to click on “GO” button every time.

Also Read:

  1. How to Search on Multiple Fields in Sage 300 ERP
  2. Search and Find Item Option in Transaction UI
  3. Advantages of ERP in Manufacturing Companies
  4. Manufacturing Overhead in Sage 300 ERP
  5. Order Process for Manufacturing Company in Sage 300 ERP

Show component details while creating BOM

$
0
0

What is BOM (Bill of Materials)?”  BOM is nothing but the list of all parts, components including operations, resources, tools etc. to build a product. BOM basically defines all finished goods or semi-finished Goods.

In this blog, we have come up with one easy customization for BOM screen which is available in Manufacturing Module.

New Stuff :- Easily Search item Option in manufacturing Order detail

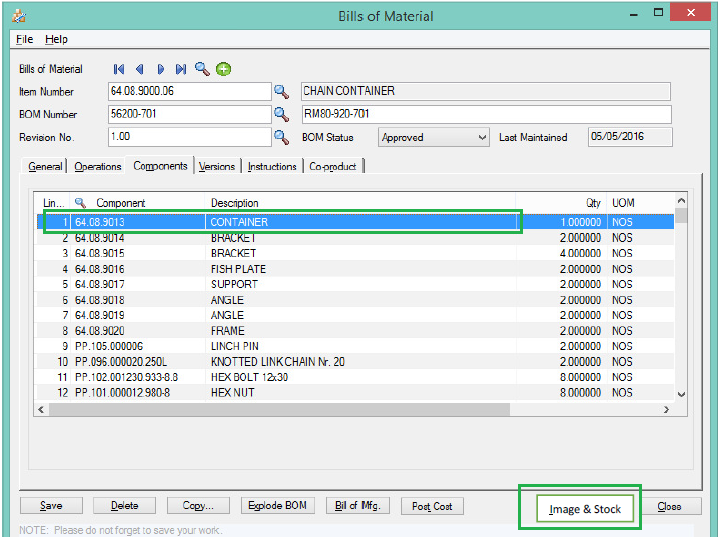
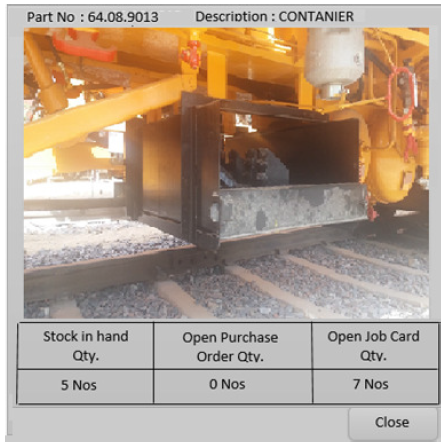
The goal of this customization is to know the detailed information (Available stock with its Image) about the particular component which the user will add at the time of creating BOM. If the user wants to know the available stock with its image at the time of adding one by one components in BOM then the user will only need to click the function key F6 or click the newly added button (Image & Stock). Our customization will populate a new Popup which will show detailed information about the selected component. See the below image for more clarification.

Below is the BOM screen in Manufacturing Module with already added components & newly added button at the bottom of screen (highlighted in green)

Whenever the user needs to know the details about the selected component, he needs to click the button or simply press F6 & then he will get below Popup with details.

With the help of this functionality, the user will know the exact status of added component items & identify the stock status of it. Rather than going to stock details screen, user will get this information easily over here.

Now here, you must have one question about from where we are displaying the image of item?

For this, we have to keep the images of all the items & make sure that the name of image must be item code in sage. And while displaying the image in popup, we will display it from that particular folder only.

Also Read:

  1. Create duplicate copy of Manufacturing BOM in Single Click
  2. BOM Component Usage Enquiry in Sage 300 ERP
  3. BOM and KIT – Understanding the Basic Difference
  4. Generate BOM and Kitting items on the fly from Order Entry screen in Sage 300 ERP
  5. BOM Setup for Manufacturing Company in Sage 300 ERP

New feature at Greymatrix : Generate/Update Item on Range of Style code

$
0
0

In our earlier blog, we have seen the multiple features of the Style maintenance screen, in which we can create the no. of items based on style code, size & color, also we have add some feature related to an item pricing based on multiple currency code, have explain that feature in our recent blogs.

New Stuff: Show component details while creating BOM

There is a situation where we need to add some colors or sizes in the existing styles and have to update this in the given style and can be easy to update the same in the style if there only few styles by just using the Generate update click on the every style one by one. But it would very difficult for the users if he as to update for few hundreds of styles and he has to navigate to every style and update one by one. This consume lots of time of user for updating all the new colors/Sizes in the existing styles. So we are come up with the new screen where user can add or import the new colors\sizes in the existing styles and update them through new screen by selecting particular or range of styles.

Now as shown in below image, previously if we have done some changes to already save style codes on style maintenance screen after that, we usually clicked on generate/update Item button of individually style codes or we have an option to generate /update all the styles together by clicking on Auto Generate item for all style which automatically generate/update the all items of all the style codes together.

1.1 Style Maintenance screen

1.1 Style Maintenance screen

If user want to generate/update only some of the or selected style codes of all the styles, user can select the range of style codes which they need to generate/update together with the new option of Generate Update Range of Style..

1.2 Default Screen of Generate/Update Range of Style code

1.2 Default Screen of Generate/Update Range of Style code

As shown on given screen user can set the style range by entering the style code from its finder at From And To style field. Once it’s done user just have to clicked on the Generate/Update Item Button which automatically generate /update all items of the selected range of style code and give a popup message for each style once successfully generate and update process.

1.3 Generate/Update screen with selected range of Style codes

1.3 Generate/Update screen with selected range of Style codes

Also Read:

1. Migrate Vendor Expense Account from Sage 50 US (Peachtree) to Sage 300 ERP
2. Easily Search item Option in manufacturing Order detail
3. GL Clearing Module – Import Functionality
4. Document Number Based On Sales Person For Order Entry

Item-Wise Consumption Report

$
0
0

Enterprise Resource planning is a business software that integrates and runs all aspect of your business. ERP systems have evolved today to include several new functional application integration like vendor portals, product wise view and functionality, single view of complete supply chain, etc.

New stuff : New feature at Greymatrix : Generate/Update Item on Range of Style code

One of the major components in any ERP software is the reporting system. Sometimes in a standard ERP system, the reports generated will not be give you the exact data which you require. This is where customization come into play. Item-Wise Consumption Report is a customized report which is used to keep track of all the PO Receipts & Internal Usage of Items done & processed day-end successfully.

We have provided this utility to pick the data from Posted IC Internal usages entries and Posted PO receipt entries of Non-stock items only.

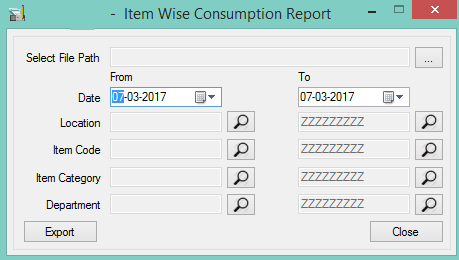
For more clarifications please refer the below screenshot.


We have provided filters for Posting Date, Item, Location, Category, & Department.

Suppose if the user has created an entry e.g.: An Internal Usage Entry in which he inserts data item wise & posts the transaction. After the posting of particular transaction, user cannot open the entry for checking the transaction of Item. This report helps the user to check the details of the respective items, their quantities after the day end process is completed so that the user can get to filter which transactions are processed day end successfully. Same goes with the PO Receipt. The user can find the details of all the items used in PO Receipt item wise after day end processed successfully.

The main motto for this report is to keep track of all the items consumed or used in the system after the day end process of all the transactions & all the details of the items.

Also the user can check the final extended total cost set for the particular item of the PO Receipt & Internal Usage after day end process.

The user can also check the inventory levels used and their quantities to maintain track of quantity used after the day end processed.

The above screenshot refers to the output of the transnational data of the Item Wise Consumption report.

The main purpose of this blog is to keep track of all the Internal Usage & PO Receipt Entries Item Wise whose day end processed have been made successfully.

Also Read

How to Record Internal Usage (Consumed) Entry in Sage 300 ERP

Inventory Cost Analysis in Sage 300 ERP

Automatic insertion of Item Wise Detail Tax


Cash Book Report

$
0
0

Enterprise Resource Planning is an important enterprise application that integrates all the individual department functions into a single software application.

ERP makes it easier to track all the information and transactions which are done from multiple modules so that the user can export all data in single sheet.

But sometimes client requires transactions from multiple modules with single account and it is difficult to track all information.

For this type of requirement we have developed a customized report called Cash Book Report which can display the data using single user interface. This report has been developed for one of our clients with filter criteria as:-

New stuff : Item-Wise Consumption Report

Filter Criteria:
•   From and to Account code (Account code from Bank Master)
•   from and to Date ( GL Posting Date)

This report will consider the transaction of AP Payment Entry, AR Receipt Entry, Bank Transfer and Bank Entry.

Report UI:

When report will be run then the following details should come. Please refer below screen shot for ready reference

Below we have mentioned the details of reports for better understanding and clarity:

First user will select from and To Gl posted date with Account code and click on the print button

Once report gets generated as displayed above with detail of batch number, Entry number , transaction type , Vendor/customer code (If transaction type is “Misc. Payment”, then “G/L Account” codes which have entered in line level will populate here), vendor/customer name (If G/L Account code is selected, the description of GL/ Account will be populate in this column), detail level Reference field , document no. which is done against same transaction , transaction date , Receipt/payment amount .

Below these fields we will be displaying the closing value of selected ‘to date’ and opening value will be displayed for next day (report will be display for selected from and to date).

With the help of this report, user can keep record from multiple modules with opening and closing balance using single customize UI.

Also Read

  1. Accounts Receivable Batch Status Report
  2. Accounts Payable Batch Status Report
  3. Account Receivable Creating Summary Invoice in Sage 300
  4. GL Custom Report


PJC – Contract Summary Report

$
0
0

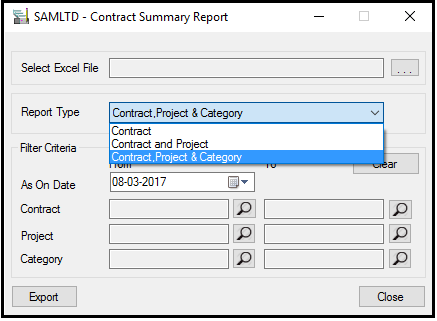
Sometimes it is difficult to track distribution summary between contract & project and detail of category for particular as on date. To overcome this point, we have developed a customized report called Contract Summary Report in Sage 300 ERP. The Report has been developed for one of our client with filter criteria as:-

New stuff: Cash Book Report

Filter criteria:

  • As on date
  • From and To Contract
  • From and To Project
  • From and To Category

Report UI:

This report provides a summary for each contract, project & category including: current/estimated cost, work order/ PO cost, Actual cost, UOM, balance cost and % completed for selected as on date.

The Report will get printed in summary for contract, project &category in Excel format after fetching data from PJC module.

The report gives us detail as below:

Also Read:

  1. Project wise Costing Analysis in Sage 300 ERP
  2. Sage 300 ERP Project and Job Costing Settings
  3. Project wise Profit Analysis in Sage 300 ERP
  4. Project/Contract Maintenance in Sage 300 ERP


IC Transfer linked with BOM component

$
0
0

A BOM (bill of materials) is a list of raw items, sub-assemblies, intermediate assemblies, sub-components, components, parts and the quantities of each needed to manufacture a finished product. Sage 300 ERP offers multi-level BOM, increasing the complexity of the BOM.

Sometime customer requirement will be totally different compared to current possibilities

New stuff:PJC Contract Summary Report

Like being able to transfer multiple inventories using single BOM.

For this type of requirement we have customized I/C Transfer screen and using this customization it became easy.

To navigate this screen, visit Inventory control àIC Transaction àTransfer

Customization will work for Document type Transfer, Transit Transfer & Transit Receipt

We have added below fields on Standard IC Transfer screen (Header Part).

  • Item Number (Item number from IC item Master screen)
  • BOM no (This will display the BOM No IC Bom No’s)
  • From and To Location (This will be Location master finder)
  • QTY (Qty field in which user can enter manually)
  • Go button

Please Refer below screen :-

Once user will click on go button then, we need to auto populate all the components from selected BOM into the detail grid of IC Transfer screen.

e.g. User will create Bom number (BOM123) for Respective Item (A1-103/0) and also define component items as  (A- 105/0,A1-310/0). Please Refer below screen:-

Now user will create IC trnasfer entry using Same Item.

Item number – User will select item number A1-103/0

BOM number – User will select BOM number BOM123

From and to Loc –  User can select location from finder.

QTY- User can put value manually.

Once user clicks on Go button system will display Component items from IC –Bom screen into the details grid automatically with From Location & to Location values as selected values in finder.

We will display all the components from selected BOM, but if in case component will have another sub components then we need to add those sub components instead of adding main component.

Purpose of this customization:

User should not add items manually. If user knows the BOM no. then user only needs to select the BOM & our customization will automatically show the component items with from & to Location values.

With the help of this user can save his/her time at the time of creating the manual entries.

Also Read:-

  1. BOM Component Usage Enquiry in Sage 300 ERP
  2. Show component details while creating BOM
  3. Additional Copy functionality on BOM
  4. Create duplicate copy of Manufacturing BOM in Single Click
  5. Using BOM and Assembly to Convert Items in Sage 300 ERP

Location Wise Item’s Quantity On Hand Report in Sage 300

$
0
0

Enterprise Resource planning is a business software that integrates and runs all aspects of your business. ERP systems have evolved today to include several new functional application integration like vendor portals, product wise view and functionality, single view of complete supply chain, etc.

New stuff:IC Transfer linked with BOM component

One of the major components in any ERP software is the reporting system. Sometimes in a standard ERP system, the reports generated will not give you the exact data which you require. This is where customizations come into play. Location Wise Item Qty On Hand is an external utility which is used to keep track of all the quantities of the particular location “Quantity On Hand” which means stock of that inventory in the particular location is available or not.

We have provided this utility to display data of the items and their respective locations with their Quantity available for that location.

For more clarifications please refer the below screenshot.

We have provided filters to filter data Item and their respective category.

Suppose if the user has to keep track of the items and their quantities available in the stock for the specific location then this utility is very helpful and easy to find the remaining stock quantity of the item location wise.

For Example: If the user is having an ITEM and their respective quantities has been used in different locations such as WAREHS (Warehouse), GRT (Goods in Transit), etc. So the data for that particular item used will be displayed as below:

In the above screenshot the columns after the sellable Column is the Location columns in which the items are present.

The data as its showing is the Items and their respective details, with the Quantity available in stock location wise.

The main purpose of this blog is to keep track of the all the Inventories Available in the Stock Location Wise which will keep user to get update of the remaining stock available in the particular location.

Also Read:

  1. IC Items Location Details Quantity Inquiry in Sage 300 ERP
  2. Migrate Item On Hand Quantity from Business Vision to Sage 300 ERP
  3. Stock summary Report
  4. Quantity On Hand Drilldown feature for OE Order Entry Screen


PW Purchase order Quantity should not be greater than Current estimated quantity

$
0
0

Project handling from start to end involves many complex and inter-related tasks, all of which need to be monitored, analysed and reported in detail. The Project Job Costing or

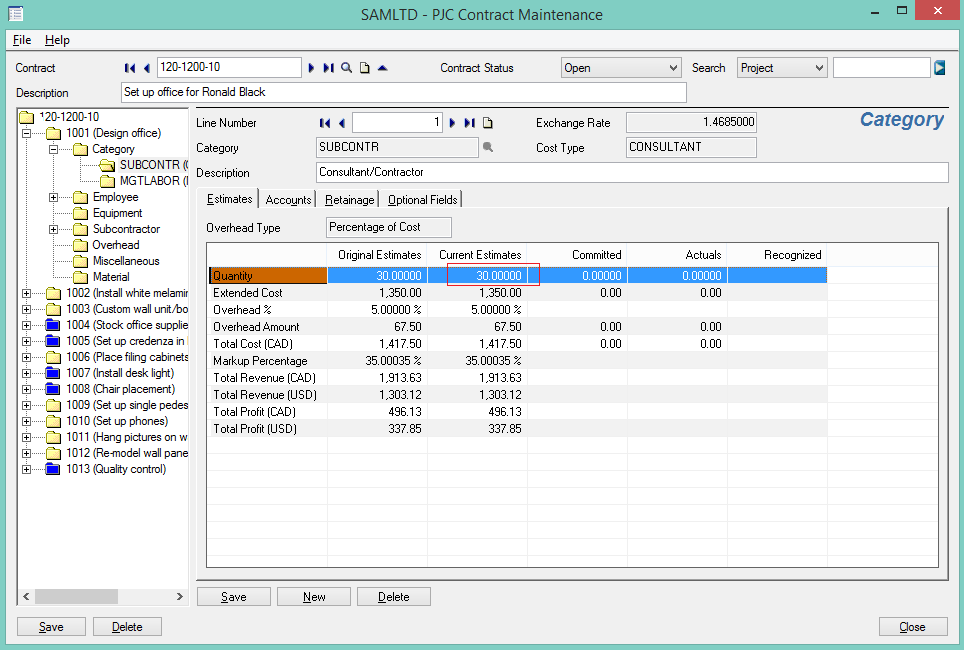
PJC module in Sage 300 ERP helps us to get all, in and out of the projects. In this blog, we will focus how to validate the purchase order quantity in terms of contract budget. As we know that in PJC Contract Maintenance screen, we can define the Current Estimated Quantity. This gives us the estimated quantities required for the given project.

New stuff: Location Wise Item’s Quantity On Hand Report in Sage 300

Please find the below screen:

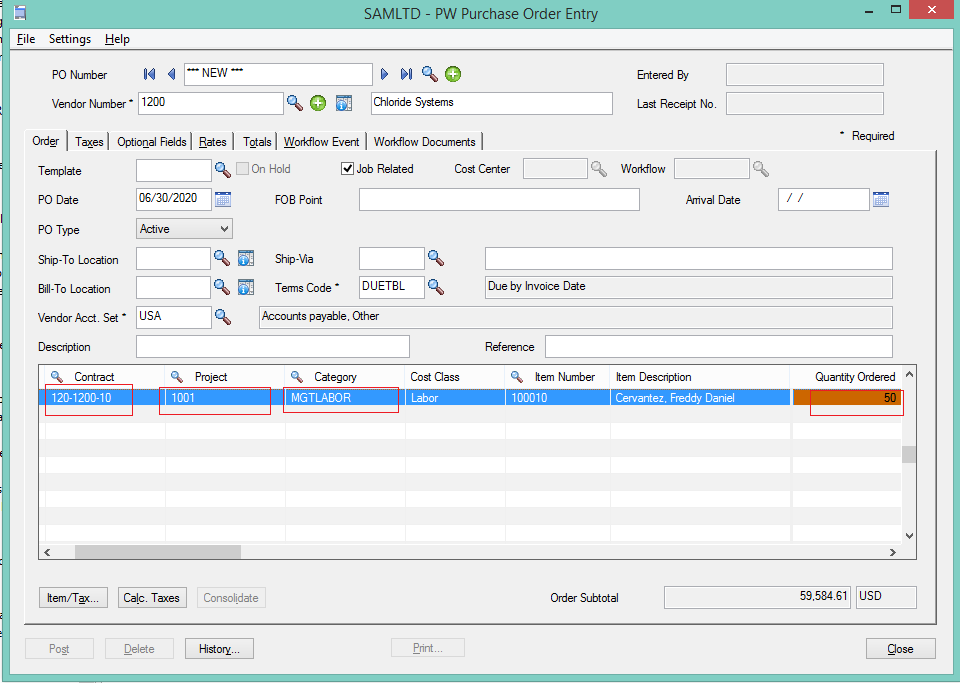
Suppose you are now creating a purchase order in Purchasing Workflow against the contract and in the contract you define the estimated quantity as 30 and at the time of purchase order you are purchasing 50 quantities, this is logically not correct and the system will prompt you to correct the input.

To restrict the user to not order excess quantities than the PJC budget quantity we have customised the standard purchase order Screen. If you order more quantities than PJC Estimated quantity then the error that “Purchase order quantities cannot b greater than PJC Cost quantities” will pop up. Until you correct it you cannot move forward.

There are few more useful customization which we will discuss in our next blog.

  1. Creating Purchase Work Flow Requisition using PO Requisition in SAGE 300 ERP
  2. Allow Non Inventory Item Option in PO
  3. Copy Cost To Purchase Order
  4. Inventory Cost Analysis in Sage 300 ERP

Auto Vendor / Customer Code Generation in Sage 300 ERP

$
0
0

Enterprise Resource planning is a business software that integrates and runs all aspect of your business. With the help of a customized ERP, you can overcome big challenges, which are specific to your industry and attain your desired goals.

Today, ERP system have expanded to include several new functional application and integration like vendor portal, supplier portal, customer redressal forums, etc. These capabilities ensure that organization wide processes and departments are on the same track while identifying and closing any data faults.

New Stuff:- PW Purchase order Quantity should not be greater than Current estimated quantity

In a Manufacturing company, there are huge order requirements placed from multiple customers and vendor. In such a scenario, on would want to keep all the data in one place along with setting up alert and notifications so that important communication to the client is not missed out.

In Sage 300 ERP, when you create and save any new Vendor or Customer, you will have to enter Vendor / Customer code manually in accordance with the naming format of the company. Sometimes it is difficult to remember what the last number of that record was and it might take time to locate the particular data when in dire need.

To overcome this problem, we have come up with one small customization, which when set according to the rule, will help auto-generate the Vendor / Customer code once you click on the ‘new’ button. E.g., you have last vendor number in database saved as S00009, so the next vendor number will be “S00010” which is automatically generated by system. User cannot manually enter anything in the Vendor Text Box because that text box will appear as a disabled field.

Currently we have used the prefix “C” for customer & “S” for vendor. You can change this prefix as per your requirement or else this prefix will be generated automatically.

Create Vendor number in Sage 300 ERP–>navigate to Sage 300 >> Account payable >>A/P vendor >> Vendor

Please Refer below screen for more clarification:-

Rest of the functionality will be same as per Standard screen functionality of Vendor master screen

Also Read:

  1. I/C Transaction History Report
  2. Manage AR Item Statistics in Sage 300 ERP
  3. Migrate Vendor Expense Account from Sage 50 US (Peachtree) to Sage 300 ERP
  4. Migrate Item Vendor from Sage Business Vision to Sage 300 ERP
  5. Customized “A/P Payment Batch Creation” screen to generate A/P Payment Batch using Invoice Account set instead of Vendor Account set

Generic GL Import Macro for Sage 300 ERP

$
0
0

Sage 300 ERP Macros are widely used to achieve custom requirements as VBA is a standard macros language and gives great power to customize Sage 300 ERP.
Macros are used to create our own screens that interact with the business logic and perform your various custom tasks.

New Staff:- Generic GL Import Macro for Sage 300 ERP

Suppose you want to create GL entry and if there only few entries available, here you will not find the process difficult, but assume there are 500-600 or more number of entries present and you need to add them manually. Then surely you feel it a tedious task to do. Our GL Import are solution to this.

In our previous blog we are go through the generic import- export macro for AR invoice entry in similar way we will create GL entry from GL import macro.

Just for reference below is excel format of GL entry.


After reading excel file GL entry is created in sage 300 ERP


This type of macros are basically use at the time of version upgradation. With the help of this, you can easily import your unposted entries into updated version in minimum time.

Also Read:

  1. Generic Import-Export Macros for Sage 300 ERP
  2. Dealing with Macros while Sage 300 version upgrades
  3. Password Protect Macro Code in Sage 300 ERP
  4. Edit a Macro without installing Sage 300 SDK
  5. How Are Sage 300 Macros Used

Realised Unrealised Report

$
0
0

Enterprise resource Planning or ERP is a solution for organisations to manage their business efficiently. The main moto of an ERP Software is to collect and organise data from various levels and provide management the clear picture of profit and loss.

New stuff:-Generic GL Import Macro for Sage 300 ERP

Let us say, if in a business you issue invoices or makes purchases in foreign currency then it is necessary to keep values in “Home” currency to keep your accounting accurate. With this report, you can found the realised unrealised gain and loss. In accounting, there is a difference between realised and unrealised gain and losses. Realised income and expense refer to profit and loss of completed transactions whereas unrealised is for relevant transactions, which are not completed.

Let’s take an example, suppose you have created an invoice of rupee 100 which has an exchange rate as 5 and while creating payment of 100 rupee the exchange rate is 6  in this case when we convert these amount to home currency its different will be 100 rupee is consider as Realised Unrealised value of this transaction.

In Sage 300 ERP, we have given new user interface to print this report, which look as follows:

Here it has from and to date filter criteria which export the report to excel format.

The report export format is as follows:

The report mainly contains the posted GL Batches, which has the income and loss accounts. The report shows the main receipt or payment and the original document number against which the receipt or payment is applied. In the report you will find different columns like GL Batch, GL Entry NO, AP/AR/BK Batch No, AP/AR/BK Entry No, Account code, Account Description, Original document No(Batch / Entry). Other columns that you will find here are Original Document No, Original Document Date, Original Document Amount Original Document Currency, Original Document Rate, Original Document Value in Functional Currency, Payment / Receipt Document No, Payment / Receipt Document No (Batch / Entry), Payment / Receipt Document Date, Payment / Receipt Document Amount. More columns consists of: Payment / Receipt Document Currency, Payment / Receipt document rate, Revaluation rate(in case of unrealised valuation), Payment / Receipt / Revaluation document value in Functional Currency, Exchange rate diff, Realised forex (Gain) / loss etc.

Revaluation batches are also a part of this report. This report is useful to find the Realised and Unrealised profit and loss of your business.

Also Read:-

  1. GL Clearing Module – Import Functionality
  2. Create GL Batch Entry from AR Invoice Entry
  3. New way of post AP, AR, GL, Bank batches in Sage 300 ERP 2016
  4. Pros and Cons of Single vs Multiple Databases in Sage 300
  5. Sage 300 Customization to Print AP Aged Payable Report for multiple companies
Viewing all 1488 articles
Browse latest View live


<script src="https://jsc.adskeeper.com/r/s/rssing.com.1596347.js" async> </script>