Quantcast
Channel: Sage 300 ERP – Tips, Tricks and Components
Viewing all 1488 articles
Browse latest View live

Rent Receipt Report for Rental industries

$
0
0

Sage 300 ERP helps us to know in detail about ongoing projects. Reporting being a major part of projects, we have custom-made reports that will be useful for various type of industries & organizations. In this blog, we are introducing you to one more report that can be used for Rental industries. This is simply a Rent Receipt Report, which is needed to be provided to the customer after receiving monthly payment. The interface and the components of the report are easily customizable too. (Please refer below screen):

New staff:-Realised Unrealised Report

UI contains:

  • From and To Tenant (Customer)
  • From and To Data
  • Cluster (Cluster will be Territory Code from AR Customer Master)
  • Building No (This is address line 2 from AR Customer Master)
  • Printing Type (Dot Matrix, Laser Printer)

As per selection criteria in UI, Report output is as follows:-

From above data BUILDING (4252), CS NO, Room/Shop, Floor, Email, State, country and zip is coming from AR Customer Master.

Division- we will map optional field “DIV” to customer master, Bill No (invoice number), Date (Document Date), Rent / Month – (AR Customer master level optional field ), Received with thanks from (AR Invoice Header level optional field ), Amount in Word (Total invoice amount in words), RS (This is total invoice amount.)

This receipt will fetch information from customer Master and AR invoice screen. You can generate Rent Receipt for Multiple Customer at a time as per the selection criteria.

This is our customized report format that is design as the client requirement, but we can modified it as per your organization standard format.

Also Read:-

  1. Create GL Batch Entry from AR Invoice Entry
  2. Migrate AR Invoice (summary) from Sage Business Vision to Sage 300 ERP
  3. How to post the AR Invoice batch from Invoice Entry in Sage 300 ERP V2016
  4. AR Invoice Report
  5. Propagating Optional Field Value from Posted AR Invoice into GL Entry in Sage 300 ERP


Migrate Customer Ship via code from Sage 50 US (Peachtree) to Sage 300 ERP

$
0
0

GUMU™ for Sage 50 US (formerly known as Peachtree) to Sage 300 ERP is a Sage certified Migration solution. Greytrix is a pioneer in providing migration services at its Sage Migration Centre and catering end-users business requirements.

Data migration is always a challenging task to perform. We migrate data with the help of our Sage certified migration utility in accordance to our well defined migration process.

In this blog we will discuss about how GUMU™ migrates A/R Terms from Sage 50 US to Sage 300 ERP (Formerly known as Accpac).

New Stuff: Migrate Vendor Expense Account from Sage 50 US (Peachtree) to Sage 300 ERP

In the below screenshot you can see the Customer Ship to Address of Sage 50 US. To view the Customer Ship via code of Sage 50 US follow the below mentioned path:

Open Sage 50 US –> Customers -> Click on a customer ->Go to Sales Info Tab.

Sage50 Ship-via code

You can view Customer Ship via code in Sage 300 from the following path

Account Receivables->A/R Customers ->Customers -> Select the customer ->Go to Invoicing tab

Sage 300 ship via code

In this way, Sage 50 US ship-via code is migrated into target Sage 300 ERP company database. For more information on ERP data migration, drop us a mail at erpmig@greytrix.com 

About Us:

Greytrix is one stop solution provider for Sage ERP and Sage CRM needs. We provide complete end-to-end assistance for your technical consultations, product customizations, data migration, system integrations, third party add-on development and implementation expertise.

Greytrix helps in migrating to Sage 100, Sage 300 and Sage ERP X3 from Sage ProSage 50 USSage 50 CA, Sage 50 Usage Business Works, Sage Business Vision, QuickBooks and MS Dynamics Great Plains.


Also Read:

1.       Rent Receipt Report for Rental industries
2.       Realised Unrealised Report
3.       Generic GL Import Macro for Sage 300 ERP
4.       Location Wise Item’s Quantity On Hand Report in Sage 300
5.       Auto Vendor / Customer Code Generation in Sage 300 ERP


E-Return filing of Central Excise and Service Tax returns make easy with XML utility in SAGE 300 ERP

$
0
0

Trading Excise is Greytrix Add-On, seamlessly, integrated with Sage 300 ERP, which makes easy for the users to make the automated duty calculation and also helps users to get the required statutory report to track the excisable inventory and duty levied on goods. Also it is important for the users to get their excise return automatically without doing the manual work. Main crucial task is to create XML file to upload E-return on www. ACES.com

New stuff: Rent Receipt Report for Rental industries

In case of online return filing of Central Excise and Service Tax returns, two options are available
1. Feeding the data online in return forms or filling the data offline. Uploading the XML files later.
2. All returns are converted in to XML files either with the use of third party software or by using the government excel utilities.

Trading Excise module contains utility that generate xml file with help of data in Trading Excise module of SAGE 300 ERP. It just one way process no need extra hectic user need to just generate that using below screen.

Excise return XML utility

Excise return XML utility

Fields to provide to screen.
1. Fiscal Year: here user need to enter current fiscal year.
2. Quarter: here user need to enter current fiscal year.
3. Location: location on which duty need to calculate.
4. Path: path to generate XML file.

It will create File structure as below
1. Header Data: Contains Return Year, Quarter, Company Name, and Registration Number.
2. Shipment Data: All the information related Shipment and levied duty on that goods.
3. Receipt Data: All the information related Receipt and levied duty on that goods.

XML Utility

XML Utility

With the help of this utility user can easily extract the XML file for all the sales and purchases done for particular quarter and upload on the government site for e-Return.

Also Read:
1. Why use Greytrix Trading Excise
2. Transfer of Excise duties along with Inventory Transfer in Sage 300 ERP
3. Taxes in Sage 300 ERP

New Notes feature in Sage 300 Web screens

$
0
0

With the release of Sage 300 v2017 and new web screen, some new features has been introduced. In this blog we are going to discuss new Add Notes features added in Web screens.

New Stuff: Migrate Customer Ship via code from Sage 50 US (Peachtree) to Sage 300 ERP

With the new web screen introduced, user have ability to Access the Sage 300 data entry screen over the web. With Sage 300 V2017user can now add Notes to the customers, vendors, and inventory items through the Web screens also.

User can access the Vendor, Customer, Item master screen through the web login and on the master screen they can access the Add/Edit/Update/Delete Notes section on the web screen.

Home Screen

You can now create notes from the web screens as well. You can also Edit/Delete notes from the web screens.

AP Vendor with details

With this new feature even from the Web screen user can now add notes to the masters in Sage 300 ERP.

Also Read:

Migrate Vendor Expense Account from Sage 50 CAD (Simply Accounting) to Sage 300 ERP

$
0
0

GUMU™ for Sage 50 CAD (formally known as Simply Accounting) to Sage 300 ERP is a Sage certified migration solution. Greytrix is a pioneer in providing Migration services at its Sage Migration Centre and catering end-users business requirements. In this blog you will get to know how GUMU™ migrates Vendor Expense Account from Sage 50 CAD (Simply Accounting) ERP to Sage 300 ERP.

New Stuff: Migrate Customer Ship via code from Sage 50 US (Peachtree) to Sage 300 ERP

You can view Vendor’s Expense Account in Sage 50 CAD (Simply Accounting) from the following path,
Sage 50 CAD (Simply Accounting) -> Payables -> Suppliers -> View Suppliers -> Select any Supplier
In below screen-shot you can view the Expense Account associated with the Vendor/Supplier in Sage 50 CAD ERP,

Sage 50 CAD Vendor Expense Account Details

Sage 50 CAD Vendor Expense Account Details

You can check migrated Vendor’s Expense Account data in Sage 300 ERP as shown below. Path for Sage 300 ERP is,
Sage 300 ERP –> Accounts Payable –> A/P Vendors –> Vendors

Sage 300 Vendor Expense Account Details

Sage 300 Vendor Expense Account Details

In this way, Vendor Expense Account from Source Sage 50 CAD (Simply Accounting) are migrated into target Sage 300 ERP company database.
Below is the mapping of the converted Vendor’s Expense Account from Sage 50 CAD to Sage 300 ERP,

Sage 50 CAD - Sage 300 ERP Vendor Expense Account Mapping

Sage 50 CAD – Sage 300 ERP Vendor Expense Account Mapping

Hope the above topic provides you sufficient information in comparing the Vendor’s Expense Account records between the two diverse ERP systems.

About Us:
Greytrix is one stop solution provider for Sage ERP and Sage CRM needs. We provide complete end-to-end assistance for your technical consultations, product customizations, data migration, system integrations, third party add-on development and implementation expertise.
Greytrix helps in migrating to Sage 100, Sage 300 and Sage ERP X3 from Sage Pro, Sage 50 US, Sage 50 CA, Sage Business Works, Sage Business Vision, QuickBooks and MS Dynamics Great Plains.
For more information on migration solutions, please contact us at erpmig@greytrix.com. We will be glad to assist you.

Also Read:
1) Migrate Item Vendor from Sage 50 CAD (Simply Accounting) to Sage 300 ERP
2) Migrating Open Sales Order from Sage 50 CAD to Sage 300 ERP
3) How to purge Data in Sage 50 CAD (Simply Accounting)
4) Migrate Customers Notes from Sage 50 CAD(Simply Accounting) to Sage 300 ERP
5) Migrate vendor custom Fields from Sage 50 CAD (Simply Accounting) to sage 300

Extract Pending PO & Pending GRN Report from single screen

$
0
0

In our previous blog of Pending PO & Pending GRN, you can see there are separate UI for both the reports. Here, we have come up with a more convenient UI for user to extract both reports from a single UI.

Pending PO & GRN Report helps us to keep track of all the pending POs & Receipt Entries created against particular vendors.

For this report we have created utility for displaying records in which the PO and GRN is partially completed or not completed in the system.

This utility provides us both Pending PO & GRN print option to print in one report only. So that the user can print both the reports in a single utility. As shown in below figure:

This utility will be helpful for users, as it will give them all the records that they need to capture from database for Pending Purchase & Receipt Entries.

Pending PO Report:


In the above example of Pending PO Report, a user can create a purchase order entry with quantity of 6 and create a partial receipt of the same. Hence, in this report, we will get the details of the quantity ordered and the quantity received for the same item with their respective Unit Cost. It also displays Item-Wise Entries with their respective Vendors & PO Numbers.

It will be helpful to the user to keep track of the newly created inventories that are purchased and received for the item.

It will also help the user to keep track of the item used in this report in which he will know the quantity that is available for the same item for a particular location.

Pending GRN Report:

In the above example, we are displaying records account set wise with their respective Vendors and Year period in which the receipts are being generated.

This report provides us the pending GRN’s that are partially invoiced with their source amount and functional amount that means the receipt amount and invoice amount respectively.

Suppose if the user used a specific account set (EUROPE) in the Purchase Order entry and created a receipt entry against the same. Then the receipt, which is partially invoiced, will be displayed in the report.

The main purpose to write this blog is to provide users a track of all the Pending PO & GRN Report that gives us the exact quantities used in GRN & PO Entries. This report will be helpful to keep track if the PO or GRN is completed or not in the system.

Also Read

  1. Pending Order Aging Report in Sage 300 ERP
  2. Printing Non-invoiced and Partially invoiced Reports
  3. Quotation and Sales Order Report from Single UI
  4. Pending P/O Receipts Inquiry
  5. Pending Shipments Inquiry in Sage 300 ERP

How to hide Sage 300 Web Screens using UI Profiles

$
0
0

We have seen that we have the UI Profiles in the standard Sage 300 for Desktop version, Sage has also provided the same feature in Web screens version 2017.

New Stuff:  Extract Pending PO & Pending GRN Report from single screen

UI profiles allows the user to customize the standard screens for particular users depending on the need and the permission.

Following are the steps to restrict user to access/view some fields in the web screens:

1. Open the O/E Order Entry screen that is available under menu “Order Entry”. We have currently logged the user with ADMIN and created an order. As we can see that the “Entered By” field shows the “ADMIN” as highlighted.

2.Click on the “customize” under Options.

Order Entry form

3. We will have the below screen after clicking on customize. We will need to create the “Customization ID”, “UI Profiles” and uncheck the fields that needs to be restricted (Ex.: Entered By Label and Textbox) and Save the customization ID using Save button.

Customized screen

4. We need to create UI profile that will be assigned to the Sage User and will apply the Customization ID.

Assign the user for the Profile ID. We have assigned the USER1 for Profile ID “ORDER”

Profile creation -UI

Assign the Customized Screens for the Profile ID that needs for the selected users.

Customized Screens for the Profile ID

5. Now when we login the Sage 300 using the user “USER1” for which the customization screen is applied, we can see that the “Entered By” label and the Textbox containing the information that has entered an order is not visible to the user.

OE Order entry screen

So, UI Profiles is helpful when we want to restrict the Sage user to access\view creating screen functionality in Sage 300 Web screens.

Also Read:

  1. Easily customize screens in Sage 300c
  2. New Notes feature in Sage 300 Web screens
  3. Sage 300c Web Screens Installation
  4. Hiding Control on Sage 300 UI
  5. Hide fields or object in Sage 300 ERP

About Us

Greytrix is one stop solution provider for Sage ERP and Sage CRM needs. We provide complete end-to-end assistance for your technical consultations, product customizations, data migration, system integrations, third party add-on development and implementation expertise.
Greytrix have some unique solutions of Sage 300 integration with Sage CRM, Salesforce.com and Magento eCommerce along with Sage 300 Migration from Sage 50 US, Sage 50 CA, Sage PRO, QuickBooks, Sage Business Vision and Sage Business Works. We also offer best-in-class Sage 300 customization and development services to Sage business partners, end users, and Sage PSG worldwide.
For more details on Sage 300 Services, please contact us at accpac@greytrix.com . We will be glad to assist you.

How to Process Credit Card Payments in O/E

$
0
0

Credit cards offer a flexible way to cover unexpected expenses and build up a good financial reputation. That’s why Sage Payment Solutions provides a variety of ways to accept and process payments in Sage 300 ERP.  Before you start you must install Sage Exchange in workstation to process credit cards. Sage Exchange connects your Sage 300 ERP system to Sage Payment Solutions. Sage Exchange transmits and stores credit card details in a PCI-compliant vault.

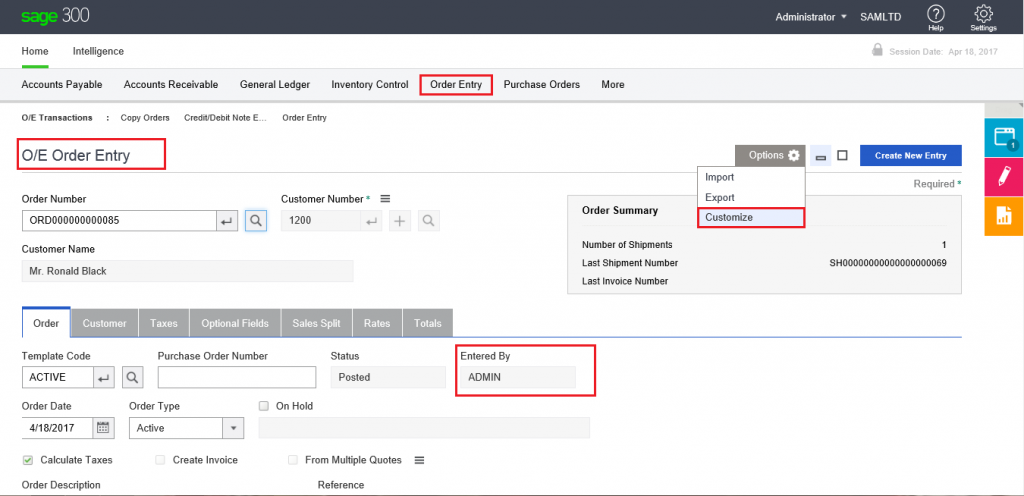
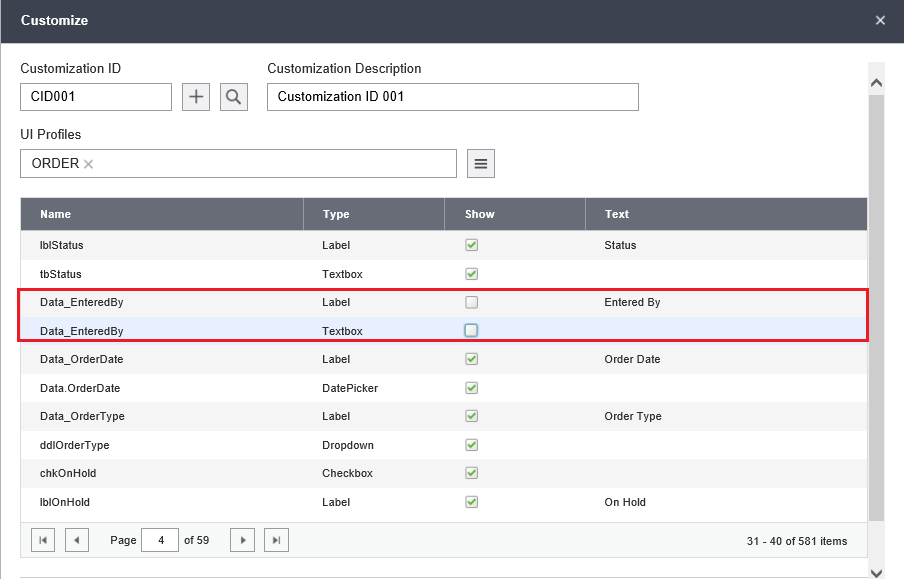
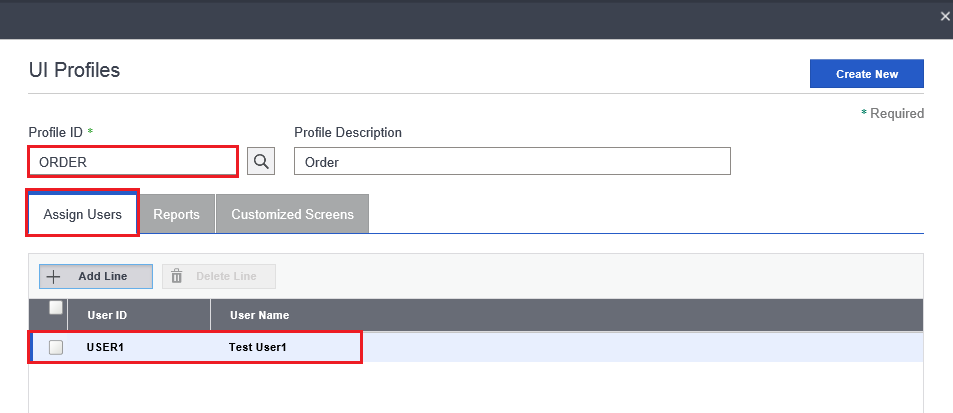
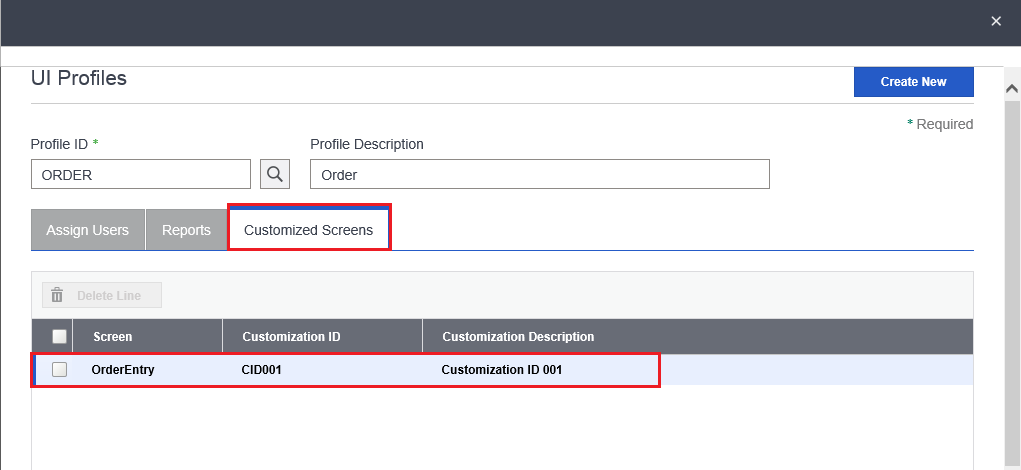
New Stuff: How to hide Sage 300 Web Screens using UI Profiles

You can process a credit card payment in Order Entry or Accounts Receivable Modules. In Order Entry or Accounts Receivable, create or select a document for which you want to process a credit card payment. A/R Invoice Entry, A/R Receipt and O/E Order Entry screens are support credit card payments.

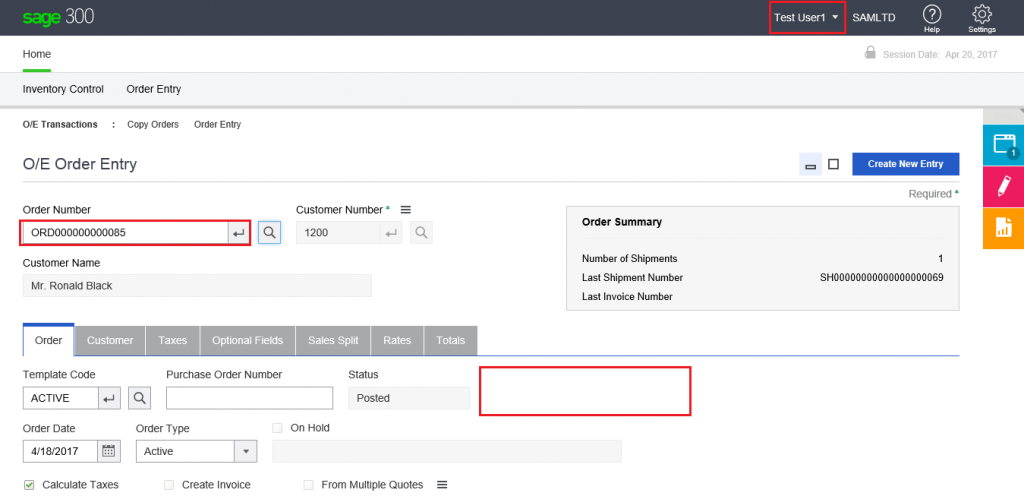
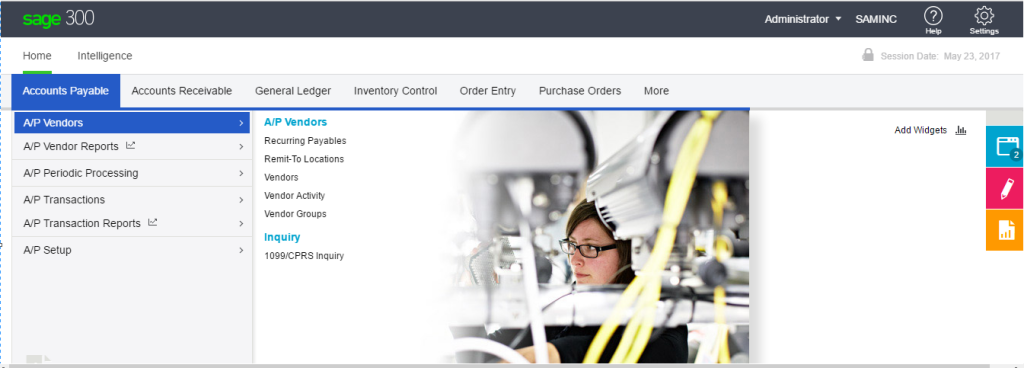
To process a credit card prepayment in order entry navigates to Order Entry –> O/E Transactions –> Order Entry and then create or select a document.

Kindly refer the below screenshot for the same.

Order Entry screen

OE Order Entry

Click the Prepayment button and it will open O/E Prepayments screen.

OE Prepayments

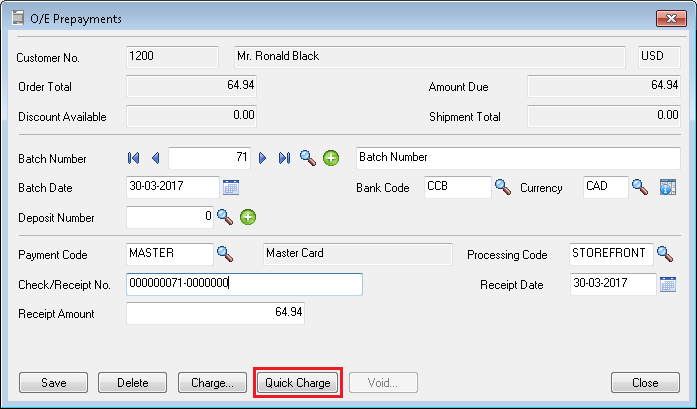
On the O/E Prepayments screen, create or select a receipt batch for the prepayment you are entering.

OE Prepayments

Batch Number :-  In the Batch Number field, select an existing receipt batch for the prepayment you are entering, or use the options to the right of the field to create a new batch.

Batch Date:- If you are creating a new batch, enter the batch date.

Bank Code / Currency :- If you use multicurrency accounting, select the bank code and currency.  

Deposit Number:- Select a deposit number, or use the options to the right of the field to create a new deposit.

Payment Code :-  Select a payment code. If you want to use Sage Payment Solutions to process a credit card prepayment, select a payment code that uses the payment type SPS Credit Card.

Processing Code :- Select a processing code that will be used to process the credit card transaction. The bank and currency for the processing code you select must match the bank and currency for the current transaction.

Check/Receipt Number :- In the Check/Receipt Number field, enter the check number if payment is by check.If the payment is not by check, you can enter a reference number.If you leave the field blank, Order Entry assigns a number that consists of the batch number and the entry number.

Receipt Date :- Select the receipt date.

Receipt Amount :- Enter the amount of the prepayment.

Click Add button to enable the Charge Button.

OE Prepayment charge

Click Charge button to open The Process Credit Card screen. If a default credit card exists in the customer record that uses the processing code selected for the current transaction, that credit card is selected by default. To Select the Saved Credit Card, use the Finder.

Process Credit card sale

To enter details for a new credit card that will not be saved in the customer record, select checkbox Enter a Card for One-Time Use.

Process Credit card

Click Process Payment button, The Sage Payment Solutions browser form will appear.

Sage Payment Solution

If you use a card reader device and did not select a saved credit card for this transaction, you can click Swipe Card to swipe a credit card.
If you want to review these details, click the Next button on the browser form.

Click Submit button, Sage Payment Solutions will then process the payment and once it’s finished, the browser form will close. The transaction details and a status message will then appear on the Process Credit Card screen. Once you finish reviewing the transaction details and status, click Close.
Post or save the document.

Also read:

  1. Check/Payment Register Report.
  2. Reverse Receipt and Payment in Sage 300 ERP
  3. Migration of Credit Card Transactions from QuickBooks to Sage 300
  4. AR Refund Inquiry for Sage 300 ERP
  5. AR Prepayment Creation through Order Entry

About Us

Greytrix is one stop solution provider for Sage ERP and Sage CRM needs. We provide complete end-to-end assistance for your technical consultations, product customizations, data migration, system integrations, third party add-on development and implementation expertise.
Greytrix have some unique solutions of Sage 300 integration with Sage CRM, Salesforce.com and Magento eCommerce along with Sage 300 Migration from Sage 50 US, Sage 50 CA, Sage PRO, QuickBooks, Sage Business Vision and Sage Business Works. We also offer best-in-class Sage 300 customization and development services to Sage business partners, end users, and Sage PSG worldwide.
For more details on Sage 300 Services, please contact us at accpac@greytrix.com . We will be glad to assist you.


How to remove payroll check lock if previous process is incomplete

$
0
0

Sage 300 payroll checks allows us to Print and reprint checks and direct deposit advices and Review the employees to be paid in this check run. Sage 300 Payroll not allows to enter manual check or print payroll check with different date if last report generation remain as incomplete state.

In this blog we will see how to remove this payroll check lock.

New Stuff: How to Process Credit Card Payments in O/E

You can check below screen that previous report generation is not completed so when user try to open payroll check screen, system will show message as “Last payroll check run is incomplete. Run Payroll Check to reprint checks or post” and once user click on OK button payroll check screen gets open with all disable fields. And it is not allowing user to print new payroll check for a different date.

Payroll Check Error message box

Payroll check screen

User can remove this payroll check printing lock using Restart Maintenance screen.

Go to Administrative service module-> Open Restart maintenance screen -> Select database through which you are logged in.

Restart Maintenance screen

Click on delete button to remove lock on payroll check.

Restart Maintenance

Here you can check after deleting database through restart maintenance that payroll check screen gets open with original state. Also it will allows user to select new details in payroll check screen.

Payroll check screen

Payroll check

So using this process user can easily print new payroll check even after previous process is not completed.

Also Read:-

About Us

Greytrix is one stop solution provider for Sage ERP and Sage CRM needs. We provide complete end-to-end assistance for your technical consultations, product customizations, data migration, system integrations, third party add-on development and implementation expertise.
Greytrix have some unique solutions of Sage 300 integration with Sage CRM, Salesforce.com and Magento eCommerce along with Sage 300 Migration from Sage 50 US, Sage 50 CA, Sage PRO, QuickBooks, Sage Business Vision and Sage Business Works. We also offer best-in-class Sage 300 customization and development services to Sage business partners, end users, and Sage PSG worldwide.
For more details on Sage 300 Services, please contact us at accpac@greytrix.com . We will be glad to assist you.

Sage 300 PJC – Posting Date Option

$
0
0

With the help of Sage 300 Project and Job Costing module organization can be able to manage estimations, tracking inventory purchase, costing, and billings of projects, miscellaneous costs as well as processing charges. This module also facilitates user to set some default options which will help in making faster entries and brings uniqueness in process followed.
In this blog we are going to discuss about the option provided in Sage 300 PJC module which allows user to set default posting date for various types of transactions such as Timecards, Equipment Usage, Material Usage, Material Returns and Material Allocation.

New Stuff: How to remove payroll check lock if previous process is incomplete

In order to access the screen navigates to Project and Job Costing –> PJC Setup –> Options screen –> Transactions Tab. Kindly refer the screenshot for the same.

PJC Option -> Setup form

There is no provision to set the posting date on the transactions screen in the PJC module.  You can specify the default date that will considered as the Posting Date for various transactions in this module.
This setting provides two options for setting posting date as “Document / Transaction Date” and “Session Date”.

Documents/ Transaction Date: This is option means the transactions posting date will be considered as its posting date to regardless of session date or actual date on which transaction is processed. This option is set as by default option for this setting.
Session Date: If this option is set for the “Default Posting Date” then transaction posing date will be considered as the Sage 300 session’s date i.e. Session in which user is logged in while posting the transactions.

Note: User can change this setting any time. The posting dates will be considered accordingly for the transactions being processed after changing the setting.

Also read:

  1. PJC – Contract Summary Report
  2. Sage 300 PJC – Option to default AR Invoice Comment Field
  3. Default Contract Style of PJC Options in Sage 300 ERP
  4. Default accounting methods of PJC
  5. Sage 300 PJC – Option to default AR Invoice Description Field

About Us

Greytrix is one stop solution provider for Sage ERP and Sage CRM needs. We provide complete end-to-end assistance for your technical consultations, product customizations, data migration, system integrations, third party add-on development and implementation expertise.

Greytrix have some unique solutions of Sage 300 integration with Sage CRM, Salesforce.com and Magento eCommerce along with Sage 300 Migration from Sage 50 US, Sage 50 CA, Sage PRO, QuickBooks, Sage Business Vision and Sage Business Works. We also offer best-in-class Sage 300 customization and development services to Sage business partners, end users, and Sage PSG worldwide.

For more details on Sage 300 Services, please contact us at accpac@greytrix.com . We will be glad to assist you.

New Features in Order Entry Payment Screen

$
0
0

With the release of the Sage 300 v2017 some new features has been introduced. In this blog we are going to discuss new features added in Order Entry Payment Screen.

New Stuff: Sage 300 PJC – Posting Date Option

The new feature added in order entry payment screen Quick Charge button.

O/E Prepayment

In O/E Prepayments screen, you selected a payment code that uses the payment type SPS Credit Card and you click the Add button the Charge and Quick Charge buttons become available.

By clicking either Charge or Quick Charge, you can process a credit card payment. The difference between these two buttons is the amount of information you must enter to complete the transaction:

Charge:-  This button is used to open the Process Credit Card screen and credit card payment is begin process. You must enter all required information for the transaction.

Quick Charge:- This button is used to process a credit card payment without entering any information.

Before you can use Quick Charge button for a customer, you must:

1. Set up a credit card for the customer with the Use This as Default Card option selected (on the A/R Credit Card Information screen). Also, this default credit card must use the same currency as the customer’s currency.

2. The currency for a credit card is determined by the Processing Code specified for the credit card on the A/R Credit Card Information screen.

3. The currency for a customer is determined by the Account Set specified for the customer on the Processing tab of the A/R Customers screen.

After you process a credit card payment, the Charge button is replaced with the Void button and the Quick Charge button is disabled.

Also Read:

  1. AR Prepayment Creation through Order Entry
  2.  Migration of Credit Card Transactions from QuickBooks to Sage 300
  3. Control Payments in Sage 300 ERP
  4. Migrate AP Payments from Sage Business Vision ERP to Sage 300 ERP
  5. Migrate AR Payments from Sage BusinessWorks ERP to Sage 300 ERP

About Us

Greytrix is one stop solution provider for Sage ERP and Sage CRM needs. We provide complete end-to-end assistance for your technical consultations, product customizations, data migration, system integrations, third party add-on development and implementation expertise.
Greytrix have some unique solutions of Sage 300 integration with Sage CRM, Salesforce.com and Magento eCommerce along with Sage 300 Migration from Sage 50 US, Sage 50 CA, Sage PRO, QuickBooks, Sage Business Vision and Sage Business Works. We also offer best-in-class Sage 300 customization and development services to Sage business partners, end users, and Sage PSG worldwide.
For more details on Sage 300 Services, please contact us at accpac@greytrix.com . We will be glad to assist you.

Printing Sales Report Country Wise

$
0
0

Many times we get enquiry of sales report in Sage 300 where user can bifurcate sales on country wise basis. This means if they want to check how much sales was made in India or China during a particular time, the system should generate that.

So we have found a workaround that to achieve their requirement without doing any modification in the sales report or developing any new components.
In this blog we are going to discuss that workaround.

New Stuff: New Features in Order Entry Payment Screen

1. At the Customer Master you can define the Country code as Territory i.e. CA for USA.

AR Customer Screen

2. Now after doing the transaction for the customers you can get sales report based on country wise basis.

3. For generating the report Go to Order EntryàO/E Reportsà Sales History

4. Filter the report based on Territory in our case this will be country code.

Sales History report

5. On Printing the report It will generate a report where the Order will be sorted by selected Territory/Territories, as shown in the below screenshot.

Sales history report

So using the above approach one can easily bifurcate sales on country wise basis.

Also Read:

  1. Sales History For all Costing Method
  2. Sales History Report in Sage 300 ERP
  3. AR Customers-OE Order Inquiry
  4. Find the A/R items sales history
  5. Options for maintaining Sales History in Sage 300

About Us

Greytrix is one stop solution provider for Sage ERP and Sage CRM needs. We provide complete end-to-end assistance for your technical consultations, product customizations, data migration, system integrations, third party add-on development and implementation expertise.
Greytrix have some unique solutions of Sage 300 integration with Sage CRM, Salesforce.com and Magento eCommerce along with Sage 300 Migration from Sage 50 US, Sage 50 CA, Sage PRO, QuickBooks, Sage Business Vision and Sage Business Works. We also offer best-in-class Sage 300 customization and development services to Sage business partners, end users, and Sage PSG worldwide.
For more details on Sage 300 Services, please contact us at accpac@greytrix.com . We will be glad to assist you.

Sage 300 PJC – Transaction Numbering

$
0
0

With the help of Sage 300 Project and Job Costing module organization can be able to manage estimations, tracking inventory purchase, costing, and billings of projects, miscellaneous costs as well as processing charges. This module also facilitates user to set some formats for the various documents/transactions that are processed under PJC module.

In this blog we are going to discuss about the option provided in Sage 300 PJC module which allows user to specify the specific format for document number.

New Stuff: Printing Sales Report Country Wise

In order to access the screen navigates to Project and Job Costing –> PJC Setup –> Options screen –> Transactions Tab. Kindly refer the screenshot for the same.

PJC Setup

With this feature user will be able to set the format for document number for the various PJC module transactions.

User can use this feature based on below parameters:

Document Type:

  • As you can see in the screenshot above, it allows user to specify the format for transaction numbers “Document Type” wise.
  • This is non editable column; all the standard screens for PJC Transactions are listed under this column.

Length:

  • The feature also allows user to set the maximum character length for the transaction number.
  • The value specified for the length is validated against the Sage 300 character limit for that particular transaction number. User can specify the length less than or equal to maximum characters supported as per standard.
  • Editable column, user can not set ‘0’ value i.e. 0 character length for any of this.

Prefix:

  • User can specify the set of characters which will be considered as “prefix” while generating transaction number.
  • Editable field and user can leave this field blank.
  • Maximum Prefix length allowed is transaction number length specified -1 or 6 whichever is less.

Next Number:

  • This is the actual number which will get assigned to transaction by combining with prefix and padding zeros as a transaction number. It helps to uniquely identify each transaction.
  • This value will get automatically incremented on creation of new transaction with auto-numbered document.
  • Editable field, User can change the value for next number.

Note:

  1. User can change transaction number formats specifications i.e. length, Prefix and next number at any time.
  2. This will allow user to set the transaction numbers which can describe the transaction in better terms. Also can help to skip the specific transaction number generation and can later on allow entering the skipped transaction.

You can refer to the example below for demonstrating use of “Transaction Numbering” feature:
Kindly refer to the screenshot above and consider the values set for the “Material Usage”
Length: 8 characters, Prefix: MTRL, Next Number: 6
The last entry generated for the Material usage is as below:

PJC Material Usage

So the next transaction number will be generated as “MTRL0006” (prefix: MTRL, Length: 8 Characters and Next number: 6)

PJC Material Usage

The “Next Number” in the PJC options will be set to 7, kindly refer to the screenshot below:

PJC Option screen

If user makes changes in the prefix and next number as per below screenshot
Set the Prefix as “MTRLU” instead of “MTRL” and length as “16” instead of “8” and Next Number “10” instead of “7”.

PJC Option Screen

Then the next transaction will get generated with number as “MTRLU00000000010 and will assign 11 as next number to be generated in the PJC options. Kindly refer to the screenshots below:

PJC Transaction screen

Also read:

  1. PJC – Contract Summary Report
  2. Sage 300 PJC – Option to default AR Invoice Comment Field
  3. Default Contract Style of PJC Options in Sage 300 ERP
  4. Sage 300 PJC – Option to default AR Invoice Description Field
  5. Default accounting methods of PJC

About Us

Greytrix is one stop solution provider for Sage ERP and Sage CRM needs. We provide complete end-to-end assistance for your technical consultations, product customizations, data migration, system integrations, third party add-on development and implementation expertise.

Greytrix have some unique solutions of Sage 300 integration with Sage CRM, Salesforce.com and Magento eCommerce along with Sage 300 Migration from Sage 50 US, Sage 50 CA, Sage PRO, QuickBooks, Sage Business Vision and Sage Business Works. We also offer best-in-class Sage 300 customization and development services to Sage business partners, end users, and Sage PSG worldwide.

Migrate Sales Invoice from Sage Pro to Sage 300 ERP

$
0
0

GUMU™ for Sage PRO ERP to Sage 300 ERP is a Sage certified Migration solution. Greytrix is a pioneer in providing Migration services at its Sage Migration Centre and catering end-users business requirements.

We at Greytrix help the end – user in implementing new Sage 300 ERP system through our various successful migration and integration solutions.

In this blog we will discuss about how GUMU TM migrates Sales Invoice from Sage PRO ERP to Sage 300 ERP (Formerly known as Accpac). Our GUMU™ migration utility is compatible to convert all Master and Open transactions along with Sales, Purchase and GL historical data from Sage Pro to Sage 300 ERP.

New Stuff:Migrate Item Product Line from Sage Pro to Sage 300 ERP

Let’s have a look into Sage Pro Sales Invoice screen. We have open the existing invoice ‘1240’ from Sage pro data.

Sage 300 ERP Sales invoice screen: In the below screenshot you could see the Sales invoice entry screen.

After data migration from Pro the field values of Sage Pro invoice get converted with the following mapping:

Here is the converted Sales invoice of Sage Pro into Sage 300 (Accpac) (refer below screenshot) where the Invoice Transactions have been converted as per mapping.

Once you do the IC Day end processing in Sage 300, the above OE Transaction get created into AR module with the description as O/E invoices/credit notes.

In the below screenshot you could see the document total.

In the above mentioned ways the Sales Invoice gets converted into Sage 300 ERP.

About Us:

Greytrix is one stop solution provider for Sage ERP and Sage CRM needs. We provide complete end-to-end assistance for your technical consultations, product customizations, data migration, system integrations, third party add-on development and implementation expertise.

Greytrix helps in migrating to Sage 100, Sage 300 and Sage X3 from Sage Pro, Sage 50 US, Sage 50 CA, Sage 50 Usage Business Works, Sage Business Vision and QuickBooks.

For more information on migration solutions, please contact us at erpmig@greytrix.com. We will be glad to assist you.

Also Read:
1) Migrate Sales Person from Sage 50 (CAD) to Sage 300 ERP
2) Migrate Items from Sage 50 (CAD) to Sage 300 ERP
3) Migrate Sales Invoice from Sage 50 CAD to Sage 300 ERP
4 )Migrate Customer ShipVia Code from Sage 50 US (Peachtree) to Sage 100 ERP
5) Migrate Open Sales Order from Sage 50 (US) to Sage 100 ERP


Migrate A/P Payment from Sage 50 CAD (Simply Accounting) to Sage 300 ERP

$
0
0

GUMU™ for Sage 50 CAD (formerly known as Simply Accounting) to Sage 300 ERP is a Sage certified Migration solution. Greytrix is a pioneer in providing migration services at its Sage Migration Centre and catering end-users business requirements.

Data migration is always a challenging task to perform. We migrate data with the help of our Sage certified migration utility in accordance to our well defined migration process.

In this blog we will discuss about how GUMU™ migrates A/P Payment from Sage 50 CAD to Sage 300 ERP.

New Stuff: Migrate Vendor Expense Account from Sage 50 CAD (Simply Accounting) to Sage 300 ERP

In the below screenshot you can see the A/P Payment of Sage 50 CAD. To view the A/P Payment of Sage 50 CAD (Simply Accounting) follow the below mentioned path:

Open Sage 50 CAD => Vendors & payables => Click on Payment drop down => click find payments in the below screenshot.

You can view A/P Payments in Sage 300 from the following path

Account Payables->A/P Transactions -> Payment Entry->

In this way, Sage 50 CAD A/P Payments are migrated into target Sage 300 ERP company database.

About Us:
Greytrix is one stop solution provider for Sage ERP and Sage CRM needs. We provide complete end-to-end assistance for your technical consultations, product customizations, data migration, system integrations, third party add-on development and implementation expertise.

Greytrix helps in migrating to Sage 100, Sage 300 and Sage X3 from Sage ProSage 50 USSage 50 CA, Sage 50 Usage Business Works, Sage Business Vision and QuickBooks.

For more information on migration solutions, please contact us at erpmig@greytrix.com. We will be glad to assist you.

Also Read:
1. Migrate Customer Ship via code from Sage 50 US (Peachtree) to Sage 300 ERP
2. Migrate Vendor Expense Account from Sage 50 US (Peachtree) to Sage 300 ERP
3. Migrate Vendors Remit To Locations from Sage 100 to Sage 300 ERP
4. Migrate Sage Pro GL Accounts to Sage 300 ERP


How to Purge Sage Pro data

$
0
0

In this blog will discuss about why to Purge Sage Pro data. In Purging process we can remove customer, Vendors, Items and Paid Transactions such as Invoices, receipts etc. In purging process we can delete unwanted data and it will reduce the size of files for a company and free the valuable disk space for current data. Once the Sage Pro data is purged then it is no longer available for lookup and it cannot brought back. So, before performing purging process make a backup of Sage Pro data.

Follow the below mentioned steps to purge the sage Pro data:

Open Sage Pro Data àin Application select SM module à Transactions à Purge Transactions from Archive.

When you click on ‘Purge Transactions from Archive’ then the below screen will get displayed. You just need to click on OK button.

Click on OK button.

Once you click on OK button then the below screen will get displayed. In the below screen you need to select the company code of which you want to purge the data. Here we have selected Company code as 99 ‘Professional Software, Inc.’. In the Deletion Cutoff Date you need to select the date from calendar till you want to purge the data. Now to select the desired modules to purge, here we have selected all modules, to select all module you can click on ‘Select all’ button. And then click on OK button to proceed with the further conversion process.

Once you click on OK button then the below screen will get displayed with the modules to be purged. Click on OK button to proceed.

When you click on OK button then the below screen will get displayed and here you need to set the password and click on OK button to continue with the further purging process.

Once you click on OK button then it will ask you if are ready to start the purging process. Click on ‘Yes’ to start the purging process.

Click on Scrren.

And here the purging of Sage Pro data is completed.

In the above mentioned way we can purge the sage Pro data.

About Us:
Greytrix is one stop solution provider for Sage ERP and Sage CRM needs. We provide complete end-to-end assistance for your technical consultations, product customizations, data migration, system integrations, third party add-on development and implementation expertise.

Greytrix helps in migrating to Sage 100, Sage 300 and Sage X3 from Sage Pro, Sage 50 US, Sage 50 CA, Sage 50 Usage Business Works, Sage Business Vision and QuickBooks.

For more information on migration solutions, please contact us at erpmig@greytrix.com. We will be glad to assist you.

Also Read:

1) How to purge Data in Sage 50 CAD (Simply Accounting)
2) How to Purge Sage 50 US (Peachtree) Data
3) Migrate Sage Pro GL Accounts to Sage 300 ERP
4) Migrate AP Invoice from Sage Pro to Sage 300 ERP
5)  Migrating your Sage Pro Company Database to Sage 300 ERP using GUMU Migration services


Migrate Item Category from Sage 50 CAD to Sage 300 ERP

$
0
0

GUMU™ for Sage 50 CAD (formerly known as Simply Accounting) to Sage 300 ERP is a Sage certified Migration solution. Greytrix is a pioneer in providing migration services at its Sage Migration Centre and catering end-users business requirements.

Data migration is always a challenging task to perform. We migrate data with the help of our Sage certified migration utility in accordance to our well defined migration process.

In this blog we will discuss about how GUMU™ migrates A/P Terms from Sage 50 CAD to Sage 300 ERP (Formerly known as Accpac).

New Stuff: Migrate A/P Payment from Sage 50 CAD (Simply Accounting) to Sage 300 ERP

In the below screenshot you can see the Item Categories of Sage 50 CAD. To view the Inventory & services category of Sage 50 CAD follow the below mentioned path:
Open Sage 50 CAD => Settings => Inventory & Services => Categories.

To view items assigned with these categories in Sage 50CAD go to Inventory & Services =>click an Item:

Sage 50 CAD item Category


You can view I/C Categories in Sage 300 from the following path
Inventory Control=> I/C Setup => Categories

To view items assigned with these categories in Sage 300 go to => Inventory Control => I/C Items and Price Lists => Items

In this way, Sage 50 CAD I/C Categories are migrated into target Sage 300 ERP company database.

About Us:
Greytrix is one stop solution provider for Sage ERP and Sage CRM needs. We provide complete end-to-end assistance for your technical consultations, product customizations, data migration, system integrations, third party add-on development and implementation expertise.

Greytrix helps in migrating to Sage 100, Sage 300 and Sage X3 from Sage ProSage 50 USSage 50 CA, Sage 50 Usage Business Works, Sage Business Vision and QuickBooks.

For more information on migration solutions, please contact us at erpmig@greytrix.com. We will be glad to assist you.

Also Read:

  1. Migrate Vendor Expense Account from Sage 50 CAD (Simply Accounting) to Sage 300 ERP
  2. Migrate Customer Ship via code from Sage 50 US (Peachtree) to Sage 300 ERP
  3. Migrate Vendor Expense Account from Sage 50 US (Peachtree) to Sage 300 ERP
  4. Migrate Vendors Remit To Locations from Sage 100 to Sage 300 ERP
  5. Migrate Sage Pro GL Accounts to Sage 300 ERP


Adding custom button in Accpac View List

$
0
0

There are situations where the user requires the custom column in the Standard Sage 300 Grid. Sage 300 ERP allows us to use/add columns in the standard Grid using “AccpacViewList”.
Based on the requirement of the column, it becomes necessary to provide custom finder on newly added column. We can assign the finder property to the control and use “OnCustomButtonClick” event to perform the desired operation.

New Stuff:  Migrate Item Category from Sage 50 CAD to Sage 300 ERP

A snippet of code which may help the developer to make use of this functionality:

Step 1: Declare the Viewlist with event in the control file

Public WithEvents avlDetail As AccpacFldList.AccpacViewList

Step 2: Adding new column and assigning custom button

Private Sub AccpacXX1000UICtrl1_OnUIAppOpened()

Dim stdPic As StdPicture     ‘TODO: Write your custom button column code here

Set stdPic = AccpacXX1000UICtrl1.Picture     ‘Inherit the Picture from the Control

Set avlDetail = AccpacXX1000UICtrl1.UIAppControls(“ModuleNameFromUIinfo”).GetControl

‘Add column with Finder property as True to use the custom button.

avlDetail.AddColumn avlDetail.ColumnCount, “BindField”, 0, “Column Name”, ALIGMENT_LEFT, 100, True, False, True

‘Adding the custom button with ZOOM symbol and picture inherited from the control. There are different buttons available in the list (BUTTON_ZOOM)

avlDetail.SetCustomButton avlDetail.ColumnIndexByField(“BindField”), BUTTON_ZOOM, stdPic
End Sub

Step 3: OnCustomButtonClick event have the control of the click

Private Sub avlDetail_OnCustomButtonClick(ByVal ColIndex As Long, ByVal ColName As String, ByVal FieldName As String, Bookmark As Variant)

‘TODO: Write your code here to perform operation on custom button click

Call CustomFinder
End Sub

So, developer can use the above code snippet to call the functions, forms and also perform any other operations supported by VB6 and Sage 300.

Also Read :

  1. Tips and Tricks on Sage ACCPAC ERP’s Views: 2. How to get data immediately displayed on the screen when updated in the views?
  2. Auto Vendor / Customer Code Generation in Sage 300 ERP
  3. GET XML FORMAT DATA FROM WEB SERVICE RESPONSE WITHOUT EXPORTING FILE FOR SAGE 300 ERP
  4. Tips and Tricks of Sage ACCPAC ERP’s Views: 1. Do you know how to get notification from the Accpac Views?
  5. Adding columns to the detail grid of Transaction Screens

About Us

Greytrix is one stop solution provider for Sage ERP and Sage CRM needs. We provide complete end-to-end assistance for your technical consultations, product customizations, data migration, system integrations, third party add-on development and implementation expertise.
Greytrix have some unique solutions of Sage 300 integration with Sage CRM, Salesforce.com and Magento eCommerce along with Sage 300 Migration from Sage 50 US, Sage 50 CA, Sage PRO, QuickBooks, Sage Business Vision and Sage Business Works. We also offer best-in-class Sage 300 customization and development services to Sage business partners, end users, and Sage PSG worldwide.


Automation on OE Order Quantity

$
0
0

Recently we had a chance to work on automation on order quantity where our customer was looking for the O/E Screen to add two columns and a multiplication of both the new column would be a calculate order quantity. Essentially, they need the Qty Ordered column to be calculated by two additional columns Length and No. of Sheets. The Length column should be populated by an Optional Field in the item record and the No. of Sheets column will be manual and editable so that user can enter a required value in it.

New Stuff: Adding custom button in Accpac View List

In this blog, we would be discussing about same automation of OE Order Quantity in detail.
In order to calculate the quantity order automatically we need to follow the process below.

1. We have used the Item Master optional fields for storing the characteristic of the Item i.e. Length.

2. We have applied “LENGTH” optional field to I/C Item and at the Order Detail so that it gets flowed from Item master to Order details.

3. We have assigned the “LENGTH” optional field to Item “A1-103/0” with value 3.30.

IC Item Form4. If user selects the item in the order detail line which has optional field “LENGTH” applied in I/C Item will carry the value of “LENGTH” to the order detail optional field. Refer the screenshot below.

IC Optional field value setting5. As per the customization request “No. of Sheets” and the “Length” are the new fields which we have added into the order detail line. The value from the order detail optional field will be automatically copied into the new field i.e. “Length”.\

6. In the order below user inputs 2.00 into no. of sheets and 3.30 is value of Length so 3.30 * 2.00 = 6.6000. The quantity order gets calculated automatically. Refer the screenshot below.

OE Order entry screen

This customization is available for Sage 300 v2016.

Also Read:-

  1. Printing Sales Report Country Wise
  2. New Features in Order Entry Payment Screen
  3. Sage 300 PJC – Posting Date Option
  4. How to remove payroll check lock if previous process is incomplete
  5. Optional field Validation on Order Entry Screen

About Us

Greytrix is one stop solution provider for Sage ERP and Sage CRM needs. We provide complete end-to-end assistance for your technical consultations, product customizations, data migration, system integrations, third party add-on development and implementation expertise.
Greytrix have some unique solutions of Sage 300 integration with Sage CRM, Salesforce.com and Magento eCommerce along with Sage 300 Migration from Sage 50 US, Sage 50 CA, Sage PRO, QuickBooks, Sage Business Vision and Sage Business Works. We also offer best-in-class Sage 300 customization and development services to Sage business partners, end users, and Sage PSG worldwide.

Difference between Sage 300 Portal and the new Web Screens

$
0
0

In this blog we will look into the difference between Sage 300 portals and new Web screens, how both are differ from each other and how they both have their individual pros and cons.

New Stuff : Automation on OE Order Quantity

Web Screens:

Sage 300 web screens bring the power of Sage 300 to your web browser. Whether you’re using your desktop computer, your laptop, or your tablet, now you can enter transactions, generate reports, manage company finances, anywhere anytime.

Web screens are redesigned version of Sage 300 desktop screens that user can use in a web browser. Web screens are available in English, French, Spanish, and Chinese.

Generally it is difficult for user to switch to new workaround from current one as it may arise several questions like weather it is support to all functions or not? Etc. let us tell you that Optional field, multicurrency, payment processing support in web screen.

Custom forms and custom reports are also support in web screen but with the exception such as if you have customized versions of the standard forms and reports included with Sage 300, they will be available in web screens, as long as the report file name has not been changed. However, any new custom forms or reports you create will not be available for use in web screens.

Sage 300c web screen having so many advantages, such as:-

1. More flexibility to change National Accounts :- In Accounts Receivable, user can now change the national account for a customer even if there are outstanding transactions for the customer.

2. Improved Help menu: – The Help menu has an improved design, including several new options, to get you to the appropriate help resource when you need it.

3. Improved validation on P/O Receipt Entry screen :- In Purchase Orders, the Receipt Entry screen now prevents from entering duplicate invoice numbers for the same vendor.

4. Improved error messages in day-end processing: – If a problem occurs during day-end processing, improved messages help you identify the cause of the problem.

The look and feel of web screen is more interactive and user friendly.

Web Screen

Sage 300 Portal

The Sage 300 Portal provides access to Sage 300 desktop screens in a web browser, but the screens are not web-based.

Sage 300 ERP portal is a beautiful tool which can be used to extract the required information with very practical and real-time feel including the graphs and pie charts which really makes it more informative to use and verify the data.

Sage 300 web Portal has a new advanced feature called the ADHOC Query Tool where we had query templates for A/R customers & Transactions, A/P Vendors & Transactions, G/L Accounts & Net changes, G/L Account & Transactions, IC Transactions, O/E Transactions & P/O Transactions.

For more detail regarding this you can follow below link.
http://www.greytrix.com/blogs/sageaccpacerp/2015/09/28/inquiry-tool-in-sage-300-web-portal/

Also Read

  1. How to hide Sage 300 Web Screens using UI Profiles
  2. New Notes feature in Sage 300 Web screens
  3. Troubleshoot: Error while configuring the Sage 300 Web Screens
  4. Sage 300c Web Screens Installation
  5. A/R Customer List Screen

About Us

Greytrix is one stop solution provider for Sage ERP and Sage CRM needs. We provide complete end-to-end assistance for your technical consultations, product customizations, data migration, system integrations, third party add-on development and implementation expertise.
Greytrix have some unique solutions of Sage 300 integration with Sage CRM, Salesforce.com and Magento eCommerce along with Sage 300 Migration from Sage 50 US, Sage 50 CA, Sage PRO, QuickBooks, Sage Business Vision and Sage Business Works. We also offer best-in-class Sage 300 customization and development services to Sage business partners, end users, and Sage PSG worldwide.

Viewing all 1488 articles
Browse latest View live


<script src="https://jsc.adskeeper.com/r/s/rssing.com.1596347.js" async> </script>